WPF快速入门系列(6)——WPF资源和样式
一、引言
WPF资源系统可以用来保存一些公有对象和样式,从而实现重用这些对象和样式的作用。而WPF样式是重用元素的格式的重要手段,可以理解样式就如CSS一样,尽管我们可以在每个控件中定义格式,但是如果多个控件都应用了多个格式的时候,我们就可以把这些格式封装成格式,然后在资源中定义这个格式,之前如果用到这个格式就可以直接使用这个样式,从而达到重用格式的手段。从中可以发现,WPF资源和WPF样式是相关的,我们经常把样式定义在资源中。
二、WPF资源详解
2.1 资源基础介绍
尽管可以在代码中创建和操作资源,但是通常都是以XAML标签的形式定义资源的。下面具体看看如何去定义一个资源,具体的XAML代码如下所示:
<Window x:Class="ResourceDemo.ResourceUse"
        xmlns="http://schemas.microsoft.com/winfx/2006/xaml/presentation"
        xmlns:x="http://schemas.microsoft.com/winfx/2006/xaml"
        Title="REsource" Height="100" Width="350"
        xmlns:sys="clr-namespace:System;assembly=mscorlib">
    <Window.Resources>
        <!--定义一个字符串资源-->
        <sys:String x:Key="nameStr">
            LearningHard博客:http://www.cnblogs.com/zhili/
        </sys:String>
    </Window.Resources>
    <StackPanel>
        <!--通过资源key来对资源进行使用-->
        <TextBlock Text="{StaticResource nameStr}" Margin="10"/>
    </StackPanel>
</Window>
每一个元素都有一个Resources属性,该属性存储了一个资源字典集合。关于资源字典将会在下面部分介绍。尽管每个元素都提供了Resources属性,但通常在窗口级别上定义资源,就如上面XAML代码所示的那样。因为每个元素都可以访问它自己的资源集合中的资源,也可以访问所有父元素的资源集合中的资源。
2.2 静态资源和动态资源区别
为了使用XAML标记中的资源,需要一种引用资源的方法,可以通过两个标记来进行引用资源:一个用于静态资源,另一个用于动态资源。在上面的XAML中,我们引用的方式就是静态资源的引用方式,因为我们指定了StaticResource。那静态资源和动态资源有什么区别呢?
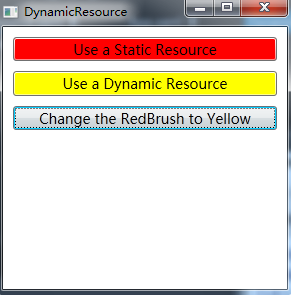
对于静态资源在第一次创建窗口时,一次性地设置完毕;而对于动态资源,如果发生了改变,则会重新应用资源。下面通过一个示例来演示下他们之间的区别。具体的XAML代码如下所示:
<Window x:Class="ResourceDemo.DynamicResource"
        xmlns="http://schemas.microsoft.com/winfx/2006/xaml/presentation"
        xmlns:x="http://schemas.microsoft.com/winfx/2006/xaml"
        Title="DynamicResource" Height="300" Width="300">
    <Window.Resources>
        <SolidColorBrush x:Key="RedBrush" Color="Red"></SolidColorBrush>
    </Window.Resources>
    <StackPanel Margin="5">
      <Button Background="{StaticResource RedBrush}" Margin="5" FontSize="14" Content="Use a Static Resource"/>
        <Button Background="{DynamicResource RedBrush}" Margin="5" FontSize="14" Content="Use a Dynamic Resource"/>
        <Button Margin="5" FontSize="14" Content="Change the RedBrush to Yellow" Click="ChangeBrushToYellow_Click"/>
    </StackPanel>
</Window>
对应改变资源按钮的后台代码如下所示:
private void ChangeBrushToYellow_Click(object sender, RoutedEventArgs e)
        {
            // 改变资源
            this.Resources["RedBrush"] = new SolidColorBrush(Colors.Yellow);
        }
运行上面程序,你将发现,当点击Change按钮之后,只改变了动态引用资源按钮的背景色,而静态引用按钮的背景却没有发生改变,具体效果图如下所示:

2.3 资源字典
在前面中讲到,每个Resources属性存储着一个资源字典集合。如果希望在多个项目之间共享资源的话,就可以创建一个资源字典。资源字段是一个简单的XAML文档,该文档就是用于存储资源的,可以通过右键项目->添加资源字典的方式来添加一个资源字典文件。下面具体看下如何去创建一个资源字典。具体的XAML代码如下:
<ResourceDictionary xmlns="http://schemas.microsoft.com/winfx/2006/xaml/presentation"
                    xmlns:x="http://schemas.microsoft.com/winfx/2006/xaml">
    <SolidColorBrush x:Key="blueBrush" Color="Blue"/>
    <FontWeight x:Key="fontWeight">Bold</FontWeight>
</ResourceDictionary>
为了使用资源字典,需要将其合并到应用程序中资源集合位置,当然你也可以合并到窗口资源集合中,但是通常是合并到应用程序资源集合中,因为资源字典的目的就是在于多个窗体中共享,具体的XAML代码如下所示:
<Application x:Class="ResourceDemo.App"
             xmlns="http://schemas.microsoft.com/winfx/2006/xaml/presentation"
             xmlns:x="http://schemas.microsoft.com/winfx/2006/xaml"
             StartupUri="DynamicResource.xaml">
    <Application.Resources>
        <!--合并资源字典到Application.Resources中-->
        <ResourceDictionary>
            <ResourceDictionary.MergedDictionaries>
                <ResourceDictionary Source="Generic.xaml"/>
            </ResourceDictionary.MergedDictionaries>
        </ResourceDictionary>
    </Application.Resources>
</Application>
那怎样使用资源字典中定义的资源呢?其使用方式和引用资源的方式是一样的,一样是通过资源的Key属性来进行引用的,具体使用代码如下所示:
<Window x:Class="ResourceDemo.ResourceUse"
        xmlns="http://schemas.microsoft.com/winfx/2006/xaml/presentation"
        xmlns:x="http://schemas.microsoft.com/winfx/2006/xaml"
        Title="REsource" Height="100" Width="350"
        xmlns:sys="clr-namespace:System;assembly=mscorlib">
    <Window.Resources>
        <!--定义一个字符串资源-->
        <sys:String x:Key="nameStr">
            LearningHard博客:http://www.cnblogs.com/zhili/
        </sys:String>
    </Window.Resources>
    <StackPanel>
        <!--使用资源字典中定义的资源-->
        <Button  Margin="10" Background="{StaticResource blueBrush}" Content="Blue Button" FontWeight="{StaticResource fontWeight}"/>
        <!--通过资源key来对资源进行使用-->
        <TextBlock Text="{StaticResource nameStr}" Margin="10"/>
    </StackPanel>
</Window>
此时的运行效果如下图所示:

前面只是介绍在当前应用程序下共享资源可以把资源字典合并到应用程序资源集合中,如果想在多个应用程序共享资源怎么办呢?最简单的方法就是在每个应用程序中拷贝一份资源字典的XAML文件,但是这样不能对版本进行控制,显然这不是一个好的办法。更好的办法是将资源字典编译到一个单独的类库程序集中,应用程序可以通过引用程序集的方式来共享资源。这样就达到了在多个应用程序中共享资源的目的。
使用这种方式面临着另一个问题,即如何获得所需要的资源并在应用程序中使用资源。对此,可以采用两种方法。第一种办法是通过代码创建一个ResourceDictionary对象,再通过指定其Source属性来定位程序中资源字典文件,一旦创建了ResourceDictionary对象,就可以通过key来检索对应的资源,具体的实现代码如下:
  ResourceDictionary resourceDic = new ResourceDictionary();
            // ReusableDictionary.xaml是资源字典文件
            resourceDic.Source = new Uri("ResourceLibrary;component/ReusableDictionary.xaml", UriKind.Relative);
            SolidColorBrush blueBrush =(SolidColorBrush)resourceDic["BlueBrush"];
这种方式不需要手动指定资源,当加载一个新的资源字典时,窗口中所有的DynamicResource引用都会自动引用新的资源,这样的方式可以用来构建动态的皮肤功能。
另外一种办法可以使用ComponentResourceKey标记,使用ComponentResourceKey为资源创建键名。具体使用例子请参看博文:Defining and Using Shared Resources in a Custom Control Library。
三、WPF样式详解
在前面介绍了WPF资源,使用资源可以在一个地方定义对象而在整个应用程序中重用它们,除了在资源中可以定义各种对象外,还可以定义样式,从而达到样式的重用。
样式可以理解为元素的属性集合。与Web中的CSS类似。WPF可以指定具体的元素类型为目标,并且WPF样式还支持触发器,即当一个属性发生变化的时,触发器中的样式才会被应用。
3.1 WPF样式使用
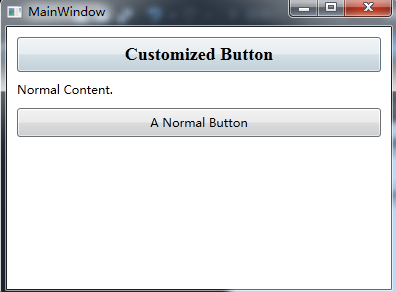
之前WPF资源其实完全可以完成WPF样式的功能,只是WPF样式对资源中定义的对象进行了封装,使其存在于样式中,利于管理和应用,我们可以把一些公共的属性定义放在样式中进行定义,然后需要引用这些属性的控件只需要引用具体的样式即可,而不需要对这多个属性进行分别设置。下面XAML代码就是一个样式的使用示例:
<Window x:Class="StyleDemo.StyleDefineAndUse"
        xmlns="http://schemas.microsoft.com/winfx/2006/xaml/presentation"
        xmlns:x="http://schemas.microsoft.com/winfx/2006/xaml"
        Title="MainWindow" Height="300" Width="400">
    <Window.Resources>
        <!--定义样式-->
        <Style TargetType="Button">
            <Setter Property="FontFamily" Value="Times New Roman" />
            <Setter Property="FontSize" Value="18" />
            <Setter Property="FontWeight" Value="Bold" />
        </Style>
    </Window.Resources>
    <StackPanel Margin="5">
        <!--由于前面定义的样式没有定义key标记,如果没有显示指定Style为null,这按钮将指定引用事先定义的样式-->
        <Button Padding="5" Margin="5">Customized Button</Button>
        <TextBlock Margin="5">Normal Content.</TextBlock>
        <!--使其不引用事先定义的样式-->
        <Button Padding="5" Margin="5" Style="{x:Null}">A Normal Button</Button>
    </StackPanel>
</Window>
具体的运行效果如下图所示:

当样式中没有定义key标记时,则对应的样式会指定应用到目标对象上,上面XAML代码就是这种情况,如果显式为样式定义了key标记的话,则必须显式指定样式Key的方式,对应的样式才会被应用到目标对象上,下面具体看看这种情况。此时XAML代码如下所示:
<Window x:Class="StyleDemo.ReuseFontWithStyles"
        xmlns="http://schemas.microsoft.com/winfx/2006/xaml/presentation"
        xmlns:x="http://schemas.microsoft.com/winfx/2006/xaml"
        Title="ReuseFontWithStyles" Height="300" Width="300">
    <Window.Resources>
        <!--带有key标签的样式-->
        <Style TargetType="Button" x:Key="BigButtonStyle">
            <Setter Property="FontFamily" Value="Times New Roman" />
            <Setter Property="FontSize" Value="18" />
            <Setter Property="FontWeight" Value="Bold" />
        </Style>
    </Window.Resources>
    <StackPanel Margin="5">
        <!--如果不显式指定样式key将不会应用样式-->
        <Button Padding="5" Margin="5">Normal Button</Button>
        <Button Padding="5" Margin="5" Style="{StaticResource BigButtonStyle}">Big Button</Button>
        <TextBlock Margin="5">Normal Content.</TextBlock>
        <!--使其不引用事先定义的样式-->
        <Button Padding="5" Margin="5" Style="{x:Null}">A Normal Button</Button>
    </StackPanel>
</Window>
此时运行效果如下图所示:

3.2 样式触发器
WPF样式还支持触发器,在样式中定义的触发器,只有在该属性或事件发生时才会被触发,下面具体看看简单的样式触发器是如何定义和使用的,具体的XAML代码如下所示:
<Window x:Class="StyleDemo.SimpleTriggers"
        xmlns="http://schemas.microsoft.com/winfx/2006/xaml/presentation"
        xmlns:x="http://schemas.microsoft.com/winfx/2006/xaml"
        Title="SimpleTriggers" Height="300" Width="300">
    <Window.Resources>
        <Style x:Key="BigFontButton">
            <Style.Setters>
                <Setter Property="Control.FontFamily" Value="Times New Roman" />
                <Setter Property="Control.FontSize" Value="18" />

            </Style.Setters>
            <!--样式触发器-->
            <Style.Triggers>
                <!--获得焦点时触发-->
                <Trigger Property="Control.IsFocused" Value="True">
                    <Setter Property="Control.Foreground" Value="Red" />
                </Trigger>
                <!--鼠标移过时触发-->
                <Trigger Property="Control.IsMouseOver" Value="True">
                    <Setter Property="Control.Foreground" Value="Yellow" />
                    <Setter Property="Control.FontWeight" Value="Bold" />
                </Trigger>
                <!--按钮按下时触发-->
                <Trigger Property="Button.IsPressed" Value="True">
                    <Setter Property="Control.Foreground" Value="Blue" />
                </Trigger>
            </Style.Triggers>
        </Style>
    </Window.Resources>

    <StackPanel Margin="5">
        <Button Padding="5" Margin="5"
            Style="{StaticResource BigFontButton}"
              >A Big Button</Button>
        <TextBlock Margin="5">Normal Content.</TextBlock>
        <Button Padding="5" Margin="5"
            >A Normal Button</Button>
    </StackPanel>
</Window>
此时的运行效果如下图所示:

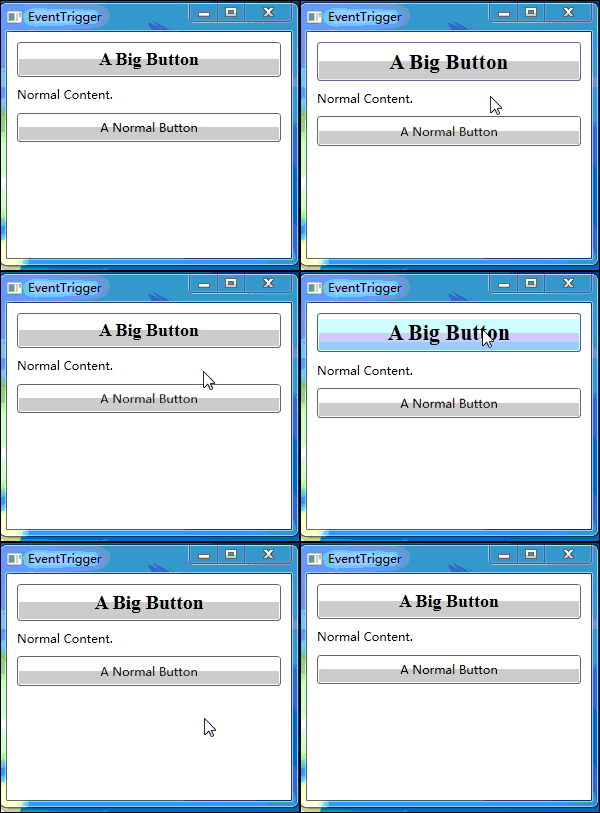
上面定义的触发器都是在某个属性发生变化时触发的,也可以定义当某个事件激活时的触发器,我们也把这样的触发器称为事件触发器,下面示例定义的事件触发器是等待MouseEnter事件,一旦触发MouseEnter事件,则动态改变按钮的FontSize属性来形成动画效果,具体的XAML代码如下所示:
<Window x:Class="StyleDemo.EventTrigger"
        xmlns="http://schemas.microsoft.com/winfx/2006/xaml/presentation"
        xmlns:x="http://schemas.microsoft.com/winfx/2006/xaml"
        Title="EventTrigger" Height="300" Width="300">
    <Window.Resources>
        <Style x:Key="BigFontButton">
            <Style.Setters>
                <Setter Property="Control.FontFamily" Value="Times New Roman" />
                <Setter Property="Control.FontSize" Value="18" />
                <Setter Property="Control.FontWeight" Value="Bold" />
            </Style.Setters>
            <Style.Triggers>
                <!--定义事件触发器-->
                <EventTrigger RoutedEvent="Mouse.MouseEnter">
                    <!--事件触发时只需的操作-->
                    <EventTrigger.Actions>
                        <!--把动画放在动画面板中-->
                        <BeginStoryboard>
                            <!--在0.2秒的时间内将字体放大到22单位-->
                            <Storyboard>
                                <DoubleAnimation
                  Duration="0:0:0.2"
                  Storyboard.TargetProperty="FontSize"
                  To="22"  />
                            </Storyboard>
                        </BeginStoryboard>
                    </EventTrigger.Actions>
                </EventTrigger>
                <!--鼠标移开触发的事件-->
                <EventTrigger RoutedEvent="Mouse.MouseLeave">
                    <EventTrigger.Actions>
                        <BeginStoryboard>
                            <!--在1秒的时间内将字体尺寸缩小到原来的大小-->
                            <!--如果目标字体尺寸没有明确指定,则WPF将默认使用第一次动画之前按钮的字体尺寸-->
                            <Storyboard>
                                <DoubleAnimation
                  Duration="0:0:1"
                  Storyboard.TargetProperty="FontSize"  />
                            </Storyboard>
                        </BeginStoryboard>
                    </EventTrigger.Actions>
                </EventTrigger>
            </Style.Triggers>
        </Style>
    </Window.Resources>
    <StackPanel Margin="5">
        <Button Padding="5" Margin="5"
            Style="{StaticResource BigFontButton}"
              >A Big Button</Button>
        <TextBlock Margin="5">Normal Content.</TextBlock>
        <Button Padding="5" Margin="5"
            >A Normal Button</Button>
    </StackPanel>
</Window>
此时的运行效果如下图所示:

四、小结
到这里,WPF资源和样式的内容就介绍结束。总结为,WPF样式类似CSS,可以将多个属性定义在一个样式中,而样式又存放在资源中,资源成了样式和对象的容器。另外WPF样式还支持触发器功能,本文中演示了属性触发器和事件触发器的使用。在接下来一篇博文中将介绍WPF模板。
本文所有源码:ResourceAndStyle.zip
如果您认为这篇文章还不错或者有所收获,您可以通过右边的“打赏”功能 打赏我一杯咖啡【物质支持】,也可以点击右下角的【店长推荐】按钮【精神支持】,因为这两种支持都是我继续写作,分享的最大动力


 浙公网安备 33010602011771号