一.静态资源访问
1.三种方式访问并处理静态资源:
-
webjars方式:(一般不使用)
-
可访问webjars官网查找需要的资源
-
导入需要的资源配置放入pom.xml中
-
可以查看项目中的lib包资源是否被导入
-
在lib包中查看导入的资源下有一个WEB-INF/resources里面就是我们需要的静态资源
-
浏览器访问:localhost:8080/webjars/xxx (xxx为资源名)
-
在项目的resources目录下可访问的四个文件夹的方式:(常用)
-
public文件夹,static文件夹,resources文件夹,WEB-INF/resources文件夹,一般用前三个
-
优先级:resources>static>public
-
自定义资源访问路径:
-
在application.properties中添加spring.resources.static-locations=classpath:/wzh/,classpath:/hello/ 用来指定静态资源访问路径为wzh文件夹和hello文件夹
二.首页定制
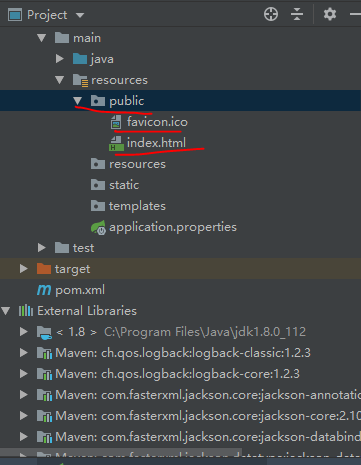
1.首页可存放的目录(4个)
-
public文件夹下
-
static文件夹下
-
resources文件夹下
-
templates文件夹下(必须支持thymeleaf,才能访问)
2.在SpringBoot2.2.4版本中不能定制图标
但是我们可以写在html中引入 <link rel="shortcut icon" href="./favicon.ico" type="image/x-icon" />
<!DOCTYPE html>
<html lang="en">
<head>
    <meta charset="UTF-8">
    <title>首页</title>
    <link rel="shortcut icon" href="./favicon.ico" type="image/x-icon" />
</head>
<body>
<h1>首页</h1>
</body>
</html>
三.模板引擎Thymeleaf
注:SpringBoot2.x必须使用Thymeleaf3.x版本
1.步骤:
-
导入依赖
-
编写前端页面引入命名空间
-
编写后台代码
-
测试
(1)导入依赖
<!--thymeleaf模板,我们都是基于3.x开发 -->
<dependency>
    <groupId>org.thymeleaf</groupId>
    <artifactId>thymeleaf-spring5</artifactId>
</dependency>
(2)编写前端页面引入命名空间 xmlns:th="http://www.thymeleaf.org"
注意:必须将页面放在template文件夹下
<!DOCTYPE html>
<html lang="en" xmlns:th="http://www.thymeleaf.org">
<head>
<meta charset="UTF-8">
<title>test</title>
</head>
<body>
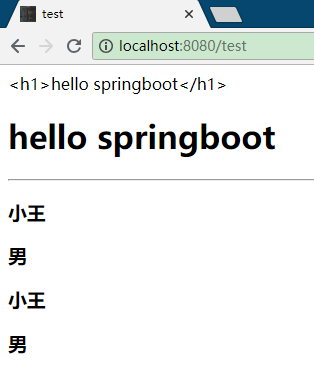
<!--1.显示文本内容,text转义特殊标签直接输出,utext不转义特殊标签-->
<div th:text="${msg}"></div>
<div th:utext="${msg}"></div>
<hr>
<!--2.循环-->
<!--写法一:行内写法(推荐使用)-->
<h3 th:each="user:${users}" th:text="${user}"></h3>
<!--写法二:两个中括号取值-->
<h3 th:each="user:${users}">[[ ${user} ]]</h3>
</body>
</html>
(3)编写后台代码
import org.springframework.stereotype.Controller;
import org.springframework.ui.Model;
import org.springframework.web.bind.annotation.RequestMapping;

import java.util.Arrays;

@Controller
public class IndexController {

    @RequestMapping("/test")
    public String test(Model model){

        model.addAttribute("msg","<h1>hello springboot</h1>");

        model.addAttribute("users", Arrays.asList("小王","男"));

        return "test";
    }
}
(4)测试
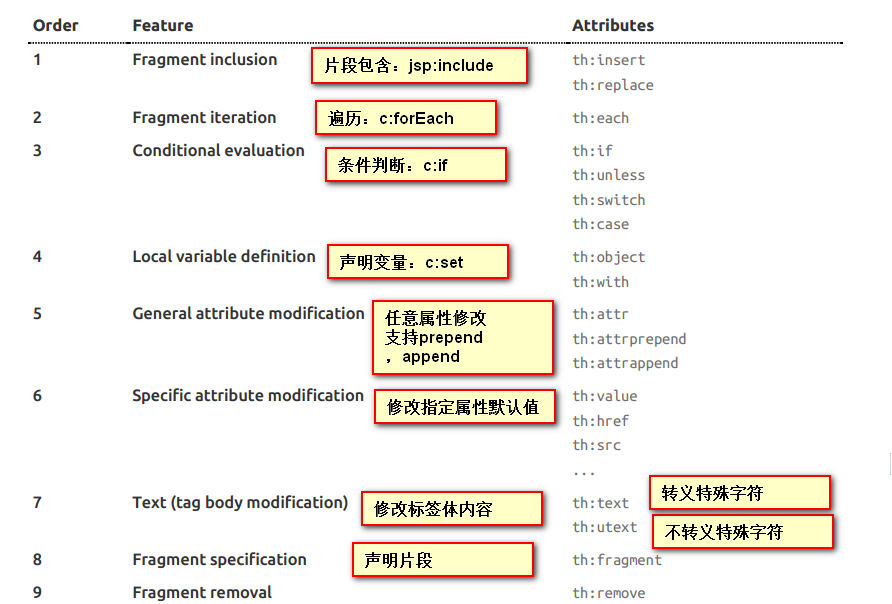
2.语法讲解
参考官方文档:https://www.thymeleaf.org/doc/tutorials/3.0/usingthymeleaf.html#attribute-precedence
(1)th的属性:
(2)表达式:
Simple expressions:(表达式语法)

Variable Expressions: ${...}:获取变量值;OGNL;
    1)、获取对象的属性、调用方法
    2)、使用内置的基本对象: #18
         #ctx : the context object.
         #vars: the context variables.
         #locale : the context locale.
         #request : (only in Web Contexts) the HttpServletRequest object.
         #response : (only in Web Contexts) the HttpServletResponse object.
         #session : (only in Web Contexts) the HttpSession object.
         #servletContext : (only in Web Contexts) the ServletContext object.

                ${session.foo}
      3)、内置的一些工具对象:
      #execInfo : information about the template being processed.
      #messages : methods for obtaining externalized messages inside variables expressions, in the same way as they would be obtained using #{…} syntax.
      #uris : methods for escaping parts of URLs/URIs
      #conversions : methods for executing the configured conversion service (if any).
      #dates : methods for java.util.Date objects: formatting, component extraction, etc.
      #calendars : analogous to #dates , but for java.util.Calendar objects.
      #numbers : methods for formatting numeric objects.
      #strings : methods for String objects: contains, startsWith, prepending/appending, etc.
      #objects : methods for objects in general.
      #bools : methods for boolean evaluation.
      #arrays : methods for arrays.
      #lists : methods for lists.
      #sets : methods for sets.
      #maps : methods for maps.
      #aggregates : methods for creating aggregates on arrays or collections.
      #ids : methods for dealing with id attributes that might be repeated (for example, as a result of an iteration).

==============================================================================================
Selection Variable Expressions: *{...}:选择表达式:和${}在功能上是一样;
   补充:配合 th:object="${session.user}:

   <div th:object="${session.user}">
    <p>Name: <span th:text="*{firstName}">Sebastian</span>.</p>
    <p>Surname: <span th:text="*{lastName}">Pepper</span>.</p>
    <p>Nationality: <span th:text="*{nationality}">Saturn</span>.</p>
    </div>

Message Expressions: #{...}:获取国际化内容
Link URL Expressions: @{...}:定义URL;
            @{/order/process(execId=${execId},execType='FAST')}

Fragment Expressions: ~{...}:片段引用表达式
            <div th:insert="~{commons :: main}">...</div>

Literals(字面量)
      Text literals: 'one text' , 'Another one!' ,…
      Number literals: 0 , 34 , 3.0 , 12.3 ,…
      Boolean literals: true , false
      Null literal: null
      Literal tokens: one , sometext , main ,…
Text operations:(文本操作)
    String concatenation: +
    Literal substitutions: |The name is ${name}|
Arithmetic operations:(数学运算)
    Binary operators: + , - , * , / , %
    Minus sign (unary operator): -
Boolean operations:(布尔运算)
    Binary operators: and , or
    Boolean negation (unary operator): ! , not
Comparisons and equality:(比较运算)
    Comparators: > , < , >= , <= ( gt , lt , ge , le )
    Equality operators: == , != ( eq , ne )
Conditional operators:条件运算(三元运算符)
    If-then: (if) ? (then)
    If-then-else: (if) ? (then) : (else)
    Default: (value) ?: (defaultvalue)
Special tokens:
    No-Operation: _
四.SpringMVC的自动配置
SpringBoot让我们可以扩展和定制MVC
1.定制
(1)定制视图解析器
步骤:
-
实现WebMvcConfigurer接口
-
自定义视图解析器,生成bean交给Springboot
-
添加注解 @Configuration
所以说,我们如果想要使用自己定制化的东西,我们只需要给容器中添加这个组件就好了!剩下的事情SpringBoot就会帮我们做了
import org.springframework.context.annotation.Bean;
import org.springframework.context.annotation.Configuration;
import org.springframework.web.servlet.View;
import org.springframework.web.servlet.ViewResolver;
import org.springframework.web.servlet.config.annotation.WebMvcConfigurer;

import java.util.Locale;

//自定义视图解析器
//如果需要自定义一些定制化的功能,只要写个组件交给springboot管理,spring boot会帮我们自动装配
@Configuration
public class MyMvcConfig1 implements WebMvcConfigurer {

    //生成bean交给Springboot管理
    @Bean
    public ViewResolver myViewResolver(){
        return new MyViewResolver();
    }


    //自定义一个自己的视图解析器MyViewResolver
    public static class MyViewResolver implements ViewResolver{

        @Override
        public View resolveViewName(String s, Locale locale) throws Exception {
            return null;
        }
    }
}
(2)定制日期格式
只需要在配置文件application.properties中添加需要配置的格式即可
# 自定义日期格式化
#spring.mvc.date-format
2.扩展
步骤:
-
实现WebMvcConfigurer接口
-
重写addViewControllers方法
-
添加注解@Configuration
访问:localhost:8080/wzh会自动帮我们跳转到test视图
import org.springframework.context.annotation.Configuration;
import org.springframework.web.servlet.config.annotation.ViewControllerRegistry;
import org.springframework.web.servlet.config.annotation.WebMvcConfigurer;

//自定义视图跳转
//官方建议我们这么去扩展springmvc,自定义类扩展MVC的功能
@Configuration
public class MyMvcConfig2 implements WebMvcConfigurer {

    //自定义url路径对应的跳转视图
    @Override
    public void addViewControllers(ViewControllerRegistry registry) {
        registry.addViewController("/wzh").setViewName("test");
    }
}
3.全面接管SpringMVC
-
全面接管即:SpringBoot对SpringMVC的自动配置不需要了,所有都是我们自己去配置!只需在我们的配置类中要加一个@EnableWebMvc.
-
我们看下如果我们全面接管了SpringMVC了,我们之前SpringBoot给我们配置的静态资源映射全部失效。
-
一般我们不推荐使用全面接管方式
import org.springframework.context.annotation.Configuration;
import org.springframework.web.servlet.config.annotation.EnableWebMvc;
import org.springframework.web.servlet.config.annotation.WebMvcConfigurer;

//自定义视图解析器
//如果需要自定义一些定制化的功能,只要写个组件交给springboot管理,spring boot会帮我们自动装配
@Configuration
@EnableWebMvc   //全面接管SpringMVC,之前Springboot自动配置好的静态资源映射全部失效
public class MyMvcConfig implements WebMvcConfigurer {


}


 浙公网安备 33010602011771号