

1、准备好3台CentOS系统机器
1)修改hostname为mysql1、mysql2、mysql3,修改/etc/hostname文件,将里面内容改掉即可
vi /etc/hostname
2)修改/etc/hosts文件,配置映射
vi /etc/hosts
配置如下:
172.16.43.141     mysql1
172.16.43.142     mysql2
172.16.43.143     mysql3

3)禁用防火墙或开放3306和33061端口
systemctl stop firewalld.service
systemctl disable firewalld.service

4)禁用SELINUX,修改/etc,SELINUX=enforcing改为SELINUX=disabled(为啥这样做不是很清楚,不操作的话后面无法创建集群)
vi /etc/selinux/config
5)重启服务器,让配置生效。
2、安装MySQL
详细安装过程见:https://www.cnblogs.com/zhi-leaf/p/5993676.html
mysql80-community-release-el7-3.noarch.rpm默认安装的MySQL8,如果想安装MySQL5.7,需要修改/etc/yum.repos.d/mysql-community.repo,将mysql57和mysql80的enabled值对调一下
vi /etc/yum.repos.d/mysql-community.repo

3、安装mysql-shell和mysql-router
yum install mysql-community-server -y
yum install mysql-shell -y
yum install mysql-router -y
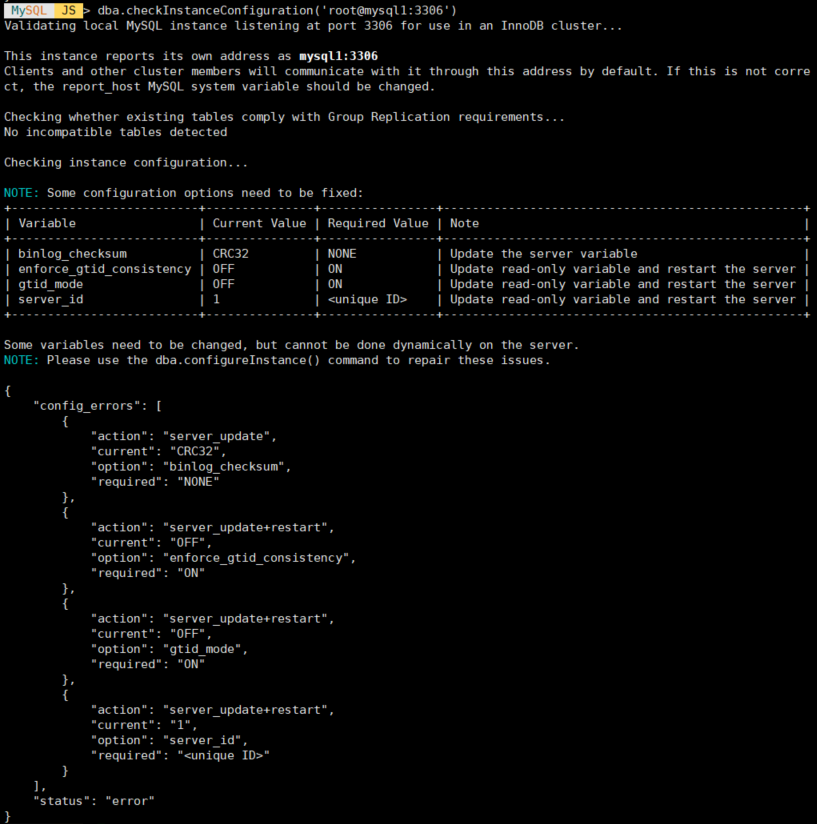
4、查看mysqld配置是否满足集群
mysqlsh --log-level=DEBUG3
dba.checkInstanceConfiguration('root@mysql1:3306')  # 检测mysql服务是否满足集群条件
5、根据上面的检查,我们修改对应的配置(所有MySQL服务节点都需要修改)
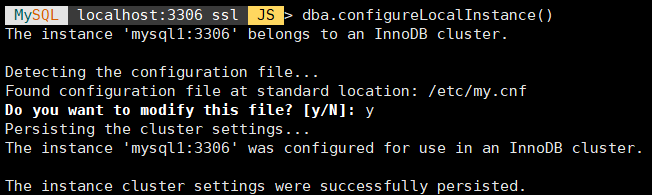
1)退出MySQL JS,重新登陆到具体服务
mysqlsh --uri root@localhost:3306


2)执行dba.configureLocalInstance(),自动修改配置(配置修改完成后一定要重启mysqld服务)
dba.configureLocalInstance('root@localhost:3306')
dba.checkInstanceConfiguration()
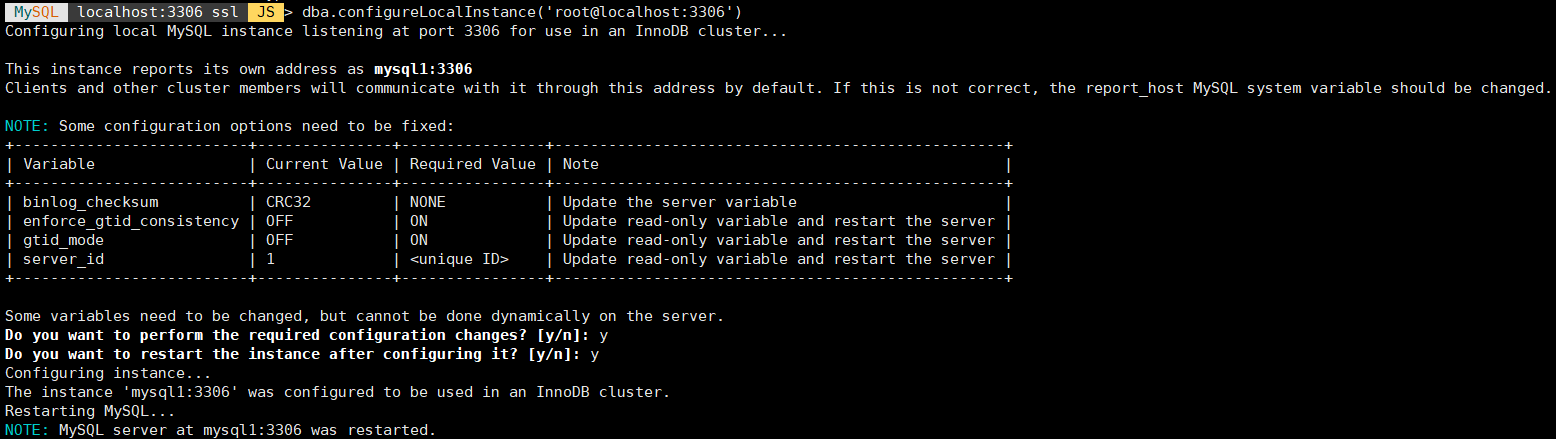
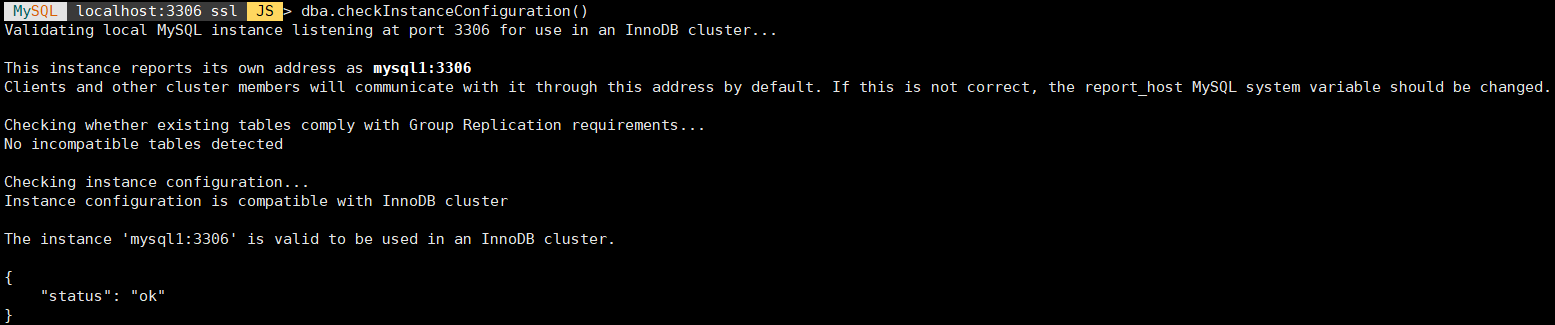
再次使用dba.checkInstanceConfiguration(),当时检查结果status为ok时,说明配置已修改完成,MySQL服务符合集群条件,这时只需重启mysqld服务就可以了
service mysqld restart
说明一点:mysql8.0直接修改运行参数,而ysql5.7会将修改的配置写入/etc/my.cnf文件,他在my.cnf中增加的配置信息如下图(这些修改项正是 dba.checkInstanceConfiguration() 检查的修改项,我们直接复制过去也是可以的):
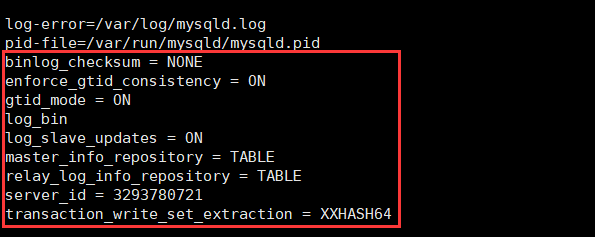
binlog_checksum = NONE
enforce_gtid_consistency = ON
gtid_mode = ON
log_bin
log_slave_updates = ON
master_info_repository = TABLE
relay_log_info_repository = TABLE
server_id = 3293780721
transaction_write_set_extraction = XXHASH64
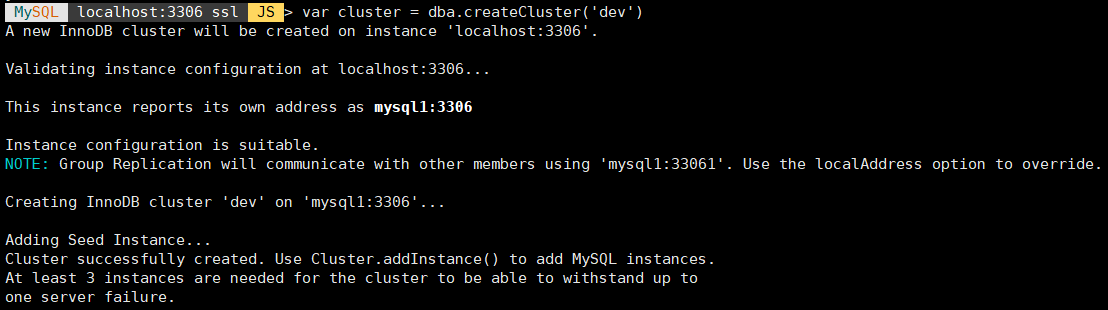
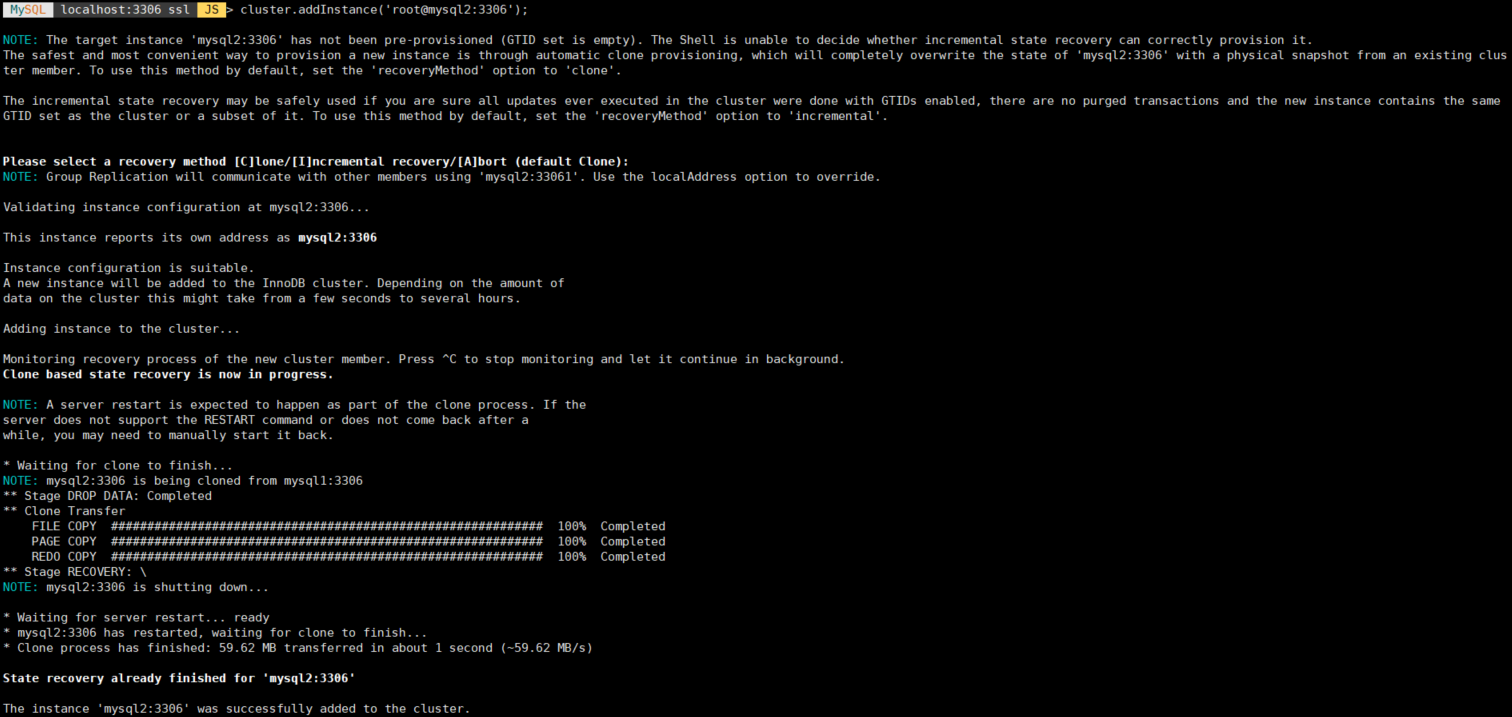
6、mysql服务重启完成后,我们就可以创建集群,并添加2个节点(只需在一个节点操作)
mysqlsh --uri root@localhost:3306  # 进入mysqlsh客户端
var cluster = dba.createCluster('dev')
cluster.addInstance('root@mysql2:3306');
cluster.addInstance('root@mysql3:3306');
再注意一点:mysql57在创建集群和添加节点的时候会出现警告:
WARNING: Instance 'mysql1:3306' cannot persist configuration since MySQL version 5.7.29 does not support the SET PERSIST command (MySQL version >= 8.0.11 required). Please use the <Dba>.configureLocalInstance() command locally to persist the changes.
这个警告没关系,他告诉我们做集群修改的配置没有持久化,我们再次在每个节点都执行dba.configureLocalInstance()就可以了,他会一大堆group_replication配置信息写入到/etc/my.cnf。
新添加的配置项如下(我对比了一下,只有group_replication_group_seeds和group_replication_local_address2个参数不一致):
auto_increment_increment = 1
auto_increment_offset = 2
group_replication_allow_local_disjoint_gtids_join = OFF
group_replication_allow_local_lower_version_join = OFF
group_replication_auto_increment_increment = 7
group_replication_bootstrap_group = OFF
group_replication_components_stop_timeout = 31536000
group_replication_compression_threshold = 1000000
group_replication_enforce_update_everywhere_checks = OFF
group_replication_exit_state_action = READ_ONLY
group_replication_flow_control_applier_threshold = 25000
group_replication_flow_control_certifier_threshold = 25000
group_replication_flow_control_mode = QUOTA
group_replication_force_members =
group_replication_group_name = eb782af9-732a-11ea-9cee-000c290200c6
group_replication_group_seeds = mysql1:33061,mysql3:33061
group_replication_gtid_assignment_block_size = 1000000
group_replication_ip_whitelist = AUTOMATIC
group_replication_local_address = mysql2:33061
group_replication_member_weight = 50
group_replication_poll_spin_loops = 0
group_replication_recovery_complete_at = TRANSACTIONS_APPLIED
group_replication_recovery_reconnect_interval = 60
group_replication_recovery_retry_count = 10
group_replication_recovery_ssl_ca =
group_replication_recovery_ssl_capath =
group_replication_recovery_ssl_cert =
group_replication_recovery_ssl_cipher =
group_replication_recovery_ssl_crl =
group_replication_recovery_ssl_crlpath =
group_replication_recovery_ssl_key =
group_replication_recovery_ssl_verify_server_cert = OFF
group_replication_recovery_use_ssl = ON
group_replication_single_primary_mode = ON
group_replication_ssl_mode = REQUIRED
group_replication_start_on_boot = ON
group_replication_transaction_size_limit = 0
group_replication_unreachable_majority_timeout = 0
super_read_only = ON
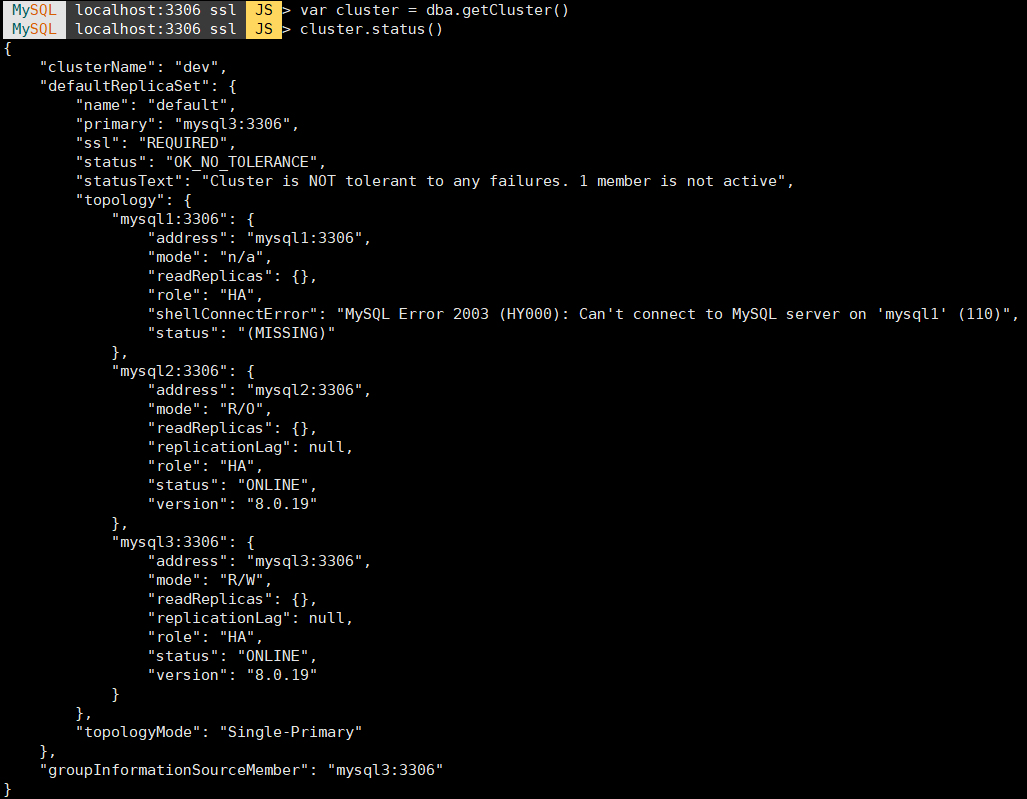
7、集群安装完成,我们可以查看集群的安装状态
var cluster = dba.getCluster()
cluster.status()

可以看出,mysql1节点为读写模式,mysql2和mysql3节点为读模式(只能查询,不能执行建表、新增数据等操作)
8、集群验证
关闭mysql1节点,几秒钟后,集群primary节点从mysql1切换到了msql3,并且mysql3变成了读写模式
更多安装说明:https://dev.mysql.com/doc/refman/8.0/en/mysql-innodb-cluster-creating.html
遇到的问题:
问题1:Dba.createCluster: dba.createCluster: Unable to create cluster. The instance 'mysql1:3306' has a populated Metadata schema and belongs to that Metadata. Use either dba.dropMetadataSchema() to drop the schema, or dba.rebootClusterFromCompleteOutage() to reboot the cluster from complete outage. (RuntimeError)
解决:执行dba.rebootClusterFromCompleteOutage()
问题2:Cluster.addInstance: Cannot add an instance with the same server UUID (4245c0b6-7270-11ea-929d-000c292b8420) of an active member of the cluster 'mysql1:3306'. Please change the server UUID of the instance to add, all members must have a unique server UUID. (RuntimeError)
解决:我是虚拟机复制的,所有MySQL服务的server_uuid和server_id是一样的,我们必须修改,servier_uuid需要修改/var/lib/mysql/auto.cnf文件,server_id通过sql语句设置。资料参考:https://dev.mysql.com/doc/refman/8.0/en/replication-options.html
vi /var/lib/mysql/auto.cnf // 修改server_uuid
set global server_id = 549754138; // 修改server_id
问题3:Unable to start Group Replication for instance 'mysql3:3306'. Please check the MySQL server error log for more information.
Cluster.addInstance: Group Replication failed to start: MySQL Error 3096 (HY000): mysql3:3306: The START GROUP_REPLICATION command failed as there was an error when initializing the group communication layer. (RuntimeError)
解决:mysql3主机的hosts配置错了。
问题4:Dba.getCluster: This function is not available through a session to a standalone instance (metadata exists, instance belongs to that metadata, but GR is not active) (RuntimeError)
解决:解决:执行dba.rebootClusterFromCompleteOutage()

 浙公网安备 33010602011771号