环境配置
conda命令
# 1. 创建环境
conda create -n 名字 python=版本号
# 2. 列出所有环境
conda info --envs
# 3. 删除一个环境
conda env remove -n 环境名
# 4. 进入环境
conda activate 环境名
# 5. 退出当前环境
conda deactivate
# 6. 从.txt文件安装依赖(每一行是“包名==版本号”)
conda install --file environment.txt
# 7. 搜索某个包
conda search | grep 包名
从文件安装依赖
参考链接:
https://blog.csdn.net/chenxy_bwave/article/details/121187923
requirement.txt
# 1. 生成
# 1.1 法一
pip freeze > requirements.txt # 生成requirements.txt
# 1.2 法二 https://github.com/bndr/pipreqs
# 优点:
# pip freeze only saves the packages that are installed with pip install in your environment.(不包含conda install安装的包)
# pip freeze saves all packages in the environment including those that you don't use in your current project (if you don't have virtualenv).
pip install pipreqs
pipreqs 要保存到的路径

# 2. 使用
pip install -r requirements.txt # 从requirements.txt安装依赖
environment.yml
# 1. 创建
conda env export > environment.yml
# 2. 使用
conda env create -f environment.yml
注意:
-
.yml文件移植过来的环境只是安装了你原来环境里用conda install等命令直接安装的包,你用pip之类装的东西没有移植过来,需要你重新安装。 -
environment.yml中包含该文件创建时所在的虚拟环境名称,不需要先执行"conda env create"创建并进入虚拟环境,直接在base环境下执行就会自动创建虚拟环境以及安装其中的依赖包(这个是与pip install -r requirements.txt不同的)。当然这就要求你的当前环境中没有同名的虚拟环境。如果安装者不想使用environment.yml中内置的虚拟环境名(在environment.yml的第一行),可以使用-n选项来指定新的虚拟环境名,如下所示:
conda env create -f environment.yml -n new_env_name -
将两者结合起来(在
.yml文件中直接使用pip install是无效的)# run: conda env create --file environment.yml name: test-env dependencies: - python>=3.5 - anaconda - pip - numpy=1.13.3 # pin version for conda - pip: # works for regular pip packages - docx - gooey - matplotlib==2.0.0 # pin version for pip # and for wheels - http://www.lfd.uci.edu/~gohlke/pythonlibs/bofhrmxk/opencv_python-3.1.0-cp35-none-win_amd64.whl如果有
requirements.txt可以先用.yml创建环境,进入环境后使用pip install -r requirements.txt
安装一个包
注意
FQ时使用pip命令可能会出错
conda install package_name=version
# 一般在windows下使用pip,在mac和linux下使用pip3
pip install package_name==version
pip3 install package_name==version # pip3是python3环境下的包管理工具
# 更新名为example_pkg的包到最新版本
pip install -U example_pkg
# pip 换源
pip install package_name==version -i 源的地址
	阿里云 http://mirrors.aliyun.com/pypi/simple/
  中国科技大学 https://pypi.mirrors.ustc.edu.cn/simple/
  豆瓣(douban) http://pypi.douban.com/simple/
  清华大学 https://pypi.tuna.tsinghua.edu.cn/simple/
  中国科学技术大学 http://pypi.mirrors.ustc.edu.cn/simple/
列出当前环境的所有包
conda list列出由conda管理的包,包括通过conda或pip安装的包。而pip list只列出通过pip安装的包,不包括通过conda安装的包。如果你在使用conda环境时想查看所有已安装的包,包括使用pip安装的包,你应该使用conda list命令。如果你只关心pip安装的包,可以使用pip list命令。
CUDA
参考链接:https://zhuanlan.zhihu.com/p/396344997
CUDA分为两种,驱动API和运行API,驱动API指的是指的显卡驱动支持的最高cuda版本,我们运行程序时用的是运行API。
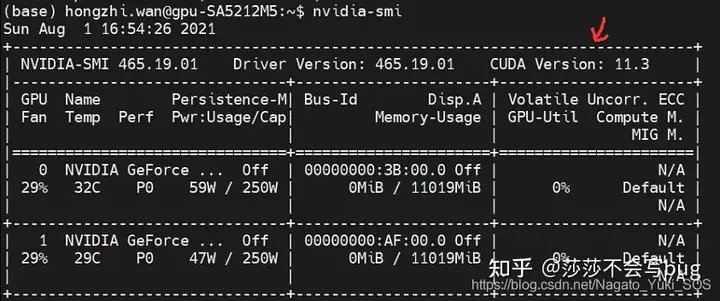
查看CUDA的驱动API版本
表示的是驱动所能支持的最大运行API版本。如果显示11.3,用我们常说的话就是最大支持11.3的cuda。下面为查看CUDA驱动API版本的命令:
nvidia-smi #右上角显示CUDA版本(驱动API)
查看CUDA的运行API版本
在安装完anaconda后,运行pytorch代码就会使用anaconda的cudatoolkit,而忽视官方的CUDA Toolkit,所以我们只需要根据anaconda的cudaoolkit包的版本来安装相应的pytorch即可。下面为查看运行API版本的命令:
查看Anaconda里cudatoolkit包版本
conda list
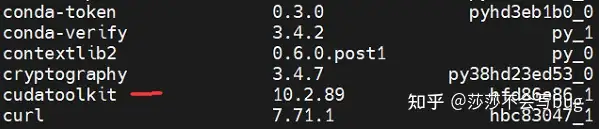
显示的版本为10.2.89。这是我们运行pytorch的cuda版本,根据它来下载对应的pytorch即可。
pytorch
注意
在安装cuda版本pytorch时,要注意与该版本的Pytorch对应的pythonb版本,不能太低。否则在这个Python版本下只能安装cpu版的pytorch。可以在执行conda install命令后观察torch包的版本来确认。
-
验证cuda是否已在本地安装
nvcc -V -
验证pytorch cuda版本是否安装成功的代码(注意,该代码不能验证本地是否安装了nvida的cuda)
import torch
print(torch.cuda.is_available())
print(torch.cuda.current_device())
print(torch.cuda.device(0))
print(torch.cuda.device_count())
print(torch.cuda.get_device_name())
print(torch.__version__)
print(torch.version.cuda)
print(torch.backends.cudnn.version())
oracle jdk on linux
首先卸载可能已经安装的openjdk
# 查看是否安装了openjdk
java -version
# 查找openjdk的包名
dpkg -l | grep jdk
# 删除包和配置文件
sudo apt purge package_name
# 清理不必要的依赖项
sudo apt autoremove
然后再安装oracle-jdk
1、需要本地有一个 JDK 文件,例如 jdk-8u161-linux-x64.tar.gz,没有请自行百度下载
2、在 linux 的 /home 中建立一个目录,存放 jdk 文件,例如 /home/software;在 linux 的 /usr/local 中建立 Java 目录,为 /usr/local/Java
3、 将 jdk 文件上传到 linux 的 /home/software 目录
4、解压 JDK 文件到 /usr/local/Java 目录
tar -zxvf jdk-8u161-linux-x64.tar.gz -C /usr/local/Java1.
5、修改 /etc/profile 文件,配置环境变量,在 profile 文件末尾追加以下内容,注意具体路径以自己的为准
export JAVA_HOME=/usr/local/Java/jdk1.8.0_161
export JRE_HOME=${JAVA_HOME}/jre
export CLASSPATH=.:${JAVA_HOME}/lib:${JRE_HOME}/lib
export PATH=${JAVA_HOME}/bin:$PATH
6、刷新 profile 配置文件
source /etc/profile
7、查看是否配置成功
 java -version
 # 输出:
 java version "1.8.0_161"
Java(TM) SE Runtime Environment (build 1.8.0_161-b12)
Java HotSpot(TM) 64-Bit Server VM (build 25.161-b12, mixed mode)
ubuntu删除一个包
Apt Remove vs Apt Autoremove vs Apt Purge: Key Differences
# 删除包和配置文件
sudo apt purge package_name
# 清理不必要的依赖项
sudo apt autoremove
\(notes\)
apt remove- Uninstalls the specified package.
- Keeps system-wide configuration files and user data.
- Leaves behind unused dependencies.
apt autoremove- Removes unused dependencies, freeing up disk space.
- Does not target any specific package, only orphaned dependencies.
- Helps maintain a clean and efficient system.
apt purge- Uninstalls the specified package.
- Removes both the package and its associated system-wide configuration files.(比apt remove更进一步)
- Does not remove unused dependencies.
ubuntu查看已经安装的包
dpkg -l | grep package_name
anaconda删除一个包
# conda安装
conda uninstall pkg_name
# pip 安装
pip uninstall pkg_name
# 注意,执行完上述命令后,conda下载的包的缓存还留在anaconda/pkgs中,需要彻底删除
    # 删除没有用的包
    conda clean -p
    # 删除tar打包
    conda clean -t
    # 删除无用的包和缓存(最彻底)
    conda clean -a
# pip 缓存
# linux系统
rm -rf ~/.cache/pip
# windows
# 删除下面的文件夹
C:\Users\USER_NAME\AppData\Local\pip\cache
ubuntu设置ssh
https://wwfe.lanzoub.com/iaxSb19ddahe
WSL
官方教程https://learn.microsoft.com/zh-cn/windows/wsl/setup/environment
安装步骤
-
安装windows terminal
-
安装WSL
# 在cmd或powershell中
wsl --install
-
解决代理问题
-
解决网络问题(ping baidu.com也失败)
https://github.com/microsoft/WSL/issues/5420#issuecomment-646479747
-
解决无法在windows terminal中启动Ubuntu的问题
https://blog.csdn.net/huahuaaaaaa1/article/details/127661144
在环境变量中添加WindowsApps的路径(之前被我删了)
-
FQ:开启clash 的 Tun 模式即可
https://docs.cfw.lbyczf.com/contents/tun.html#windows
要将clash更新到最新版本,下载Service Mode,之后才能启动Tun
检验是否成功:
ping google.com
-
-
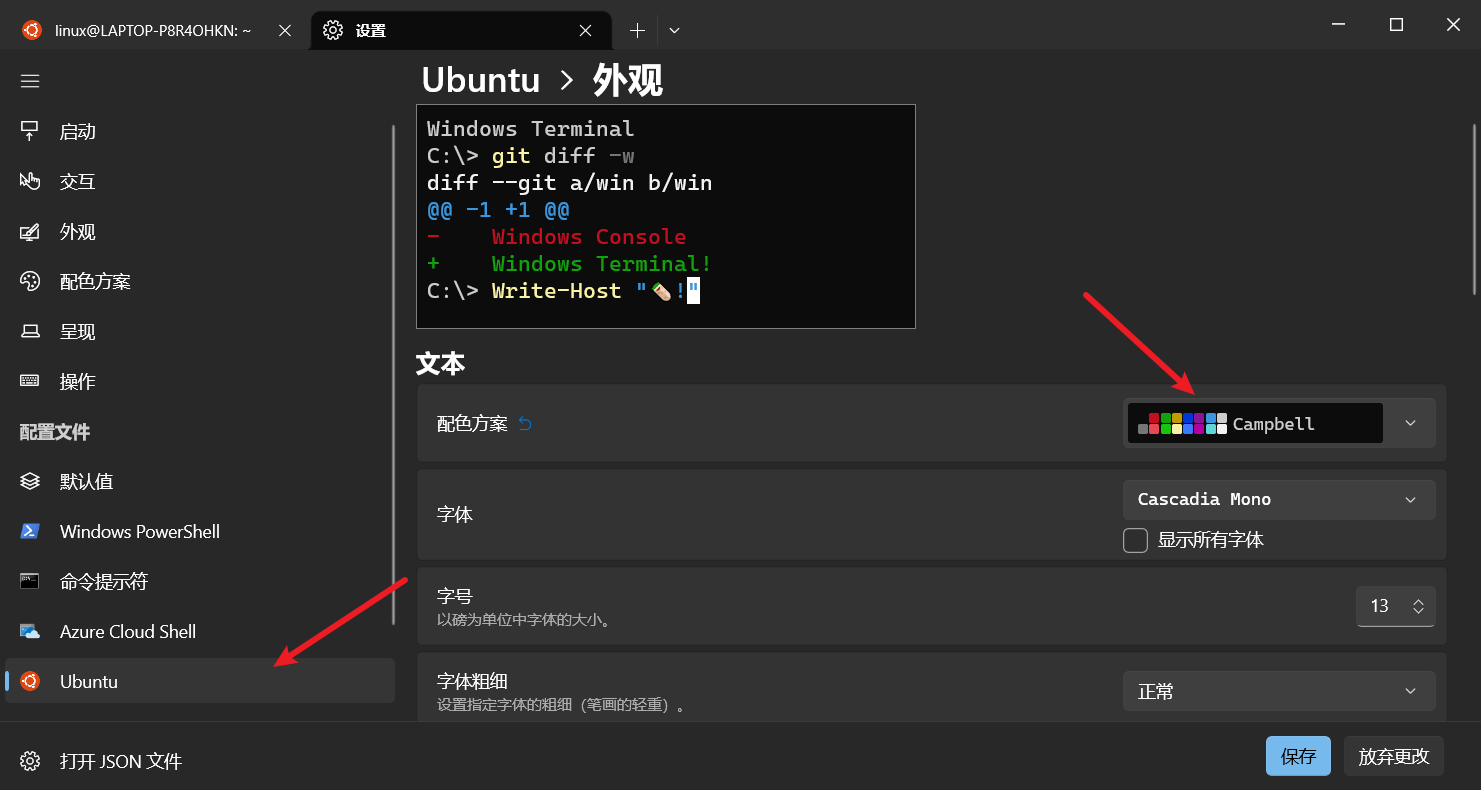
设置配色方案为Campbell
tmux的配置
-
创建配置文件,在tmux里用vim
https://superuser.com/questions/1325629/unknown-command-error-when-loading-tmux-conf
tmux show -g | sed 's/^/set -g /' > ~/.tmux.conf -
修改配置文件,主要修改前缀键和开启鼠标
vim .tmux.conf
-
acwing的tmux配置
set-option -g status-keys vi
setw -g mode-keys vi

setw -g monitor-activity on

# setw -g c0-change-trigger 10
# setw -g c0-change-interval 100

# setw -g c0-change-interval 50
# setw -g c0-change-trigger  75


set-window-option -g automatic-rename on
set-option -g set-titles on
set -g history-limit 100000

#set-window-option -g utf8 on

# set command prefix
set-option -g prefix C-a
unbind-key C-b
bind-key C-a send-prefix

bind h select-pane -L
bind j select-pane -D
bind k select-pane -U
bind l select-pane -R

bind -n M-Left select-pane -L
bind -n M-Right select-pane -R
bind -n M-Up select-pane -U
bind -n M-Down select-pane -D

bind < resize-pane -L 7
bind > resize-pane -R 7
bind - resize-pane -D 7
bind + resize-pane -U 7


bind-key -n M-l next-window
bind-key -n M-h previous-window


set -g status-interval 1
# status bar
set -g status-bg black
set -g status-fg blue


#set -g status-utf8 on
set -g status-justify centre
set -g status-bg default
set -g status-left " #[fg=green]#S@#H #[default]"
set -g status-left-length 20


# mouse support
# for tmux 2.1
# set -g mouse-utf8 on
set -g mouse on
#
# for previous version
#set -g mode-mouse on
#set -g mouse-resize-pane on
#set -g mouse-select-pane on
#set -g mouse-select-window on


#set -g status-right-length 25
set -g status-right "#[fg=green]%H:%M:%S #[fg=magenta]%a %m-%d #[default]"

# fix for tmux 1.9
bind '"' split-window -vc "#{pane_current_path}"
bind '%' split-window -hc "#{pane_current_path}"
bind 'c' new-window -c "#{pane_current_path}"

# run-shell "powerline-daemon -q"

# vim: ft=conf
vim配置
复制方法:https://www.jianshu.com/p/01cb26c8cdb4
- 取消行号,用tmux的复制
- 设置为set paste,然后进入插入模式
- ctrl+v粘贴
配置相关文档 :help '属性名',:q退出查看
我的vim配置:参考
"set number
set nu "显示行号和相对行号

set noswapfile "不生成.swf

" Set fileencodings
set fileencodings=utf-8,ucs-bom,gb18030,gbk,gb2312,cp936
set termencoding=utf-8
set encoding=utf-8


" Set for mouse
" set mouse=a

set smartindent
set autoindent

set tabstop=4
set shiftwidth=4

"自动补全
inoremap [ []<Esc>i
inoremap ( ()<Esc>i
inoremap " ""<Esc>i
inoremap { {<CR>}<Esc>O

"输入右括号时检查
inoremap ) <c-r>=Close(')')<CR>
inoremap ] <c-r>=Close(']')<CR>
inoremap } <c-r>=Close('}')<CR>
func! Close(char)
    if getline('.')[col('.') - 1] == a:char
        return "\<Right>"
    else
        return a:char
    endif
endfunc

"常用操作的按键映射,仅编辑模式生效
inoremap <C-z> <Esc>ui "撤销
inoremap <C-l> <Esc>$a "到行尾
inoremap <C-k> <Esc>^i "到行首
inoremap <C-d> <Esc>dd$a "删除一行
inoremap jj <Esc> "方便快速切换到普通模式
在WSL中debug 多文件C项目
参考教程:https://www.youtube.com/watch?v=DVyYnOHP4nY
准备:下载好WSL
-
将所有的
.c文件放在一个文件夹下,并写好Makefile。 -
假设这些文件都在windows中,而不在wsl中。先在vscode中打开这个文件夹。注意,一开始
.vscode文件夹和里面的launch.json和tasks.json是不存在的。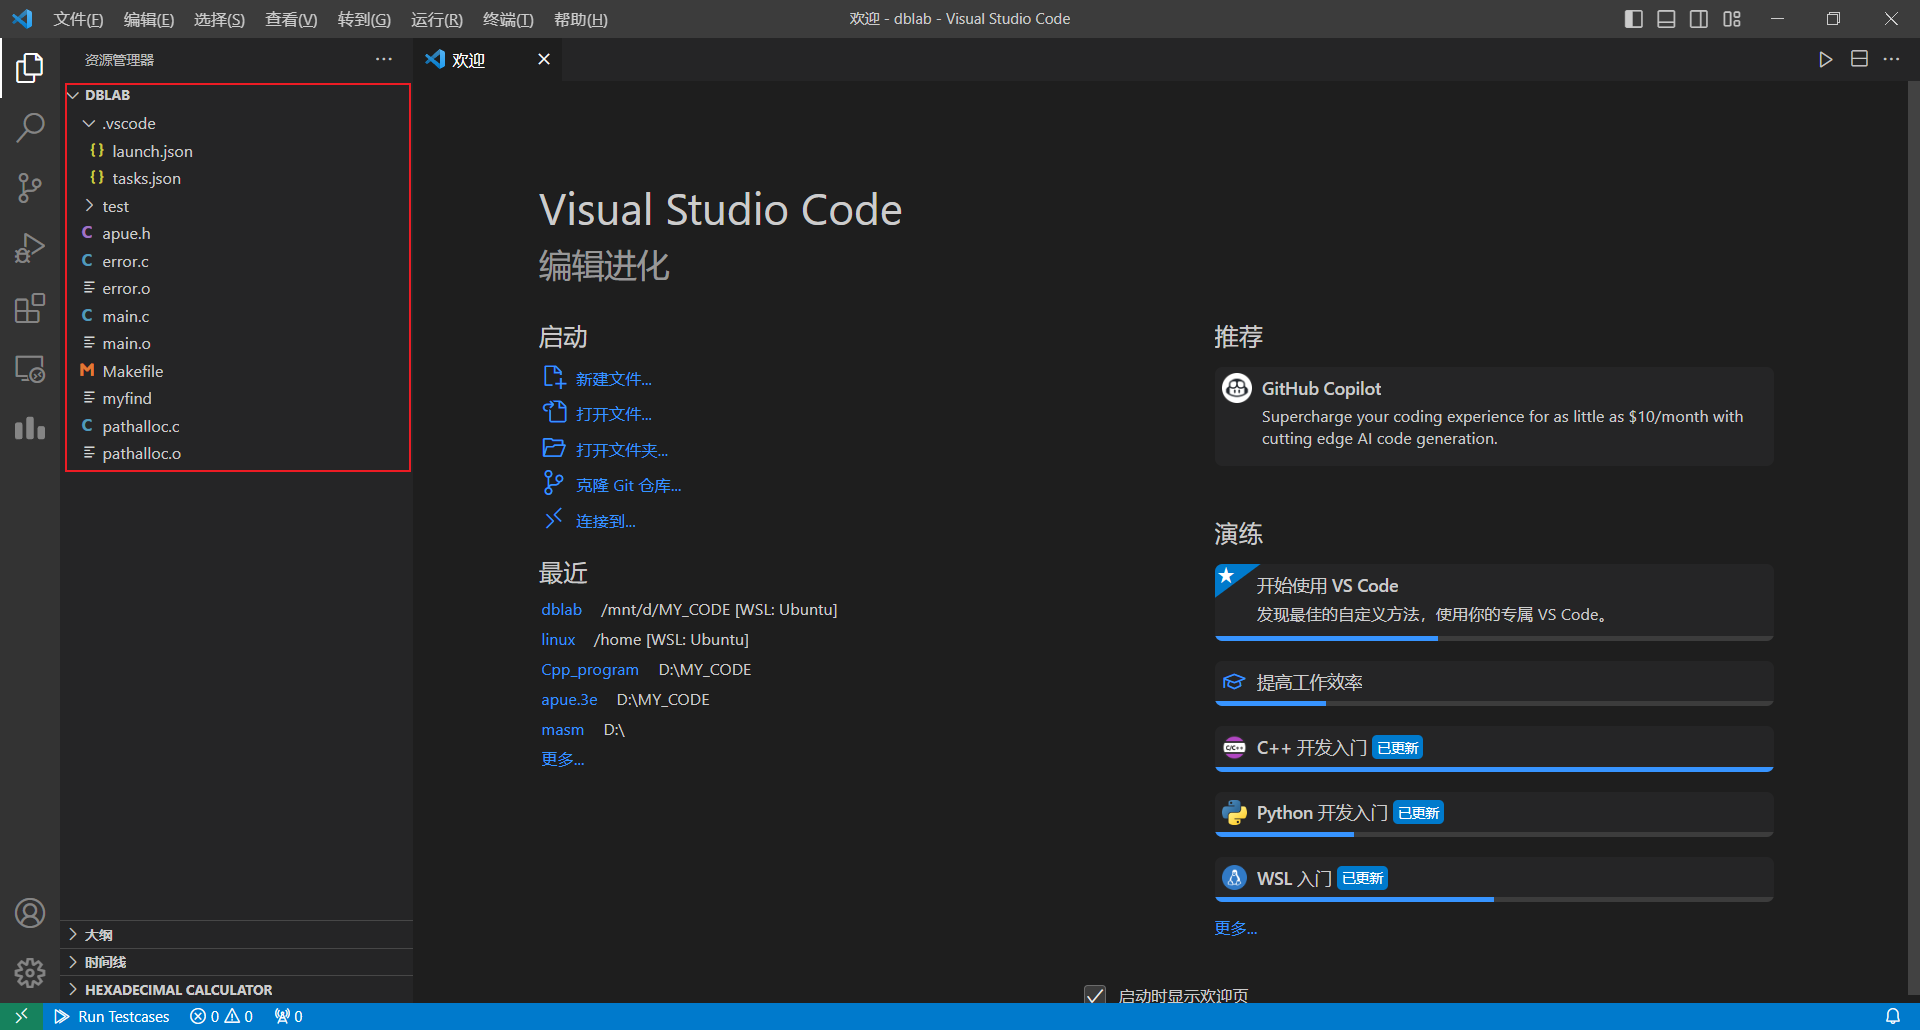
-
ctrl + shift + p进入命令模式,输入reopen folder in wsl,点击后就可以在WSL中打开此文件夹,这一步是关键,不能在本机里使用``wsl的工具debug`,对我来说会造成混乱。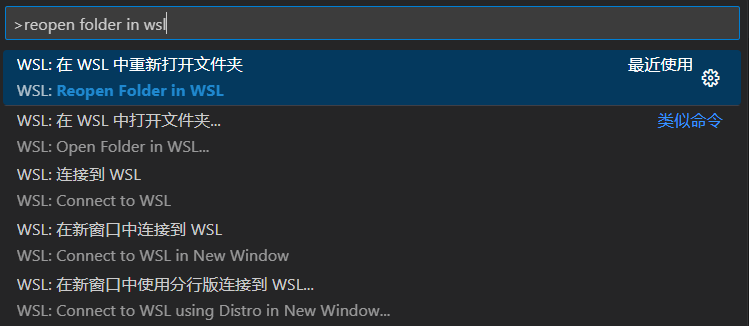
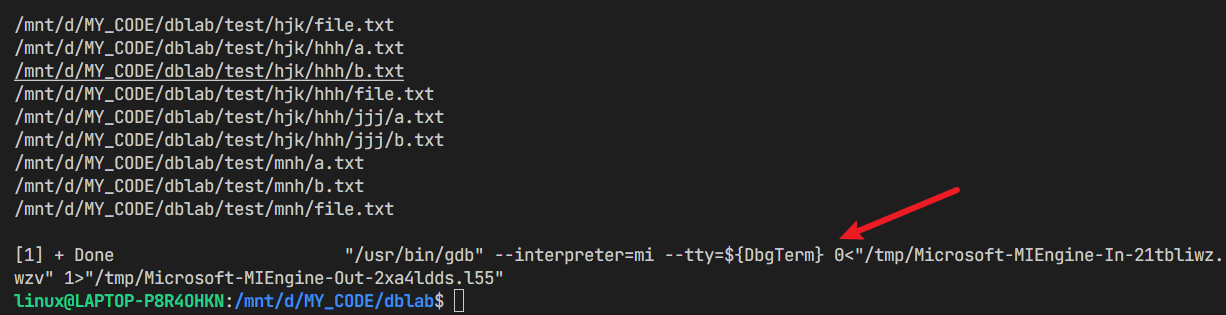
进入之后如下图所示,这里我为了从0开始演示,把
.vscode删掉了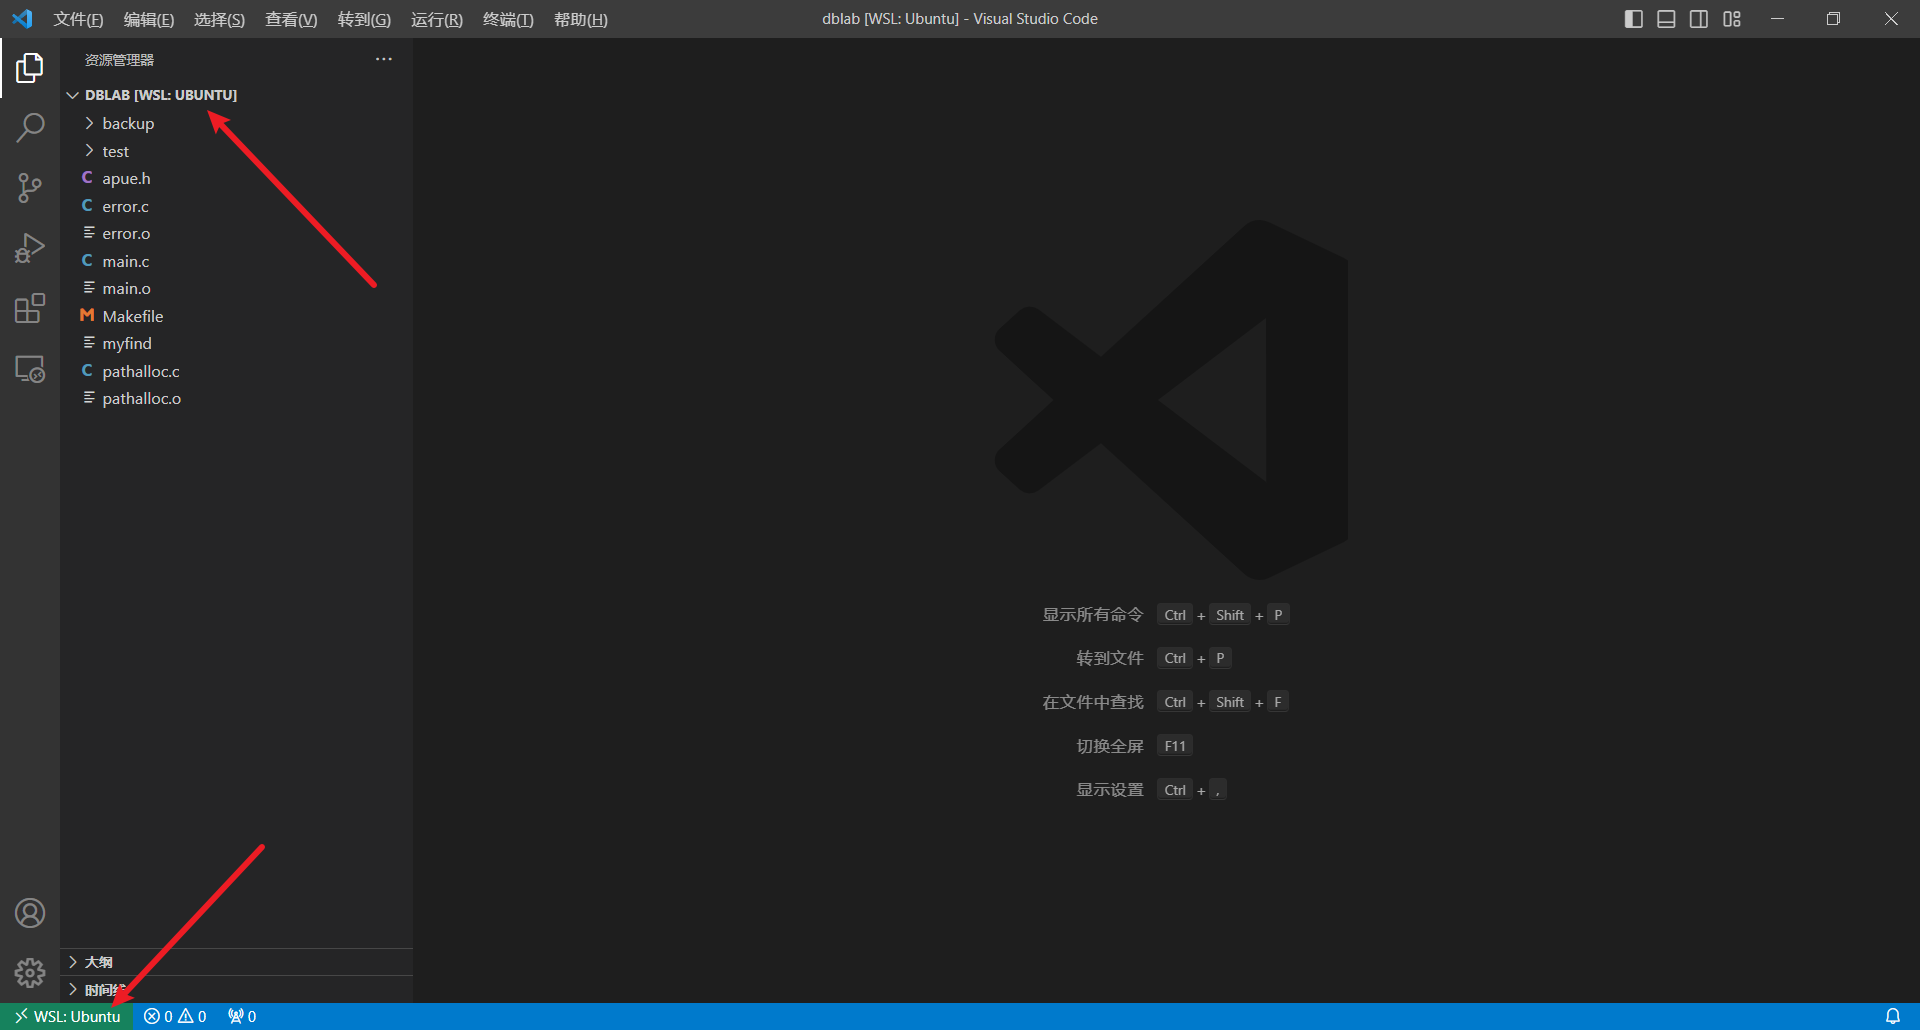
-
找到入口程序
main.c,在编辑器里打开,点击F5,选择gcc 生成和调试活动文件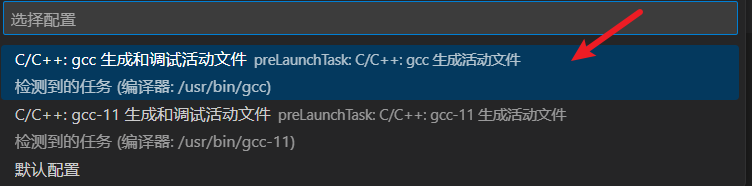
之后会报错,选择
仍要调试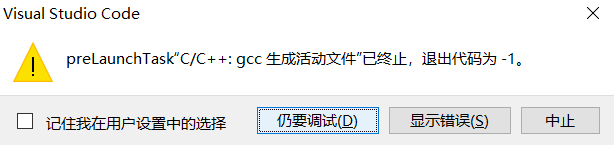
选择
打开 launch.json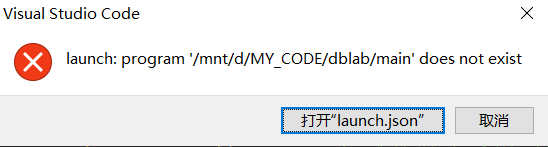
好了,此时vscode已经帮我们自动生成好了
.vscode文件夹和tasks.json、launch.json这两个文件,这也是这一步的目的。如果熟练的话,可以自己从0开始写这两个json,但这里我们让vscode自动生成。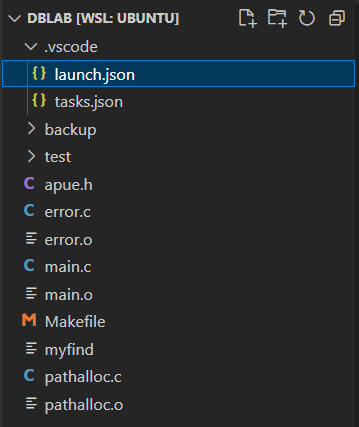
文件解释:
launch.json是项目debug的启动配置,我们可以在里面设置从哪个文件启动,并为这个文件提供命令行参数tasks.json是项目的编译配置,在launch.json中,有一个prelaunch的属性,意思就是在项目启动debug前会先运行tasks.json中的任务。我们可以在这个文件中写编译命令,我们写的东西就相当于输入到命令行的命令。因此,如果我们在其中写好了make命令,到时候自然就会执行Makefile里的指令得到可执行文件了。
-
编写
tasks.json我们已经写好了
Makefile,tasks.json的任务让vscode帮我们在命令行输入make指令。Makefile内容如下:OBJS = main.o \ error.o \ pathalloc.o \ CC = gcc CFLAGS = -g -std=c99 all: myfind myfind: $(OBJS) $(CC) $(CFLAGS) $(OBJS) -o myfind %.o: %.c $(CC) $(CFLAGS) -c $< -o $@ clean: rm -f *.o myfind .PHONY: clean all我们打算先在命令行输入
make clean删除上次编译的结果,再执行make all,生成可执行文件,则对应的tasks.json如下,配合注释理解。每个task的label属性就是在
launch.json找到要执行哪个task的依据,所以我们先分别写clean和all任务,最后用build-all将它们放在一起,则launch.json只需执行build-all任务即可。{ // See https://go.microsoft.com/fwlink/?LinkId=733558 // for the documentation about the tasks.json format "version": "2.0.0", "tasks": [ { "label": "clean", // 任务名称 "command": "make", // 命令 "args": [ "clean" ], // 相当于make clean "type": "shell" }, { "label": "all", "command": "make", "args": [ "all" ], "type": "shell" }, { // 依次调试多个任务,若不配置此,则每次launch只会启动一个任务。 "label": "build-all", "dependsOn": [ "clean", "all" ] } ] } -
编写
launch.json一开始的
launch.json是这样的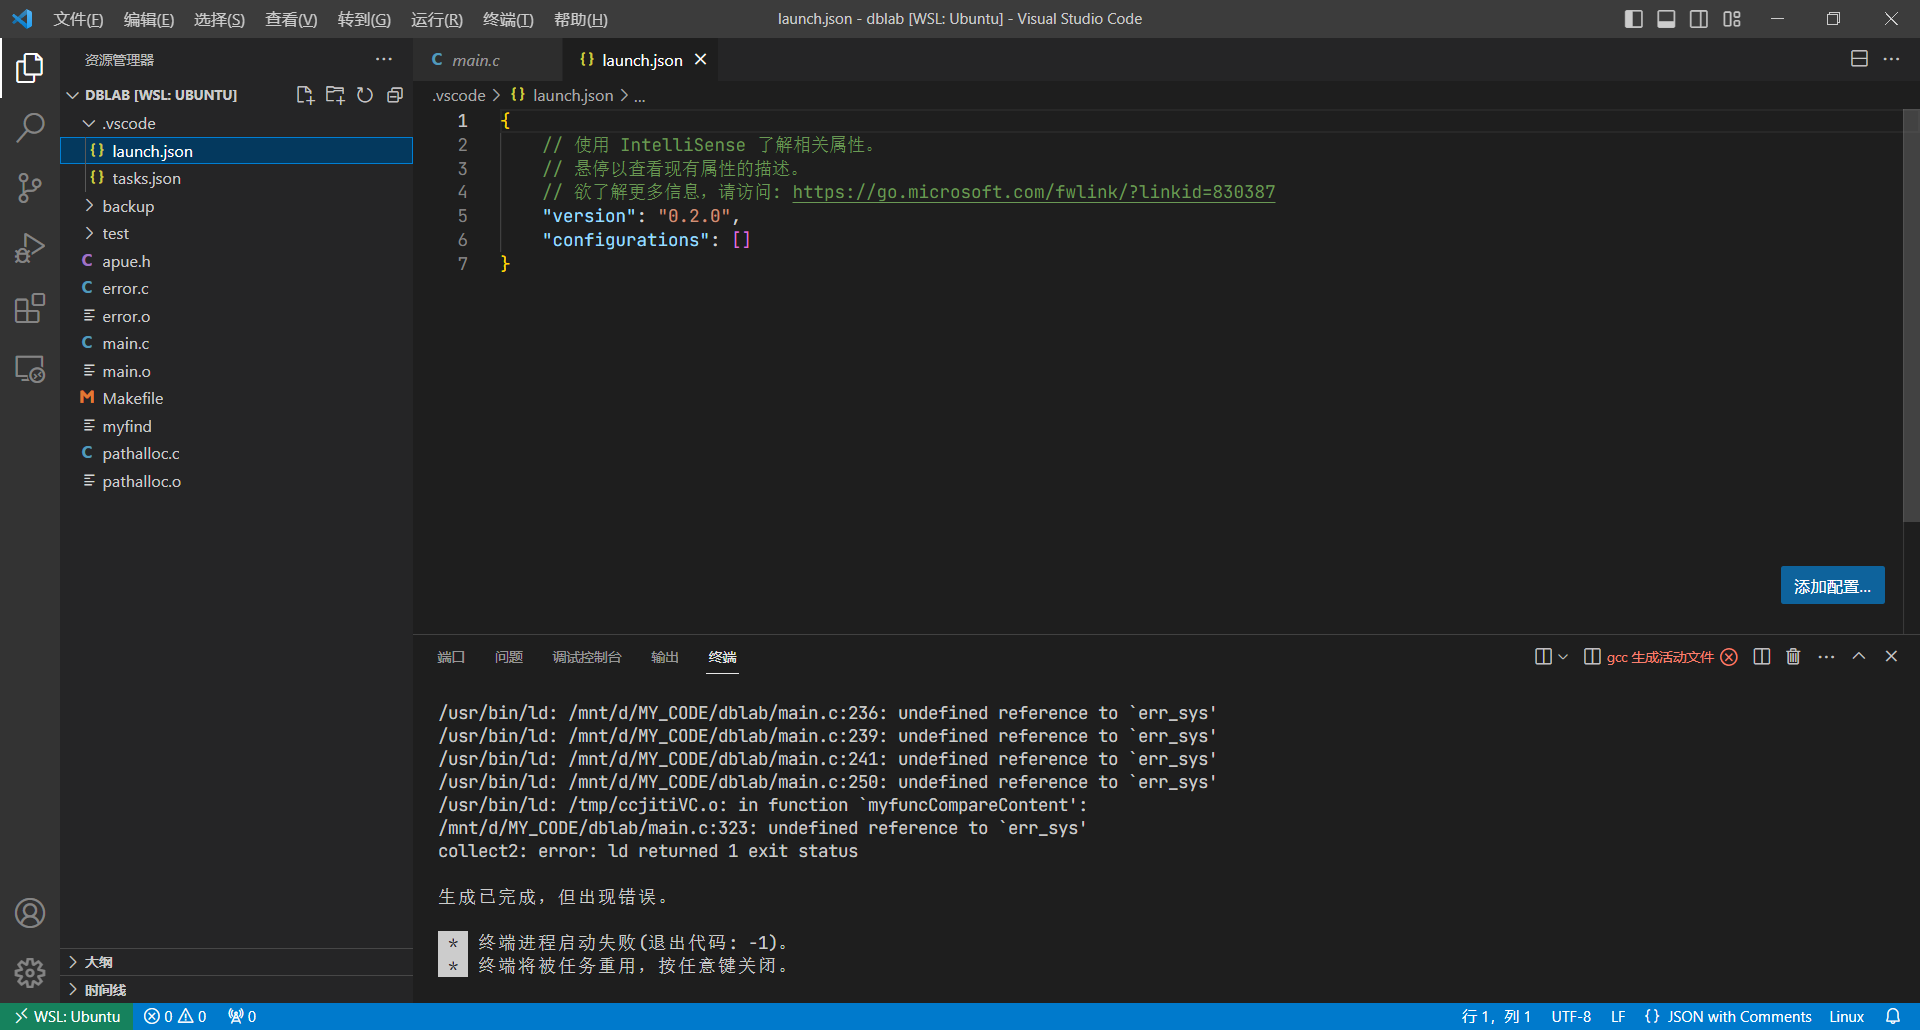
我们点击右下角的
添加配置,选择c/c++: (gdb)启动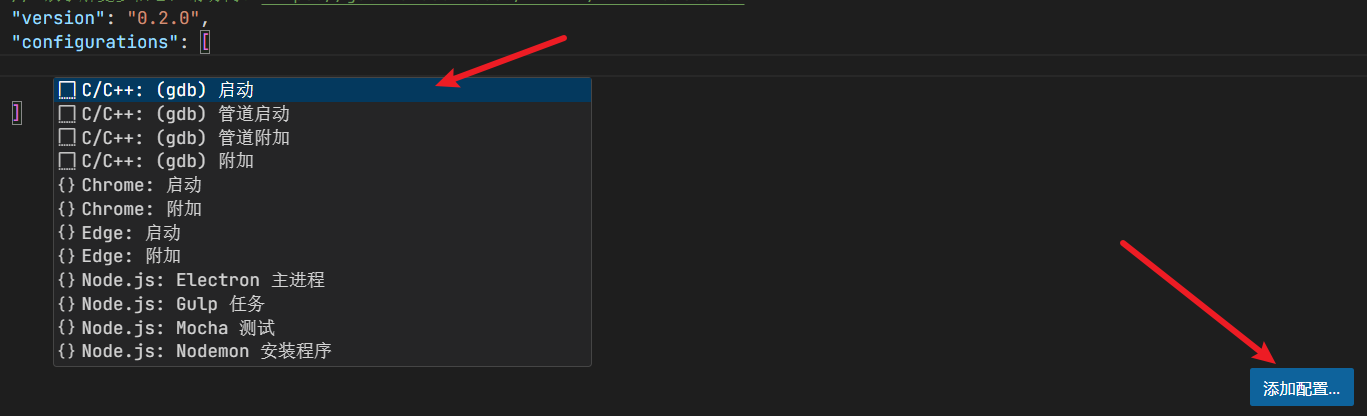
则vscode为我们自动生成了以下内容
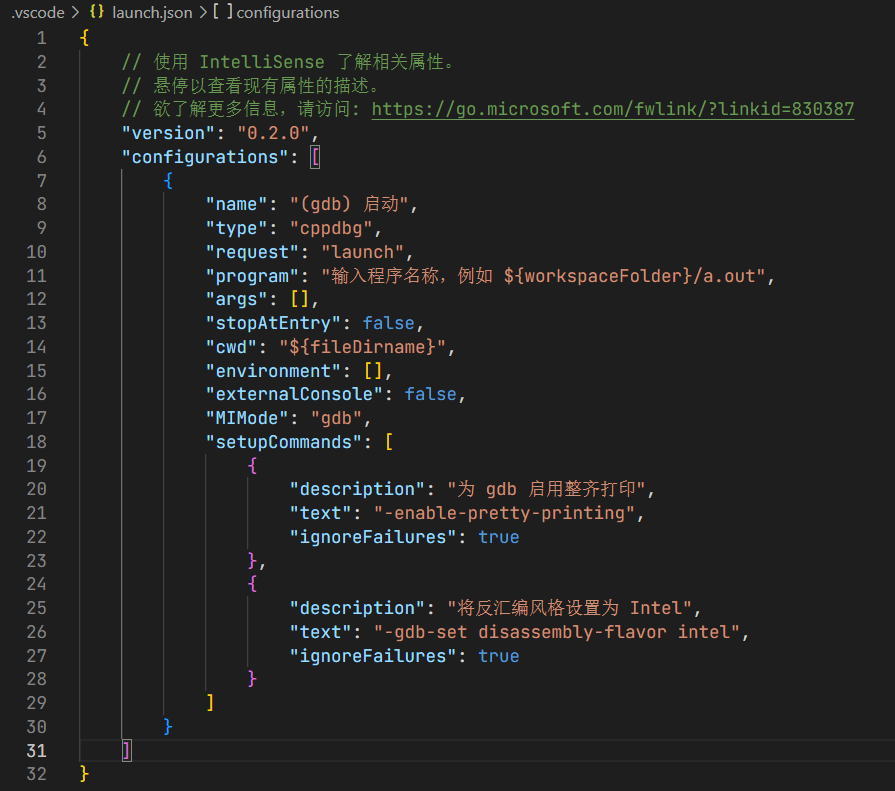
我们需要做一些简单的修改:
-
program需要指定为项目最终编译产生的可执行文件的路径,其中${workspaceFolder}就是当前的工作目录,我们在Makefile中写好生成的文件的位置,然后对应的修改program即可。这里我们最后的文件会生成在工作目录的根目录下,直接修改a.out为我们的文件名即可,这里是myfind
-
preLaunchTask:在debug前要执行tasks.json中的任务生成可执行文件,如上文提到的,我们这里填写要执行的task的label即可。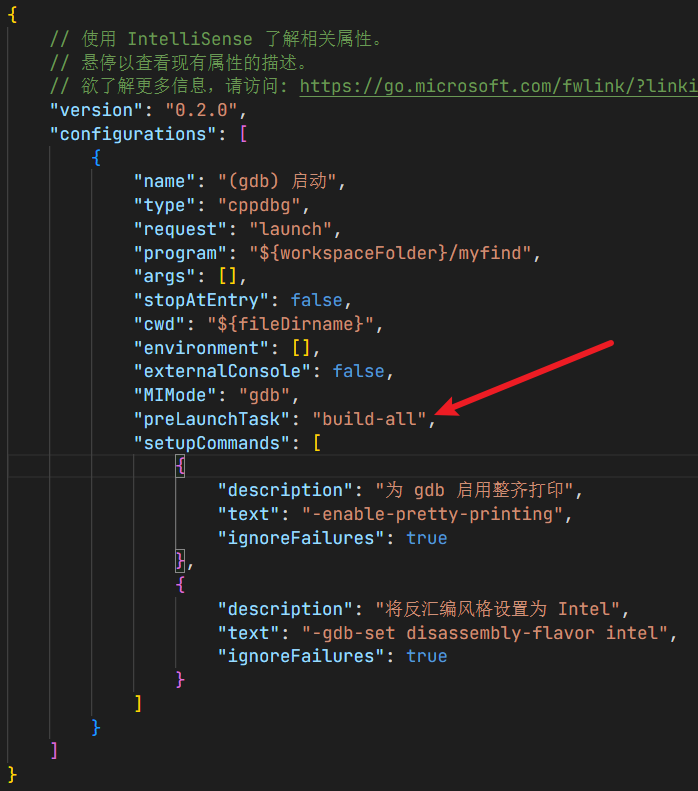
-
args是我们在命令行要传递给可执行文件的参数,一个参数用一个双引号,它们之间用逗号隔开。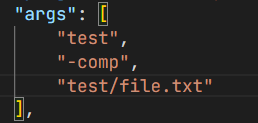
{ // 使用 IntelliSense 了解相关属性。 // 悬停以查看现有属性的描述。 // 欲了解更多信息,请访问: https://go.microsoft.com/fwlink/?linkid=830387 "version": "0.2.0", "configurations": [ { "name": "(gdb) 启动", "type": "cppdbg", "request": "launch", "program": "${workspaceFolder}/myfind", "args": [ "test", "-comp", "test/file.txt" ], "stopAtEntry": false, "cwd": "${fileDirname}", "environment": [], "externalConsole": false, "MIMode": "gdb", "preLaunchTask": "build-all", "setupCommands": [ { "description": "为 gdb 启用整齐打印", "text": "-enable-pretty-printing", "ignoreFailures": true }, { "description": "将反汇编风格设置为 Intel", "text": "-gdb-set disassembly-flavor intel", "ignoreFailures": true } ] } ] } -
-
在要暂停的地方打上断点,点击
F5执行成功!
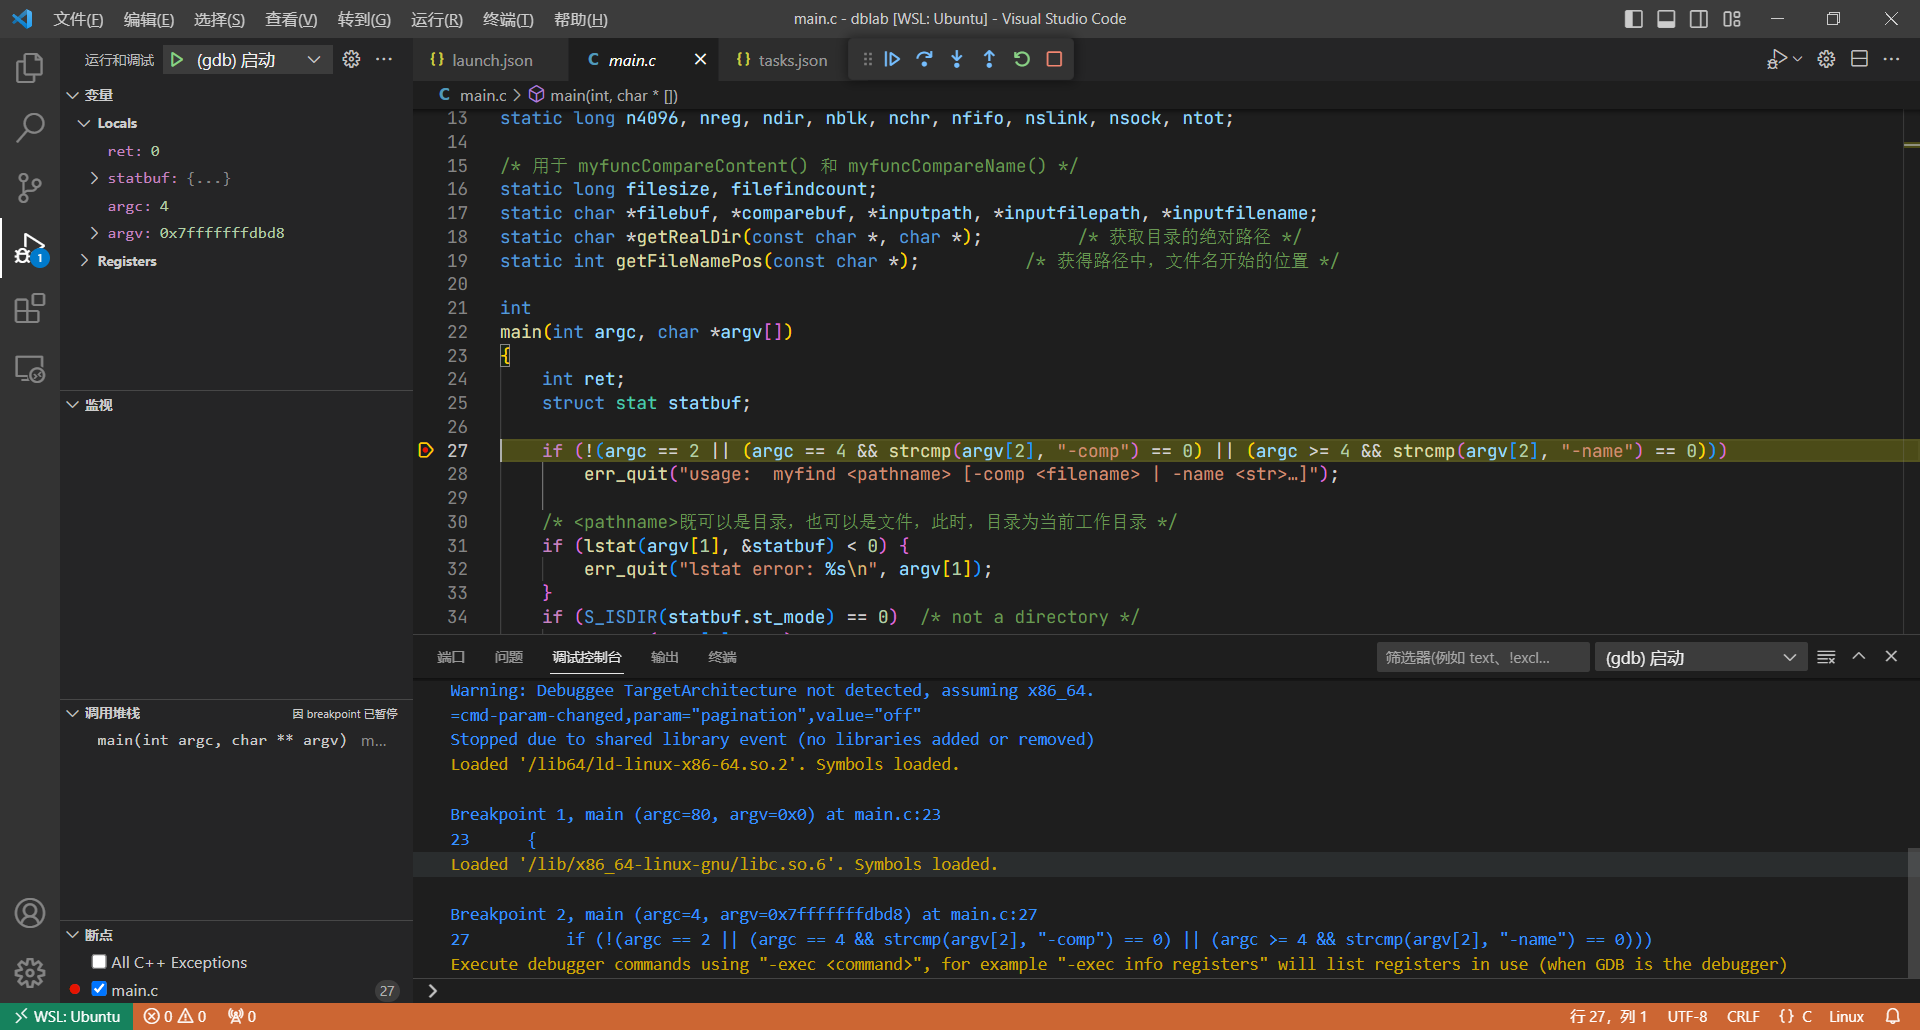
程序的输出在
终端中: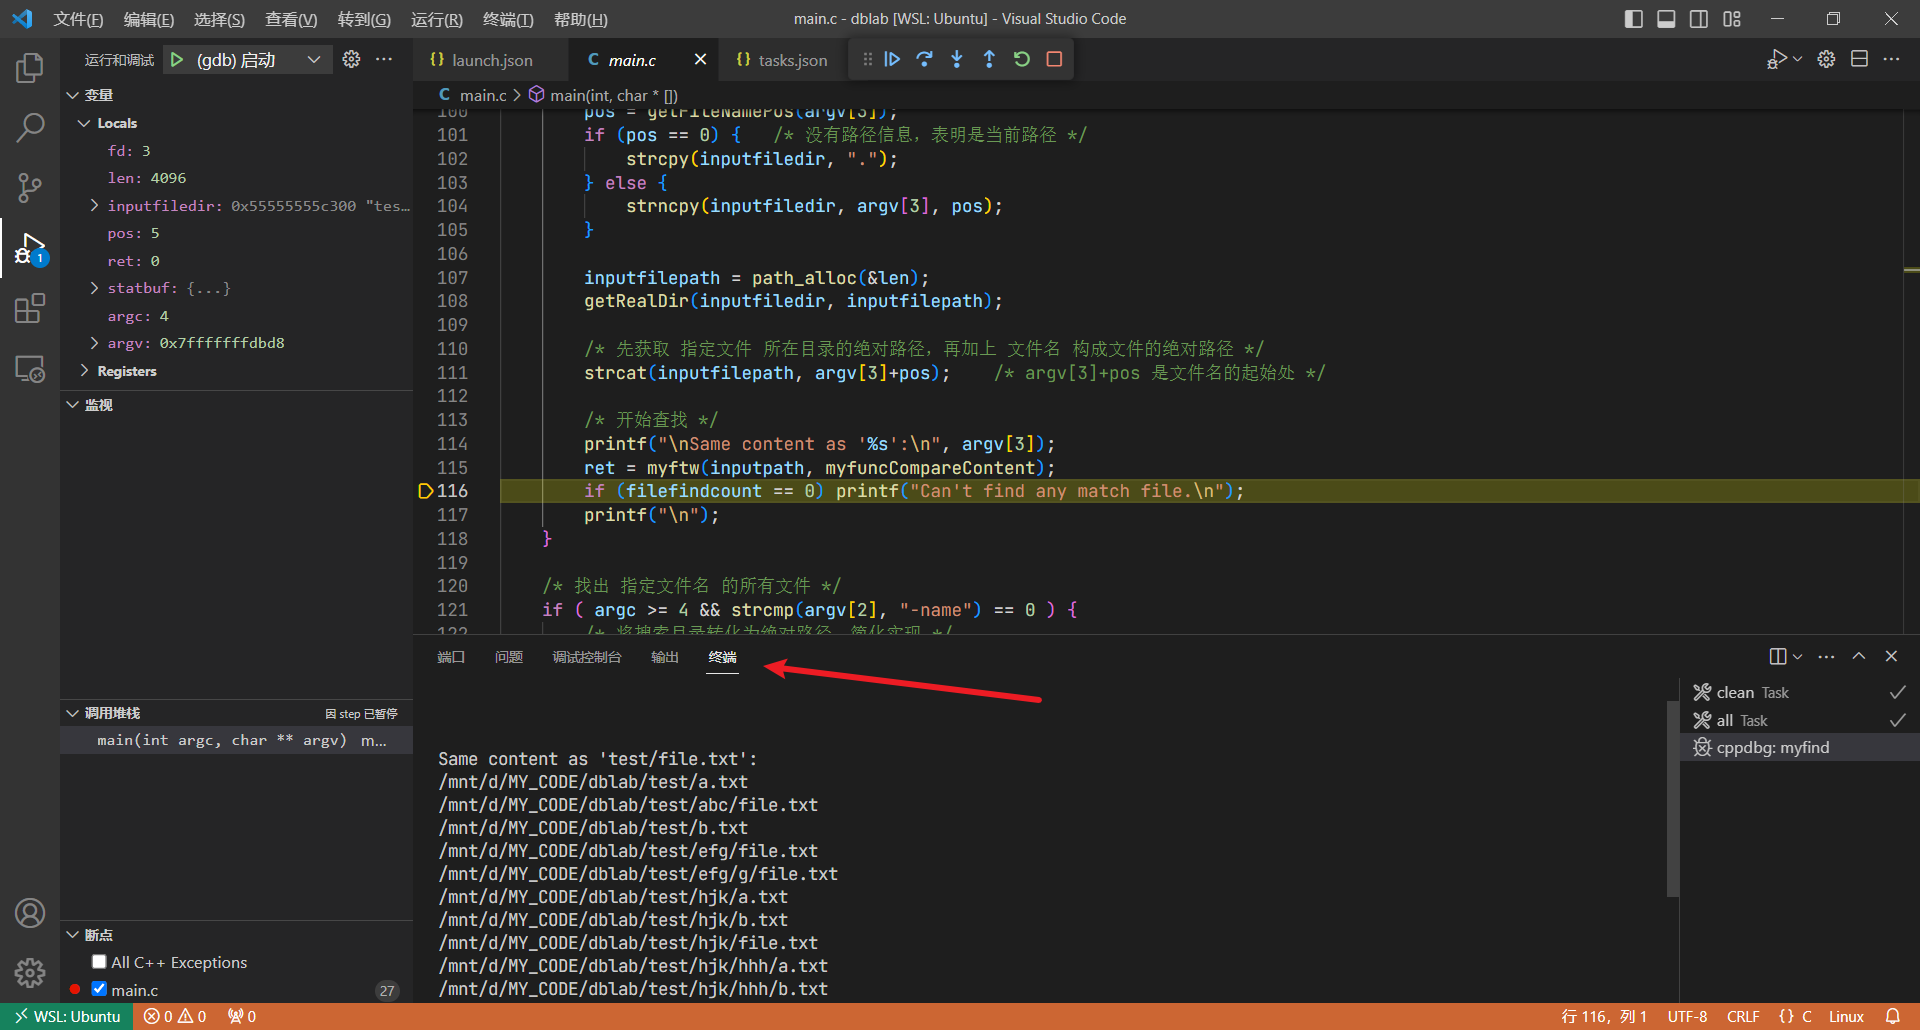
最后执行完成退出时有一行提示