SpringBoot——配置及原理

更多内容,前往 IT-BLOG

一、Spring Boot全局配置文件


application.properties 与 application.yml 配置文件的作用:可以覆盖 SpringBoot 配置的默认值。

◀ YML(is not a Markup Language:不仅仅是一个标记语言):以前的配置文件,大多是xx.xml文件,而 YAML是以数据为中心,比 json、xml等更适合做配置文件。

 1 #普通配置文件.properties的语法
 2 #server.port=80
 3 
 4 #XML的写法
 5 #<server>
 6 #   <port>8080<port/>
 7 #<server/>
 8 
 9 #yml 以数据为中心的语法
10 server:
11   port: 8080

◀ YML语法:基本语法:k:(空格)v--->表示一对键值对。(以空格缩进来控制层级关系;只要是左对齐的一列数据,都是同一层级)属性和值也是大小写敏感。

1 server:
2   port: 8080
3   path: /hello
4 spring:
5   profiles: dev

◀ 值的写法:【1】字面量:普通的值(数字、字符串、布尔),字符串默认是不用加上单引号或者双引号,但也可以加,但是有区别:双引号,不会转义字符串里面的特殊字符,特殊字符会作为本身想表达的意思。单引号,会转义特殊字符,特殊字符最终只是一个普通的字符串数据。
【2】对象(属性和值)或者Map(键值对)的表达[k: v]形式,对象也是[k: v]的方式。比较抽象,我们举个栗子看看:

1 #yml正常写法
2 friends:
3     lastName: zhangsan           
4     age: 20
5 
6 #行内写法
7 friends: {lastName: zhangsan,age: 20}

【3】数组(List、Set)用 [- 值]表示数组中的一个元素,也举一个栗子:

1 # yml正常写法 -值 形式
2 pets:
3    - cat
4    - dog
5 #行内写法
6 pets: [cat,dog]

◀ 配置文件注入:测试上面数据赋值是否正确。
【1】准备配置文件:application.yml

 1 person:
 2   lastName: zhangsan
 3   age: 20
 4   boss: false
 5   birth: 2018/8/20
 6   map: {k1: v1,k2: v2}
 7   lists: [listi,zhaoliu]
 8   dog:
 9     name: gou
10     age: 2

【2】准备 JavaBean:@ConfigurationProperties(prefix ="person") 表示将配置文件中的 person的每一个属性映射到这个组件中,但只有这个组件是容器中的组件,才能提供功能。需要使用 @Component标注才能成为容器组件。

 1 @Component
 2 @ConfigurationProperties(prefix ="person")
 3 public class Person {
 4     private String lastName;
 5     private Integer age;
 6     private boolean boss;
 7     private Date birth;
 8     private Map<String,String> map;
 9     private List lists;
10     private Dog dog;
11 }

【3】优化:当准备2中的文件,会提示我们 “Spring Boot Configuration Annotation ...” 点击去后会发现如下 starters信息,那么我们将此配置于 pom文件中,作用:当我们在配置文件中,给带有 @ConfigurationProperties的实体类赋值时会有属性提示。

<dependency>
    <groupId>org.springframework.boot</groupId>
    <artifactId>spring-boot-configuration-processor</artifactId>
    <optional>true</optional>
</dependency>

【4】测试: 进入 test目录底下的类目录,直接导入 person输入,查看是否已赋值即可。

 1 //使用Spring的驱动器,不用再使用JUnit的驱动器了
 2 @RunWith(SpringRunner.class)
 3 @SpringBootTest
 4 public class HellowordQuickStartApplicationTests {
 5         //在测试期间可以类似编码一样进行自动注入
 6     @Autowired
 7     Person person;
 8 
 9         @Test
10     public void testPersion(){
11         System.out.println(person);
12     }
13 }

【5】properties 中的语句与 yml不同,以下是 properties的配置语句。

 1 #person.lastName=张三 也是可以的
 2 person.last-name=张三
 3 person.age=18
 4 person.birth=2013/04/23
 5 person.boss=false
 6 person.map.key1=v1
 7 person.map.key2=v2
 8 person.lists=a,b,c
 9 person.dog.name=dog
10 person.dog.age=2

【6】测试的时候可能会出现乱码,设置如下。properties 默认的编码时ASK码,我们需要将其设置为UTF-8来解决乱码问题。

【7】第二种赋值方式:@Value(“字面量/${key}从环境变量、配置文件中获取值/#{SpEL}”)---三种传值方式

 1 @Component
 2 //@ConfigurationProperties(prefix ="person")
 3 public class Person {
 4     //@email @Value不支持校验(JSR303数据校验)
 5     @Value("${person.last-name}")
 6     private String lastName;
 7     //SPEL
 8     @Value("#{22*3}")
 9     private Integer age;
10     @Value("true")
11     private boolean boss;

 ● @Vaule与@ConfigurationProperties两者的区别如下:(其实@Value最多用在获取单个值的时候使用)

  @configuration @value
功能 批量注入配置文件中的属性 每个属性单独配置
松散绑定(松散语法) 支持(大小写不敏感) 不支持(与配置文件保持一致)
SpEL 不支持(不能用于逻辑计算) 支持#{逻辑计算}
JSR303数据校验 支持@validated 不支持
复杂类型封装 支持 不支持(map对象)

二、@PropertySource 与 @ConfigurationProperties之间的区别


@ConfigurationProperties:默认从全局配置文件中加载值。

  ● @PropertySource:指向自己定义的 properties配置文件,新建 person.properties配置文件(省略),如下获取值。

1 //优先级高于@ConfigurationProperties(prefix ="person")
2 @PropertySource(value = {"classpath:person.properties"})
3 @Component
4 //@ConfigurationProperties(prefix ="person")
5 //@Validated
6 public class Person {

  ● @ImportResource:导入 Spring的配置文件,让配置文件里面的内容生效 。
    1)、定义配置文件bean.xml(以前的配置,SpringBoot不这么用)

1 <?xml version="1.0" encoding="UTF-8"?>
2 <beans xmlns="http://www.springframework.org/schema/beans"
3        xmlns:xsi="http://www.w3.org/2001/XMLSchema-instance"
4        xsi:schemaLocation="http://www.springframework.org/schema/beans
5        http://www.springframework.org/schema/beans/spring-beans.xsd">
6 
7     <bean id="helloService" class="com.atguigu.Servers.HelloService"></bean>
8 </beans>

    2)、在主程序中使用@ImportResource注解导入bean.xml配置文件

@ImportResource(locations={"classpath:bean.xml"})
@SpringBootApplication
public class HellowordQuickStartApplication {

  ● SpringBoot中(配置类====配置文件xml)推荐使用配置类,如下创建:

 1 //@Configuration指明当前类是一个配置类 替代配置文件
 2 @Configuration
 3 public class MyAppConfig {
 4     //@bean注解就相当于<bean></bean>标签
 5     @Bean
 6     //方法名就相当于xml中的id , 项目启动时就会将组件加入容器中
 7     public HelloService helloService(){
 8         System.out.println("@Bean给容器中添加组件");
 9         return new HelloService();
10     }
11 }

三、配置文件占位符


【1】随机数(了解即期)

${random.value}、${random.int}、${random.log}、${random.int(10)}

【2】占位符(当属性不存在时,可以给一个默认值,例如下面age属性值得获取)

persion.last-name=张三
persion.dog.name=${persion.last_name}_dog
perdion.dog.age=${persion.noexistage:20}

四、Profile:是 Spring对不同环境提供不同配置功能的支持,可以通过激活、指定参数等方式快速切换环境


【1】多 profile文件形式(了解一下,我们使用更多的是2中的yml形式):我们可以编写多个配置文件,对应多个场景(开发、测试、生产等),文件名可以是 application-{profile}.properties/yml的形式命名,例如:application-dev.properties
   
  项目启动时默认使用application.properties的配置,如果要激活开发配置文件,在application.properties中输入如下激活信息。

#激活dev开发模式的配置文件,就不用application.properties文件的配置了
spring.profiles.active=dev

【2】yml 支持多文档块方式(推荐使用):通过“---”来划分文档块,Document表示所处模块的位置/总块 。

 1 # --- 称为多文档快 , 简写1中的形式
 2 ---
 3 server:
 4   port: 8080
 5   path: /hello
 6 # 如下为激活profiles ,如果不激活则默认为Document1中的配置
 7 spring:
 8   profiles:
 9     active: dev
10 ---
11 server:
12   port: 8084
13 spring:
14   profiles: prod
15 ---
16 server:
17   port: 8081
18 spring:
19   profiles:
20     active: dev

【3】激活指定 profile方式,上面用的都是第一种:
   1)在默认配置 application.properties 中设置spring.profiles.active属性 

spring.profiles.active=dev

   2)命令行:--spring.profiles.active=dev

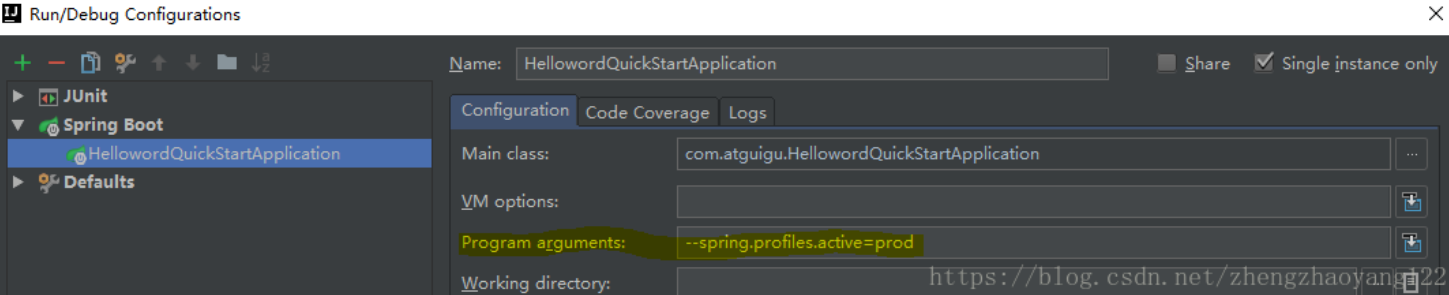
命令行运行 jar包的方式:java -jar xxx.jar --spring.profiles.active=dev;
3)虚拟机参数:-Dspring.profiles.active=prod;

五、配置文件加载位置:也就优先级


SpringBoot 启动时会扫描以下位置的application.properties 或者 application.yml 文件作为 SpringBoot 的默认配置文件:
【1】file:./config/  (项目底下的config目录)
【2】file:./   (直接位于项目底下的配置文件)
【3】classpath:/config/ (config文件默认没生成,需要自己创建)
【4】classpath:/  (项目创建后,配置文件默认位置)
以上是按照优先级从高到低的顺序,所有位置的文件都会被加载,高优先级配置内容会覆盖低优先级配置的相同内容
我们也可以通过 spring.config.location 来改变默认配置(项目打包成功以后,我们可以使用命令行参数的形式,启动项目来指定配置文件的新位置;指定的配置文件会共同起作用,形成互补作用),这个优先级肯定最高了。而且我们要知道,打jar包的时候只包含src底下的main和resource文件,1、2中的不会被打包进去。其实将jar包与配置文件*.yml等放在同一个目录下的情况也比较多常见,因为灵活。项目启动时可以自动加载同目录下的*.yml等配置文件。且优先级高于内部的配置文件,之间互补配置。

#命令行添加配置,优先级最高
java -jar xxx.jar --spring.config.location=d:\xxx.properties

六、自动配置原理


【1】SpringBoot 启动的时候加载主配置类,@SpringBootApplication下开启了主配置功能@EnableAutoConfiguration
【2】@EnableAutoConfiguration作用:①、利用EnableAutoConfigurationImportSelector给容器导入一些组件。
   ②、可以查看 selectImports() 方法的内容:List configurations = getCandidateConfigurations(annotationMetadata, attributes);获取候选的配置。SpringFactoriesLoader.loadFactoryNames()扫描所有jar包类路径下 META‐INF/spring.factories 把扫描到的这些文件的内容包装成properties对象从properties中获取到EnableAutoConfiguration.class 类(类名)对应的值,然后把他们添加在容器中。
【3】将类路径下 META-INF/spring.factories 里面配置的所有 EnableAutoConfiguration的值加入到了容器中;

# EnableAutoConfiguration  对应 @EnableAutoConfiguration
org.springframework.boot.autoconfigure.EnableAutoConfiguration=\
org.springframework.boot.autoconfigure.admin.SpringApplicationAdminJmxAutoConfiguration,\
org.springframework.boot.autoconfigure.aop.AopAutoConfiguration,\
org.springframework.boot.autoconfigure.amqp.RabbitAutoConfiguration,\
org.springframework.boot.autoconfigure.batch.BatchAutoConfiguration,\
org.springframework.boot.autoconfigure.cache.CacheAutoConfiguration,\
org.springframework.boot.autoconfigure.cassandra.CassandraAutoConfiguration,\
org.springframework.boot.autoconfigure.cloud.CloudAutoConfiguration,\
org.springframework.boot.autoconfigure.context.ConfigurationPropertiesAutoConfiguration,\
org.springframework.boot.autoconfigure.context.MessageSourceAutoConfiguration,\
org.springframework.boot.autoconfigure.context.PropertyPlaceholderAutoConfiguration,\
org.springframework.boot.autoconfigure.couchbase.CouchbaseAutoConfiguration,\
org.springframework.boot.autoconfigure.dao.PersistenceExceptionTranslationAutoConfiguration,\
org.springframework.boot.autoconfigure.data.cassandra.CassandraDataAutoConfiguration,\
org.springframework.boot.autoconfigure.data.cassandra.CassandraReactiveDataAutoConfiguration,\

每一个这样的 xxxAutoConfiguration 类都是容器中的一个组件,都加入到容器中。用他们来做自动配置;
【4】每一个自动配置类进行自动配置功能,以 HttpEncodingAutoConfiguration(Http编码自动配置)为例解释自动配置原理;

 1 @Configuration //表示这是一个配置类,以前编写的配置文件一样,也可以给容器中添加组件
 2 @EnableConfigurationProperties(HttpEncodingProperties.class) //启动指定类的
 3 //ConfigurationProperties功能;将配置文件中对应的值和HttpEncodingProperties绑定起来;并把
 4 //HttpEncodingProperties加入到ioc容器中
 5 @ConditionalOnWebApplication //Spring底层@Conditional注解(Spring注解版),根据不同的条件,如果
 6 //满足指定的条件,整个配置类里面的配置就会生效; 判断当前应用是否是web应用,如果是,当前配置类生效
 7 @ConditionalOnClass(CharacterEncodingFilter.class) //判断当前项目有没有这个类
 8 //CharacterEncodingFilter;SpringMVC 中进行乱码解决的过滤器;
 9 //判断配置文件中是否存在某个配置 spring.http.encoding.enabled;如果不存在,判断也是成立的
10 @ConditionalOnProperty(prefix = "spring.http.encoding", value = "enabled", matchIfMissing = true) 
11 //即使我们配置文件中不配置pring.http.encoding.enabled=true,也是默认生效的;
12 public class HttpEncodingAutoConfiguration {
13     //他已经和SpringBoot的配置文件映射了
14     private final HttpEncodingProperties properties;
15     //只有一个有参构造器的情况下,参数的值就会从容器中拿
16     public HttpEncodingAutoConfiguration(HttpEncodingProperties properties) {
17         this.properties = properties;
18     }
19 
20     @Bean //给容器中添加一个组件,这个组件的某些值需要从properties中获取
21     @ConditionalOnMissingBean(CharacterEncodingFilter.class) //判断容器没有这个组件?
22     public CharacterEncodingFilter characterEncodingFilter() {
23         CharacterEncodingFilter filter = new OrderedCharacterEncodingFilter();
24         filter.setEncoding(this.properties.getCharset().name());
25         filter.setForceRequestEncoding(this.properties.shouldForce(Type.REQUEST));
26         filter.setForceResponseEncoding(this.properties.shouldForce(Type.RESPONSE));
27         return filter;
28     }

根据当前不同的条件判断,决定这个配置类是否生效?一但这个配置类生效;这个配置类就会给容器中添加各种组件;这些组件的属性是从对应的properties类中获取的,这些类里面的每一个属性又是和配置文件绑定的;

【5】所有在配置文件中能配置的属性都是在 xxxxProperties类中封装;配置文件能配置什么就可以参照某个功能对应的属性类

@ConfigurationProperties(prefix = "spring.http.encoding") //从配置文件中获取指定的值和bean的属性进行绑定
public class HttpEncodingProperties {
public static final Charset DEFAULT_CHARSET = Charset.forName("UTF‐8");

精髓:【1】SpringBoot 启动会加载大量的自动配置类;
【2】我们看我们需要的功能有没有SpringBoot默认写好的自动配置类;
【3】我们再来看这个自动配置类中到底配置了哪些组件;(只要我们要用的组件有,我们就不需要再来配置了)
【4】给容器中自动配置类添加组件的时候,会从properties类中获取某些属性。我们就可以在配置文件中指定这些属性的值;
   xxxxAutoConfigurartion:自动配置类,给容器中添加组件。xxxxProperties:封装配置文件中相关属性;

七、@ConditionalOnxxx 中的 @Conditional 派生注解(Spring注解版原生的@Conditional作用)作用


必须是 @Conditional 指定的条件成立,才给容器中添加组件,配置配里面的所有内容才生效。


● 自动配置类必须在一定的条件下才能生效,那么我们如何知道哪些配置类生效哪些没有生效,其实我们可以通过在配置文件启用 debug=true属性,就可以查看哪些配置类生效。

debug=true

▶ 通过控制台打印自动配置报告,我们就可以知道哪些自动配置类生效(Positive matches:匹配成功的自动配置类)

Positive matches:
-----------------

   CodecsAutoConfiguration matched:
      - @ConditionalOnClass found required class 'org.springframework.http.codec.CodecConfigurer'; @ConditionalOnMissingClass did not find unwanted class (OnClassCondition)

   CodecsAutoConfiguration.JacksonCodecConfiguration matched:
      - @ConditionalOnClass found required class 'com.fasterxml.jackson.databind.ObjectMapper'; @ConditionalOnMissingClass did not find unwanted class (OnClassCondition)

   CodecsAutoConfiguration.JacksonCodecConfiguration#jacksonCodecCustomizer matched:
      - @ConditionalOnBean (types: com.fasterxml.jackson.databind.ObjectMapper; SearchStrategy: all) found bean 'jacksonObjectMapper' (OnBeanCondition)

   DispatcherServletAutoConfiguration matched:
      - @ConditionalOnClass found required class 'org.springframework.web.servlet.DispatcherServlet'; @ConditionalOnMissingClass did not find unwanted class (OnClassCondition)
      - found ConfigurableWebEnvironment (OnWebApplicationCondition)

▶ 自动配置未生效类(Negative matches:匹配失败的自动配置类)

Negative matches:
-----------------

   ActiveMQAutoConfiguration:
      Did not match:
         - @ConditionalOnClass did not find required classes 'javax.jms.ConnectionFactory', 'org.apache.activemq.ActiveMQConnectionFactory' (OnClassCondition)

   AopAutoConfiguration:
      Did not match:
         - @ConditionalOnClass did not find required classes 'org.aspectj.lang.annotation.Aspect', 'org.aspectj.lang.reflect.Advice', 'org.aspectj.weaver.AnnotatedElement' (OnClassCondition)

   ArtemisAutoConfiguration:
      Did not match:
         - @ConditionalOnClass did not find required classes 'javax.jms.ConnectionFactory', 'org.apache.activemq.artemis.jms.client.ActiveMQConnectionFactory' (OnClassCondition)


 ----关注公众号,获取更多内容----

 
posted @ 2020-11-22 09:33  Java程序员进阶  阅读(16)  评论(0编辑  收藏  举报