

scrapy抓取全站产品,存储数据到mongo,下载产品源码以及图片,生成excel,以及采用scrapy+redis分布式实现过程
简单粗暴,不说别的废话,今天我们使用scrapy来爬 https://www.tous.com/us-en/jewelry 这个站的产品信息。
先来了解一下 scrapy这个爬虫框架 看下面的图片
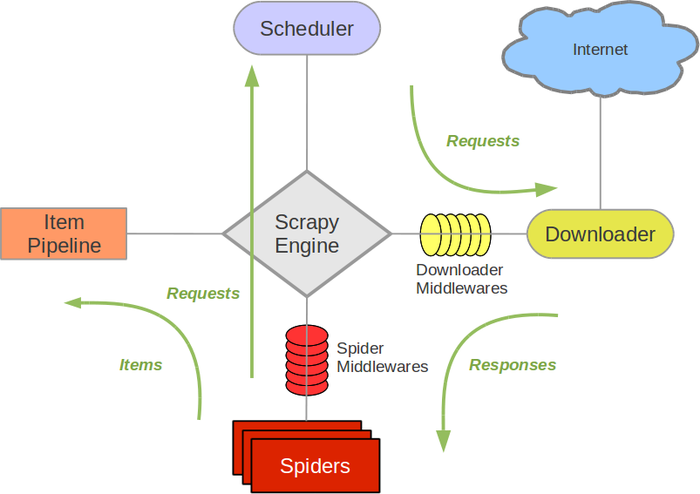
1、引擎(Scrapy): 用来处理整个系统的数据流处理, 触发事务(框架核心)。
2、调度器(Scheduler): 用来接受引擎发过来的请求, 压入队列中, 并在引擎再次请求的时候返回. 可以想像成一个URL(抓取网页的网址或者说是链接)的优先队列, 由它来决定下一个要抓取的网址是什么, 同时去除重复的网址。
3、下载器(Downloader): 用于下载网页内容, 并将网页内容返回给蜘蛛。
4、爬虫(Spiders): 爬虫是主要干活的, 用于从特定的网页中提取自己需要的信息, 即所谓的实体(Item)。用户也可以从中提取出链接,让Scrapy继续抓取下一个页面。
5、项目管道(Pipeline): 负责处理爬虫从网页中抽取的实体,主要的功能是持久化实体、验证实体的有效性、清除不需要的信息。当页面被爬虫解析后,将被发送到项目管道,并经过几个特定的次序处理数据。
6、下载器中间件(Downloader Middlewares): 位于Scrapy引擎和下载器之间的框架,主要是处理Scrapy引擎与下载器之间的请求及响应。
7、爬虫中间件(Spider Middlewares): 介于Scrapy引擎和爬虫之间的框架,主要工作是处理蜘蛛的响应输入和请求输出。
8、调度中间件(Scheduler Middewares): 介于Scrapy引擎和调度之间的中间件,从Scrapy引擎发送到调度的请求和响应。
上面可能说的比较专业术语一些,没那么通俗易懂,下面是我总结的,其实很简单只要记住:
1、item定义一个类,里面定义我们需要提取的网页信息
2、爬虫文件调用这个类item,实例化,给预先定义好的变量进行赋值,提去网页信息,最后将结果返回给pipeline文件。
3、pipeline文件是用来数据库处理,比如存数据库,下载文件,图片等。
4、爬虫中间件middleware ,有时候我们容易被封号,这时候代理ip的处理就是在这个文件。
5、最后将pipeline定义的类以及middleware定义的类,需要使用的东西,写好之后,去setting对应的地方注册,就可以启用整个爬虫。
6、还要将setting文件中的ROBOTSTXT_OBEY改为False,以及想应的请求头信息
以上应该可以很好明白把,我们就按照这个步骤一步一步来敲代码,敲完以上代码,我们运行scrapy crawl tou 即可运行啦!
安装scrapy也是很容易的啦 pip install scrapy 即可,我的开发环境是centos.
先创建工程 scrapy stratproject tous
然后创建spider scrapy genspider tou tous.com
首先第一步我们先定义item
class TousItem(scrapy.Item):
    file_urls = scrapy.Field()
    files = scrapy.Field()
    image_urls = scrapy.Field()
    images = scrapy.Field()
    current_time = scrapy.Field()
    product_url = scrapy.Field()
    name = scrapy.Field()
    marketprice = scrapy.Field()
    price = scrapy.Field()
    sku = scrapy.Field()
    des = scrapy.Field()
    image = scrapy.Field()
    v_categories_name_1 = scrapy.Field()
    v_categories_name_2 = scrapy.Field()
    v_categories_name_3 = scrapy.Field()
    v_categories_name_4 = scrapy.Field()
    v_categories_name_5 = scrapy.Field()
    v_categories_name_6 = scrapy.Field()
    v_categories_name_7 = scrapy.Field()
    shop = scrapy.Field()
第二步:我们使用item这个类,来编写我们的tou.py提去网页中我们需要的数据,最后返回给pipelines
class TouSpider(CrawlSpider):
    name = 'tou'
    allowed_domains = ['tous.com']
    start_urls = ['https://www.tous.com/us-en/jewelry']

    rules = (
        Rule(LinkExtractor(allow=r'https://www.tous.com/us-en/[a-zA-Z-0-9-]+/'),callback='parse_item',follow=True),
        Rule(LinkExtractor(allow=r'https://www.tous.com/us-en/[a-zA-Z-0-9-]+/'), follow=True),
        Rule(LinkExtractor(allow=r'https://www.tous.com/us-en/[a-zA-Z-0-9-]+/[a-zA-Z-0-9-]+/'), follow = True),
        Rule(LinkExtractor(allow=r'https://www.tous.com/us-en/[a-zA-Z-0-9-]+/[a-zA-Z-0-9-]+/\?p=\d+'), follow = True),
        Rule(LinkExtractor(allow=r'https://www.tous.com/us-en/[a-zA-Z-0-9-]+/\?p=\d+'), follow = True),
    )

    def parse_item(self, response):
        try:
            item = TousItem()
            item["name"] = response.css("h1#products-name::text").extract()[0].strip()
            item["sku"] ='N'+response.css("span#product-sku::text").extract()[0]
            item["product_url"] =re.findall(r'<meta\s*property=\"og:url\"\s*content=\"(.*?)\"',str(response.body))[0]
            item["price"]= response.css("div.product-shop-inner div.price-box span.regular-price span.price::text").extract()[0]
            item["marketprice"]= response.css("div.product-shop-inner div.price-box span.regular-price span.price::text").extract()[0]
            item["des"]= response.css("div.easytabs-content ul li::text").extract()[0]
            try:
                all_image = response.css("a.thumbnail").extract()
                all_img = []
                for i in range(0,len(all_image)):
                    all_img.append(re.findall(r'<img\s*src=\"(.*?)\"',all_image[i])[0].replace("/140x/","/1000x/"))
                item["image"]= all_img
            except:
                all_img = []
                all_img.append(re.findall(r'<meta\s*property=\"og:image\"\s*content=\"(.*?)\"',str(response.body))[0])
            item["current_time"]= time.strftime("%Y-%m-%d %H:%M:%S",time.localtime())
            try:
                classify = response.css("div.breadcrumbs ul li a::text").extract()
                item["v_categories_name_1"] = classify[0] if len(classify) > 0 else ""
                item["v_categories_name_2"] = classify[0] if len(classify) > 1 else ""
                item["v_categories_name_3"] = classify[0] if len(classify) > 2 else ""
                item["v_categories_name_4"] = classify[0] if len(classify) > 3 else ""
                item["v_categories_name_5"] = classify[0] if len(classify) > 4 else ""
                item["v_categories_name_6"] = classify[0] if len(classify) > 5 else ""
                item["v_categories_name_7"] = classify[0] if len(classify) > 6 else ""
            except:
                print("目录")
            item["shop"]= "https://www.tous.com/us-en/jewelry"
            item["file_urls"] = [item["product_url"]]
            item["image_urls"] = all_img
            print(item["file_urls"])
            print(item["image_urls"])
            print("是产品页面")
            print("--------------------------")
            yield item
        except:
            print("不是产品页面")
第三步:我们编写pipe管道文件 处理爬虫返回的信息 这边我们实现两个功能:1、将数据存进mongo数据库 2、自定义命名文件的存储形式
class MongoDBPipeline(object):
    def __init__(self):
        client = pymongo.MongoClient(settings['MONGODB_SERVER'], settings['MONGODB_PORT'])
        db = client[settings['MONGODB_DB']]
        self.product_col = db[settings['MONGODB_COLLECTION']]


    def process_item(self, item, spider):
        result = self.product_col.find_one({"sku": item["sku"], "product_shop": item["shop"]})
        print("查询结果:"+str(result))
        try:
            if len(result) > 0:
                mongoExistFlag = 1
        except Exception as e:
            mongoExistFlag = 0
        if (mongoExistFlag == 0):
            print("这条记录数据库没有 可以插入")
            self.product_col.insert_one(
                {"sku": item["sku"], "img": item["image"], "name": item["name"], "price": item["price"], "marketprice": item["marketprice"], "des": item["des"],
                 "addtime": item["current_time"], "product_url": item["product_url"], "v_specials_last_modified": "",
                 "v_products_weight": "0", "v_last_modified": "", "v_date_added": "", "v_products_quantity": "1000",
                 "v_manufacturers_name": "1000", "v_categories_name_1": item["v_categories_name_1"],
                 "v_categories_name_2": item["v_categories_name_2"], "v_categories_name_3": item["v_categories_name_3"],
                 "v_categories_name_4": item["v_categories_name_4"], "v_categories_name_5": item["v_categories_name_5"],
                 "v_categories_name_6": item["v_categories_name_6"], "v_categories_name_7": item["v_categories_name_7"],
                 "v_tax_class_title": "Taxable Goods", "v_status": "1", "v_metatags_products_name_status": "0",
                 "v_metatags_title_status": "0", "v_metatags_model_status": "0", "v_metatags_price_status": "0",
                 "v_metatags_title_tagline_status": "0", "v_metatags_title_1": "", "v_metatags_keywords_1": "",
                 "v_metatags_description_1": "", "product_shop": item["shop"]})
            print("数据插入mongo数据库成功")
            print("---------------------------------------")
            # time.sleep(2)
        if (mongoExistFlag == 1):
            print("该字段已在数据库中有记录")
            print("该页面是产品,准备存进磁盘")
            print("------------------------------------------")
            # time.sleep(2)
        return item

class DownloadImagePipeline(ImagesPipeline):
    def get_media_requests(self, item, info):  # 下载图片
        print("进入图片的 get_media_requests")
        print(item["image_urls"])
        for image_url in item['image_urls']:
            yield Request(image_url, meta={'item': item, 'index': item['image_urls'].index(image_url)})

    def file_path(self, request, response=None, info=None):
        print("下载图片")
        item = request.meta['item']  # 通过上面的meta传递过来item
        index = request.meta['index']
        # print(item)
        # print(index)
        image_name = item["sku"]+"_"+str(index)+".jpg"
        print("-----------------------------------")
        print("image_name:"+str(image_name))
        print("-----------------------------------")
        time.sleep(1)
        down_image_name = u'full/{0}/{1}'.format(item["sku"], image_name)
        print("----------------------------------")
        print("down_image_name:"+str(down_image_name))
        print("----------------------------------")
        time.sleep(1)
        return down_image_name

class DownloadFilePipeline(FilesPipeline):
    def get_media_requests(self, item, info):
        for file_url in item['file_urls']:
            yield Request(file_url, meta={'item': item, 'index': item['file_urls'].index(file_url)})

    def file_path(self, request, response=None, info=None):
        print("下载文件")
        item = request.meta['item']  # 通过上面的meta传递过来item
        # index = request.meta['index']
        file_name = item["sku"]+".html"
        print("-----------------------------------")
        print("file_name:"+str(file_name))
        print("-----------------------------------")
        time.sleep(1)
        down_file_name = u'full/{0}/{1}'.format(item["sku"], file_name)
        print("----------------------------------")
        print("down_file_name:"+str(down_file_name))
        print("----------------------------------")
        time.sleep(1)
        return down_file_name
第四步:有时候我们如果用自己的ip地址,不断访问,可能最后会被禁止访问,那咋办呢,使用代理呀,这个文件我们在middleware文件编写一个类
class TouspiderProxyIPLoadMiddleware(object):
    def __init__(self):
        self.proxy = ""
        self.expire_datetime = datetime.datetime.now() - datetime.timedelta(minutes=1)
        # self._get_proxyip()

    def _get_proxyip(self):
        f = open("proxy.txt")
        proxys = f.read().split("\n")
        p = random.sample(proxys, 1)[0]
        print("proxy:", p)
        self.proxy = p
        self.expire_datetime = datetime.datetime.now() + datetime.timedelta(minutes=1)

    def _check_expire(self):
        if datetime.datetime.now() >= self.expire_datetime:
            self._get_proxyip()
            print("切换ip")

    def process_request(self, spider, request):
        self._check_expire()
        request.meta['proxy'] = "http://" + self.proxy
最后一步当然是去setting里面注册啦,注册代理,注册mongo,注册文件以及图片的自定义:
DOWNLOADER_MIDDLEWARES = {
   # 'tous.middlewares.TousDownloaderMiddleware': 543,
    'tous.middlewares.TouspiderProxyIPLoadMiddleware':543,
}

ITEM_PIPELINES = {
   # 'tous.pipelines.TousPipeline': 300,
    'tous.pipelines.MongoDBPipeline':1,
    'tous.pipelines.DownloadFilePipeline':2,
    'tous.pipelines.DownloadImagePipeline':3,
}
FILES_STORE = 'files'
IMAGES_STORE = "images"
MONGODB_SERVER = '数据库地址'
MONGODB_PORT = 27017
# 设置数据库名称
MONGODB_DB = 'product'
# 存放本数据的表名称
MONGODB_COLLECTION = 'product'
然后最后再更改一下这两个东西即可:请求头 和 ROBOTSTXT_OBEY 改为false
ROBOTSTXT_OBEY = False


DEFAULT_REQUEST_HEADERS = {
  'Accept': 'text/html,application/xhtml+xml,application/xml;q=0.9,*/*;q=0.8',
  'Accept-Language': 'en',
  'User-Agent':'Mozilla/5.0 (Windows NT 10.0; Win64; x64) AppleWebKit/537.36 (KHTML, like Gecko) Chrome/71.0.3578.98 Safari/537.36',
  'Reference':'https://www.tous.com/us-en/jewelry',
}
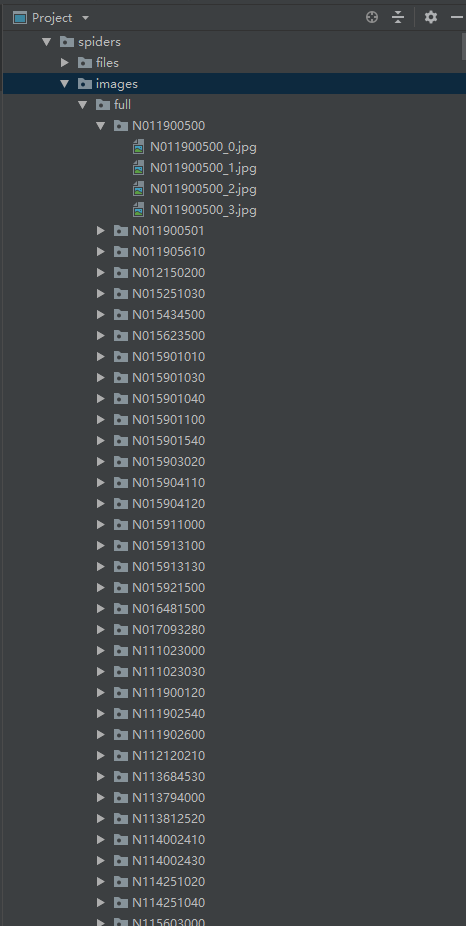
然后我们 scrapy crawl tou 就可以爬了 以下是下载好的图片以及文件 存放格式

这时候等你运行完之后,图片和文件都下好啦,这时候excel要怎么弄呢?
有两种方法:第一种我们直接在运行的时候带参数,第二种使用python带的库。
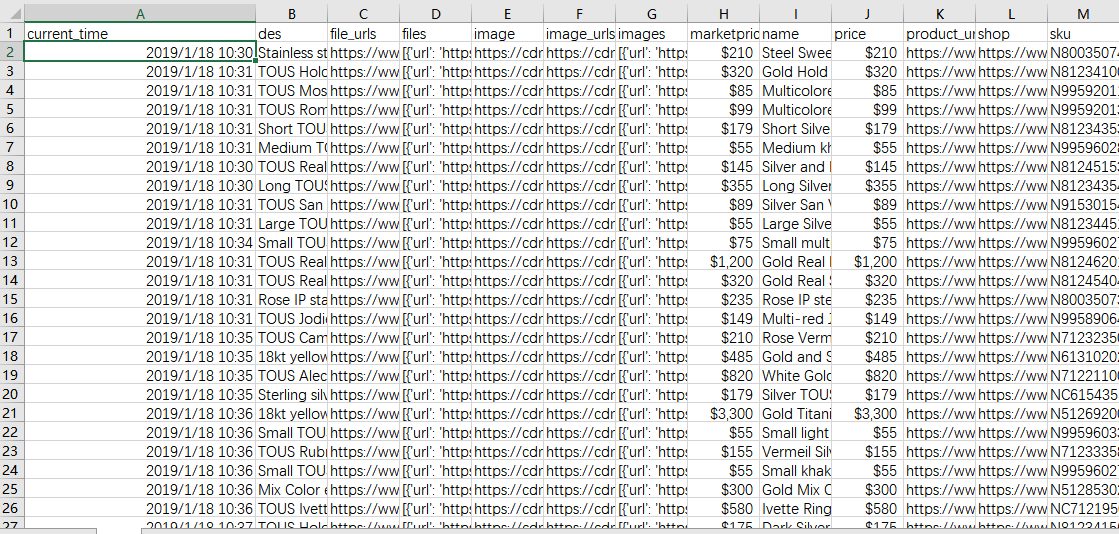
第一种:运行的时候带参数,这边生成的都是item类里面定义好的字段。
scrapy crawl tou -o tou.csv
以下是部分excel截图
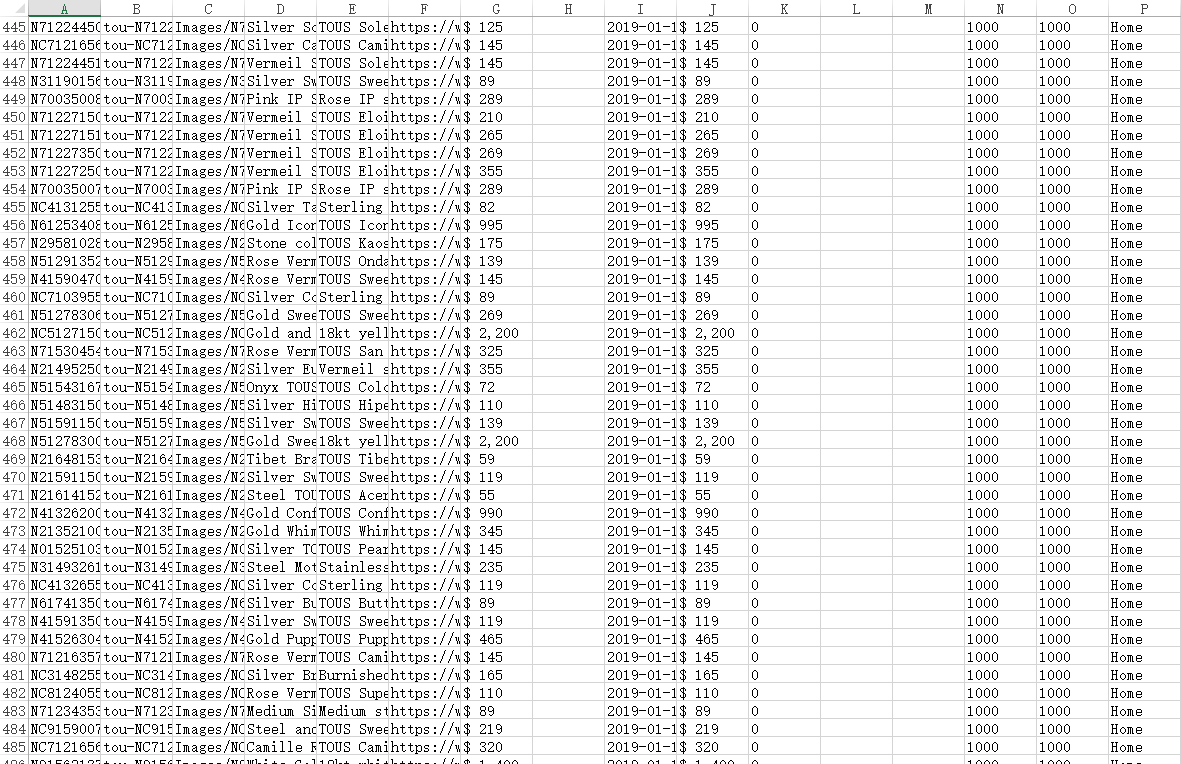
第二种,比较推荐使用,我们可以自定义一些字段,我们使用这个库openpyxl,将mongo数据库里面的数据读出导成excel
from openpyxl import Workbook
这边就不做介绍啦 相对简单 以下是运行完excel的部分截图
以上就是一个爬虫的完整过程啦!
scrapy+redis
大家都知道scrapy是python主流的爬虫框架,单单使用scrapy框架,还不能快速爬虫做到分布式,所以呢,要怎么做呢?这边我简单介绍一下!
虽然scrapy能做的事情很多,但是要做到大规模的分布式应用则捉襟见肘。我么可以scrapy的队列调度,将起始的网址从start_urls里分离出来,改为从redis读取,多个客户端可以同时读取同一个redis,从而实现了分布式的爬虫。
我们先说一下大概分布式的一个思路:
比如我们有十台机子:那其中的一台作为Master端(核心服务器),其余九台作为Slaver端(爬虫程序执行端) 。
Master端(核心服务器) :搭建一个Redis数据库,不负责爬取,只负责url指纹判重、Request的分配,以及数据的存储
Slaver端(爬虫程序执行端) :负责执行爬虫程序,运行过程中提交新的Request给Master
(其实以上过程就是想socket通讯,server端有完整的全站的地址,server负责给client端分发数据,client进行点击并将结果返回给server,sever进行相应的查重)
实现过程:
首先Slaver端从Master端拿任务(Request、url)进行数据抓取,Slaver抓取数据的同时,产生新任务的Request便提交给 Master 处理;
Master端只有一个Redis数据库,负责将未处理的Request去重和任务分配,将处理后的Request加入待爬队列,并且存储爬取的数据。
scrapy-redis默认使用的就是这种策略,我们实现起来很简单,因为任务调度等工作scrapy-redis都已经帮我们做好了,我们只需要继承RedisCrawlSpider、指定redis_key就行了。
怎么样,应该很好理解吧,这边下面我们开始!
第一步:肯定是要安装scrapy-redis
pip install scrapy-redis
第二步:导入scrapy-redis,集成RedisCrawlSpider
from scrapy_redis.spiders import RedisCrawlSpider
第三步:指定redis_key
redis_key = 'tou:start_urls'
RedisCrawlSpider类 不需要写start_urls
必须指定redis_key,即启动爬虫的命令,参考格式:redis_key = '类名:start_urls'
根据指定的格式,start_urls将在 Master端的 redis-cli 里 lpush 到 Redis数据库里,RedisSpider 将在数据库里获取start_urls。
第四步:然后要去setting文件夹配置一下我们的redis
# 过滤器
DUPEFILTER_CLASS = "scrapy_redis.dupefilter.RFPDupeFilter"
# 调度器
SCHEDULER = "scrapy_redis.scheduler.Scheduler"
# 调度状态持久化
SCHEDULER_PERSIST = True
# 请求调度使用优先队列
SCHEDULER_QUEUE_CLASS = 'scrapy_redis.queue.SpiderPriorityQueue'
REDIS_ENCODING = "utf-8"
REDIS_HOST='ip地址'
REDIS_PORT=6379
REDIS_PARAMS = {'password':'redis数据库密码'}
第五步:在ITEM_PIPELINES注册一下我们的redis数据库
'scrapy_redis.pipelines.RedisPipeline': 4,
然后我们运行scrapy crawl tou 发现爬虫们处于等待时刻
然后在Master端的redis-cli输入push指令,

然后分布式爬虫就这么愉快的开始啦!这边是一个运行过程的截图,我的master是win10端,Slaver端是linux
slave服务器处于等待状态,当右边的主服务push一个url入口,左边的两个便有一个获取到这个链接的request,然后返回更多的request到请求队列中,然后slave服务器便开始从队列获取请求开始爬了。

redis保存数据如图所示:

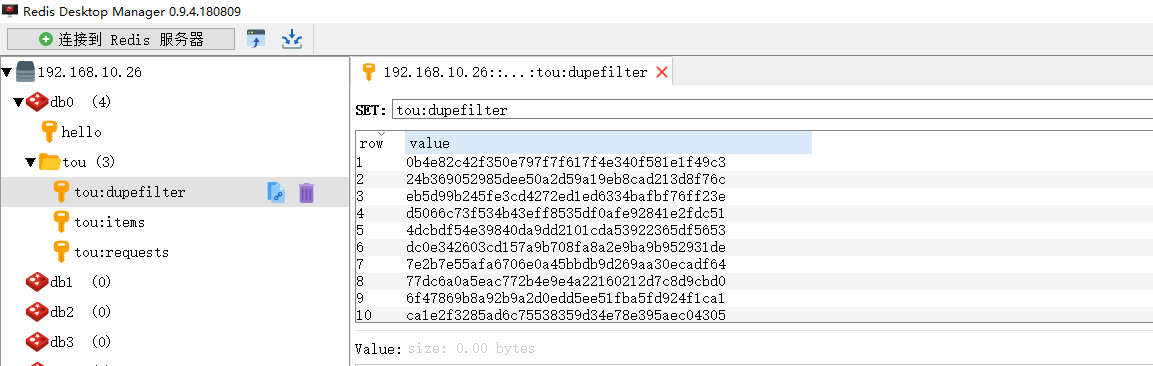
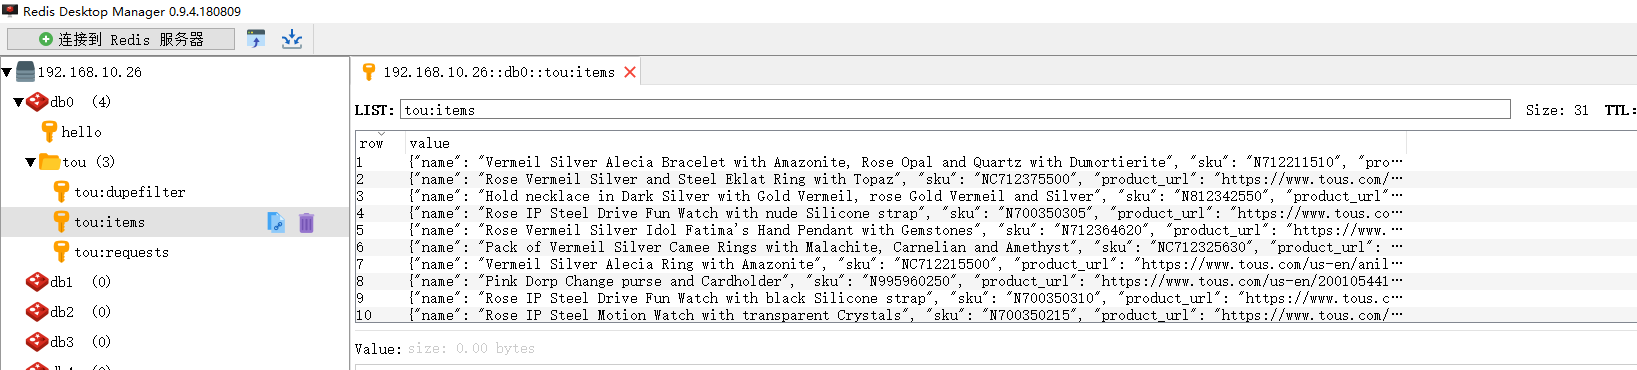
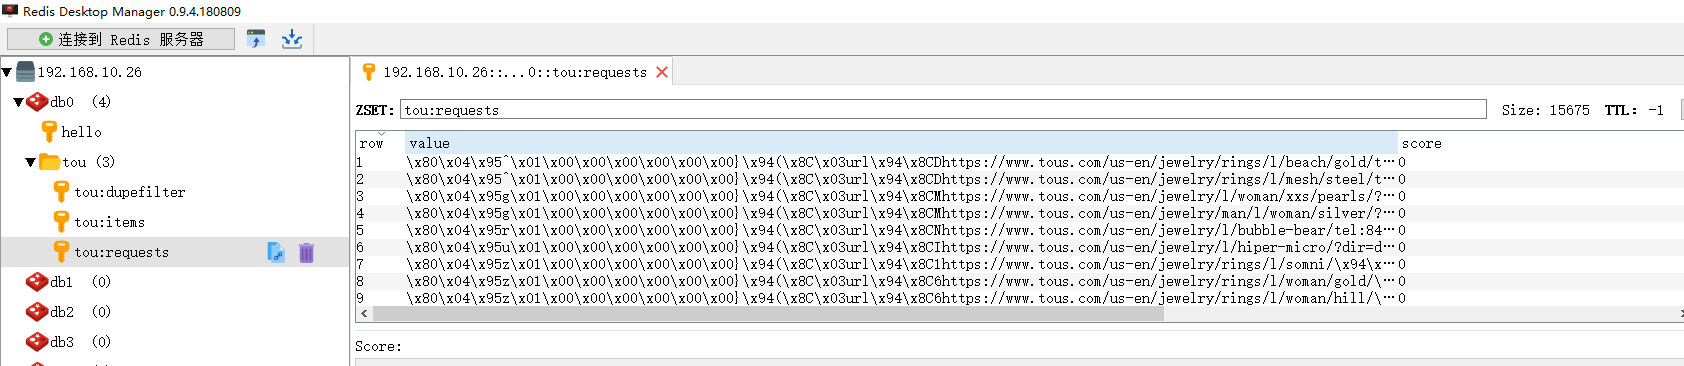
这个就是一个分布式的爬虫过程的一个展示!速度确实上去不少!

 浙公网安备 33010602011771号