MybaitsPlus
MyBatis Plus
第 1 章 简介
1.1 MyBatisPlus 介绍

MyBatis-Plus(**简称 MP),是一个 MyBatis 的增强工具包,只做增强不做改变. 发工作、提高生产率而生。
我们的愿景是成为 Mybatis 最好的搭档,就像 魂斗罗 中的 1P、2P,基友搭配,效率翻倍。
1.2 代码及文档发布地址
官方地址: http://mp.baomidou.com
代码发布地址:
Github: https://github.com/baomidou/mybatis-plus Gitee: https://gitee.com/baomidou/mybatis-plus
文档发布地址:
http://mp.baomidou.com/#/?id=%E7%AE%80%E4%BB%8B
1.3 前置知识
Mybatis Spring Maven
第 2 章 集成 MP
2.1 创建测试表
-- 创建库
CREATE DATABASE mp;
-- 使用库
USE mp;
-- 创建表
CREATE TABLE tbl_employee(
    id INT(11) PRIMARY KEY AUTO_INCREMENT,
    last_name VARCHAR(50), email VARCHAR(50),
    gender CHAR(1), age int
);

INSERT INTO tbl_employee(last_name,email,gender,age) VALUES('Tom','tom@atguigu.com',1,22); INSERT INTO tbl_employee(last_name,email,gender,age) VALUES('Jerry','jerry@atguigu.com',0,25); INSERT INTO tbl_employee(last_name,email,gender,age) VALUES('Black','black@atguigu.com',1,30); INSERT INTO tbl_employee(last_name,email,gender,age) VALUES('White','white@atguigu.com',0,35);
2.2 创建 javaBean


public class Employee {

    private Integer id ;   //  int
    private String  lastName;
    private String  email ;
    private Integer gender;
    private Integer age ;
    private Double salary ;

    public Double getSalary() {
        return salary;
    }
    public void setSalary(Double salary) {
        this.salary = salary;
    }
    public Integer getId() {
        return id;
    }
    public void setId(Integer id) {
        this.id = id;
    }
    public String getLastName() {
        return lastName;
    }
    public void setLastName(String lastName) {
        this.lastName = lastName;
    }
    public String getEmail() {
        return email;
    }
    public void setEmail(String email) {
        this.email = email;
    }
    public Integer getGender() {
        return gender;
    }
    public void setGender(Integer gender) {
        this.gender = gender;
    }
    public Integer getAge() {
        return age;
    }
    public void setAge(Integer age) {
        this.age = age;
    }
    @Override
    public String toString() {
        return "Employee [id=" + id + ", lastName=" + lastName + ", email=" + email + ", gender=" + gender + ", age="
                + age + "]";
    }

}
2.3 依赖配置
- 在 pom.xml 中加入对 MP、Spring、连接池、Junit、Mysql 驱动等依赖
<project xmlns="http://maven.apache.org/POM/4.0.0" xmlns:xsi="http://www.w3.org/2001/XMLSchema-instance" xsi:schemaLocation="http://maven.apache.org/POM/4.0.0 http://maven.apache.org/xsd/maven-4.0.0.xsd">
  <modelVersion>4.0.0</modelVersion>
  <groupId>com.atguigu.mp</groupId>
  <artifactId>mp01</artifactId>
  <version>0.0.1-SNAPSHOT</version>

  <dependencies>
          <!-- mp依赖
               mybatisPlus 会自动的维护Mybatis 以及MyBatis-spring相关的依赖
           -->
        <dependency>
            <groupId>com.baomidou</groupId>
            <artifactId>mybatis-plus</artifactId>
            <version>2.3</version>
        </dependency>
        <!--junit -->
        <dependency>
            <groupId>junit</groupId>
            <artifactId>junit</artifactId>
            <version>4.9</version>
        </dependency>
        <!-- log4j -->
        <dependency>
            <groupId>log4j</groupId>
            <artifactId>log4j</artifactId>
            <version>1.2.17</version>
        </dependency>
        <!-- c3p0 -->
        <dependency>
            <groupId>com.mchange</groupId>
            <artifactId>c3p0</artifactId>
            <version>0.9.5.2</version>
        </dependency>
        <!-- mysql -->
        <dependency>
            <groupId>mysql</groupId>
            <artifactId>mysql-connector-java</artifactId>
            <version>5.1.37</version>
        </dependency>
        <!-- spring -->
        <dependency>
            <groupId>org.springframework</groupId>
            <artifactId>spring-context</artifactId>
            <version>4.3.10.RELEASE</version>
        </dependency>
        <dependency>
            <groupId>org.springframework</groupId>
            <artifactId>spring-orm</artifactId>
            <version>4.3.10.RELEASE</version>
        </dependency>
  </dependencies>

</project>
特别说明: Mybatis 及 Mybatis-Spring 依赖请勿加入项目配置,以免引起版本冲突!!!
Mybatis-Plus 会自动帮你维护!
- 加入 MyBatis 的全局配置文件mybatis-config.xml
<?xml version="1.0" encoding="UTF-8" ?>
<!DOCTYPE configuration
PUBLIC "-//mybatis.org//DTD Config 3.0//EN"
"http://mybatis.org/dtd/mybatis-3-config.dtd">
<configuration>

</configuration>
- 加入 log4j.xml
<?xml version="1.0" encoding="UTF-8" ?>
<!DOCTYPE log4j:configuration SYSTEM "log4j.dtd">

<log4j:configuration xmlns:log4j="http://jakarta.apache.org/log4j/">

 <appender name="STDOUT" class="org.apache.log4j.ConsoleAppender">
   <param name="Encoding" value="UTF-8" />
   <layout class="org.apache.log4j.PatternLayout">
    <param name="ConversionPattern" value="%-5p %d{MM-dd HH:mm:ss,SSS} %m  (%F:%L) \n" />
   </layout>
 </appender>
 <logger name="java.sql">
   <level value="debug" />
 </logger>
 <logger name="org.apache.ibatis">
   <level value="info" />
 </logger>
 <root>
   <level value="debug" />
   <appender-ref ref="STDOUT" />
 </root>
</log4j:configuration>
- 加入 db.properties 连接信息配置
jdbc.driver=com.mysql.jdbc.Driver
jdbc.url=jdbc:mysql://localhost:3306/mp
jdbc.username=root
jdbc.password=1234
- 加入 spring 的配置文件 applicationContext.xml
<?xml version="1.0" encoding="UTF-8"?>
<beans xmlns="http://www.springframework.org/schema/beans"
    xmlns:xsi="http://www.w3.org/2001/XMLSchema-instance"
    xmlns:context="http://www.springframework.org/schema/context"
    xmlns:tx="http://www.springframework.org/schema/tx"
    xmlns:mybatis-spring="http://mybatis.org/schema/mybatis-spring"
    xsi:schemaLocation="http://mybatis.org/schema/mybatis-spring http://mybatis.org/schema/mybatis-spring-1.2.xsd
        http://www.springframework.org/schema/beans http://www.springframework.org/schema/beans/spring-beans.xsd
        http://www.springframework.org/schema/context http://www.springframework.org/schema/context/spring-context-4.0.xsd
        http://www.springframework.org/schema/tx http://www.springframework.org/schema/tx/spring-tx-4.0.xsd">


    <!-- 数据源 -->
    <context:property-placeholder location="classpath:db.properties"/>
    <bean id="dataSource" class="com.mchange.v2.c3p0.ComboPooledDataSource">
        <property name="driverClass" value="${jdbc.driver}"></property>
        <property name="jdbcUrl" value="${jdbc.url}"></property>
        <property name="user" value="${jdbc.username}"></property>
        <property name="password" value="${jdbc.password}"></property>
    </bean>

    <!-- 事务管理器 -->
    <bean id="dataSourceTransactionManager"
        class="org.springframework.jdbc.datasource.DataSourceTransactionManager">
        <property name="dataSource" ref="dataSource"></property>
    </bean>
    <!-- 基于注解的事务管理 -->
    <tx:annotation-driven transaction-manager="dataSourceTransactionManager"/>


    <!--  配置SqlSessionFactoryBean
        Mybatis提供的: org.mybatis.spring.SqlSessionFactoryBean
        MP提供的:com.baomidou.mybatisplus.spring.MybatisSqlSessionFactoryBean
     -->
    <bean id="sqlSessionFactoryBean" class="com.baomidou.mybatisplus.spring.MybatisSqlSessionFactoryBean">
        <!-- 数据源 -->
        <property name="dataSource" ref="dataSource"></property>
        <property name="configLocation" value="classpath:mybatis-config.xml"></property>
        <!-- 别名处理 -->
        <property name="typeAliasesPackage" value="com.atguigu.mp.beans"></property>

        <!-- 注入全局MP策略配置 -->
        <property name="globalConfig" ref="globalConfiguration"></property>
    </bean>

    <!-- 定义MybatisPlus的全局策略配置-->
    <bean id ="globalConfiguration" class="com.baomidou.mybatisplus.entity.GlobalConfiguration">
        <!-- 在2.3版本以后,dbColumnUnderline 默认值就是true -->
        <property name="dbColumnUnderline" value="true"></property>

        <!-- 全局的主键策略 -->
        <property name="idType" value="0"></property>

        <!-- 全局的表前缀策略配置 -->
        <property name="tablePrefix" value="tbl_"></property>

    </bean>

    <!--
        配置mybatis 扫描mapper接口的路径
     -->
    <bean class="org.mybatis.spring.mapper.MapperScannerConfigurer">
        <property name="basePackage" value="com.atguigu.mp.mapper"></property>
    </bean>


</beans>
2.4 测试
测试 Spring-Mybatis 的环境,保证 OK。
public class TestMP {
    private ApplicationContext ioc =
                new ClassPathXmlApplicationContext("applicationContext.xml");

    @Test
    public void testDataSource() throws Exception {
        DataSource ds  = ioc.getBean("dataSource",DataSource.class);
        System.out.println(ds);
        Connection conn = ds.getConnection();
        System.out.println(conn);
    }
2.5 集成 MP
- Mybatis-Plus 的集成非常简单, 对于 Spring , 我们仅仅需要把 Mybatis 自带的
SqlSessionFactoryBean替换为 MP 的MybatisSqlSessionFactoryBean即可。
<!--  配置SqlSessionFactoryBean
        Mybatis提供的: org.mybatis.spring.SqlSessionFactoryBean
        MP提供的:com.baomidou.mybatisplus.spring.MybatisSqlSessionFactoryBean
     -->
    <bean id="sqlSessionFactoryBean" class="com.baomidou.mybatisplus.spring.MybatisSqlSessionFactoryBean">
        <!-- 数据源 -->
        <property name="dataSource" ref="dataSource"></property>
        <property name="configLocation" value="classpath:mybatis-config.xml"></property>
        <!-- 别名处理 -->
        <property name="typeAliasesPackage" value="com.atguigu.mp.beans"></property>
    </bean>
第 3 章 入门 HelloWorld
3.1 通用 CRUD
- 提出问题:
假设我们已存在一张 tbl_employee 表, 且已有对应的实体类 Employee , 实现tbl_employee 表的 CRUD 操作我们需要做什么呢?
- 实现方式:
基于 Mybatis
需要编写 EmployeeMapper 接口,并手动编写 CRUD 方法
提供 EmployeeMapper.xml 映射文件,并手动编写每个方法对应的 SQL 语句. 基于 MP
只需要创建 EmployeeMapper 接口, 并继承 BaseMapper 接口.这就是使用 MP
需要完成的所有操作,甚至不需要创建 SQL 映射文件。
3.2 插入操作
-
Integer insert(T entity);
-
@TableName
-
全局的 MP 配置: <property name="tablePrefix" value="tbl_"></property>
-
@TableField
-
全局的 MP 配置: <property name="dbColumnUnderline" value="true"></property>
-
@TableId
-
全局的 MP 配置: <property name="idType" value="0"></property>
- 支持主键自增的数据库插入数据获取主键值
Mybatis: 需要通过 useGeneratedKeys 以及 keyProperty 来设置
MP: 自动将主键值回写到实体类中
- Integer insertAllColumn(T entity)
3.3 更新操作
-
Integer updateById(@Param("et") T entity);
-
Integer updateAllColumnById(@Param("et") T entity)
3.4 查询操作
-
T selectById(Serializable id);
-
T selectOne(@Param("ew") T entity);
-
List selectBatchIds(List<? extends Serializable> idList);
-
List selectByMap(@Param("cm") Map<String, Object> columnMap);
-
List selectPage(RowBounds rowBounds, @Param("ew") Wrapper wrapper);
3.5 删除操作
-
Integer deleteById(Serializable id);
-
Integer deleteByMap(@Param("cm") Map<String, Object> columnMap);
-
Integer deleteBatchIds(List<? extends Serializable> idList);
3.6 MP 启动注入 SQL 原理分析
- 问题: xxxMapper 继承了 BaseMapper, BaseMapper 中提供了通用的 CRUD 方法, 方法来源于 BaseMapper, 有方法就必须有 SQL, 因为 MyBatis 最终还是需要通过SQL 语句操作数据.
前置知识:MyBatis 源码中比较重要的一些对象, MyBatis 框架的执行流程
Configuration
MappedStatement
……..
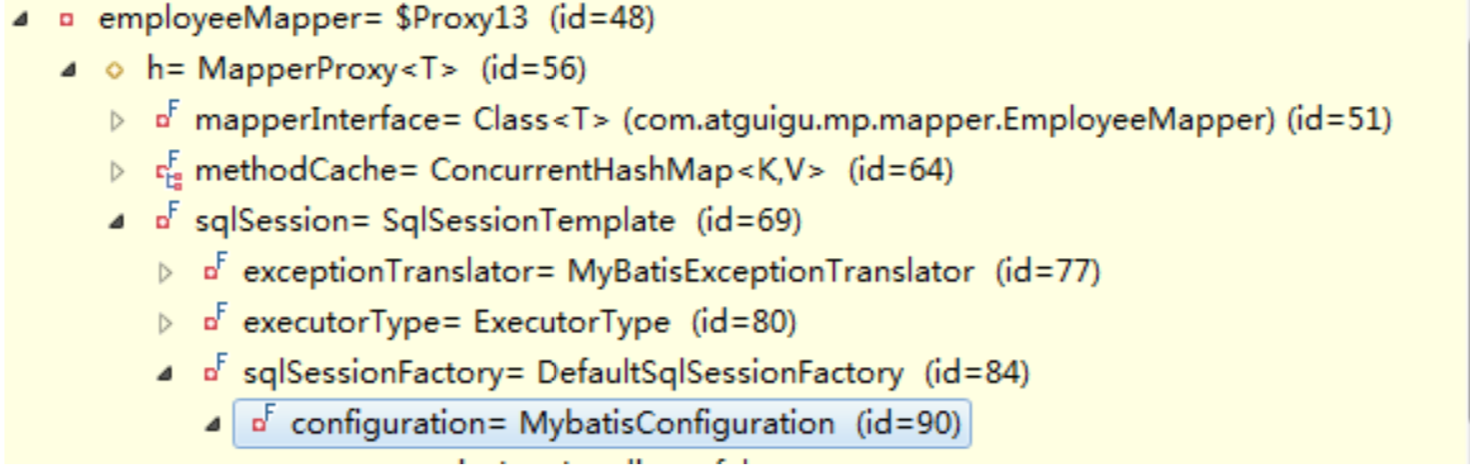
- 通过现象看到本质
A. employeeMapper 的本质 org.apache.ibatis.binding.MapperProxy
B. MapperProxy 中 sqlSession –>SqlSessionFactory

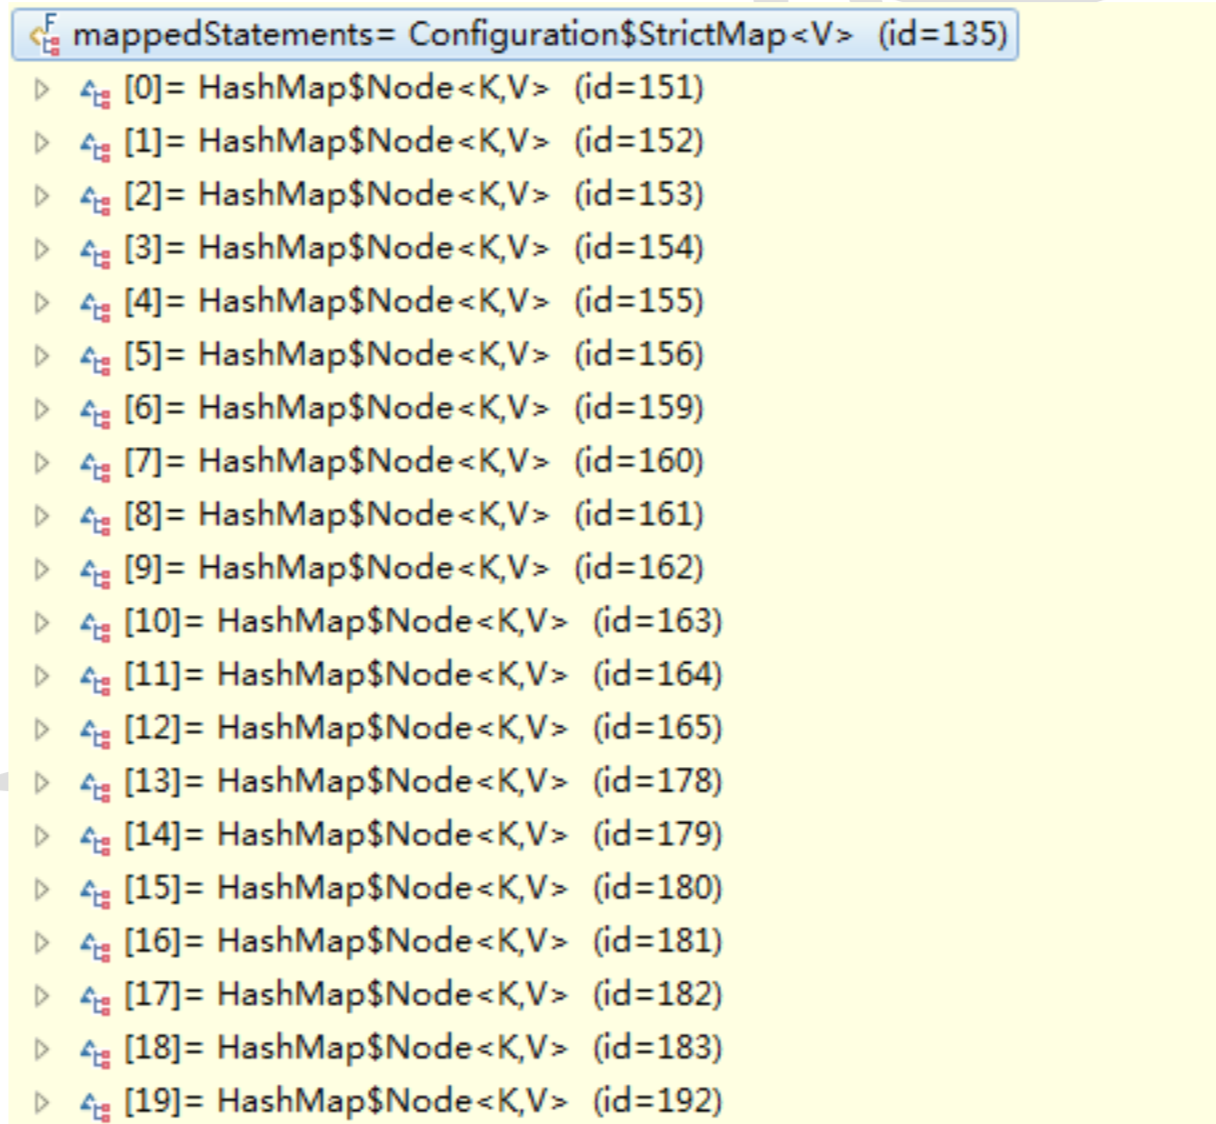
C. SqlSessionFacotry 中 → Configuration→ MappedStatements
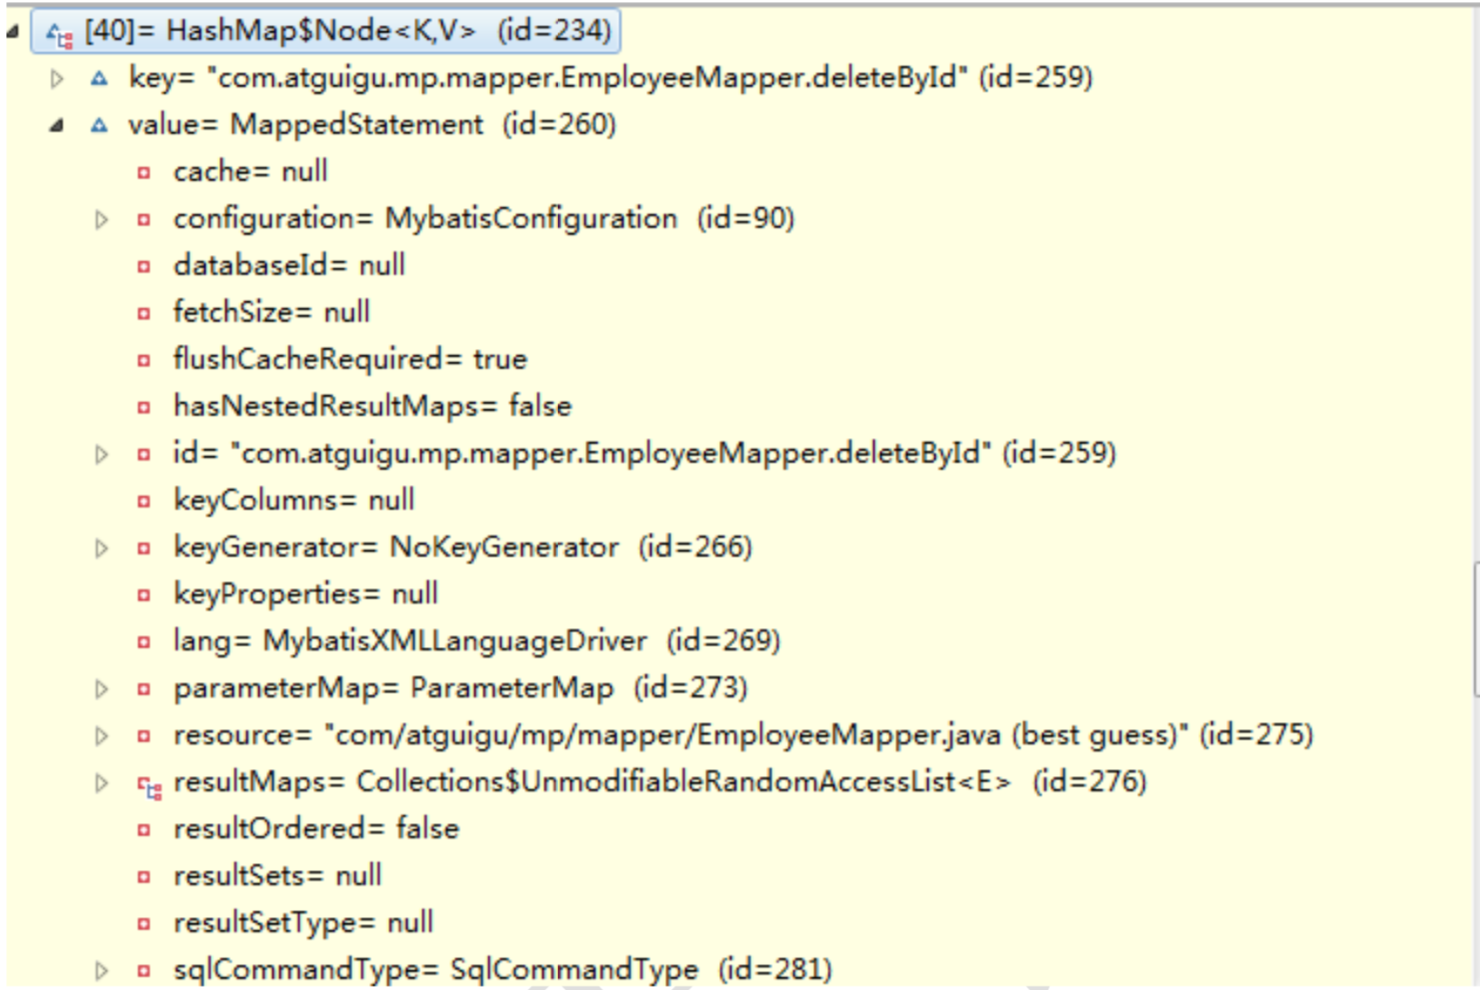
每一个 mappedStatement 都表示 Mapper 接口中的一个方法与 Mapper 映射文件中的一个 SQL。
MP 在启动就会挨个分析 xxxMapper 中的方法,并且将对应的 SQL 语句处理好,保存到 configuration 对象中的 mappedStatements 中.
D. 本质:

Configuration: MyBatis 或者 MP 全局配置对象
MappedStatement:一个 MappedStatement 对象对应 Mapper 配置文件中的一个
select/update/insert/delete 节点,主要描述的是一条 SQL 语句
SqlMethod : 枚举对象 ,MP 支持的 SQL 方法
TableInfo:数据库表反射信息 ,可以获取到数据库表相关的信息
SqlSource: SQL 语句处理对象
MapperBuilderAssistant: 用于缓存、SQL 参数、查询方剂结果集处理等.
通过 MapperBuilderAssistant 将每一个 mappedStatement
添加到 configuration 中的 mappedstatements 中
3.7 通用 CRUD 小结
-
以上是基本的 CRUD 操作,如您所见,我们仅仅需要继承一个 BaseMapper 即可实现大部分单表 CRUD 操作。BaseMapper 提供了多达 17 个方法给大家使用, 可以极其方便的实现单一、批量、分页等操作。极大的减少开发负担,难道这就是 MP 的强大之处了吗?
-
提出需求:
现有一个需求,我们需要分页查询 tbl_employee 表中,年龄在 18~50 之间性别为男且姓名为 xx 的所有用户,这时候我们该如何实现上述需求呢?
MyBatis : 需要在 SQL 映射文件中编写带条件查询的 SQL,并基于 PageHelper 插件完成分页. 实现以上一个简单的需求,往往需要我们做很多重复单调的工作。普通的 Mapper 能够解决这类痛点吗?
MP: 依旧不用编写 SQL 语句, MP 提供了功能强大的条件构造器 EntityWrapper
第 4 章 条件构造器 EntityWrapper
4.1 EntityWrapper 简介
-
Mybatis-Plus 通过 EntityWrapper(简称 EW,MP 封装的一个查询条件构造器)或者Condition(与 EW 类似) 来让用户自由的构建查询条件,简单便捷,没有额外的负担, 能够有效提高开发效率
-
实体包装器,主要用于处理 sql 拼接,排序,实体参数查询等
3) 注意: 使用的是数据库字段,不是 Java 属性!
- 条件参数说明:
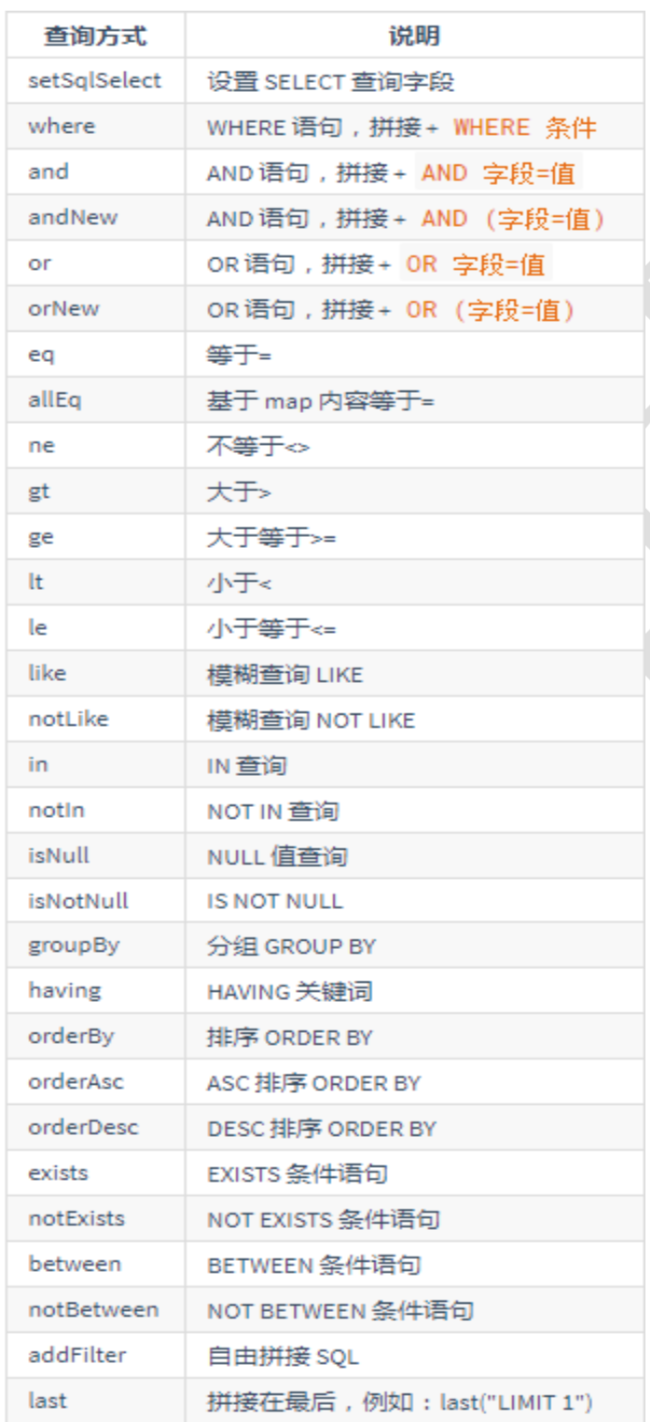
4.2 使用 EntityWrapper 的方式
List<Employee>  userList  =  employeeMapper.selectPage(
    new Page<Employee>(2, 3),
    new  EntityWrapper<Employee>().eq("last_name","MybatisPlus")
);
4.3 带条件的查询
- List selectList(@Param("ew") Wrapper wrapper);
4.4 带条件的修改
- Integer update(@Param("et") T entity, @Param("ew") Wrapper wrapper);
4.5 带条件的删除
- Integer delete(@Param("ew") Wrapper wrapper);
4.6 使用 Condition 的方式
List<Employee>  userListCondition  =  employeeMapper.selectPage(
        new Page<Employee>(2,3),
      Condition.create(). eq("gender",  1). eq("last_name",  "MyBatisPlus"). between("age", 18, 50));
4.7 小结
MP: EntityWrapper Condition 条件构造器
MyBatis MBG : xxxExample→Criteria : QBC( Query By Criteria)
Hibernate 、 通用 Mapper
第 5 章:ActiveRecord(活动记录)
Active Record(活动记录),是一种领域模型模式,特点是一个模型类对应关系型数据库中的一个表,而模型类的一个实例对应表中的一行记录。
ActiveRecord 一直广受动态语言( PHP 、 Ruby 等)的喜爱,而 Java 作为准静态语言, 对于 ActiveRecord 往往只能感叹其优雅,所以 MP 也在 AR 道路上进行了一定的探索
5.1 如何使用 AR 模式
- 仅仅需要让实体类继承 Model 类且实现主键指定方法,即可开启 AR 之旅.
@TableName("tbl_employee")
public class Employee    extends Model<Employee>{
    // .. fields
    //  ..  getter  and  setter

    @Override
    protected  Serializable  pkVal()  {
        return this.id;
    }
}
5.2 AR 基本 CRUD
- 插入操作 public boolean insert()
- 修改操作 public boolean updateById()
- 查询操作
public T selectById()

public T selectById(Serializable id) public List<T> selectAll()

public List<T> selectList(Wrapper wrapper) public int selectCount(Wrapper wrapper)
- 删除操作
public boolean deleteById()

public boolean deleteById(Serializable id) public boolean delete(Wrapper wrapper)
- 分页复杂操作 public Page<T> selectPage(Page<T> page, Wrapper<T> wrapper)
5.3 AR 小结
- AR 模式提供了一种更加便捷的方式实现 CRUD 操作,其本质还是调用的 Mybatis 对应的方法,类似于语法糖
语法糖是指计算机语言中添加的某种语法,这种语法对原本语言的功能并没有影响. 可以更方便开发者使用,可以避免出错的机会,让程序可读性更好.
- 到此,我们简单领略了 Mybatis-Plus 的魅力与高效率,值得注意的一点是:我们提供了强大的代码生成器,可以快速生成各类代码,真正的做到了即开即用
第 6 章:代码生成器
-
MP 提供了大量的自定义设置,生成的代码完全能够满足各类型的需求
-
MP 的代码生成器 和 Mybatis MBG 代 码 生 成 器 : MP 的代码生成器都是基于 java 代码来生成。MBG 基于 xml 文件进行代码生成MyBatis 的代码生成器可生成: 实体类、Mapper 接口、Mapper 映射文件
MP 的代码生成器可生成: 实体类(可以选择是否支持 AR)、Mapper 接口、Mapper 映射文件、 Service 层、Controller 层.
-
表及字段命名策略选择
在 MP 中,我们建议数据库表名 和 表字段名采用驼峰命名方式, 如果采用下划线命名方式 请开启全局下划线开关,如果表名字段名命名方式不一致请注解指定,我们建议最好保持一致。
这么做的原因是为了避免在对应实体类时产生的性能损耗,这样字段不用做映射就能直接和实体类对应。当然如果项目里不用考虑这点性能损耗,那么你采用下滑线也是没问题的,只需要在生成代码时配置 dbColumnUnderline 属性就可以
6.1 代码生成器依赖
- 模板引擎
MP 的代码生成器默认使用的是 Apache 的 Velocity 模板,当然也可以更换为别的模板技术,例如 freemarker。此处不做过多的介绍。需要加入 Apache Velocity 的依赖
<!-- Apache velocity -->
<dependency>
    <groupId>org.apache.velocity</groupId>
    <artifactId>velocity-engine-core</artifactId>
    <version>2.0</version>
</dependency
- 加入 slf4j ,查看日志输出信息
<!-- sfl4j -->
<dependency>
    <groupId>org.slf4j</groupId>
    <artifactId>slf4j-api</artifactId>
    <version>1.7.7</version>
</dependency>
<dependency>
    <groupId>org.slf4j</groupId>
    <artifactId>slf4j-log4j12</artifactId>
    <version>1.7.7</version>
</dependency>
6.2 MP 代码生成器示例代码
public class TestMP {


    /**
     * 代码生成    示例代码
     */
    @Test
    public void  testGenerator() {
        //1. 全局配置
        GlobalConfig config = new GlobalConfig();
        config.setActiveRecord(true) // 是否支持AR模式
              .setAuthor("weiyunhui") // 作者
              .setOutputDir("D:\\workspace_mp\\mp03\\src\\main\\java") // 生成路径
              .setFileOverride(true)  // 文件覆盖
              .setIdType(IdType.AUTO) // 主键策略
              .setServiceName("%sService")  // 设置生成的service接口的名字的首字母是否为I
                                     // IEmployeeService
               .setBaseResultMap(true)
               .setBaseColumnList(true);

        //2. 数据源配置
        DataSourceConfig  dsConfig  = new DataSourceConfig();
        dsConfig.setDbType(DbType.MYSQL)  // 设置数据库类型
                .setDriverName("com.mysql.jdbc.Driver")
                .setUrl("jdbc:mysql://localhost:3306/mp")
                .setUsername("root")
                .setPassword("1234");

        //3. 策略配置
        StrategyConfig stConfig = new StrategyConfig();
        stConfig.setCapitalMode(true) //全局大写命名
                .setDbColumnUnderline(true)  // 指定表名 字段名是否使用下划线
                .setNaming(NamingStrategy.underline_to_camel) // 数据库表映射到实体的命名策略
                .setTablePrefix("tbl_")
                .setInclude("tbl_employee");  // 生成的表

        //4. 包名策略配置
        PackageConfig pkConfig = new PackageConfig();
        pkConfig.setParent("com.atguigu.mp")
                .setMapper("mapper")
                .setService("service")
                .setController("controller")
                .setEntity("beans")
                .setXml("mapper");

        //5. 整合配置
        AutoGenerator  ag = new AutoGenerator();

        ag.setGlobalConfig(config)
          .setDataSource(dsConfig)
          .setStrategy(stConfig)
          .setPackageInfo(pkConfig);

        //6. 执行
        ag.execute();
    }

}
6.3 ServiceImpl 说明
EmployeeServiceImpl 继承了 ServiceImpl 类,mybatis-plus 通过这种方式为我们注入了 EmployeeMapper,这样可以使用 service 层默认为我们提供的很多方法,也可以调用我们自己在 dao 层编写的操作数据库的方法.
6.4 小结
第 7 章:插件扩展
7.1 Mybatis 插件机制简介
- 插件机制:
Mybatis 通过插件(Interceptor) 可以做到拦截四大对象相关方法的执行,根据需求,完成相关数据的动态改变。
- Executor
- StatementHandler
- ParameterHandler
- ResultSetHandler
- 插件原理
四大对象的每个对象在创建时,都会执行 interceptorChain.pluginAll(),会经过每个插件对象的 plugin()方法,目的是为当前的四大对象创建代理。代理对象就可以拦截到四大对象相关方法的执行,因为要执行四大对象的方法需要经过代理.
7.2 分页插件
- com.baomidou.mybatisplus.plugins.PaginationInterceptor
7.3 执行分析插件
-
com.baomidou.mybatisplus.plugins.SqlExplainInterceptor
-
SQL 执行分析拦截器,只支持 MySQL5.6.3 以上版本
-
该插件的作用是分析 DELETE UPDATE 语句,防止小白或者恶意进行 DELETE UPDATE 全表操作
-
只建议在开发环境中使用,不建议在生产环境使用
-
在插件的底层 通过 SQL 语句分析命令:Explain 分析当前的 SQL 语句, 根据结果集中的 Extra 列来断定当前是否全表操作。
7.4 性能分析插件
-
com.baomidou.mybatisplus.plugins.PerformanceInterceptor
-
性能分析拦截器,用于输出每条 SQL 语句及其执行时间
-
SQL 性能执行分析,开发环境使用,超过指定时间,停止运行。有助于发现问题
7.5 乐观锁插件
-
com.baomidou.mybatisplus.plugins.OptimisticLockerInterceptor
-
如果想实现如下需求: 当要更新一条记录的时候,希望这条记录没有被别人更新
-
乐观锁的实现原理:
取出记录时,获取当前 version 2
更新时,带上这个 version 2
执行更新时, set version = yourVersion+1 where version = yourVersion
如果 version 不对,就更新失败
- @Version 用于注解实体字段,必须要有。
第 8 章:自定义全局操作
根据 MybatisPlus 的 AutoSqlInjector 可以自定义各种你想要的 sql ,注入到全局中,相当于自定义 Mybatisplus 自动注入的方法。
之前需要在 xml 中进行配置的 SQL 语句,现在通过扩展 AutoSqlInjector 在加载 mybatis 环境时就注入。
8.1 AutoSqlInjector
-
在 Mapper 接口中定义相关的 CRUD 方法
-
扩展 AutoSqlInjector inject 方法,实现 Mapper 接口中方法要注入的 SQL
-
在 MP 全局策略中,配置 自定义注入器
8.2 自定义注入器的应用之 逻辑删除
假删除、逻辑删除: 并不会真正的从数据库中将数据删除掉,而是将当前被删除的这条数据中的一个逻辑删除字段置为删除状态.
tbl_user logic_flag = 1 → -1
-
com.baomidou.mybatisplus.mapper.LogicSqlInjector
-
logicDeleteValue 逻辑删除全局值
-
logicNotDeleteValue 逻辑未删除全局值
-
在 POJO 的逻辑删除字段 添加 @TableLogic 注解
-
会在 mp 自带查询和更新方法的 sql 后面,追加『逻辑删除字段』=『LogicNotDeleteValue 默认值』 删除方法: deleteById()和其他 delete 方法, 底层 SQL 调用的是 update tbl_xxx set 『逻辑删除字段』=『logicDeleteValue 默认值』
第 9 章:公共字段自动填充
9.1 元数据处理器接口
com.baomidou.mybatisplus.mapper.MetaObjectHandler

insertFill(MetaObject metaObject)
updateFill(MetaObject metaObject)
metaobject: 元对象. 是 Mybatis 提供的一个用于更加方便,更加优雅的访问对象的属性, 给对象的属性设置值 的一个对象. 还会用于包装对象. 支持对 Object 、Map、Collection 等对象进行包装
本质上 metaObject 获取对象的属性值或者是给对象的属性设置值,最终是要通过 Reflector 获取到属性的对应方法的 Invoker, 最终 invoke.
9.2 开发步骤
-
注解填充字段 @TableFile(fill = FieldFill.INSERT) 查看 FieldFill
-
自定义公共字段填充处理器
-
MP 全局注入 自定义公共字段填充处理器
第 10 章 Oracle 主键 Sequence
MySQL: 支持主键自增。 IdType.Auto
Oracle: 序列(Sequence)
- 实体类配置主键 Sequence @KeySequence(value=”序列名”,clazz=xxx.class 主键属性类型)
- 全局 MP 主键生成策略为 IdType.INPUT
- 全局 MP 中配置 Oracle 主键 Sequence
com.baomidou.mybatisplus.incrementer.OracleKeyGenerator
- 可以将@keySequence 定义在父类中,可实现多个子类对应的多个表公用一个 Sequence
第 11 章 Idea 快速开发插件
MybatisX 辅助 idea 快速开发插件,为效率而生.
可以实现 java 与 xml 跳转,根据 Mapper 接口中的方法自动生成 xml 结构.
官方安装: File -> Settings -> Plugins -> Browse Repositories.. 输入 mybatisx 安装下载
Jar 安装: File -> Settings -> Plugins -> Install plugin from disk.. 选中 mybatisx..jar 安装

 浙公网安备 33010602011771号