

自搭建jetbrains系列ide授权服务器
1、下载 LicenseServer
地址:https://mega.nz/#!7B5UVY6b!Hae2ceTBPIrTowQN0sV9fQ5lGOKzGxas2ug02RZAdGU,里面有不同的服务器对应的文件。
2、配置
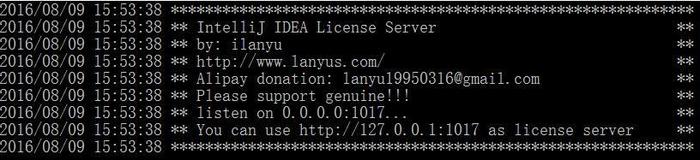
找一个合适的文件夹,放进去。可重命名为其他名称。防火墙端口要放开,我的是1017端口,具体端口可先运行一下看看是什么端口。成功如下图:
chmod +x IdeaServer
IdeaServer -p 1024 -prolongationPeriod 999999999999
3、后台及开机运行
参考文章http://www.cnblogs.com/zhaoyihao/p/8778502.html,先新建start.sh就放在IdeaServer文件夹下吧。start.sh中的内容是:路径必须写全
nohup /usr/IdeaServer/IdeaServer -p 1024 -prolongationPeriod 999999999999 &
更改start.sh文件的权限
chmod 755 start.sh
新建服务文件IdeaServer,要放在/etc/init.d/ 文件夹下
#!/bin/sh
#chkconfig:2345 70 30
#description:IdeaServer

ss_path=/usr/IdeaServer
case "$1" in
    start)
        echo "start idea service.."
        sh ${ss_path}/start.sh
        ;;
    *)
    exit 1
    ;;
esac
chmod 755 IdeaServer
添加开机启动
chkconfig --add  IdeaServer
service IdeaServer start //测试服务是否能启动成功
4、参考地址,下载最新的破解文件以防被封
http://blog.lanyus.com/archives/174.html
5、nginx配置,使用域名代替IP地址
因为ip地址加端口号的方式有可能被封。nginx的安装就不再赘述。1027的端口号要根据下载的新版破解文件的端口号来定义。如果使用域名的方式,1027的端口号就不用加到firewall中了。
server {
    listen 80;
    server_name xx.xncoding.com;
    root /var/www/html/;

    location / {
        proxy_pass http://127.0.0.1:1027;
        proxy_redirect off;
        proxy_set_header Host $host;
        proxy_set_header X-Real-IP $remote_addr;
        proxy_set_header X-Forwarded-For $proxy_add_x_forwarded_for;
    }
    access_log off; #access_log end
    error_log /dev/null; #error_log end
}
nginx安装好之后,默认不会开机自动启动,设置默认开机启动。
设置开机启动

systemctl enable nginx

 浙公网安备 33010602011771号