OpenCV人脸识别LBPH算法源码分析
1 背景及理论基础
人脸识别是指将一个需要识别的人脸和人脸库中的某个人脸对应起来(类似于指纹识别),目的是完成识别功能,该术语需要和人脸检测进行区分,人脸检测是在一张图片中把人脸定位出来,完成的是搜寻的功能。从OpenCV2.4开始,加入了新的类FaceRecognizer,该类用于人脸识别,使用它可以方便地进行相关识别实验。
原始的LBP算子定义为在3*3的窗口内,以窗口中心像素为阈值,将相邻的8个像素的灰度值与其进行比较,若周围像素值大于或等于中心像素值,则该像素点的位置被标记为1,否则为0。这样,3*3邻域内的8个点经比较可产生8位二进制数(通常转换为十进制数即LBP码,共256种),即得到该窗口中心像素点的LBP值,并用这个值来反映该区域的纹理特征。如下图所示:

原始的LBP提出后,研究人员不断对其提出了各种改进和优化。
1.1 圆形LBP算子
基本的 LBP算子的最大缺陷在于它只覆盖了一个固定半径范围内的小区域,这显然不能满足不同尺寸和频率纹理的需要。为了适应不同尺度的纹理特征,Ojala等对LBP算子进行了改进,将3×3邻域扩展到任意邻域,并用圆形邻域代替了正方形邻域,改进后的LBP算子允许在半径为R的圆形邻域内有任意多个像素点,从而得到了诸如半径为R的圆形区域内含有P个采样点的LBP算子,OpenCV中正是使用圆形LBP算子,下图示意了圆形LBP算子:

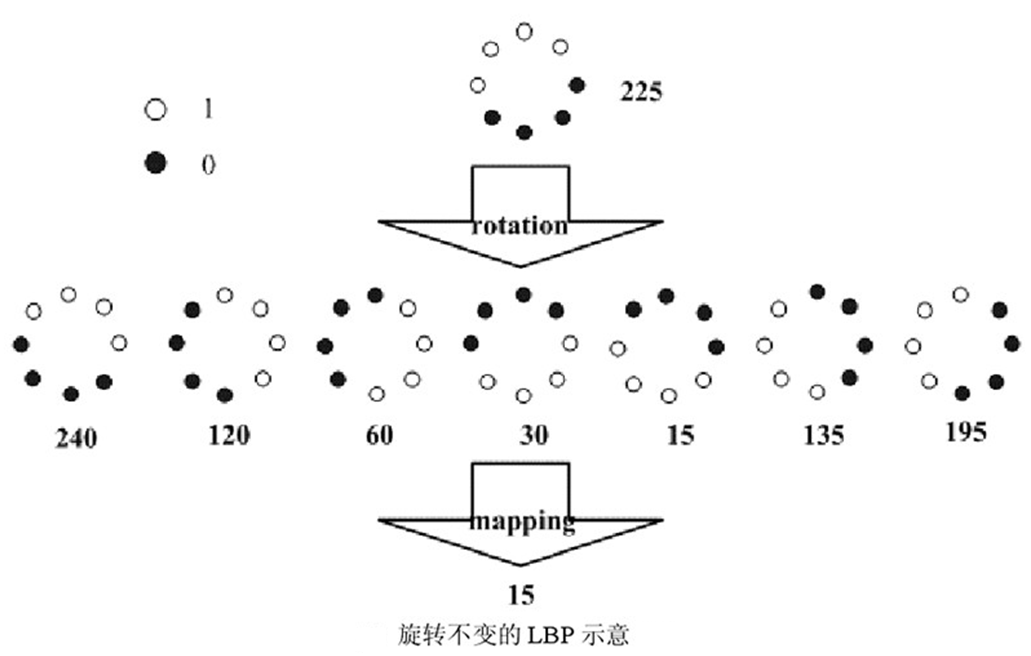
1.2 旋转不变模式
从LBP的定义可以看出,LBP算子是灰度不变的,但却不是旋转不变的,图像的旋转就会得到不同的LBP值。Maenpaa等人又将LBP算子进行了扩展,提出了具有旋转不变性的LBP算子,即不断旋转圆形邻域得到一系列初始定义的LBP值,取其最小值作为该邻域的LBP值。下图给出了求取旋转不变LBP的过程示意图,图中算子下方的数字表示该算子对应的LBP值,图中所示的8种LBP模式,经过旋转不变的处理,最终得到的具有旋转不变性的LBP值为15。也就是说,图中的8种LBP模式对应的旋转不变的LBP码值都是00001111。
1.3 等价模式
一个LBP算子可以产生不同的二进制模式,对于半径为R的圆形区域内含有P个采样点的LBP算子将会产生P2种模式。很显然,随着邻域集内采样点数的增加,二进制模式的种类是急剧增加的。例如:5×5邻域内20个采样点,有220=1,048,576种二进制模式。如此多的二值模式无论对于纹理的提取还是对于纹理的识别、分类及信息的存取都是不利的。为了解决二进制模式过多的问题,提高统计性,Ojala提出了采用一种“等价模式”(Uniform Pattern)来对LBP算子的模式种类进行降维。Ojala等认为,在实际图像中,绝大多数LBP模式最多只包含两次从1到0或从0到1的跳变。因此,Ojala将“等价模式”定义为:当某个局部二进制模式所对应的循环二进制数从0到1或从1到0最多有两次跳变时,该局部二进制模式所对应的二进制就成为一个等价模式类。如00000000(0次跳变),00000111(含一次从0到1的跳变和一次1到0的跳变),10001111(先由1跳到0,再由0跳到1,共两次跳变)都是等价模式类。除等价模式类以外的模式都归为另一类,称为混合模式类,例如10010111(共四次跳变)。
通过这样的改进,二进制模式的种类大大减少,模式数量由原来的2P种减少为P(P-1)+2+1种,其中P表示邻域集内的采样点数,等价模式类包含P(P-1)+2种模式,混合模式类只有1种模式。对于3×3邻域内8个采样点来说,二进制模式由原始的256种减少为59种,这使得特征向量的维数更少,并且可以减少高频噪声带来的影响。
2 LBP特征用于检测的原理
显而易见的是,上述提取的LBP算子在每个像素点都可以得到一个LBP“编码”,那么,对一幅图像(记录的是每个像素点的灰度值)提取其原始的LBP算子之后,得到的原始LBP特征依然是“一幅图片”(记录的是每个像素点的LBP值),如图所示:

如果将以上得到的LBP图直接用于人脸识别,其实和不提取LBP特征没什么区别,在实际的LBP应用中一般采用LBP特征谱的统计直方图作为特征向量进行分类识别,并且可以将一幅图片划分为若干的子区域,对每个子区域内的每个像素点都提取LBP特征,然后,在每个子区域内建立LBP特征的统计直方图。如此一来,每个子区域,就可以用一个统计直方图来进行描述,整个图片就由若干个统计直方图组成,这样做的好处是在一定范围内减小图像没完全对准而产生的误差,分区的另外一个意义在于我们可以根据不同的子区域给予不同的权重,比如说我们认为中心部分分区的权重大于边缘部分分区的权重,意思就是说中心部分在进行图片匹配识别时的意义更为重大。 例如:一幅100*100像素大小的图片,划分为10*10=100个子区域(可以通过多种方式来划分区域),每个子区域的大小为10*10像素;在每个子区域内的每个像素点,提取其LBP特征,然后,建立统计直方图;这样,这幅图片就有10*10个子区域,也就有了10*10个统计直方图,利用这10*10个统计直方图,就可以描述这幅图片了。之后,我们利用各种相似性度量函数,就可以判断两幅图像之间的相似性了,OpenCV在LBP人脸识别中使用的是如下相似度公式:

3 LBPH人脸识别关键部分源码
以OpenCV2.4.9为例,LBPH类源码该文件——opencv2.4.9\sources\modules\contrib\src\facerec.cpp中,如LBPH类创建函数的声明及实现如下:
1 CV_EXPORTS_W Ptr<FaceRecognizer> createLBPHFaceRecognizer(int radius=1, int neighbors=8,
2                                                             int grid_x=8, int grid_y=8, double threshold = DBL_MAX);
3
4 Ptr<FaceRecognizer> createLBPHFaceRecognizer(int radius, int neighbors,
5                                              int grid_x, int grid_y, double threshold)
6 {
7     return new LBPH(radius, neighbors, grid_x, grid_y, threshold);
8 }
由代码可见LBPH使用圆形LBP算子,默认情况下,圆的半径是1,采样点P为8,x方向和y方向上的分区个数都为8,即有8*8=64个分区,最后一个参数为相似度阈值,待识别图像也图像库中图像相似度小于该值时才会产生匹配结果。对于LBPH类我们首先看一下其训练过程函数train:
 1 void LBPH::train(InputArrayOfArrays _in_src, InputArray _in_labels, bool preserveData) {
 2     if(_in_src.kind() != _InputArray::STD_VECTOR_MAT && _in_src.kind() != _InputArray::STD_VECTOR_VECTOR) {
 3         string error_message = "The images are expected as InputArray::STD_VECTOR_MAT (a std::vector<Mat>) or _InputArray::STD_VECTOR_VECTOR (a std::vector< vector<...> >).";
 4         CV_Error(CV_StsBadArg, error_message);
 5     }
 6     if(_in_src.total() == 0) {
 7         string error_message = format("Empty training data was given. You'll need more than one sample to learn a model.");
 8         CV_Error(CV_StsUnsupportedFormat, error_message);
 9     } else if(_in_labels.getMat().type() != CV_32SC1) {
10         string error_message = format("Labels must be given as integer (CV_32SC1). Expected %d, but was %d.", CV_32SC1, _in_labels.type());
11         CV_Error(CV_StsUnsupportedFormat, error_message);
12     }
13     // get the vector of matrices
14     vector<Mat> src;
15     _in_src.getMatVector(src);
16     // get the label matrix
17     Mat labels = _in_labels.getMat();
18     // check if data is well- aligned
19     if(labels.total() != src.size()) {
20         string error_message = format("The number of samples (src) must equal the number of labels (labels). Was len(samples)=%d, len(labels)=%d.", src.size(), _labels.total());
21         CV_Error(CV_StsBadArg, error_message);
22     }
23     // if this model should be trained without preserving old data, delete old model data
24     if(!preserveData) {
25         _labels.release();
26         _histograms.clear();
27     }
28     // append labels to _labels matrix
29     for(size_t labelIdx = 0; labelIdx < labels.total(); labelIdx++) {
30         _labels.push_back(labels.at<int>((int)labelIdx));
31     }
32     // store the spatial histograms of the original data
33     for(size_t sampleIdx = 0; sampleIdx < src.size(); sampleIdx++) {
34         // calculate lbp image
35         Mat lbp_image = elbp(src[sampleIdx], _radius, _neighbors);
36         // get spatial histogram from this lbp image
37         Mat p = spatial_histogram(
38                 lbp_image, /* lbp_image */
39                 static_cast<int>(std::pow(2.0, static_cast<double>(_neighbors))), /* number of possible patterns */
40                 _grid_x, /* grid size x */
41                 _grid_y, /* grid size y */
42                 true);
43         // add to templates
44         _histograms.push_back(p);
45     }
46 }
参数_in_src为训练的人脸图像组数据(人脸库),_in_labels是对应的标签数组,这两个数组长度应保持一致,_in_src中两个人脸图像对应下标处的标签值如果相同则说明两个人脸是同一个人的人脸。函数最后的for循环实现训练的核心功能,elbp计算人脸库每一个人脸的lbp图像,spatial_histogram求每一个人脸lbp图像的分区直方图,_histograms保存相应的分区直方图,以上两个函数的实现如下:


  1 template <typename _Tp> static
  2 inline void elbp_(InputArray _src, OutputArray _dst, int radius, int neighbors) {
  3     //get matrices
  4     Mat src = _src.getMat();
  5     // allocate memory for result
  6     _dst.create(src.rows-2*radius, src.cols-2*radius, CV_32SC1);
  7     Mat dst = _dst.getMat();
  8     // zero
  9     dst.setTo(0);
 10     for(int n=0; n<neighbors; n++) {
 11         // sample points
 12         float x = static_cast<float>(radius * cos(2.0*CV_PI*n/static_cast<float>(neighbors)));
 13         float y = static_cast<float>(-radius * sin(2.0*CV_PI*n/static_cast<float>(neighbors)));
 14         // relative indices
 15         int fx = static_cast<int>(floor(x));
 16         int fy = static_cast<int>(floor(y));
 17         int cx = static_cast<int>(ceil(x));
 18         int cy = static_cast<int>(ceil(y));
 19         // fractional part
 20         float ty = y - fy;
 21         float tx = x - fx;
 22         // set interpolation weights
 23         float w1 = (1 - tx) * (1 - ty);
 24         float w2 =      tx  * (1 - ty);
 25         float w3 = (1 - tx) *      ty;
 26         float w4 =      tx  *      ty;
 27         // iterate through your data
 28         for(int i=radius; i < src.rows-radius;i++) {
 29             for(int j=radius;j < src.cols-radius;j++) {
 30                 // calculate interpolated value
 31                 float t = static_cast<float>(w1*src.at<_Tp>(i+fy,j+fx) + w2*src.at<_Tp>(i+fy,j+cx) + w3*src.at<_Tp>(i+cy,j+fx) + w4*src.at<_Tp>(i+cy,j+cx));
 32                 // floating point precision, so check some machine-dependent epsilon
 33                 dst.at<int>(i-radius,j-radius) += ((t > src.at<_Tp>(i,j)) || (std::abs(t-src.at<_Tp>(i,j)) < std::numeric_limits<float>::epsilon())) << n;
 34             }
 35         }
 36     }
 37 }
 38
 39 static void elbp(InputArray src, OutputArray dst, int radius, int neighbors)
 40 {
 41     int type = src.type();
 42     switch (type) {
 43     case CV_8SC1:   elbp_<char>(src,dst, radius, neighbors); break;
 44     case CV_8UC1:   elbp_<unsigned char>(src, dst, radius, neighbors); break;
 45     case CV_16SC1:  elbp_<short>(src,dst, radius, neighbors); break;
 46     case CV_16UC1:  elbp_<unsigned short>(src,dst, radius, neighbors); break;
 47     case CV_32SC1:  elbp_<int>(src,dst, radius, neighbors); break;
 48     case CV_32FC1:  elbp_<float>(src,dst, radius, neighbors); break;
 49     case CV_64FC1:  elbp_<double>(src,dst, radius, neighbors); break;
 50     default:
 51         string error_msg = format("Using Original Local Binary Patterns for feature extraction only works on single-channel images (given %d). Please pass the image data as a grayscale image!", type);
 52         CV_Error(CV_StsNotImplemented, error_msg);
 53         break;
 54     }
 55 }
 56
 57 static Mat
 58 histc_(const Mat& src, int minVal=0, int maxVal=255, bool normed=false)
 59 {
 60     Mat result;
 61     // Establish the number of bins.
 62     int histSize = maxVal-minVal+1;
 63     // Set the ranges.
 64     float range[] = { static_cast<float>(minVal), static_cast<float>(maxVal+1) };
 65     const float* histRange = { range };
 66     // calc histogram
 67     calcHist(&src, 1, 0, Mat(), result, 1, &histSize, &histRange, true, false);
 68     // normalize
 69     if(normed) {
 70         result /= (int)src.total();
 71     }
 72     return result.reshape(1,1);
 73 }
 74
 75 static Mat histc(InputArray _src, int minVal, int maxVal, bool normed)
 76 {
 77     Mat src = _src.getMat();
 78     switch (src.type()) {
 79         case CV_8SC1:
 80             return histc_(Mat_<float>(src), minVal, maxVal, normed);
 81             break;
 82         case CV_8UC1:
 83             return histc_(src, minVal, maxVal, normed);
 84             break;
 85         case CV_16SC1:
 86             return histc_(Mat_<float>(src), minVal, maxVal, normed);
 87             break;
 88         case CV_16UC1:
 89             return histc_(src, minVal, maxVal, normed);
 90             break;
 91         case CV_32SC1:
 92             return histc_(Mat_<float>(src), minVal, maxVal, normed);
 93             break;
 94         case CV_32FC1:
 95             return histc_(src, minVal, maxVal, normed);
 96             break;
 97         default:
 98             CV_Error(CV_StsUnmatchedFormats, "This type is not implemented yet."); break;
 99     }
100     return Mat();
101 }
102
103
104 static Mat spatial_histogram(InputArray _src, int numPatterns,
105                              int grid_x, int grid_y, bool /*normed*/)
106 {
107     Mat src = _src.getMat();
108     // calculate LBP patch size
109     int width = src.cols/grid_x;
110     int height = src.rows/grid_y;
111     // allocate memory for the spatial histogram
112     Mat result = Mat::zeros(grid_x * grid_y, numPatterns, CV_32FC1);
113     // return matrix with zeros if no data was given
114     if(src.empty())
115         return result.reshape(1,1);
116     // initial result_row
117     int resultRowIdx = 0;
118     // iterate through grid
119     for(int i = 0; i < grid_y; i++) {
120         for(int j = 0; j < grid_x; j++) {
121             Mat src_cell = Mat(src, Range(i*height,(i+1)*height), Range(j*width,(j+1)*width));
122             Mat cell_hist = histc(src_cell, 0, (numPatterns-1), true);
123             // copy to the result matrix
124             Mat result_row = result.row(resultRowIdx);
125             cell_hist.reshape(1,1).convertTo(result_row, CV_32FC1);
126             // increase row count in result matrix
127             resultRowIdx++;
128         }
129     }
130     // return result as reshaped feature vector
131     return result.reshape(1,1);
132 }
133
134 //------------------------------------------------------------------------------
135 // wrapper to cv::elbp (extended local binary patterns)
136 //------------------------------------------------------------------------------
137
138 static Mat elbp(InputArray src, int radius, int neighbors) {
139     Mat dst;
140     elbp(src, dst, radius, neighbors);
141     return dst;
142 }
需要注意的是在求图像中每个位置的8个采样点的值时,是使用的采样点四个角上相应位置的加权平均值才作为采样点的值(见上面函数elbp_中12~35行处代码),这样做能降低噪音点对LBP值的影响。而spatial_histogram函数把最后的分区直方图结果reshape成一行,这样做能方便识别时的相似度计算。识别函数有predict函数实现,源代码如下:
 1 void LBPH::predict(InputArray _src, int &minClass, double &minDist) const {
 2     if(_histograms.empty()) {
 3         // throw error if no data (or simply return -1?)
 4         string error_message = "This LBPH model is not computed yet. Did you call the train method?";
 5         CV_Error(CV_StsBadArg, error_message);
 6     }
 7     Mat src = _src.getMat();
 8     // get the spatial histogram from input image
 9     Mat lbp_image = elbp(src, _radius, _neighbors);
10     Mat query = spatial_histogram(
11             lbp_image, /* lbp_image */
12             static_cast<int>(std::pow(2.0, static_cast<double>(_neighbors))), /* number of possible patterns */
13             _grid_x, /* grid size x */
14             _grid_y, /* grid size y */
15             true /* normed histograms */);
16     // find 1-nearest neighbor
17     minDist = DBL_MAX;
18     minClass = -1;
19     for(size_t sampleIdx = 0; sampleIdx < _histograms.size(); sampleIdx++) {
20         double dist = compareHist(_histograms[sampleIdx], query, CV_COMP_CHISQR);
21         if((dist < minDist) && (dist < _threshold)) {
22             minDist = dist;
23             minClass = _labels.at<int>((int) sampleIdx);
24         }
25     }
26 }
函数中7~15行是计算带预测图片_src的分区直方图query,19~25行的for循环分别比较query和人脸库直方图数组_histograms中每一个直方图的相似度(比较方法正是CV_COMP_CHISQR),并把相似度最小的作为最终结果,该部分也可以看成创建LBPH类时threshold的作用,即相似度都不小于threshold阈值则识别失败。
4 LBP人脸识别示例
最后给出LBP人脸识别的示例代码,代码中使用的人脸库是AT&T人脸库(又称ORL人脸数据库),库中有40个人,每人10张照片,共400张人脸照片。示例代码如下:
  1 #include "opencv2/core/core.hpp"
  2 #include "opencv2/highgui/highgui.hpp"
  3 #include "opencv2/contrib/contrib.hpp"
  4
  5 #define CV_VERSION_ID       CVAUX_STR(CV_MAJOR_VERSION) CVAUX_STR(CV_MINOR_VERSION) CVAUX_STR(CV_SUBMINOR_VERSION)
  6
  7 #ifdef _DEBUG
  8 #define cvLIB(name) "opencv_" name CV_VERSION_ID "d"
  9 #else
 10 #define cvLIB(name) "opencv_" name CV_VERSION_ID
 11 #endif
 12
 13 #pragma comment( lib, cvLIB("core") )
 14 #pragma comment( lib, cvLIB("imgproc") )
 15 #pragma comment( lib, cvLIB("highgui") )
 16 #pragma comment( lib, cvLIB("flann") )
 17 #pragma comment( lib, cvLIB("features2d") )
 18 #pragma comment( lib, cvLIB("calib3d") )
 19 #pragma comment( lib, cvLIB("gpu") )
 20 #pragma comment( lib, cvLIB("legacy") )
 21 #pragma comment( lib, cvLIB("ml") )
 22 #pragma comment( lib, cvLIB("objdetect") )
 23 #pragma comment( lib, cvLIB("ts") )
 24 #pragma comment( lib, cvLIB("video") )
 25 #pragma comment( lib, cvLIB("contrib") )
 26 #pragma comment( lib, cvLIB("nonfree") )
 27
 28 #include <iostream>
 29 #include <fstream>
 30 #include <sstream>
 31
 32 using namespace cv;
 33 using namespace std;
 34
 35 static void read_csv(const string& filename, vector<Mat>& images, vector<int>& labels, char separator =';') {
 36     std::ifstream file(filename.c_str(), ifstream::in);
 37     if (!file) {
 38         string error_message ="No valid input file was given, please check the given filename.";
 39         CV_Error(CV_StsBadArg, error_message);
 40     }
 41     string line, path, classlabel;
 42     while (getline(file, line)) {
 43         stringstream liness(line);
 44         getline(liness, path, separator);
 45         getline(liness, classlabel);
 46         if(!path.empty()&&!classlabel.empty()) {
 47             images.push_back(imread(path, 0));
 48             labels.push_back(atoi(classlabel.c_str()));
 49         }
 50     }
 51 }
 52
 53 int main(int argc, const char *argv[]) {
 54     if (argc !=2) {
 55         cout <<"usage: "<< argv[0]<<" <csv.ext>"<< endl;
 56         exit(1);
 57     }
 58     string fn_csv = string(argv[1]);
 59     vector<Mat> images;
 60     vector<int> labels;
 61     try {
 62         read_csv(fn_csv, images, labels);
 63     } catch (cv::Exception& e) {
 64         cerr <<"Error opening file "<< fn_csv <<". Reason: "<< e.msg << endl;
 65         // nothing more we can do
 66         exit(1);
 67     }
 68     if(images.size()<=1) {
 69         string error_message ="This demo needs at least 2 images to work. Please add more images to your data set!";
 70         CV_Error(CV_StsError, error_message);
 71     }
 72     int height = images[0].rows;
 73     Mat testSample = images[images.size() -1];
 74     int testLabel = labels[labels.size() -1];
 75     images.pop_back();
 76     labels.pop_back();
 77     // TLBPHFaceRecognizer 使用了扩展的LBP
 78     // 在其他的算子中他可能很容易被扩展
 79     // 下面是默认参数
 80     //      radius = 1
 81     //      neighbors = 8
 82     //      grid_x = 8
 83     //      grid_y = 8
 84     //
 85     // 如果你要创建 LBPH FaceRecognizer 半径是2,16个邻域
 86     //      cv::createLBPHFaceRecognizer(2, 16);
 87     //
 88     // 如果你需要一个阈值,并且使用默认参数:
 89     //      cv::createLBPHFaceRecognizer(1,8,8,8,123.0)
 90     //
 91     Ptr<FaceRecognizer> model = createLBPHFaceRecognizer();
 92     model->train(images, labels);
 93     int predictedLabel = model->predict(testSample);
 94     //      int predictedLabel = -1;
 95     //      double confidence = 0.0;
 96     //      model->predict(testSample, predictedLabel, confidence);
 97     //
 98     string result_message = format("Predicted class = %d / Actual class = %d.", predictedLabel, testLabel);
 99     cout << result_message << endl;
100     // 有时你需要设置或者获取内部数据模型,
101     // 他不能被暴露在 cv::FaceRecognizer类中.
102     //
103     // 首先我们对FaceRecognizer的阈值设置到0.0,而不是重写训练模型
104     // 当你重新估计模型时很重要
105     //
106     model->set("threshold",0.0);
107     predictedLabel = model->predict(testSample);
108     cout <<"Predicted class = "<< predictedLabel << endl;
109     // 由于确保高效率,LBP图没有被存储在模型里面。
110     cout <<"Model Information:"<< endl;
111     string model_info = format("tLBPH(radius=%i, neighbors=%i, grid_x=%i, grid_y=%i, threshold=%.2f)",
112         model->getInt("radius"),
113         model->getInt("neighbors"),
114         model->getInt("grid_x"),
115         model->getInt("grid_y"),
116         model->getDouble("threshold"));
117     cout << model_info << endl;
118     // 我们可以获取样本的直方图:
119     vector<Mat> histograms = model->getMatVector("histograms");
120     // 我需要现实它吗? 或许它的长度才是我们感兴趣的:
121     cout <<"Size of the histograms: "<< histograms[0].total()<< endl;
122     return 0;
123 }
程序中用一个CSV文件指明人脸数据库文件及标签,即CSV文件中每一行包含一个文件名路径之后是其标签值,中间以分号为分隔符,可以手工创建该CSV文件,当然也可以用一个简单的Python程序来帮你实现该文件,我的python脚本程序如下:
 1 import sys
 2 import os
 3
 4 def read_images(path, sz=None):
 5     c = 0
 6     X,y = [], []
 7     fp = open(os.path.join(path,"test.txt"),'w')
 8     for dirname, dirnames, filenames in os.walk(path):
 9         #print dirname
10         #print dirnames
11         #print filenames
12         for subdirname in dirnames:
13             subject_path = os.path.join(dirname, subdirname)
14             for filename in os.listdir(subject_path):
15                 str = "%s;%d\n"%(os.path.join(subject_path, filename), c)
16                 print str
17                 fp.write(str)
18             c += 1
19     fp.close()
20
21 if __name__ == '__main__':
22     read_images("F:\\mywork\\facerec_demo\\att_faces")
程序中22行需改成你自己的人脸库路径。
示例程序的运行结果如下所示:

结果第二行反应了当设置阈值为0.0时(model->set("threshold",0.0)),则不会有识别结果产生。
示例程序(包含人脸库)下载地址:http://download.csdn.net/detail/weiwei22844/9557242
本博客参考了如下博文,一并致谢!

 浙公网安备 33010602011771号