sphinx+reStructuredText制作文档
1 spinx简介
Sphinx 是一种文档工具,它可以令人轻松的撰写出清晰且优美的文档, 由 Georg Brandl 在BSD 许可证下开发. 新版的Python文档 就是由Sphinx生成的,
并且它已成为Python项目首选的文档工具,同时它对 C/C++ 项目也有很好的支持; 并计划对其它开发语言添加特殊支持. 本站当然也是使用 Sphinx 生成的,
它采用reStructuredText! Sphinx还在继续开发. 下面列出了其良好特性,这些特性在Python官方文档中均有体现:
- 丰富的输出格式: 支持 HTML (包括 Windows 帮助文档), LaTeX (可以打印PDF版本), manual pages(man 文档), 纯文本
- 完备的交叉引用: 语义化的标签,并可以自动化链接函数,类,引文,术语及相似的片段信息
- 明晰的分层结构: 可以轻松的定义文档树,并自动化链接同级/父级/下级文章
- 美观的自动索引: 可自动生成美观的模块索引
- 精确的语法高亮: 基于 Pygments 自动生成语法高亮
- 开放的扩展: 支持代码块的自动测试,并包含Python模块的自述文档(API docs)等
2 rst简介
reStructuredText 是扩展名为.rst的纯文本文件,含义为"重新构建的文本",也被简称为:RST或reST;是Python编程语言的Docutils项目的一部分,
Python Doc-SIG (Documentation Special Interest Group)。该项目类似于Java的JavaDoc或Perl的POD项目。
Docutils 能够从Python程序中提取注释和信息,格式化成程序文档。
.rst 文件是轻量级标记语言的一种,被设计为容易阅读和编写的纯文本,并且可以借助Docutils这样的程序进行文档处理,
也可以转换为HTML或PDF等多种格式,或由Sphinx-Doc这样的程序转换为LaTex、man等更多格式
3 环境准备
3.1 安装python
我是在anaconda安装的python,官方下载地址是https://www.anaconda.com/download/#windows ,我写这边博文的时候最新版本是https://repo.continuum.io/archive/Anaconda3-5.0.1-Windows-x86_64.exe。
注意: 安装的时候勾选add Anaconda to my Path environment variable选项
3.2 文本编辑软件安装
这里我使用的是vscode,官方下载地址是https://code.visualstudio.com/,我写这篇博文的最新版本下载地址是https://go.microsoft.com/fwlink/?Linkid=852157
3.3 sphinx的安装
具体可以参考:http://www.sphinx-doc.org/en/stable/tutorial.html#install-sphinx
安装sphinx
C:\Users\test>pip install sphinx
安装 restructuredtext-lint
C:\Users\test>pip install restructuredtext-lint
3.4 vscode环境配置
打开vscode软件,【查看】>【扩展】输入restructuredText 安装这个软件即可。
重启下vscode使得restructuredText生效。
4 开始sphinx和rst工作
4.1 创建并打开工程目录
常见一个工程目录(c:/github/test),并使用vscode打开工程目录 ,【文件】->【打开文件夹】
4.2 使用
sphinx-quickstart
t建立工程
打开终端 ,【查看】->【终端】,输入shpinx-quickstart命令
shpinx-quichstart命令具体参考官方:http://www.sphinx-doc.org/en/stable/invocation.html#invocation
Windows PowerShell
版权所有 (C) Microsoft Corporation。保留所有权利。

PS C:\github\test> sphinx-quickstart
Welcome to the Sphinx 1.6.3 quickstart utility.

Please enter values for the following settings (just press Enter to
accept a default value, if one is given in brackets).

Enter the root path for documentation.
> Root path for the documentation [.]:

You have two options for placing the build directory for Sphinx output.
Either, you use a directory "_build" within the root path, or you separate
"source" and "build" directories within the root path.
> Separate source and build directories (y/n) [n]: y

Inside the root directory, two more directories will be created; "_templates"
for custom HTML templates and "_static" for custom stylesheets and other static
files. You can enter another prefix (such as ".") to replace the underscore.
> Name prefix for templates and static dir [_]:

The project name will occur in several places in the built documentation.
> Project name: Test
> Author name(s): Zhaojiedi1992

Sphinx has the notion of a "version" and a "release" for the
software. Each version can have multiple releases. For example, for
Python the version is something like 2.5 or 3.0, while the release is
something like 2.5.1 or 3.0a1.  If you don't need this dual structure,
just set both to the same value.
> Project version []: v1.0
> Project release [v1.0]:

If the documents are to be written in a language other than English,
you can select a language here by its language code. Sphinx will then
translate text that it generates into that language.

For a list of supported codes, see
http://sphinx-doc.org/config.html#confval-language.
> Project language [en]: en

The file name suffix for source files. Commonly, this is either ".txt"
or ".rst".  Only files with this suffix are considered documents.
> Source file suffix [.rst]:

One document is special in that it is considered the top node of the
"contents tree", that is, it is the root of the hierarchical structure
of the documents. Normally, this is "index", but if your "index"
document is a custom template, you can also set this to another filename.
> Name of your master document (without suffix) [index]:

Sphinx can also add configuration for epub output:
> Do you want to use the epub builder (y/n) [n]:

Please indicate if you want to use one of the following Sphinx extensions:
> autodoc: automatically insert docstrings from modules (y/n) [n]:
> doctest: automatically test code snippets in doctest blocks (y/n) [n]:
> intersphinx: link between Sphinx documentation of different projects (y/n) [n]:
> todo: write "todo" entries that can be shown or hidden on build (y/n) [n]:
> coverage: checks for documentation coverage (y/n) [n]:
> imgmath: include math, rendered as PNG or SVG images (y/n) [n]:
> mathjax: include math, rendered in the browser by MathJax (y/n) [n]:
> ifconfig: conditional inclusion of content based on config values (y/n) [n]:
> viewcode: include links to the source code of documented Python objects (y/n) [n]:
> githubpages: create .nojekyll file to publish the document on GitHub pages (y/n) [n]:

A Makefile and a Windows command file can be generated for you so that you
only have to run e.g. `make html' instead of invoking sphinx-build
directly.
> Create Makefile? (y/n) [y]:
> Create Windows command file? (y/n) [y]:

Creating file .\source\conf.py.
Creating file .\source\index.rst.
Creating file .\Makefile.
Creating file .\make.bat.

Finished: An initial directory structure has been created.

You should now populate your master file .\source\index.rst and create other documentation
source files. Use the Makefile to build the docs, like so:
   make builder
where "builder" is one of the supported builders, e.g. html, latex or linkcheck.
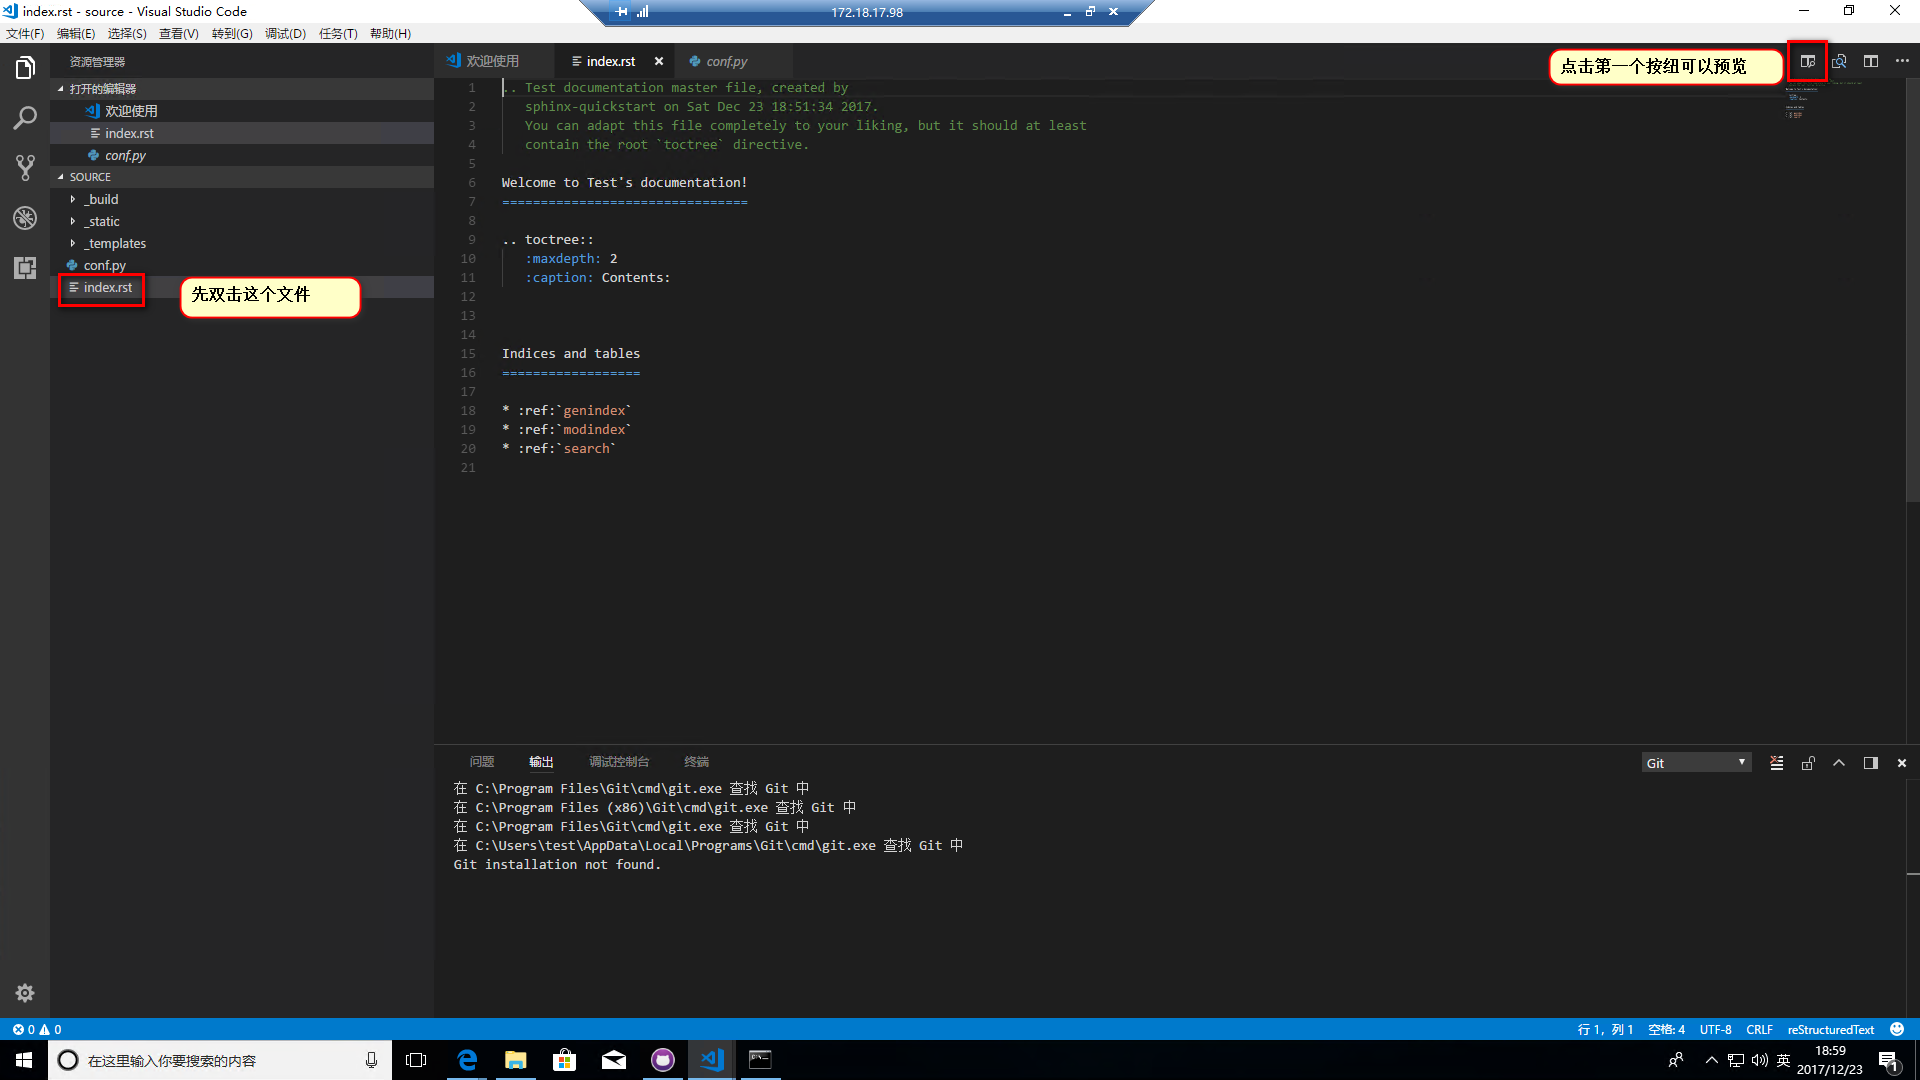
4.3 打开编码目录
在终端输入code source ,进入source目录编辑
PS C:\github\test> code source
我们可以看到又打开了一个vscode窗口。目录为source的,我们可以点击上面的有个预览按纽的。可以方便我们预览的
注意如果展示不出结果,请确认如下配置
检查工程目录下的.vscode/settings.json 文件, 核心要制定好python位置,还有就是conf.py所在的目录。
{
"python.defaultInterpreterPath": "/Users/dxm/Envs/sphinx/bin/python",
 "python.pythonPath": "/Users/dxm/Envs/sphinx/bin/python",
"restructuredtext.confPath": "${workspaceFolder}/docs/source",
}
4.4 开始编写文档
这里我就不写了。 可以直接从这个地方下载https://github.com/zhaojiedi1992/My_Study_ReStructuredText,点击Clone or download按纽即可下载源文档。
然后复制 index.rst文件和 images,基础语法,中级语法三个目录到source目录中去。
具体的文档编写可以参考如下地址:
- sphinx对rst文档的帮助文档: http://www.sphinx-doc.org/en/stable/rest.html
- spinx对rst文档的中文帮助文档:http://zh-sphinx-doc.readthedocs.io/en/latest/rest.html
- 我自己的对与rst的学习笔记 (实用版): http://www.cnblogs.com/zhaojiedi1992/p/zhaojiedi_liunx_30_python_restructuredtext.html
- rst的官文帮助文档:http://docutils.sourceforge.net/rst.html
4.5 设置主题
我不习惯官方的主题,喜欢sphinx_rtd_theme主题
官方内置主题参考:http://www.sphinx-doc.org/en/stable/theming.html#builtin-themes
PS C:\github\test\source> pip install sphinx_rtd_theme
安装完毕后,修改conf.py文件,保存下。
html_theme = 'sphinx_rtd_theme'
4.6 生成文档
在工程目录(非source目录),执行make命令
PS C:\github\test> ./make clean
PS C:\github\test> ./make html
注意:这里生成的是html格式的。当然可以生成dirhtml,singlehtml,epub,devhelp,latex,man,texinfo,text等多种格式。
详细make命令参考官方:http://www.sphinx-doc.org/en/stable/invocation.html#makefile-options
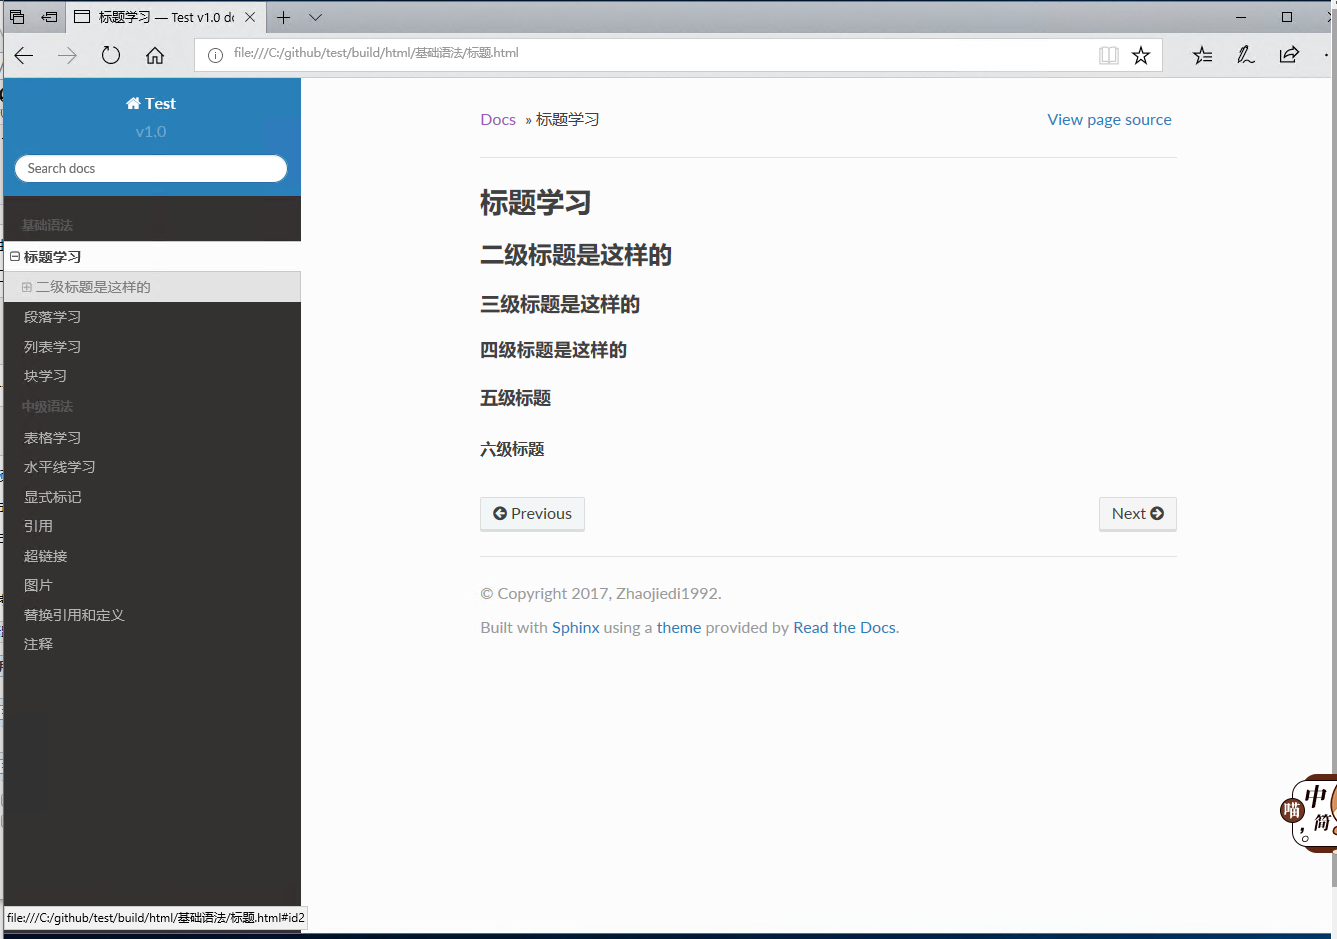
4.7 预览
生成的htm目录在工程的build/html目录
双击html目录下的index.html完成预览
5 发布出去
这个发布就比较多了。简单是可以把html目录挂到iis,或者apache,httpd对应的网页目录即可。
这里我使用redthedoc的方法来做。
5.1 注册账号
在redthedoc注册一个账号
5.2 导入项目
网址: https://readthedocs.org/dashboard/import/?
导入项目通过github方式。可以把github的库直接导入,非常方便。
我导入我的一个github项目my-study-restructuredtext
5.3构建
导入完毕后有个Build按纽,点击就可以完成构建了。
注意:这个构建一次之后。后续我们在github上的提交不用在重新构建的。它会自动保存更新的,可能需要在push后等1-2分钟。
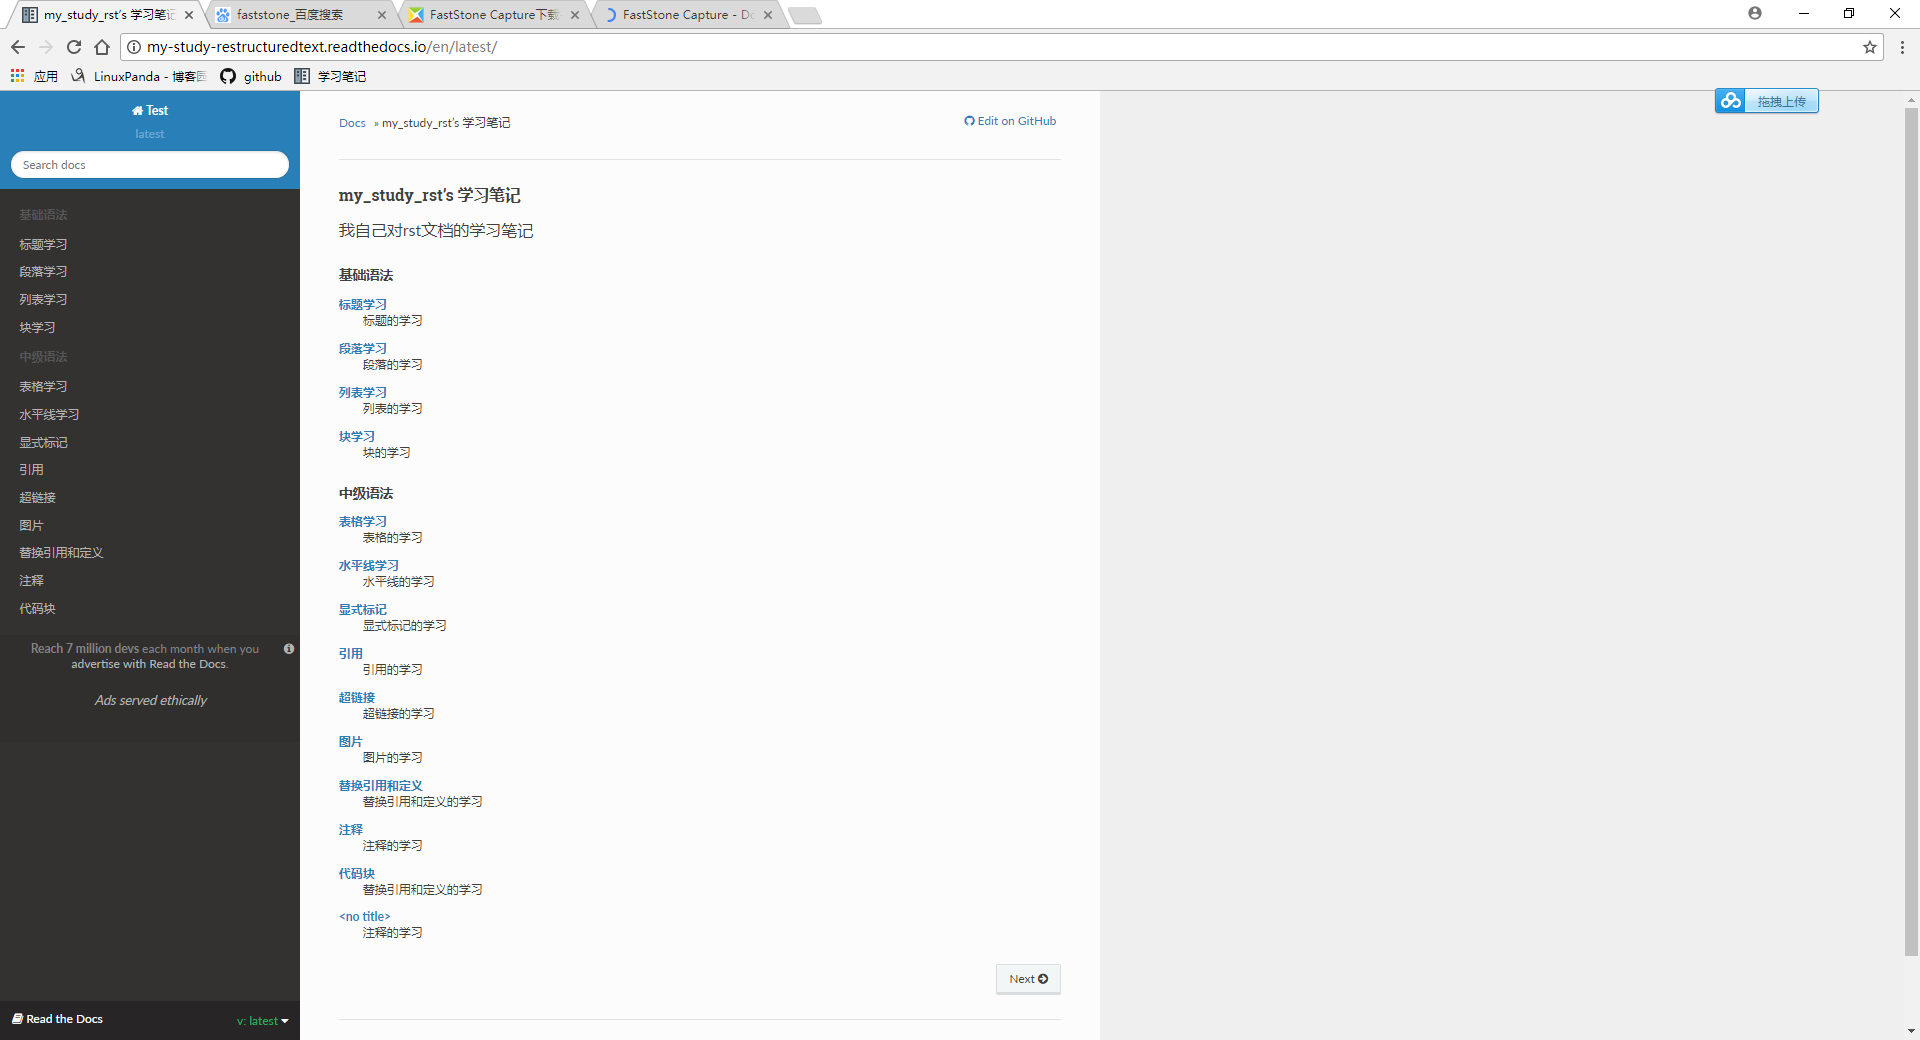
5.4 访问
构建完毕可以点击阅读文档的按纽了。
具体访问: http://my-study-restructuredtext.readthedocs.io/en/latest/
6 参考文档
sphinx中文帮助文档:http://zh-sphinx-doc.readthedocs.io/en/latest/contents.html
spinx英文帮助文档:http://www.sphinx-doc.org/en/stable/contents.html
7 常见错误
7.1 使用vscode预览不出来效果图
排查思路
- 检查python路径,如果使用虚拟路径的需要关注下。
- 是否按照spinx工具
- conf.py文件是否位置对
- 查看预览错误信息
在使用vscode 的情况下, vs会自动给目录创建一个.vscode的目录,里面去存放settings.json文件, python多会使用虚拟环境, 我们可以将虚拟环境统一下,可以参考如下配置
{
    "restructuredtext.confPath": "${workspaceFolder}",
    "python.pythonPath": "/Users/dxm/Envs/sphinx/bin/python"
}
上面的'/Users/dxm/Envs/sphinx/bin/python'路径就是我统一写文档使用的python虚拟环境。
7.2 在read the doc 上面构建提示错误: Sphinx error: master file /home/docs/checkouts/readthedocs.org/user_builds/my-study-golang/checkouts/latest/source/contents.rst not found
需要在conf.py里面添加如下行:
master_doc = 'index'
posted on 2017-12-23 20:00 LinuxPanda 阅读(8396) 评论(9) 收藏 举报

 浙公网安备 33010602011771号