

Java多线程
目录
1 进程和线程【理解】
进程:是正在运行的程序
是系统进行资源分配和调用的独立单位
每一个进程都有它自己的内存空间和系统资源
线程:是进程中的单个顺序控制流,是一条执行路径
单线程:一个进程如果只有一条执行路径,则称为单线程程序
多线程:一个进程如果有多条执行路径,则称为多线程程序
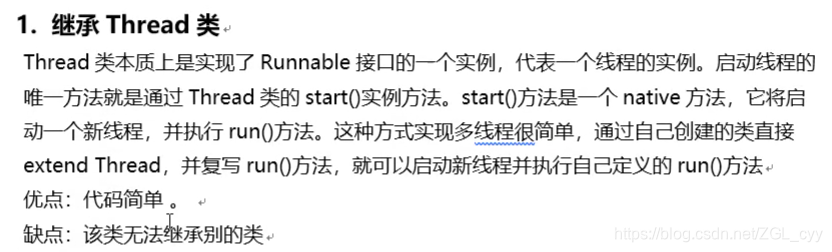
2 实现多线程方式一:继承Thread类【应用】
方法介绍

实现步骤
定义一个类
MyThread
继承
Thread
类
在
MyThread
类中重写
run()
方法
创建
MyThread
类的对象
启动线程
代码演示
public class MyThread extends Thread {
    @Override
    public void run() {
        for(int i=0; i<100; i++) {
            System.out.println(i);
        }
    }
}
public class MyThreadDemo {
    public static void main(String[] args) {
        MyThread my1 = new MyThread();
        MyThread my2 = new MyThread();
// my1.run();
// my2.run();
//void start() 导致此线程开始执行; Java虚拟机调用此线程的run方法
        my1.start();
        my2.start();
    }
}
两个小问题
为什么要重写
run()
方法?
因为
run()
是用来封装被线程执行的代码
run()
方法和
start()
方法的区别?
run()
:封装线程执行的代码,直接调用,相当于普通方法的调用
start()
:启动线程;然后由
JVM
调用此线程的
run()
方法
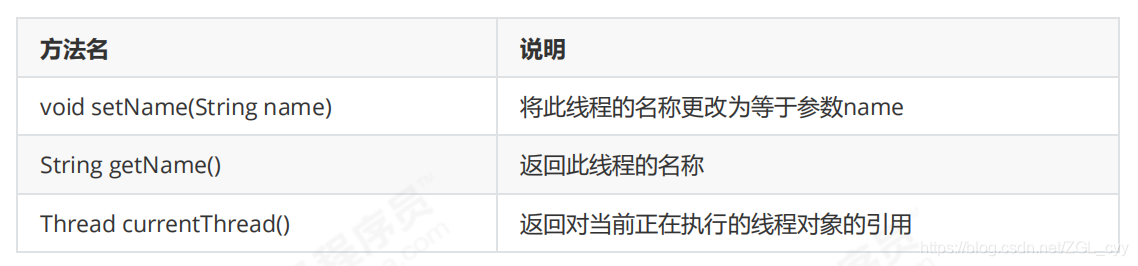
3 设置和获取线程名称【应用】
方法介绍
代码演示
public class MyThread extends Thread {
public MyThread() {}
public MyThread(String name) {
super(name);
}
@Override
public void run() {
for (int i = 0; i < 100; i++) {
System.out.println(getName()+":"+i);
}
}
}
public class MyThreadDemo {
public static void main(String[] args) {
MyThread my1 = new MyThread();
MyThread my2 = new MyThread();
//void setName(String name):将此线程的名称更改为等于参数 name
my1.setName("高铁");
my2.setName("飞机");
//Thread(String name)
MyThread my1 = new MyThread("高铁");
MyThread my2 = new MyThread("飞机");
my1.start();
my2.start();
//static Thread currentThread() 返回对当前正在执行的线程对象的引用
System.out.println(Thread.currentThread().getName());
}
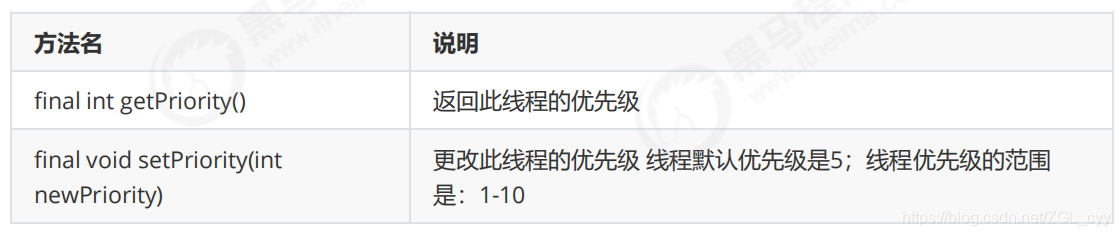
}4 线程优先级【应用】
线程调度
两种调度方式
分时调度模型:所有线程轮流使用
CPU
的使用权,平均分配每个线程占用
CPU
的时间片
抢占式调度模型:优先让优先级高的线程使用
CPU
,如果线程的优先级相同,那么会随机选择一
个,优先级高的线程获取的
CPU
时间片相对多一些
Java
使用的是抢占式调度模型
随机性
假如计算机只有一个
CPU
,那么
CPU
在某一个时刻只能执行一条指令,线程只有得到
CPU
时间片,也
就是使用权,才可以执行指令。所以说多线程程序的执行是有随机性,因为谁抢到
CPU
的使用权是不一
定的
优先级相关方法
代码演示
public class ThreadPriority extends Thread {
@Override
public void run() {
for (int i = 0; i < 100; i++) {
System.out.println(getName() + ":" + i);
}
}
}
public class ThreadPriorityDemo {
public static void main(String[] args) {
ThreadPriority tp1 = new ThreadPriority();
ThreadPriority tp2 = new ThreadPriority();
ThreadPriority tp3 = new ThreadPriority();
tp1.setName("高铁");
tp2.setName("飞机");
tp3.setName("汽车");
//public final int getPriority():返回此线程的优先级
System.out.println(tp1.getPriority()); //5
System.out.println(tp2.getPriority()); //5
System.out.println(tp3.getPriority()); //5
//public final void setPriority(int newPriority):更改此线程的优先级
// tp1.setPriority(10000); //IllegalArgumentException
System.out.println(Thread.MAX_PRIORITY); //10
System.out.println(Thread.MIN_PRIORITY); //1
System.out.println(Thread.NORM_PRIORITY); //5
//设置正确的优先级
tp1.setPriority(5);
tp2.setPriority(10);
tp3.setPriority(1);
tp1.start();
tp2.start();
tp3.start();
}
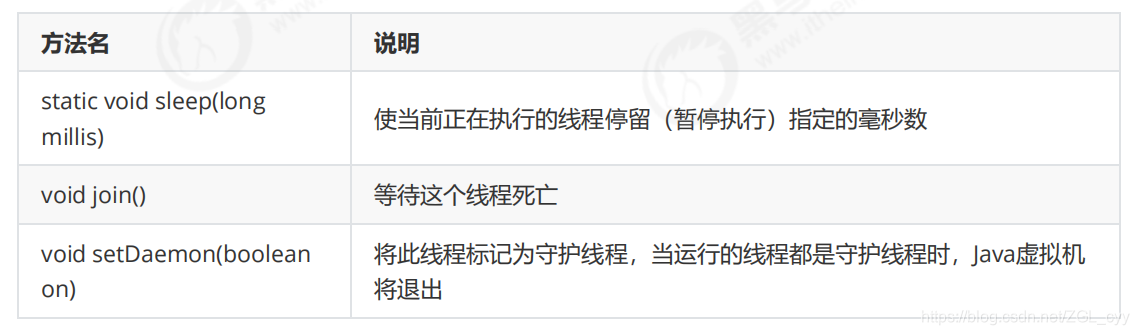
}5 线程控制【应用】
相关方法
代码演示
sleep演示:
public class ThreadSleep extends Thread {
    @Override
    public void run() {
        for (int i = 0; i < 100; i++) {
            System.out.println(getName() + ":" + i);
            try {
                Thread.sleep(1000);
            } catch (InterruptedException e) {
                e.printStackTrace();
            }
        }
    }
}
public class ThreadSleepDemo {
    public static void main(String[] args) {
        ThreadSleep ts1 = new ThreadSleep();
        ThreadSleep ts2 = new ThreadSleep();
        ThreadSleep ts3 = new ThreadSleep();
        ts1.setName("曹操");
        ts2.setName("刘备");
        ts3.setName("孙权");
        ts1.start();
        ts2.start();
        ts3.start();
    }
}
Join
演示:
public class ThreadJoin extends Thread {
    @Override
    public void run() {
        for (int i = 0; i < 100; i++) {
            System.out.println(getName() + ":" + i);
        }
    }
}
public class ThreadJoinDemo {
    public static void main(String[] args) {
        ThreadJoin tj1 = new ThreadJoin();
        ThreadJoin tj2 = new ThreadJoin();
        ThreadJoin tj3 = new ThreadJoin();
        tj1.setName("康熙");
        tj2.setName("四阿哥");
        tj3.setName("八阿哥");
        tj1.start();
        try {
            tj1.join();
        } catch (InterruptedException e) {
            e.printStackTrace();
        }
        tj2.start();
        tj3.start();
    }
}
Daemon
演示:
![]()
![]()
![]()
![]()
![]()
![]()
![]()
![]()
![]()
![]()
![]()
![]()
![]()
public class ThreadDaemon extends Thread {
@Override
public void run() {
for (int i = 0; i < 100; i++) {
System.out.println(getName() + ":" + i);
}
}
}
public class ThreadDaemonDemo {
public static void main(String[] args) {
ThreadDaemon td1 = new ThreadDaemon();
ThreadDaemon td2 = new ThreadDaemon();
td1.setName("关羽");
td2.setName("张飞");
//设置主线程为刘备
Thread.currentThread().setName("刘备");
//设置守护线程
td1.setDaemon(true);
td2.setDaemon(true);
td1.start();
td2.start();
for(int i=0; i<10; i++) {
System.out.println(Thread.currentThread().getName()+":"+i);
}
}
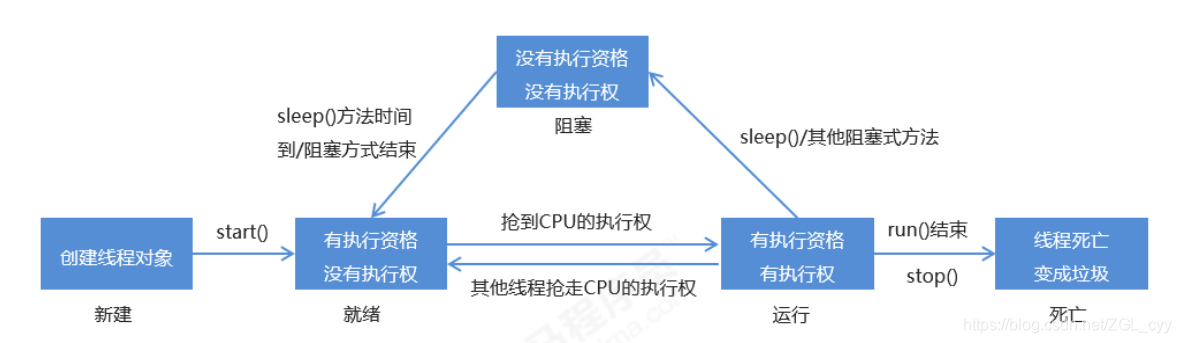
}6 线程的生命周期【理解】
线程一共有五种状态,线程在各种状态之间转换。
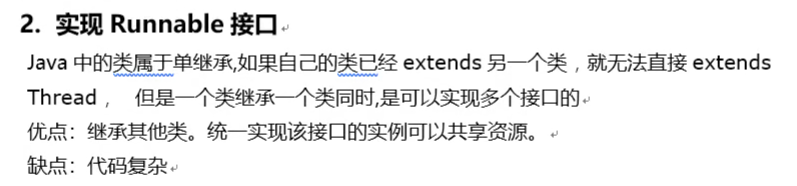
7 实现多线程方式二:实现Runnable接口【应用】
Thread
构造方法
实现步骤
定义一个类
MyRunnable
实现
Runnable
接口
在
MyRunnable
类中重写
run()
方法
创建
MyRunnable
类的对象
创建
Thread
类的对象,把
MyRunnable
对象作为构造方法的参数
启动线程
代码演示
public class MyRunnable implements Runnable {
    @Override
    public void run() {
        for(int i=0; i<100; i++) {
            System.out.println(Thread.currentThread().getName()+":"+i);
        }
    }
}
public class MyRunnableDemo {
    public static void main(String[] args) {
//创建MyRunnable类的对象
        MyRunnable my = new MyRunnable();
//创建Thread类的对象,把MyRunnable对象作为构造方法的参数
//Thread(Runnable target)
// Thread t1 = new Thread(my);
// Thread t2 = new Thread(my);
//Thread(Runnable target, String name)
        Thread t1 = new Thread(my,"高铁");
        Thread t2 = new Thread(my,"飞机");
//启动线程
        t1.start();
        t2.start();
    }
}
多线程的实现方案有两种
继承
Thread
类
实现
Runnable
接口
相比继承
Thread
类,实现
Runnable
接口的好处
避免了
Java
单继承的局限性
适合多个相同程序的代码去处理同一个资源的情况,把线程和程序的代码、数据有效分离,较好的体现了面向对象的设计思想
8 创建线程的四种方式比较


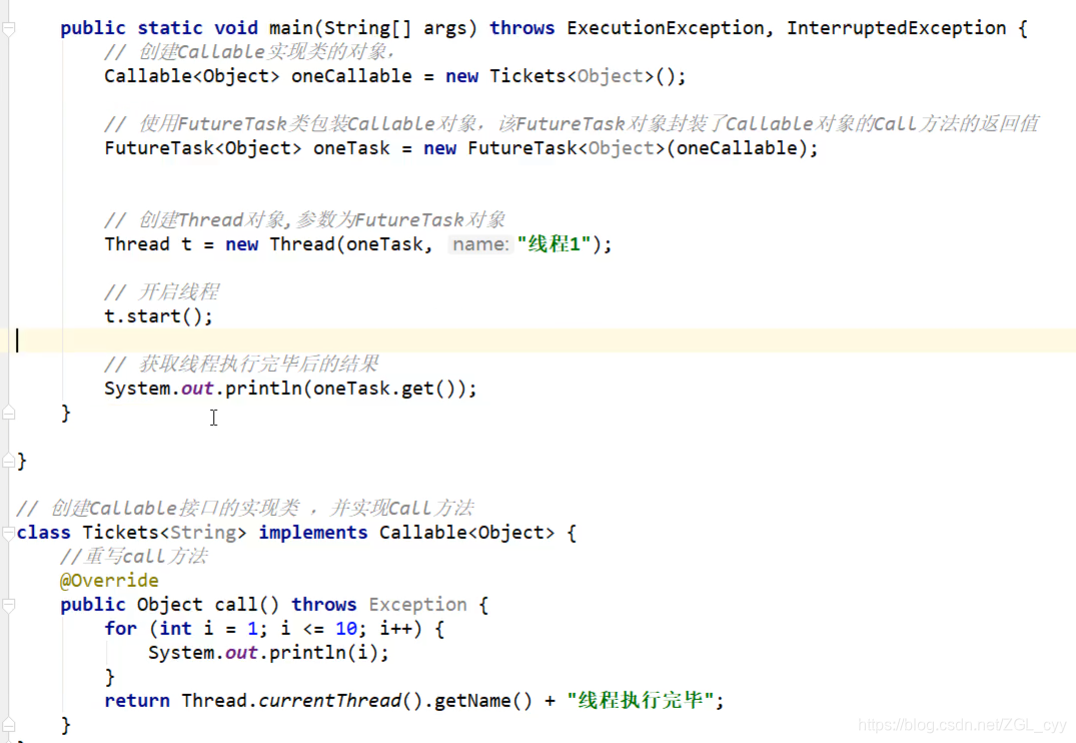

最后用那种:一般线程池足够了,如果需要返回值就用callable
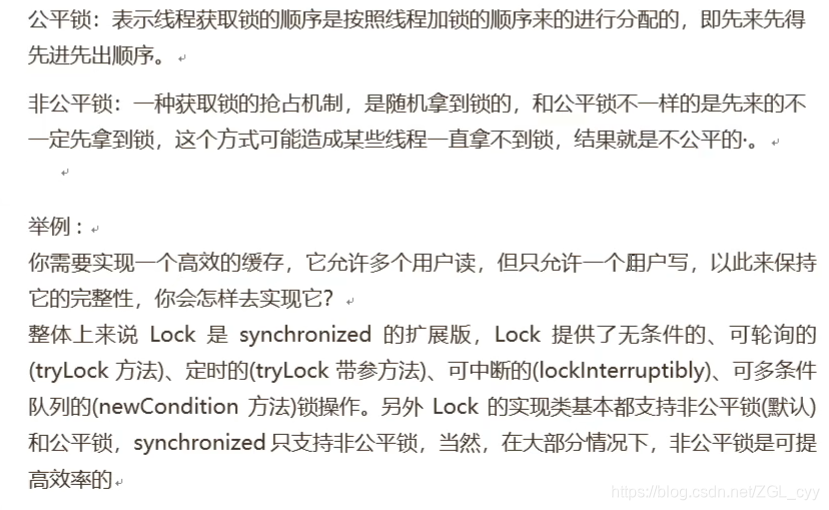
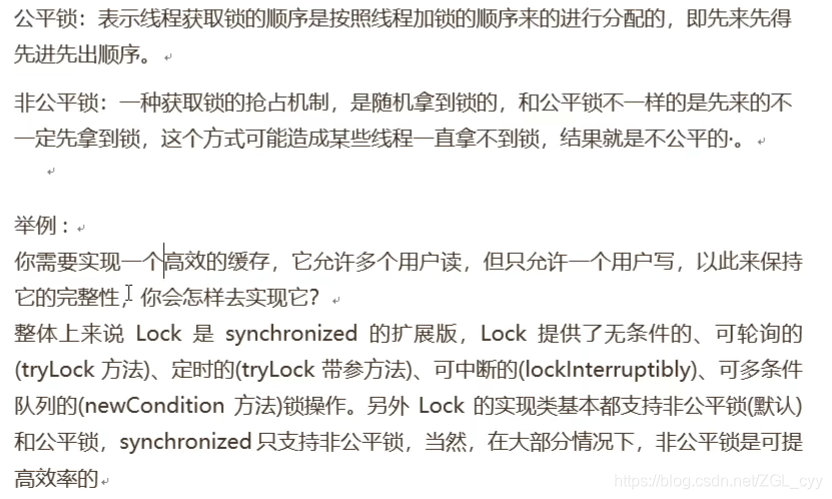
9 lock锁和synchronized块的优势


10 引用场景


 浙公网安备 33010602011771号