


5、SpringBoot Web开发
SpringBoot Web开发:
springboot到底帮我们配置了什么?能不能修改,能修改哪些东西?能不能拓展
- xxxxAutoConfigurartion…向容器中自动配置组件
- xxxxProperties:自动配置类,装配配置文件中自定义的一些内容
要解决的问题:
- 导入静态资源…
- 首页
- jsp,模版引擎Thymeleaf
- 装配扩展SpringMVC
- 增删改查
- 拦截器
- 国际化
1、静态资源的存放目录:
我们在做以前项目的时候,有WebApp下可以放静态资源以及页面,SpringBoot中没有webapp了静态资源应该怎么放置呢?
- 在springboot,我们 可以使用以下方式处理静态资源
- webjars
localhost:8080/wbjars/ - public, static,/**,resources
- webjars
- 优先级:resources>static>(默认)>public
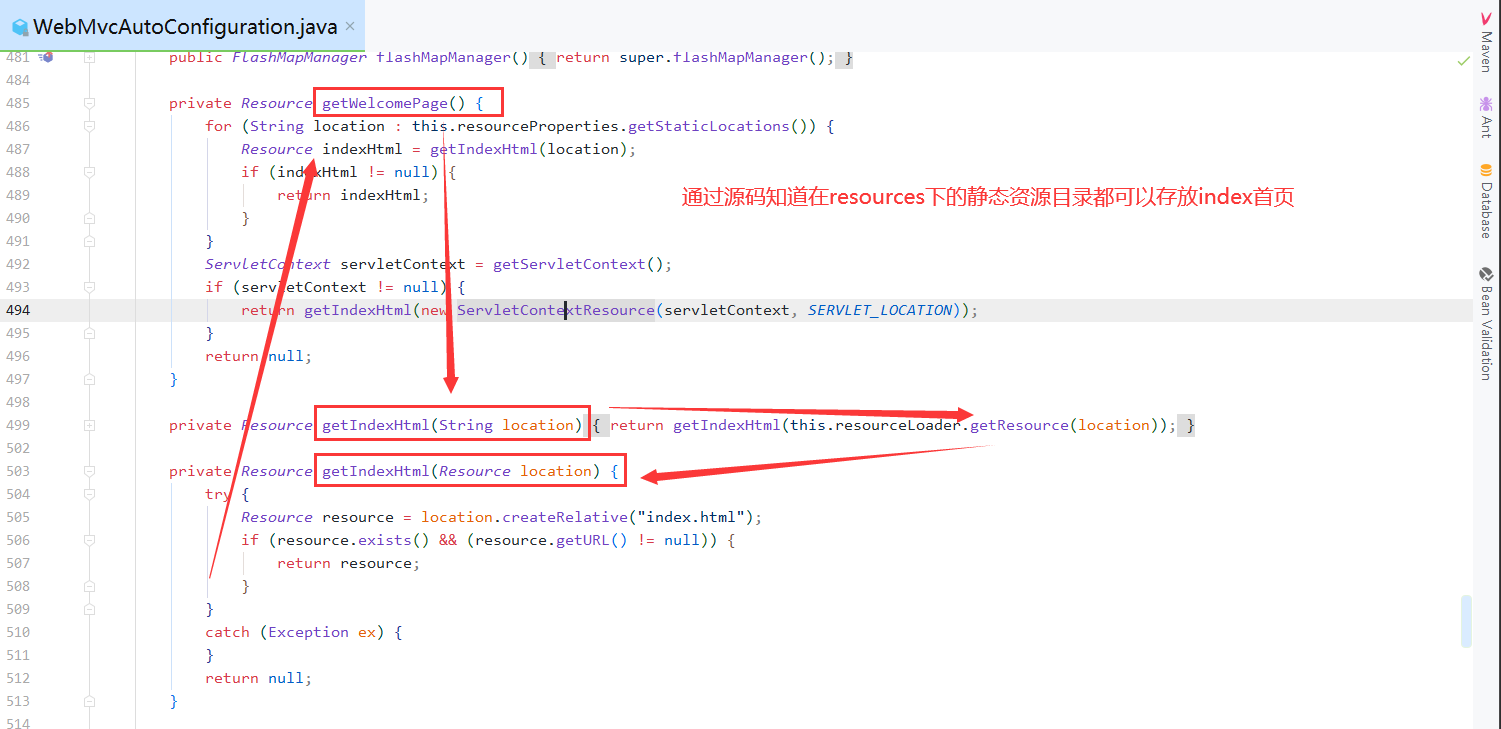
WebMVCAutoConfiguration:可以看到webjars是通过以下路径来找到
@Override
        protected void addResourceHandlers(ResourceHandlerRegistry registry) {
            super.addResourceHandlers(registry);
            if (!this.resourceProperties.isAddMappings()) {
                logger.debug("Default resource handling disabled");
                return;
            }
            ServletContext servletContext = getServletContext();
            addResourceHandler(registry, "/webjars/**", "classpath:/META-INF/resources/webjars/");
            addResourceHandler(registry, this.mvcProperties.getStaticPathPattern(), (registration) -> {
                registration.addResourceLocations(this.resourceProperties.getStaticLocations());
                if (servletContext != null) {
                    registration.addResourceLocations(new ServletContextResource(servletContext, SERVLET_LOCATION));
                }
            });
        }
Resources:是通过以下四个目录来找到静态资源
private static final String[] CLASSPATH_RESOURCE_LOCATIONS = { "classpath:/META-INF/resources/",
                "classpath:/resources/", "classpath:/static/", "classpath:/public/" };
SpringBoot项目的静态资源文件夹的优先级:
创建了三个文件名相同的文件,测试它们的优先级
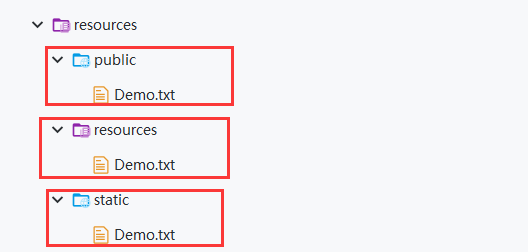
测试得到:resources目录 > static目录 > public目录
2、网站首页存放目录
将index页面放到静态资源目录:即上面的三个文件夹!优先级也是跟上面一样~
自定义默认网站图标:
1、将图片改为favicon.ico
2、放在static目录下
3、在application.yaml中添加,因为我使用的版本提示弃用的配置属性,不过不用管,可以运行成功!
spring:
  mvc:
    favicon:
      enabled: false
4、访问首页即可看到!
我使用的是SpringBoot2.4.2,直接把ico图片放在static目录下,会自动识别
3、Thymeleaf模板引擎
前端交给我们的页面,是html页面。如果是我们以前开发,我们需要把他们转成jsp页面,jsp好处就是当我们查出一些数据转发到JSP页面以后,我们可以用jsp轻松实现数据的显示,及交互等。jsp支持非常强大的功能,包括能写Java代码,
但是呢,我们现在的这种情况,SpringBoot这个项目首先是以jar的方式,不是war,像第二,我们用的还是嵌入式的Tomcat,所以呢,他现在默认是不支持jsp的。
那不支持jsp,如果我们直接用纯静态页面的方式,那给我们开发会带来非常大的麻烦,那怎么办呢,SpringBoot推荐你可以来使用模板引擎。
那么这模板引擎,我们其实大家听到很多,其实jsp就是一个模板引擎,还有以用的比较多的freemarker,包括SpringBoot给我们推荐的Thymeleaf,模板引擎有非常多,但再多的模板引擎,他们的思想都是一样的,什么样一个思想呢我们来看一下这张图。
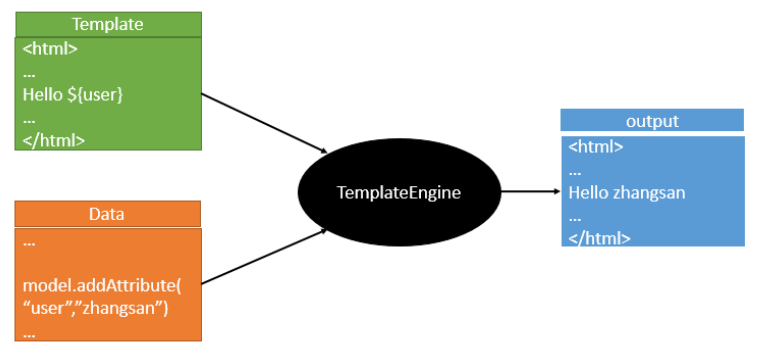
模板引擎的作用就是我们来写一个页面模板,比如有些值呢,是动态的,我们写一些表达式。而这些值,从哪来呢,我们来组装一些数据,我们把这些数据找到。然后把这个模板和这个数据交给我们模板引擎,模板引擎按照我们这个数据帮你把这表达式解析、填充到我们指定的位置,然后把这个数据最终生成一个我们想要的内容给我们写出去,这就是我们这个模板引擎,不管是jsp还是其他模板引擎,都是这个思想。
主要来介绍一下SpringBoot给我们推荐的Thymeleaf模板引擎,这模板引擎呢,是一个高级语言的模板引擎,他的这个语法更简单。而且呢,功能更强大。
3.0:引入thymeleaf :
怎么引入呢,对于springboot来说,什么事情不都是一个start的事情嘛,我们去在项目中引入一下。给大家三个网址:
1、Thymeleaf 官网:https://www.thymeleaf.org/
2、Thymeleaf 在Github 的主页:https://github.com/thymeleaf/thymeleaf
3、Spring官方文档:“https://docs.spring.io/spring-boot/docs/2.1.6.RELEASE/reference/htmlsingle/#using-boot-starter” , 找到我们对应的版本的maven依赖即可!
<dependency>
    <groupId>org.springframework.boot</groupId>
    <artifactId>spring-boot-starter-thymeleaf</artifactId>
</dependency>
或者下面的也可以,自行选择
    <!--thymeleaf模板引擎-->
        <dependency>
            <groupId>org.thymeleaf</groupId>
            <artifactId>thymeleaf-spring5</artifactId>
        </dependency>
        <dependency>
            <groupId>org.thymeleaf.extras</groupId>
            <artifactId>thymeleaf-extras-java8time</artifactId>
        </dependency>
- 查看thymeleaf.properties源码
通过前面的学习可以知道,每一个maven依赖对应的jar包都有一个对应的xxx.properties,所以我们找到thymeleaf.properties源码看一下:
@ConfigurationProperties(
    prefix = "spring.thymeleaf"
)
public class ThymeleafProperties {
    private static final Charset DEFAULT_ENCODING;
    public static final String DEFAULT_PREFIX = "classpath:/templates/";
    public static final String DEFAULT_SUFFIX = ".html";
    private boolean checkTemplate = true;
    private boolean checkTemplateLocation = true;
    private String prefix = "classpath:/templates/";
    private String suffix = ".html";
    private String mode = "HTML";
    private Charset encoding;
}
我们可以在其中看到默认的前缀和后缀!我们只需要把我们的html页面放在类路径下的templates下,thymeleaf就可以帮我们自动渲染了。
3.1:HTML中引入Thymeleaf约束
<!--我们要使用thymeleaf,需要在html文件中导入命名空间的约束,方便提示-->
<html lang="en" xmlns:th="http://www.thymeleaf.org">
3.2:th:text表达式
1、标准变量表达式
作用: 获取key对于的文本数据, key 是request作用域中的key , 使用request.setAttribute(), model.addAttribute()
<div style="margin-left: 400px">
    <h3>标准变量表达式:  ${key}</h3>
    <p th:text="${site}">key不存在</p>
    <br/>
    <p>获取SysUser对象 属性值</p>
    <p th:text="${myuser.id}">id</p>
    <p th:text="${myuser.name}">姓名</p>
    <p th:text="${myuser.sex}">姓名:m男</p>
    <p th:text="${myuser.age}">年龄</p>
    <p th:text="${myuser.getName()}">获取姓名使用getXXX</p>
</div>
语法: *{key}
作用: 获取这个key对应的数据,*{key}需要和th:object 这个属性一起使用。
<p>使用 *{} 获取SysUser的属性值</p>
<div th:object="${myuser}">
    <p th:text="*{id}"></p>
    <p th:text="*{name}"></p>
    <p th:text="*{sex}"></p>
    <p th:text="*{age}"></p>
</div>
语法: @{url}
作用:
<a th:href="@{https://www.baidu.com}">绝对地址</a><br>
<a th:href="@{'/thymeleaf/test2Link1/'+${myDataId}}">相对地址</a><br>
<a th:href="@{/thymeleaf/test2Link1(id='1',name='zs',age='23')}">多参数传递数据</a>
3.3:th:each遍历
语法:集合循环成员,循环的状态变量:两个名称都是自定义的。 “循环的状态变量”这个名称可以不定义,默认是"集合循环成员Stat"
<div th:each="集合循环成员,循环的状态变量:${key}">
    <p th:text="${集合循环成员}"></p>
</div>
1、遍历集合
@GetMapping("/forEach")
public String test3Each(Model model){
    List<Student> studentList = new ArrayList<>();
    studentList.add(new Student(1, "张三", 23));
    studentList.add(new Student(2, "李四", 24));
    studentList.add(new Student(3, "王五", 25));
    model.addAttribute("studentList", studentList);
    return "eachList";
}
<table class="my-table" th:if="${studentList.size()>0}">
    <tr>
        <th>编号</th>
        <th>ID</th>
        <th>姓名</th>
        <th>年龄</th>
    </tr>
    <tr th:each="stu:${studentList}">
        <td th:text="${stuStat.index}"></td>
        <td th:text="${stu.getId()}"></td>
        <td th:text="${stu.getName()}"></td>
        <td th:text="${stu.getAge()}"></td>
    </tr>
</table>
2、遍历Map
@GetMapping("/forEachToMap")
public String test4EachMap(Model model) {
    Map<String, Student> map = new TreeMap<>();
    map.put("stu1",new Student(1, "张三", 23));
    map.put("stu2",new Student(2, "李四", 24));
    map.put("stu3",new Student(3, "王五", 25));
    model.addAttribute("map", map);
    return "eachToMap";
}
<table class="my-table">
    <tr>
        <th>编号</th>
        <th>ID</th>
        <th>姓名</th>
        <th>年龄</th>
    </tr>
    <tr th:each="stu:${map}">
        <td th:text="${stuStat.index}"></td>
        <td th:text="${stu.value.getId()}"></td>
        <td th:text="${stu.value.getName()}"></td>
        <td th:text="${stu.value.getAge()}"></td>
    </tr>
</table>
3.4:th:if判断
"th:if" : 判断语句, 当条件为true, 显示html标签体内, 反之不显示,没有else语句;
<div th:if=" 10 > 0 "> 显示文本内容 </div>
<div style="margin-left: 400px">
        <h3> if 使用</h3>
        <p th:if="${sex=='m'}">性别是男</p>
        <p th:if="${isLogin}">已经登录系统</p>
        <p th:if="${age > 20}">年龄大于20</p>
        <!--""空字符是true-->
        <p th:if="${name}">name是“”</p>
        <!--null是false-->
        <p th:if="${isOld}"> isOld是null</p>
 </div>
3.5:th:switch
语法:和Java中Switch语法一样,默认值用*表示
<div th:switch="要比对的值">
    <p th:case="值1">
        结果1
    </p>
    <p th:case="值2">
        结果2
    </p>
    <p th:case="*">
        默认结果
    </p>
    以上的case只有一个语句执行
</div>
3.6:th:inline内联
1、内联text: 在html标签外,获取表达式的值
<p>显示姓名是:[[${key}]]</p>

 <div style="margin-left: 400px">
        <h3>内联 text, 使用内联表达式显示变量的值</h3>
        <div th:inline="text">
            <p>我是[[${name}]],年龄是[[${age}]]</p>
            我是<span th:text="${name}"></span>,年龄是<span th:text="${age}"></span>
        </div>

        <div>
            <p>使用内联text</p>
            <p>我是[[${name}]],性别是[[${sex}]]</p>
        </div>
</div>
2、内联JavaScript
<script type="text/javascript" th:inline="javascript">
    var myname = [[${name}]];
    var myage = [[${age}]];

    //alert("获取的模板中数据 "+ myname + ","+myage)

    function fun() {
        alert("单击事件,获取数据 " + myname + "," + [[${sex}]])
    }
</script>
3.7:字面量
<div style="margin-left: 400px">
    <h3>文本字面量: 使用单引号括起来的字符串</h3>
    <p th:text="'我是'+${name}+',我所在的城市'+${city}">数据显示</p>

    <h3>数字字面量</h3>
    <p th:if="${20>5}"> 20大于 5</p>

    <h3>boolean字面量</h3>
    <p th:if="${isLogin == true}">用户已经登录系统</p>

    <h3>null字面量</h3>
    <p th:if="${myuser != null}">有myuser数据</p>
</div>
3.8:字符串连接
连接字符串有两种语法
1、使用单引号括起来字符串 , 使用 + 连接其他的 字符串或者表达式
<p th:text="'我是'+${name}+',我所在的城市'+${city}">数据显示</p>
2、使用双竖线, |字符串和表达式|
<p th:text="|我是${name},我所在城市${city|">
    显示数据
</p>
3.9:运算符
算术运 算: + , - - , * , / , %
关系比较 : > , < , >= , <= ( gt , lt , ge , le )
相等判断: == , != ( eq , ne )


<div style="margin-left: 400px">
        <h3>使用运算符</h3>
        <p th:text="${age > 10}">年龄大于 10 </p>
        <p th:text="${ 20 + 30 }">显示运算结果</p>
        <p th:if="${myuser == null}">myuser是null</p>
        <p th:if="${myuser eq null}">myuser是null</p>
        <p th:if="${myuser ne null}">myuser不是null</p>

        <p th:text="${isLogin == true ? '用户已经登录' : '用户需要登录'}"></p>
        <p th:text="${isLogin == true ? ( age > 10 ? '用户是大于10的' : '用户年龄比较小') : '用户需要登录'}"></p>

    </div>

三元运算符:
 表达式  ? true的结果 : false的结果

三元运算符可以嵌套
3.10:内置对象
#request 表示 HttpServletRequest
session 表示Map对象的, 是#session的简单表示方式, 用来获取session中指定的key的值
#session.getAttribute("loginname") == session.loginname
这些是内置对象,可以在模板文件中直接使用。
<div style="margin-left: 350px">
        <h3>内置对象#request,#session,session的使用</h3>
        <p>获取作用域中的数据</p>
        <p th:text="${#request.getAttribute('requestData')}"></p>
        <p th:text="${#session.getAttribute('sessionData')}"></p>
        <p th:text="${session.loginname}"></p>

        <br/>
        <br/>
        <h3>使用内置对象的方法</h3>
        getRequestURL=<span th:text="${#request.getRequestURL()}"></span><br/>
        getRequestURI=<span th:text="${#request.getRequestURI()}"></span><br/>
        getQueryString=<span th:text="${#request.getQueryString()}"></span><br/>
        getContextPath=<span th:text="${#request.getContextPath()}"></span><br/>
        getServerName=<span th:text="${#request.getServerName()}"></span><br/>
        getServerPort=<span th:text="${#request.getServerPort()}"></span><br/>
</div>
3.11:内置工具类
内置工具类型: Thymeleaf自己的一些类,提供对string, date ,集合的一些处理方法
#dates: 处理日器的工具类
#numbers:处理数字的
<div style="margin-left: 350px">
      <h3>日期类对象 #dates</h3>
      <p th:text="${#dates.format(mydate )}"></p>
      <p th:text="${#dates.format(mydate,'yyyy-MM-dd')}"></p>
      <p th:text="${#dates.format(mydate,'yyyy-MM-dd HH:mm:ss')}"></p>
      <p th:text="${#dates.year(mydate)}"></p>
      <p th:text="${#dates.month(mydate)}"></p>
      <p th:text="${#dates.monthName(mydate)}"></p>
      <p th:text="${#dates.createNow()}"></p>
      <br/>

      <h3>内置工具类#numbers,操作数字的</h3>
      <p th:text="${#numbers.formatCurrency(mynum)}"></p>
      <p th:text="${#numbers.formatDecimal(mynum,5,2)}"></p>

      <br/>
      <h3>内置工具类#strings,操作字符串</h3>
      <p th:text="${#strings.toUpperCase(mystr)}"></p>
      <p th:text="${#strings.indexOf(mystr,'power')}"></p>
      <p th:text="${#strings.substring(mystr,2,5)}"></p>
      <p th:text="${#strings.substring(mystr,2)}"></p>
      <p th:text="${#strings.concat(mystr,'---java开发的黄埔军校---')}"></p>
      <p th:text="${#strings.length(mystr)}"></p>
      <p th:text="${#strings.length('hello')}"></p>
      <p th:unless="${#strings.isEmpty(mystr)}"> mystring 不是 空字符串  </p>

      <br/>
      <h3>内置工具类#lists,操作list集合</h3>
      <p th:text="${#lists.size(mylist)}"></p>
      <p th:if="${#lists.contains(mylist,'a')}">有成员a</p>
      <p th:if="!${#lists.isEmpty(mylist)}"> list 集合有多个成员</p>

      <br/>
      <h3>处理null</h3>
      <p th:text="${zoo?.dog?.name}"></p>

  </div>
3.12:自定义模板
1、定义模板
<div th:fragment="head">
    <p>
        java开发工程师
    </p>
    <p>
        www.zhangzhixi.top
    </p>
</div>
2、使用模板
1) ~{templatename :: selector}
    templatename:  文件名称
    selector: 自定义模板名称
2)templatename :: selector
    templatename:  文件名称
    selector: 自定义模板名称
对于使用模板:有包含模板(th:include), 插入模板(th:insert)
4、了解装配MVC以及扩展MVC
官方建议:直接创建一个MVCconfig类,在类上加上 @Configuration 注解,并且实现WebMvcConfigurer接口,并且不能使用 @EnableWebMvc 注解
为什么不能使用 @EnableWebMvc 注解
-
这个注解导入了一个类:DelegatingWebMvcConfiguration,这个类从容器中获取所有的webmvcconfig
并且在WebMvcAutoConfiguration类中有这样一个注解:
@ConditionalOnMissingBean(WebMvcConfigurationSupport.class)
-
这个注解的意思就是:容器中没有这个组件的时候,这个自动配置类才生效
-
如果加了 @EnableWebMVC 容器中就有了组件,这个配置就不生效了
如果需要全面接管SpringMVC可以使用该注解,当然在开发中,不推荐使用全面接管SpringMVC
扩展:在springboot中,有非常多的xxxx Configuration帮助我们进行扩展配置、
通常我们的添加功能扩展的类都是在config包下,而视图的跳转页面则放到templates包下:
自定义一个视图解析器实现页面的跳转:
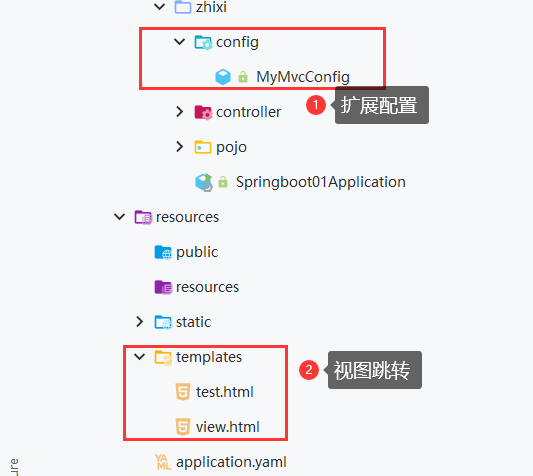
 1 /**
 2  * 扩展:自定义spring DispatcherServlet(视图解析器)
 3  *  如果你想diy一些定制化的功能, 只要写这个组件,然后将它交给springboot, springboot就会帮我们自动装配!
 4  */
 5 @Configuration
 6 public class MyMvcConfig implements WebMvcConfigurer {
 7
 8     @Override
 9     /*添加视图控制器*/
10     public void addViewControllers(ViewControllerRegistry registry) {
11         // 如果视图控制器走/zhixi,就会跳转到view.html页面
12         registry.addViewController("/zhixi").setViewName("view");
13     }
14 }
5、前端基础
如果你想定义你的404错误,就要将你的404.html页面放到templates/error/下
准备工作:
-
准备好模版(在网上找bootstrap或其他的模版,或者自己写)
-
页面直接放在templates下,css、img、js等放在static下
-
修改html页面,使其符合Thymeleaf模版规范
- 在url路径属性前增加
th:并修改url路径为@{}格式(js、css、img等)
- 在url路径属性前增加
4. 准备数据
在这里用Map模拟数据库中的数据,后期再进行数据库整合。
pojo实体类:
用户表:


 1 package com.zhixi.pojo;
 2
 3 import lombok.AllArgsConstructor;
 4 import lombok.Data;
 5 import lombok.NoArgsConstructor;
 6 import org.springframework.stereotype.Repository;
 7
 8 /**
 9  * @author zhangzhixi
10  */
11 @Data
12 @AllArgsConstructor
13 @NoArgsConstructor
14 public class User {
15     private Integer id;
16     private String name;
17     private int age;
18     // 员工部门
19     private Department department;
20 }
部门表:
package com.zhixi.pojo;

import lombok.AllArgsConstructor;
import lombok.Data;
import lombok.NoArgsConstructor;

/**
 * @author zhangzhixi
 * 部门表
 */
@Data
@AllArgsConstructor
@NoArgsConstructor
public class Department {
    private Integer id;
    private String departmentName;
}
dao层业务:
UserDao:
package com.zhixi.dao;

import com.zhixi.pojo.Department;
import com.zhixi.pojo.User;
import org.springframework.beans.factory.annotation.Autowired;
import org.springframework.stereotype.Repository;

import java.util.Collection;
import java.util.HashMap;
import java.util.Map;

/**
 * @author zhangzhixi
 */
@Repository
public class UserDao {
    //模拟数据库中的数据
    private static Map<Integer, User> userMap = null;

    @Autowired
    // 员工所属的部门
    private static DepartmentDao departmentDao;

    static {
        //模拟数据库中的数据
        userMap = new HashMap<Integer, User>();
        userMap.put(101, new User(1001, "张三", 21, new Department(101, "教学部")));
        userMap.put(102, new User(1002, "李四", 22, new Department(102, "市场部")));
        userMap.put(103, new User(1003, "王五", 23, new Department(103, "后勤部")));
    }

    // 主键自增
    private static Integer initId = 1004;

    // 添加一个用户
    public void addUser(User user) {
        userMap.put(initId++, user);
    }
    // 查询全部员工
    public Collection<User> getUsers(){
        return userMap.values();
    }
    // 通过id查询员工
    public User getUserById(Integer id){
        return userMap.get(id);
    }
    // 删除一个员工
    public void delUser(Integer id){
        userMap.remove(id);
    }
}
DepartmentDao:
 1 package com.zhixi.dao;
 2
 3 import com.zhixi.pojo.Department;
 4 import org.springframework.stereotype.Repository;
 5
 6 import java.util.Collection;
 7 import java.util.HashMap;
 8 import java.util.Map;
 9
10 /**
11  * @author zhangzhixi
12  * 部门dao
13  */
14 // 相当于Component注解
15 @Repository
16 public class DepartmentDao {
17     private static Map<Integer, Department> Departments = null;
18
19     static {
20         //模拟数据库中的数据
21         Departments = new HashMap<Integer, Department>();//创建一个部门表
22         Departments.put(101, new Department(101, "教学部"));
23         Departments.put(102, new Department(102, "市场部"));
24         Departments.put(103, new Department(103, "后勤部"));
25         Departments.put(104, new Department(104, "教研部"));
26     }
27
28     //获得所有部门信息
29     public Collection<Department> getDepartments() {
30         return Departments.values();
31     }
32
33     // 根据id查询部门
34     public Department getDepartmentById(Integer id) {
35         return Departments.get(id);
36     }
37 }
首页实现
要求:默认访问首页
方式一:写一个controller实现!
1 //会解析到templates目录下的index.html页面
2 @RequestMapping({"/","/index.html"})
3  public String index(){
4      return "index";
5 }
方式二:自己编写MVC的扩展配置
1 @Configuration
2 public class MyMVCConfig implements WebMvcConfigurer {
3     @Override
4     public void addViewControllers(ViewControllerRegistry registry) {
5         //param1:路径,param2:名称
6         registry.addViewController("/").setViewName("index");
7         registry.addViewController("/index.html").setViewName("index");
8     }
9 }
解决了这个问题,我们还需要解决一个资源导入的问题;
为了保证资源导入稳定,我们建议在所有资源导入时候使用 th:去替换原有的资源路径!
1 <!--“/”默认就是statics目录-->
2 <link th:href="@{/css/style.css}" rel="stylesheet" />
3
4 </head>
5 <body>
6
7 <script th:src="@{/js/anime.min.js}"></script>
6、项目国际化
1、在页面设置按钮发送请求,并修改页面文字元素为thymeleaf格式
注意踩坑,这里的index不带后缀名
    <!--设置语言切换-->
    <a class="btn btn-sm" th:href="@{/index(l='zh_CN')}">中文</a>
    <a class="btn btn-sm" th:href="@{/index(l='en_US')}">English</a>
2、在resources下创建i18n文件夹,并创建login.proterties文件login_zh_CN.proterties文件login_en_US.proterties文件并写入数据
login.tip=请登录
login.username=用户名
login.password=密码
login.remember=保存密码
login.btn=登录

login.tip=请登录
login.username=用户名
login.password=密码
login.remember=保存密码
login.btn=登录

login.tip=please sign in
login.username=username
login.password=userpassword
login.remember=save pwd
login.btn=login
3、在核心配置文件中配置一下属性
# 国际化配置文件的真实位置
spring.messages.basename=iI18n.login
4、在config包内创建类,实现localereslover接口,重写方法,解析请求
 1 package com.zhixi.config;
 2
 3 import org.springframework.util.StringUtils;
 4 import org.springframework.web.servlet.LocaleResolver;
 5
 6 import javax.servlet.http.HttpServletRequest;
 7 import javax.servlet.http.HttpServletResponse;
 8 import java.util.Locale;
 9
10 /**
11  * @author zhangzhixi
12  * 编写语言解析器设置
13  */
14 public class MyLocalResolver implements LocaleResolver {
15     @Override
16     public Locale resolveLocale(HttpServletRequest request) {
17         // 获取到首页传来的语言版本
18         String language = request.getParameter("l");
19         // 识别语言版本,没有就使用默认的
20         Locale locale = Locale.getDefault();
21         System.out.println("========>" + language);
22         // 请求参数携带了国际化参数,将语言zh_CH进行分割
23         if (!StringUtils.isEmpty(language)) {
24             System.out.println("==============");
25             String[] split = language.split("_");
26             // 设置国家和地区
27             System.out.println(split[0]);
28             System.out.println(split[1]);
29             locale = new Locale(split[0], split[1]);
30         }
31         return locale;
32     }
33     @Override
34     public void setLocale(HttpServletRequest httpServletRequest, HttpServletResponse httpServletResponse, Locale locale) {
35     }
36 }
5、在mvcconfig配置Bean
注意踩坑,这里的方法名必须是localeResolver
    // 注册语言解析器
    @Bean
    public LocaleResolver localeResolver(){
        return new MyLocalResolver();
    }
6、测试运行
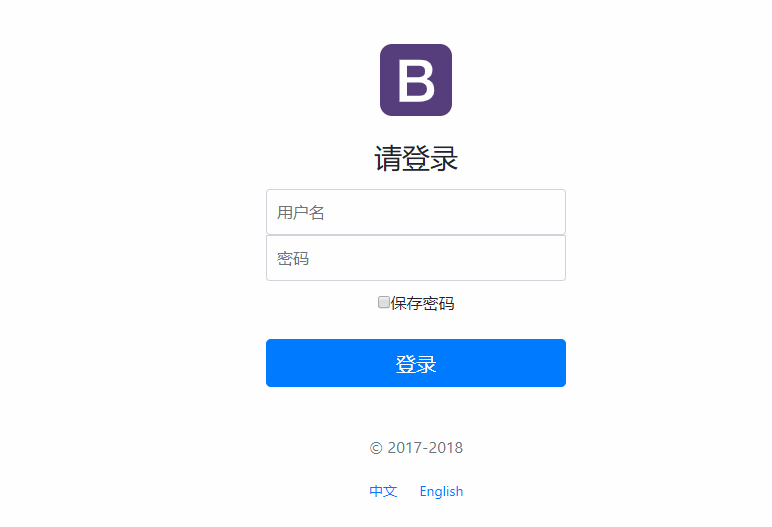
附:index首页代码
 1 <!DOCTYPE html>
 2 <html lang="en" xmlns:th="http://www.thymeleaf.org">
 3 <head>
 4     <meta http-equiv="Content-Type" content="text/html; charset=UTF-8">
 5     <meta name="viewport" content="width=device-width, initial-scale=1, shrink-to-fit=no">
 6     <meta name="description" content="">
 7     <meta name="author" content="">
 8     <title>Signin Template for Bootstrap</title>
 9     <link th:href="@{/css/bootstrap.min.css}" rel="stylesheet">
10     <link th:href="@{/css/signin.css}" rel="stylesheet">
11 </head>
12
13 <body class="text-center">
14 <form class="form-signin" action="dashboard.html">
15     <img class="mb-4" th:src="@{/img/bootstrap-solid.svg}" alt="" width="72" height="72">
16
17
18     <!--请登录-->
19     <h1 class="h3 mb-3 font-weight-normal" th:text="#{login.tip}">Please sign in</h1>
20     <!--账号密码-->
21     <input type="text" class="form-control" th:placeholder="#{login.username}" required="" autofocus="">
22     <input type="password" class="form-control" th:placeholder="#{login.password}" required="">
23
24     <div class="checkbox mb-3">
25         <label>
26             <!--记住密码-->
27             <input type="checkbox" value="remember">[[#{login.remember}]]
28         </label>
29     </div>
30     <!--登录-->
31     <button class="btn btn-lg btn-primary btn-block" type="submit">[[#{login.btn}]]</button>
32     <p class="mt-5 mb-3 text-muted">© 2017-2018</p>
33     <!--设置语言切换-->
34     <a class="btn btn-sm" th:href="@{/index(l='zh_CN')}">中文</a>
35     <a class="btn btn-sm" th:href="@{/index(l='en_US')}">English</a>
36 </form>
37
38 </body>
39
40 </html>
7、登录+拦截器功能实现
登录:
1、这里就先不连接数据库了,输入任意用户名都可以登录成功!
声明一个之前没有提到的问题: templates下的页面只能通过Controller跳转实现,而static下的页面是能直接被外界访问的,就能正常访问了。
我们把登录页面的表单提交地址写一个controller!
<form class="form" th:action="@{/user/login}" method="post">
2、去编写对应的controller
@Controller
public class LoginController {
    @RequestMapping("/user/login")
    public String login(
            @RequestParam("username") String username,
            @RequestParam("password") String password,
            Model model,) {

        if (username != null && "123".equals(password)) {
            // 重定向到controller请求中
            return "redirect:/main.html";
        } else {
            // 告诉用户登录失败
            model.addAttribute("msg", "用户名或者密码错误");
            return "index";
        }
    }
}
3、关闭页面缓存
页面存在缓存,所以我们需要禁用模板引擎的缓存
#禁用模板缓存spring.thymeleaf.cache=false
4、给出用户登录失败提示
<!--判断是否显示,使用if, ${}可以使用工具类,可以看thymeleaf的中文文档-->
<p style="color: red" th:text="${msg}" th:if="${not #strings.isEmpty(msg)}"></p>
5、在MVCConfig中添加视图控制映射
能够在第2步中的redirect中能够跳转到对应的页面
// 接收请求,转到页面
registry.addViewController("/main.html").setViewName("dashboard");
6、登录测试
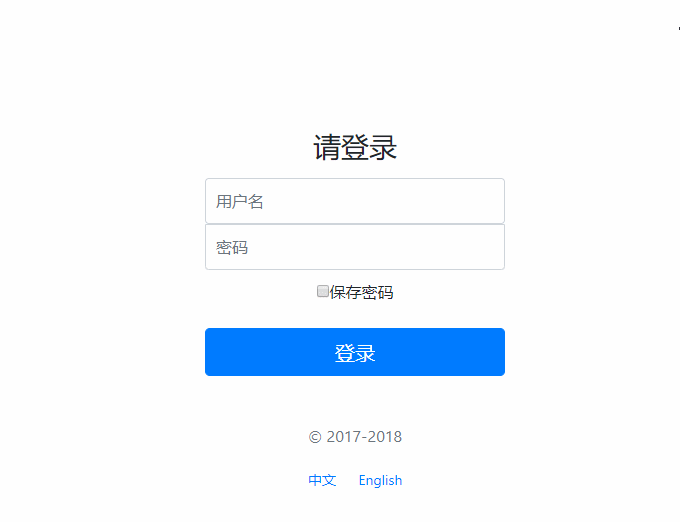
成功:
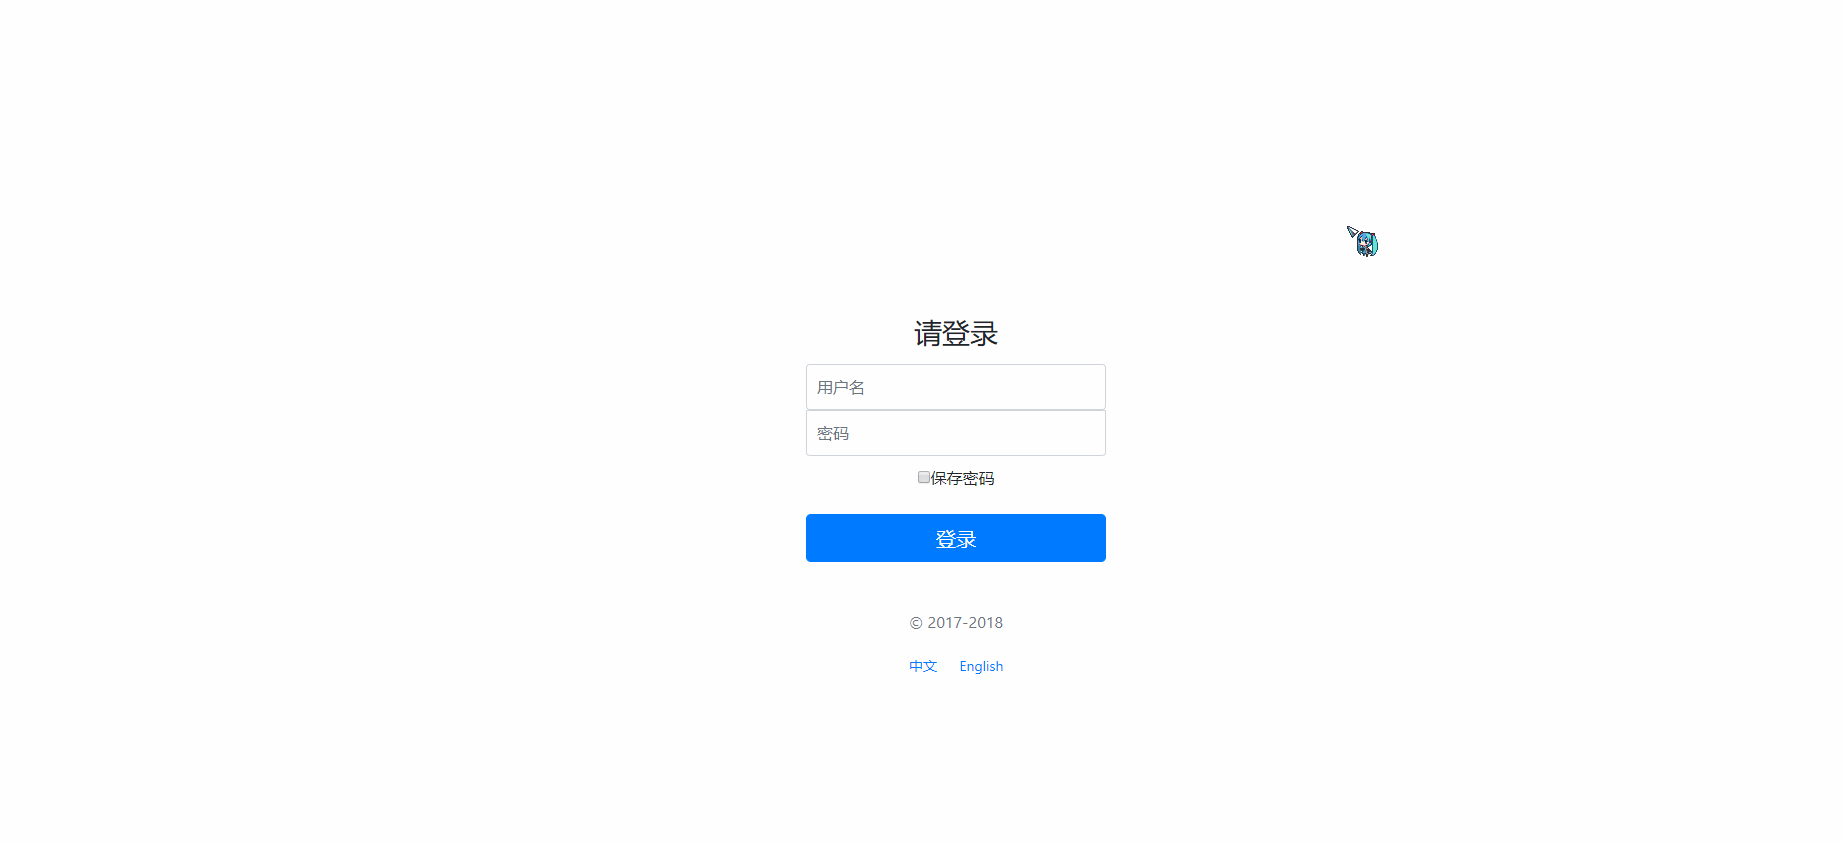
失败:
模板引擎修改后,想要实时生效!页面修改完毕后,IDEA小技巧 : Ctrl + F9 重新编译!
拦截器:HandlerInterceptor
重定向成功之后!我们解决了之前资源没有加载进来的问题!后台主页正常显示!
但是又发现新的问题,我们可以直接登录到后台主页,不用登录也可以实现!
怎么处理这个问题呢?我们可以使用拦截器机制,实现登录检查!
1、config包中自定义拦截器:
public class LoginHandlerInterceptor implements HandlerInterceptor {
    @Override
    public boolean preHandle(HttpServletRequest request, HttpServletResponse response, Object handler) throws Exception {

        Object login = request.getSession().getAttribute("login");

        // 提示用户没有登录成功
        if (login == null) {
            request.setAttribute("msg", "没有权限,请先登录!");
            request.getRequestDispatcher("/index").forward(request, response);
            return false;
        }
        return true;
    }
}
2、将拦截器注册到我们的SpringMVC配置类当中!
    // 拦截器设置
    @Override
    public void addInterceptors(InterceptorRegistry registry) {
        registry.addInterceptor(new LoginHandlerInterceptor())
                // 拦截所有请求
                .addPathPatterns("/**")
                // 放行指定路径
                .excludePathPatterns("/", "/index", "/user/login", "/css/*", "/js/*");
    }
3、测试,直接访问主页

8、展示用户页
1、首页点击用户后进行跳转
<li class="nav-item">
    <!--请求路径就到controller中-->
    <a class="nav-link" th:href="@{/emps}">
        员工
    </a>
</li>
2、定义一个controller类来实现处理请求数据的功能
@Controller
public class UserController {
    @Autowired
    private UserDao userDao;

    @RequestMapping("/emps")
    public String list(Model model) {
        // 调用dao层业务方法获取全部用户
        Collection<User> users = userDao.getUsers();
        // model携带用户数据
        model.addAttribute("emp", users);
        // 跳转到list页面展示
        return "emp/list";
    }
}
3、在list页面中定义表格,将获取到的数据通过thymeleaf显示出来
<div class="table-responsive">
	<table class="table table-striped table-sm">
		<thead>
			<tr>
				<th>编号</th>
				<th>姓名</th>
				<th>年龄</th>
				<th>部门编号</th>
				<th>部门名称</th>
				<th>操作</th>
			</tr>
		</thead>
		<tbody>
			<tr th:each="emps:${emp}">
				<td th:text="${emps.getId()}"></td>
				<td th:text="${emps.getName()}"></td>
				<td th:text="${emps.getAge()}"></td>
				<td th:text="${emps.getDepartment().getId()}"></td>
				<td th:text="${emps.getDepartment().getDepartmentName()}"></td>
				<td>
					<button class="btn btn-sm btn-primary">编辑</button>
					<button class="btn btn-sm btn-danger">删除</button>
				</td>
			</tr>
		</tbody>
	</table>
</div>

9、添加员工
1、在用户展示的list页面添加跳转到添加员工页面
<!--添加员工-->
<h2></h2><a class="btn btn-sm btn-success" th:href="@{/emp}">添加员工</a>
2、编写controller跳转到添加用户页面
// 添加用户界面
@GetMapping("/emp")
public String addUser(Model model) {
    // 查出所有部门的信息
    Collection<Department> departments = departmentDao.getDepartments();
    model.addAttribute("departments", departments);
    // 请求到add页面
    return "emp/add";
}
3、add页面添加表单数据:注意name属性要跟字段一致,否则表单不会将数据进行提交
<form th:action="@{/emp}" method="post">
    <div class="form-group">
        <label>员工姓名</label>
        <input type="text" class="form-control" placeholder="xxx" name="name">
    </div>
    <div class="form-group">
        <label>员工年龄</label>
        <input type="text" class="form-control" placeholder="xxx" name="age">
    </div>
    <div class="form-group">
        <label>员工部门</label>
        <select class="form-control" name="department.id">
            <option th:each="dept:${departments}" th:text="${dept.getDepartmentName()}" th:value="${dept.getId()}"></option>
        </select>
    </div>
    <button type="submit" class="btn btn-primary">添加</button>
</form>

4、添加用户成功跳转到查询全部员工界面
// 添加用户成功请求(跳转到首页)
@PostMapping("/emp")
public String addEmp(User user) {
    // 用户点击添加按钮,底层执行添加操作
    System.out.println("add==>" + user);
    userDao.addUser(user);
    // 重定向到查询全部用户界面
    return "redirect:/emps";
}
SpringBoot其他知识补充:
1、SpringBoot项目中,在html表单中支持发送PUT请求
1、application.properties添加配置
# 添加一个名为 HiddenHttpMethodFilter 的过滤器,将POST请求转换为PUT请求
spring.mvc.hiddenmethod.filter.enabled=true
2、表单
<form action="student" method="post">
    <!--指定实际发送的请求方式-->
    <input type="hidden" name="_method" value="PUT">
    <label>
        <input type="text" name="userName"/>
    </label>
    <input type="submit" value="发送请求">
</form>
3、Controller请求
@RestController
@RequestMapping("/student")
public class MyRequestController {
    @PutMapping
    public String requestPut(String userName) {
        return "put请求发送成功,用户名是:" + userName;
    }
}
4、或者可以通过AJAX发送PUT请求,方式如下
<!DOCTYPE html>
<html lang="en">
<head>
    <meta charset="UTF-8">
    <title>put、delete</title>
</head>
<body>
<form id="myForm">
    <input type="hidden" name="_method" value="PUT">
    <label>
        <input type="text" name="userName">
    </label>
    <button type="button" onclick="sendPutRequest()">发送请求</button>
</form>
<br>
<div id="result"></div>
<script>
    function sendPutRequest() {
        let form = document.getElementById("myForm");
        let formData = new FormData(form);

        let xhr = new XMLHttpRequest();
        xhr.open('PUT', '/student', true);
        xhr.onreadystatechange = function() {
            // 将输出返回页面
            let resultDiv = document.getElementById("result");
            if (xhr.readyState === XMLHttpRequest.DONE) {
                if (xhr.status === 200) {
                    // 处理成功响应
                    let response = xhr.response;
                    console.log(response);
                    resultDiv.innerHTML = response;
                } else {
                    // 处理错误响应
                    resultDiv.innerHTML = '出现了错误';
                }
            }
        };
        xhr.send(formData);
    }
</script>

</body>
</html>

 浙公网安备 33010602011771号