

python 15
第二模块 函数&模块
第一模块主要学习python基础知识,从第二模块就可以通过程序去解决工作中实际的问题。
从今天开始,我们将进入第二个模块,此模块主要包含两大部分:
-
函数,一个用于专门实现某个功能的代码块(可重用)。
-
内置函数
len,bin,oct,hex等 -
自定义函数
def send email():
	#写了18行代码,实现了发送邮件
	pass
send_email()
-
-
模块,集成了很多功能的函数集合。
-
内置模块,python内部帮助我们提供好的。
import random
num = random.randint(0,19)
import decimal v1 = decimal.Decimal("0.1") v2 = decimal.Decimal("0.2") v3 = v1 + v2 print(v3) -
自定义模块
-
第三方模块,网上下载别人写好的模块(功能集合)。
-
文件操作相关

1.文件操作
在学习文件操作之前,先来回顾一下编码的相关以及先数据类型的知识。
-
字符串类型(str),在程序中用于表示文字信息,本质是unicode编码中的二进制。
name = "吴佩琦" -
字节类型(bytes)
-
可表示文字信息,本质上是utf-8/gbk等编码的二进制(对unicode进行压缩,方便文件存储和网络传输。)
name = "吴佩琦" data = name.encncode('utf-8') print(data)#b'\xe5\x90\xb4\xe4\xbd\xa9\xe7\x90\xa6' result = data.decode('utf-8') print(result)#吴佩琦 -
可表示原始二进制(图片,文件等信息)
-
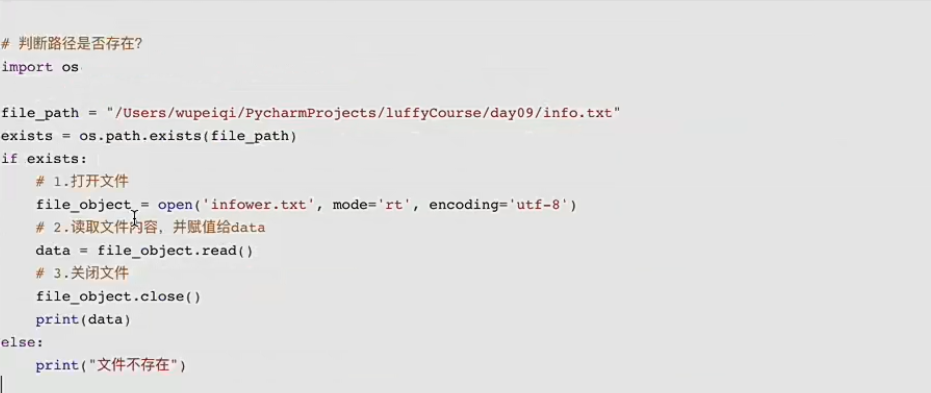
1.1读文件
- 读文本文件
#1.打开文件
#-路径:
#		相对路径:'info.txt'
#		绝对路径:'/Users/wupeqi/PycharmProjects/luffyCourse/day09/info.txt'
#-模式
#		rb,表示读取文件原始的二进制(r,读 read;b,二进制 binary;)
#1.打开文件
file_object = open('info.txt',mode = 'rb')
file_object = open('info.txt',mode = 'rt',encoding = 'utf-8')#直接读取文本内容
#2.读取文件的内容,并赋值给data
data = file_object.read()
#3.关闭文件
file_object.close()
print(data)
text = data.decode('utf-8')
print(text)
-
读图片等非内容文件。
file_object = open('info.txt',mode = 'rb')
data = file_object.read()
file_object.close()
print(data)
注意事项:
-
路径
- 相对路径,你的程序到底在哪里运行的?
![]()
-
绝对路径
![]()
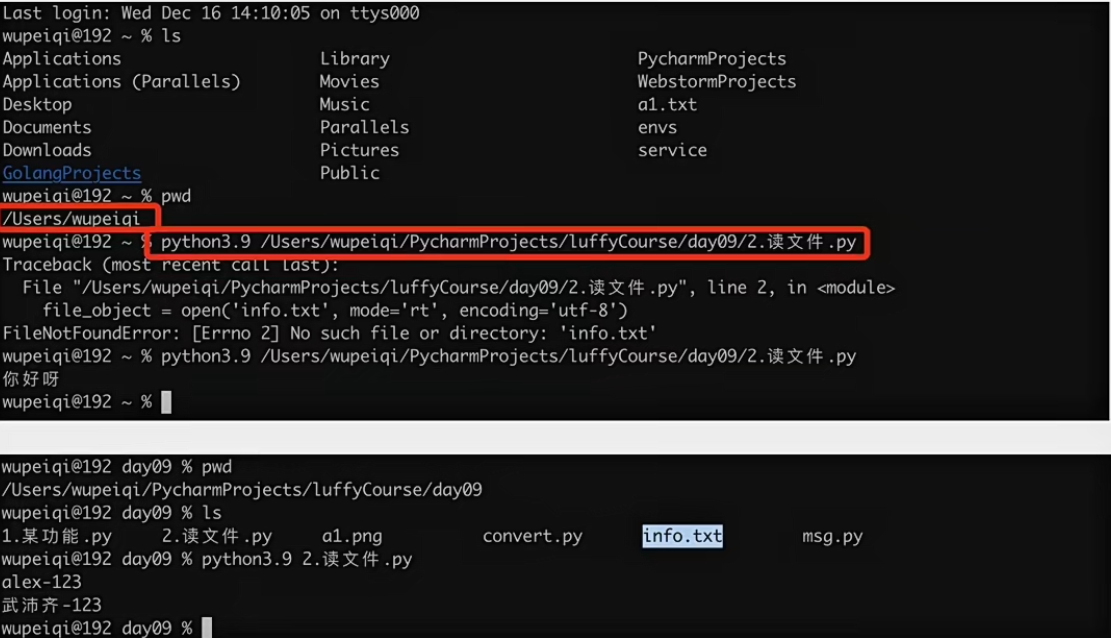

windows系统中写绝对路径容易出问题:

- 读文件时,文件不存在程序会报错。

1.2写文件
-
写文本文件
#1.打开文件 # 路径:tl.txt # 模式:wb(要求写入的内容需要是字节类型) file_object = open("tl.txt",mode = 'wb') file_object = open("tl.txt",mode = 'wt',encoding = 'utf-8')#不写默认utf-8 #2.写入内容 file_object.write("吴佩琦".encode("utf-8")) #3.文件关闭 file_object.close() -
写图片等文件
f1 = open('a1.png',mode = 'rb')
content = f1.read()
f1.close()
f2 = open('a2.png',mode = 'wb')
f2.write(content)
f2.close()
案例1:用户注册
user = input("请输入用户名:")
pwd = input("请输入密码:")
data = "{}-{}".format(user,pwd)
file_object = open("files/info.txt",mode='wt')
file_object.write(data)
file_object.close()
案例2:多用户注册
#w写入文件,先清空文件;再在文件中写入内容。
file_object = open("files/info.txt",mode='wt')
while True:
	user = input("请输入用户名:")
	if user.upper() == "Q":
		break
	pwd = input("请输入密码:")
	data = "{}-{}\n".format(user,pwd)

	file_object.write(data)
file_object.close()
小高级案例:(超前)
利用python向某个网址发送请求并获取结果(利用第三方的模块)
- 下载第三方模块

import requests
res = requests.get(
    url="https://lmg.jj20.com/up/allimg/tp10/22022312542M617-0-lp.jpg",
	headers={
        "User-Agent": "Mozilla/5.0 (Macintosh; Intel Mac OS X 10_15_7) AppleWebKit/537.36 (KHTML, like Gecko) Chrome/87.0.4280.88 Safari/537.36"
    }
)
print(res.content)
#网络传输的原始二进制信息(bytes)
#res.content
f2 = open('files/a2.png',mode = 'wb')
f2.write(res.content)
f2.close()
1.3文件打开模式
上文我们基于文件操作基本实现了读,写的功能,其中涉及的文件操作模式:rt,rb,wt,wb,其实在文件操作中还有其他的很多模式。
'r'         open for reading (default)
'w'         open for writing, truncating the file first
'x'         create a new file and open it for writing
'a'         open for writing,appending to the end of the file if it exists
'b'         binary mode
't'         text mode (default)
'+'         open a disk file for updating (reading and writing)
The default mode is 'rt' (open for reading text).
关于文件的打开模式常见应用有:
-
只读: r ,rt,rb
- 存在,读
- 不存在,报错
-
只写:w,wt,wb
- 存在,清空再写
- 不存在,创建再写
-
只写:x,xt,xb
- 存在,报错
- 不存在,创建再写
-
只写:a,at,ab【尾部追加】
- 存在,尾部追加。
- 不存在,创建再写。
-
读写
-
r+,rb+,默认光标位置:起始位置
file_object = open('info.txt',mode= 'rt+')
#读取内容
data = file_object.read()
print(data)
#写入内容
file_object.write("你好呀")
file_object.close()
file_object = open('info.txt',mode= 'rt+') #写入内容 file_object.write("你好呀") #读取内容 data = file_object.read() print(data) file_object.close() -
w+,wb+,默认光标位置:起始位置(清空文件)
file_object = open('info.txt',mode='wt+') #读取内容 data = file_object.read() print(data) #写入内容 file_object.write("你好呀") #将光标位置重置起始 file_object.seek(0) #读取内容 data = file_object.read() print(data) file_object.close() -
x+,xb+,默认光标位置:起始位置(新文件)
-
a+,ab+,默认光标位置:末尾
file_object = open('info.txt',mode='at+')
#写入内容
file_object.write("你好呀")
#将光标位置重置起始
file_object.seek(0)
#读取内容
data = file_object.read()
print(data)
file_object.close()
-
1.4常见功能
在上述对文件的操作中,我们只使用了write和read来对文件进行读写,其实在文件操作中还有很多其他的功能来辅助实现更好的读写文件的内容。
-
read,读
-
读所有
f = open('info.txt',mode='r')
data = f.read()
f.close()
f = open('info.txt',mode='rb') data = f.read() f.close() -
读n个字符(字节)
f = open('info.txt',mode= 'r')
#读一个字符
data = f.read(1)
f.close()
f = open('info.txt',mode= 'rb') #读一个字节 data = f.read(1) f.close() print(data,type(data))
-
-
readline,读一行
f = open('info.txt',mode='rb') #读第一行 first_line = f.readline() print(first_line) #继续读下一行 second_line = f.readline() print(second_line) f.close() -
readlines
f = open('info.txt',mode='rb') data_list = f.readlines() f.close() print(data_list) -
循环,读大文件
f = open('info.txt',mode='rb') for line in f: print(line.strip()) f.close() -
write,写
f = open('info.txt',mode='a',encoding='utf-8')
f.write("吴佩琦")
f.close()
f = open('info.txt',mode='a',encoding='utf-8') f.write("吴佩琦") f.close() -
fiush,刷到硬盘
f = open('info.txt',mode='a',encoding='utf-8') while True: #不是写到了硬盘,而是写在缓冲区的内容刷到硬盘。 f.write("吴佩琦") f.flush()#立即将缓冲区刷到硬盘上 f.close() -
移动光标位置(字节)
f = open('info.txt',mode='r',encoding='utf-8')
#移动光标位置,在次光标之后开始写内容(如有原内容,则会覆盖)
f.seek(3)
f.write("吴佩琦")
f.close()
注意:在a模式下,调用write在文件中写入内容时,永远只有将内容写到尾部,不会写到光标的位置。
-
获取当前光标位置
f = open('info.txt',mode='r',encoding='utf-8')
f.read(3)#3个字符
f.read(1)#1个字符
position = f.tell()
f.close()
print(position)#12
f = open('info.txt',mode='rb',encoding='utf-8') f.read(3)#3个字节 f.read(1)#1个字节 position = f.tell() f.close() print(position)#4
1.5上下文管理
之前对文件进行操作时,每次都要打开和关闭文件,比较繁琐且容易忘记关闭文件。
以后在进行文件操作时,推荐大家使用with上下文管理,它可以自动实现关闭文件。
with open("xxxxx.txt",mode='rb') as file_object:
	data = file_object.read()
	print(data)
在Python2.7后,with又支持同时对多个文件的上下文进行管理,即:
with open("xxxxx.txt",mode='rb') as f1,open("xxxxx.txt",mode='rb')as f2:
	pass
2.csv 格式文件
逗号分隔值(Comma-Separated Values,CSV,有时也称为字符分隔值,因为分割字符也可以不是逗号),其文件以纯文本形式存储表格数据(数字和文本)。
对于这种格式的数据,我们需要利用open函数来读取文件并根据逗号分隔的特点来进行处理。
import os
import requests

with open('files/mv.csv', mode='r', encoding='utf-8') as file_object:
    file_object.readline()
    for line in file_object:
        user_id, username, url = line.strip().split(',')
        print(username, url)
        # 1.根据URL下载图片
        res = requests.get(
            url=url,
            headers={
                "User-Agent": "Mozilla/5.0 (Macintosh; Intel Mac OS X 10_15_7) AppleWebKit/537.36 (KHTML, like Gecko) Chrome/87.0.4280.88 Safari/537.36"
            }
        )
        # 检查images目录是否存在?不存在,则创建images目录
        if not os.path.exists("images"):
            # 创建images目录
            os.makedirs("images")

        # 2.将图片的内容写入到文件
        with open("images/{}.png".format(username), mode='wb') as img_object:
            img_object.write(res.content)
3.ini格式
ini文件是Initialization File的缩写,平时用于存储软件的配置文件。例如:MySQL数据库的配置文件。
import configparser

config = configparser.ConfigParser()
config.read('files/my.ini', encoding='utf-8')
# config.read('/Users/wupeiqi/PycharmProjects/luffyCourse/day09/files/my.ini', encoding='utf-8')

# 1.获取所有的节点
result = config.sections()
print(result)  # ['mysqld', 'mysqld_safe', 'client']
# 2.获取节点下的键值
result = config.items("mysqld_safe")
print(result)  # [('log-error', '/var/log/mariadb/mariadb.log'), ('pid-file', '/var/run/mariadb/mariadb.pid')]
for key, value in config.items("mysqld_safe"):
    print(key, value)
# 3.获取某个节点下的键对应的值
result = config.get("mysqld","collation-server")
print(result)
# 4.1其他
 4.1 是否存在节点
 v1 = config.has_section("client")
 print(v1)
# 4.2 添加一个节点
 config.add_section("group")
 config.set('group','name','wupeiqi')
 config.set('client','name','wupeiqi')
 config.write(open('files/new.ini', mode='w', encoding='utf-8'))
# 4.3 删除
config.remove_section('client')#节点
config.remove_option("mysqld", "datadir")#节点下的键值
config.write(open('files/new.ini', mode='w', encoding='utf-8'))
4.XML格式文件
可扩展标记语言,是一种简单的数据存储语言,XML被设计用来传输和存储数据。
-
存储,可用来存放配置文件,例如:java的配置文件。
-
传输,网络传输时以这种格式存在,例如早期ajax传输的数据,soap协议等。
<data>
    <country name="Liechtenstein">
        <rank updated="yes">2</rank>
        <year>2023</year>
        <gdppc>141100</gdppc>
        <neighbor direction="E" name="Austria" />
        <neighbor direction="W" name="Switzerland" />
    </country>
    <country name="Singapore">
        <rank updated="yes">5</rank>
        <year>2026</year>
        <gdppc>59900</gdppc>
        <neighbor direction="N" name="Malaysia" />
    </country>
    <country name="Panama">
        <rank updated="yes">69</rank>
        <year>2026</year>
        <gdppc>13600</gdppc>
        <neighbor direction="W" name="Costa Rica" />
        <neighbor direction="E" name="Colombia" />
    </country>
</data>
注意:在python开发中用的相对来比较少,大家作为了解即可
4.1读取文件和内容
from xml.etree import ElementTree as ET
#直接解析xml文件
#ET去打开xml文件
tree = ET.prase("files/xo.xml")
#获取根标签
root = tree.getroot()
print(root)#<Element 'data' at 0x0000018678B733B0>
from xml.etree import ElementTree as ET
content = """
<data>
    <country name="Liechtenstein">
        <rank updated="yes">2</rank>
        <year>2023</year>
        <gdppc>141100</gdppc>
        <neighbor direction="E" name="Austria" />
        <neighbor direction="W" name="Switzerland" />
    </country>
    <country name="Singapore">
        <rank updated="yes">5</rank>
        <year>2026</year>
        <gdppc>59900</gdppc>
        <neighbor direction="N" name="Malaysia" />
    </country>
    <country name="Panama">
        <rank updated="yes">69</rank>
        <year>2026</year>
        <gdppc>13600</gdppc>
        <neighbor direction="W" name="Costa Rica" />
        <neighbor direction="E" name="Colombia" />
    </country>
</data>"""

root = ET.XML(content)
print(root)
4.2读取节点数据
from xml.etree import ElementTree as ET
content = """
<data>
    <country name="Liechtenstein">
        <rank updated="yes">2</rank>
        <year>2023</year>
        <gdppc>141100</gdppc>
        <neighbor direction="E" name="Austria" />
        <neighbor direction="W" name="Switzerland" />
    </country>
    <country name="Singapore">
        <rank updated="yes">5</rank>
        <year>2026</year>
        <gdppc>59900</gdppc>
        <neighbor direction="N" name="Malaysia" />
    </country>
    <country name="Panama">
        <rank updated="yes">69</rank>
        <year>2026</year>
        <gdppc>13600</gdppc>
        <neighbor direction="W" name="Costa Rica" />
        <neighbor direction="E" name="Colombia" />
    </country>
</data>
"""
#获取根标签 data
root = ET.XML(content)
print(root)
country_object = root.find("country")
print(country_object.tag,country_object.attrib)
gdppc_object = country_object.find("gdppc")
print(gdppc_object.tag,gdppc_object.attrib,gdppc_object.text)
#获取data标签的孩子标签
for child in root:
    #child.tag = country
    #child.attrib = {'name': 'Liechtenstein'}
    print(child.tag,child.attrib)
    for node in child:
        print(node.tag,node.attrib,node.text)
for child in root .iter('year'):
    print(child.tag,child.text)
v1 = root.findall('country')
print(v1)#[<Element 'country' at 0x000001FCF7349D10>, <Element 'country' at 0x000001FCF73744A0>, <Element 'country' at 0x000001FCF7374630>]

v2 = root.find('country').find('rank')
print(v2)#<Element 'rank' at 0x000001FCF7374310>
4.3修改和删除节点
from xml.etree import ElementTree as ET
content = """
<data>
    <country name="Liechtenstein">
        <rank updated="yes">2</rank>
        <year>2023</year>
        <gdppc>141100</gdppc>
        <neighbor direction="E" name="Austria" />
        <neighbor direction="W" name="Switzerland" />
    </country>
    <country name="Singapore">
        <rank updated="yes">5</rank>
        <year>2026</year>
        <gdppc>59900</gdppc>
        <neighbor direction="N" name="Malaysia" />
    </country>
    <country name="Panama">
        <rank updated="yes">69</rank>
        <year>2026</year>
        <gdppc>13600</gdppc>
        <neighbor direction="W" name="Costa Rica" />
        <neighbor direction="E" name="Colombia" />
    </country>
</data>
"""
#获取根标签 data
root = ET.XML(content)
#修改节点内容和属性
rank = root.find('country').find('rank')
rank.text = 999
rank.set('update','2020-11-11')
print(rank.text,rank.attrib)
#删除节点
root.remove(root.find('country'))
print(root.findall('country'))
#保存文件
tree = ET.ElementTree(root)
tree.write("newnew.xml",endcoding='utf-8')
4.4构建文档
rom xml.etree import ElementTree as ET

# 创建根标签
root = ET.Element("home")

# 创建节点大儿子
son1 = ET.Element('son', {'name': '儿1'})
# 创建小儿子
son2 = ET.Element('son', {"name": '儿2'})

# 在大儿子中创建两个孙子
grandson1 = ET.Element('grandson', {'name': '儿11'})
grandson2 = ET.Element('grandson', {'name': '儿12'})
son1.append(grandson1)
son1.append(grandson2)

# 把儿子添加到根节点中
root.append(son1)
root.append(son2)

tree = ET.ElementTree(root)
tree.write('files/oooo.xml', encoding='utf-8', short_empty_elements=True)
from xml.etree import ElementTree as ET
#创建根节点
root = ET .Element("family")
#创建节点大儿子
son1 = ET.SubRlement(root,"son",attrib={'name':'儿1'})
#创建小儿子
son2 = ET.SubElement(root,"son",attrib={"name":"儿2"})
#在大儿子中创建一个孙子
son2 = ET.SubElement(son1,"age",attrib={"name":"儿11"})
grandson1.text = '孙子'
et = ET.ElementTree(root)#生成文档对象
et.write("test.xml",encoding="utf-8")
from xml.etree import ElementTree as ET
#创建根节点
root = ET.Element("user")
root.text = "<![CDATA[你好呀]]"
et = ET.ElementTree(root)#生成文档对象
et.write("test.xml",encoding="utf-8")
5.Excel格式文件
python内部未提供处理Excel文件的功能,想要在Python中操作Excel需要按照第三方的模块。
5.1读Excel
-
读sheet
from openpyxl import load_workbook wb = load_work("files/p1.xlsx") #sheet相关操作 #1.获取excel文件中的所有sheet名称 print(wb.sheetnames) #2.选择sheet,基于sheet名称 sheet = wb["数据导出"] cell = sheet.cell(1,2) print(cell.value) #3.选择sheet,基于索引位置 sheet = wb.worksheets[0] cell = sheet.cell(1,2) print(cell.value) #4.循环所有的sheet for name in wb.sheetnames: sheet = wb[name] cell = sheet.cell(1,1) print(cell.value) #或 for sheet in wb.worksheets: cell = sheet.cell(1,1) print(cell.value) -
读sheet中单元格的数据
from openpyxl import load_workbook wb = load_workbook("files/p1.xlsx") sheet = wb.worksheets[0] # 1.获取第N行第N列的单元格(位置是从1开始) """ cell = sheet.cell(1, 1) print(cell.value) print(cell.style) print(cell.font) print(cell.alignment) """ # 2.获取某个单元格 """ c1 = sheet["A2"] print(c1.value) c2 = sheet['D4'] print(c2.value) """ # 3.第N行所有的单元格 """ for cell in sheet[1]: print(cell.value) """ # 4.所有行的数据(获取某一列数据) """ for row in sheet.rows: print(row[0].value, row[1].value) """ # 5.获取所有列的数据 """ for col in sheet.columns: print(col[1].value) """ -
读合并的单元格
from openpyxl import load_workbook

wb = load_workbook("files/p1.xlsx")
sheet = wb.worksheets[2]

# 获取第N行第N列的单元格(位置是从1开始)
c1 = sheet.cell(1, 1)
print(c1)  # <Cell 'Sheet1'.A1>
print(c1.value) # 用户信息

c2 = sheet.cell(1, 2)
print(c2)  # <MergedCell 'Sheet1'.B1>
print(c2.value) # None
5.1写Excel
在Excel中想要写文件,大致要分为在:
-
原Excel文件基础上写内容
from openpyxl import load_workbook wb = load_workbook('files/p1.xlsx') sheet = wb.worksheets[0] # 找到单元格,并修改单元格的内容 cell = sheet.cell(1, 1) cell.value = "新的开始" # 将excel文件保存到p2.xlsx文件中 wb.save("files/p2.xlsx") -
新创建Excel文件写内容
from openpyxl import workbook

# 创建excel且默认会创建一个sheet(名称为Sheet)
wb = workbook.Workbook()

sheet = wb.worksheets[0] # 或 sheet = wb["Sheet"]

# 找到单元格,并修改单元格的内容
cell = sheet.cell(1, 1)
cell.value = "新的开始"

# 将excel文件保存到p2.xlsx文件中
wb.save("files/p2.xlsx")
在了解了如何读取Excel和创建Excel之后,后续对于Excel中的sheet和cell操作基本上都相同。
from openpyxl import workbook

wb = workbook.Workbook() # Sheet

# 1. 修改sheet名称
"""
sheet = wb.worksheets[0]
sheet.title = "数据集"
wb.save("p2.xlsx")
"""

# 2. 创建sheet并设置sheet颜色
"""
sheet = wb.create_sheet("工作计划", 0)
sheet.sheet_properties.tabColor = "1072BA"
wb.save("p2.xlsx")
"""
# 3. 默认打开的sheet
"""
wb.active = 0
wb.save("p2.xlsx")
"""
# 4. 拷贝sheet
"""
sheet = wb.create_sheet("工作计划")
sheet.sheet_properties.tabColor = "1072BA"

new_sheet = wb.copy_worksheet(wb["Sheet"])
new_sheet.title = "新的计划"
wb.save("p2.xlsx")
"""
# 5.删除sheet
"""
del wb["用户列表"]
wb.save('files/p2.xlsx')
"""
from openpyxl import load_workbook
from openpyxl.styles import Alignment, Border, Side, Font, PatternFill, GradientFill


wb = load_workbook('files/p1.xlsx')

sheet = wb.worksheets[1]

# 1. 获取某个单元格,修改值
"""
cell = sheet.cell(1, 1)
cell.value = "开始"
wb.save("p2.xlsx")
"""

# 2.  获取某个单元格,修改值
"""
sheet["B3"] = "Alex"
wb.save("p2.xlsx")
"""
# 3. 获取某些单元格,修改值
"""
cell_list = sheet["B2":"C3"]
for row in cell_list:
    for cell in row:
        cell.value = "新的值"
wb.save("p2.xlsx")
"""
# 4. 对齐方式
"""
cell = sheet.cell(1, 1)

# horizontal,水平方向对齐方式:"general", "left", "center", "right", "fill", "justify", "centerContinuous", "distributed"
# vertical,垂直方向对齐方式:"top", "center", "bottom", "justify", "distributed"
# text_rotation,旋转角度。
# wrap_text,是否自动换行。
cell.alignment = Alignment(horizontal='center', vertical='distributed', text_rotation=45, wrap_text=True)
wb.save("p2.xlsx")
"""
# 5. 边框
# side的style有如下:dashDot','dashDotDot', 'dashed','dotted','double','hair', 'medium', 'mediumDashDot', 'mediumDashDotDot','mediumDashed', 'slantDashDot', 'thick', 'thin'
"""
cell = sheet.cell(9, 2)
cell.border = Border(
    top=Side(style="thin", color="FFB6C1"),
    bottom=Side(style="dashed", color="FFB6C1"),
    left=Side(style="dashed", color="FFB6C1"),
    right=Side(style="dashed", color="9932CC"),
    diagonal=Side(style="thin", color="483D8B"),  # 对角线
    diagonalUp=True,  # 左下 ~ 右上
    diagonalDown=True  # 左上 ~ 右下
)
wb.save("p2.xlsx")
"""
# 6.字体
"""
cell = sheet.cell(5, 1)
cell.font = Font(name="微软雅黑", size=45, color="ff0000", underline="single")
wb.save("p2.xlsx")
"""
# 7.背景色
"""
cell = sheet.cell(5, 3)
cell.fill = PatternFill("solid", fgColor="99ccff")
wb.save("p2.xlsx")
"""
# 8.渐变背景色
"""
cell = sheet.cell(5, 5)
cell.fill = GradientFill("linear", stop=("FFFFFF", "99ccff", "000000"))
wb.save("p2.xlsx")
"""
# 9.宽高(索引从1开始)
"""
sheet.row_dimensions[1].height = 50
sheet.column_dimensions["E"].width = 100
wb.save("p2.xlsx")
"""
# 10.合并单元格
"""
sheet.merge_cells("B2:D8")
sheet.merge_cells(start_row=15, start_column=3, end_row=18, end_column=8)
wb.save("p2.xlsx")
"""
"""
sheet.unmerge_cells("B2:D8")
wb.save("p2.xlsx")
"""
# 11.写入公式
"""
sheet = wb.worksheets[3]
sheet["D1"] = "合计"
sheet["D2"] = "=B2*C2"
wb.save("p2.xlsx")
"""
"""
sheet = wb.worksheets[3]
sheet["D3"] = "=SUM(B3,C3)"
wb.save("p2.xlsx")
"""
# 12.删除
"""
# idx,要删除的索引位置
# amount,从索引位置开始要删除的个数(默认为1)
sheet.delete_rows(idx=1, amount=20)
sheet.delete_cols(idx=1, amount=3)
wb.save("p2.xlsx")
"""
# 13.插入
"""
sheet.insert_rows(idx=5, amount=10)
sheet.insert_cols(idx=3, amount=2)
wb.save("p2.xlsx")
"""
# 14.循环写内容
"""
sheet = wb["Sheet"]
cell_range = sheet['A1:C2']
for row in cell_range:
    for cell in row:
        cell.value = "xx"

for row in sheet.iter_rows(min_row=5, min_col=1, max_col=7, max_row=10):
    for cell in row:
        cell.value = "oo"
wb.save("p2.xlsx")
"""
# 15.移动
"""
# 将H2:J10范围的数据,向右移动15个位置、向上移动1个位置
sheet.move_range("H2:J10",rows=1, cols=15)
wb.save("p2.xlsx")
"""
"""
sheet = wb.worksheets[3]
sheet["D1"] = "合计"
sheet["D2"] = "=B2*C2"
sheet["D3"] = "=SUM(B3,C3)"
sheet.move_range("B1:D3",cols=10, translate=True) # 自动翻译公式
wb.save("p2.xlsx")
"""
# 16.打印区域
"""
sheet.print_area = "A1:D200"
wb.save("p2.xlsx")
"""
# 17.打印时,每个页面的固定表头
"""
sheet.print_title_cols = "A:D"
sheet.print_title_rows = "1:3"
wb.save("p2.xlsx")
"""
6.压缩文件
基于python内置的shutil模块可以实现对压缩文件的操作。
import shutil

# 1. 压缩文件
"""
# base_name,压缩后的压缩包文件
# format,压缩的格式,例如:"zip", "tar", "gztar", "bztar", or "xztar".
# root_dir,要压缩的文件夹路径
"""
# shutil.make_archive(base_name=r'datafile',format='zip',root_dir=r'files')


# 2. 解压文件
"""
# filename,要解压的压缩包文件
# extract_dir,解压的路径
# format,压缩文件格式
"""
# shutil.unpack_archive(filename=r'datafile.zip', extract_dir=r'xxxxxx/xo', format='zip')
7.路径相关
7.1转义
windows路径使用的是\,linux路径使用的是/。
特别的,在windows系统中如果有这样的一个路径 D:\nxxx\txxx\x1,程序会报错。因为在路径中存在特殊符 \n(换行符)和\t(制表符),Python解释器无法自动区分。
所以,在windows中编写路径时,一般有两种方式:
- 加转义符,例如:
"D:\\nxxx\\txxx\\x1" - 路径前加r,例如:
r"D:\\nxxx\\txxx\\x1"
7.2程序当前路径
项目中如果使用了相对路径,那么一定要注意当前所在的位置。
例如:在/Users/wupeiqi/PycharmProjects/CodeRepository/路径下编写 demo.py文件
with open("a1.txt", mode='w', encoding='utf-8') as f:
    f.write("你好呀")
用以下两种方式去运行:
-
方式1,文件会创建在
/Users/wupeiqi/PycharmProjects/CodeRepository/目录下。cd /Users/wupeiqi/PycharmProjects/CodeRepository/ python demo.py -
方式2,文件会创建在
/Users/wupeiqi目录下。cd /Users/wupeiqi python /Users/wupeiqi/PycharmProjects/CodeRepository/demo.py
import os

"""
# 1.获取当前运行的py脚本所在路径
abs = os.path.abspath(__file__)
print(abs) # /Users/wupeiqi/PycharmProjects/luffyCourse/day09/20.路径相关.py
path = os.path.dirname(abs)
print(path) # /Users/wupeiqi/PycharmProjects/luffyCourse/day09
"""
base_dir = os.path.dirname(os.path.abspath(__file__))
file_path = os.path.join(base_dir, 'files', 'info.txt')
print(file_path)
if os.path.exists(file_path):
    file_object = open(file_path, mode='r', encoding='utf-8')
    data = file_object.read()
    file_object.close()

    print(data)
else:
    print('文件路径不存在')
7.3文件和路径相关
import shutil
import os

# 1. 获取当前脚本绝对路径
"""
abs_path = os.path.abspath(__file__)
print(abs_path)
"""

# 2. 获取当前文件的上级目录
"""
base_path = os.path.dirname( os.path.dirname(路径) )
print(base_path)
"""

# 3. 路径拼接
"""
p1 = os.path.join(base_path, 'xx')
print(p1)

p2 = os.path.join(base_path, 'xx', 'oo', 'a1.png')
print(p2)
"""
# 4. 判断路径是否存在
"""
exists = os.path.exists(p1)
print(exists)
"""

# 5. 创建文件夹
"""
os.makedirs(路径)
"""
"""
path = os.path.join(base_path, 'xx', 'oo', 'uuuu')
if not os.path.exists(path):
    os.makedirs(path)
"""
# 6. 是否是文件夹
"""
file_path = os.path.join(base_path, 'xx', 'oo', 'uuuu.png')
is_dir = os.path.isdir(file_path)
print(is_dir) # False

folder_path = os.path.join(base_path, 'xx', 'oo', 'uuuu')
is_dir = os.path.isdir(folder_path)
print(is_dir) # True

"""
# 7. 删除文件或文件夹
"""
os.remove("文件路径")
"""
"""
path = os.path.join(base_path, 'xx')
shutil.rmtree(path)
"""
# 8. 拷贝文件夹
"""
shutil.copytree("/Users/wupeiqi/Desktop/图/csdn/","/Users/wupeiqi/PycharmProjects/CodeRepository/files")
"""

# 9.拷贝文件
"""
shutil.copy("/Users/wupeiqi/Desktop/图/csdn/WX20201123-112406@2x.png","/Users/wupeiqi/PycharmProjects/CodeRepository/")
shutil.copy("/Users/wupeiqi/Desktop/图/csdn/WX20201123-112406@2x.png","/Users/wupeiqi/PycharmProjects/CodeRepository/x.png")
"""

# 10.文件或文件夹重命名
"""
shutil.move("/Users/wupeiqi/PycharmProjects/CodeRepository/x.png","/Users/wupeiqi/PycharmProjects/CodeRepository/xxxx.png")
shutil.move("/Users/wupeiqi/PycharmProjects/CodeRepository/files","/Users/wupeiqi/PycharmProjects/CodeRepository/images")
"""
总结
今天我们主要围绕着文件 相关的操作来展开进行讲解,让大家能够基于Python处理不同格式的文件。由于涉及的知识点比较多,所以今日的内容学起来会比较耗时,但都比较简单,只需要理解并编写好相关笔记以便后期开发时翻阅。
-
文件相对路径,在使用相对路径时可能会执行程序的目录不同,导致路径出问题。所以,如若使用相对路径请务必清楚当前运行程序所在目录。
-
文件绝对路径(推荐),不要将文件路径写死,而是基于 os 模块中的相关功能自动化获取绝对路径,以方便项目移动到其他文件或电脑上。
import os
base_dir = os.path.dirname(os.path.abspath(__file__))
file_path = os.path.join(base_dir, 'files', 'info.txt')
路径转义
- 手动写路径,需要自己在路径中添加 r 或 加入 \ 来进行处理。
- 基于os.path.join拼接,内部自动处理,不需要手动处理。
-
内置函数、内置模块、第三方模块的区别?
-
如何去下载安装第三方模块?
pip install 模块名称
requests模块,可以用来发送网络请求。
openpyxl模块,处理Excel格式的文件。
基本文件的读写、打开模式、上下文管理。
其他格式:csv、ini、xml、excel格式的处理(无序记忆,做好笔记即可)。
作业
1.基于csv格式实现 用户的注册 & 登录认证。详细需求如下:
- 用户注册时,新注册用户要写入文件csv文件中,输入Q或q则退出。
- 用户登录时,逐行读取csv文件中的用户信息并进行校验。
- 提示:文件路径须使用os模块构造的绝对路径的方式。
-
补充代码:实现去网上获取指定地区的天气信息,并写入到Excel中。
import requests

while True:
    city = input("请输入城市(Q/q退出):")
    if city.upper() == "Q":
        break
    url = "http://ws.webxml.com.cn//WebServices/WeatherWebService.asmx/getWeatherbyCityName?theCityName={}".format(city)
    res = requests.get(url=url)
    print(res.text)

    # 1.提取XML格式中的数据
    # 2.为每个城市创建一个sheet,并将获取的xml格式中的数据写入到excel中。

 浙公网安备 33010602011771号