vuex
vuex就是vue 应用中统一管理数据的地方。
安装、使用 vuex
首先我们在 vue.js 2.0 开发环境中安装 vuex :
npm install vuex --save
然后 , 在 main.js 中加入 :
import vuex from 'vuex'
Vue.use(vuex);
var store = new vuex.Store({//store对象
    state:{
        show:false
    }
})
再然后 , 在实例化 Vue对象时加入 store 对象 :
new Vue({
  el: '#app',
  router,
  store,//使用store
  template: '<App/>',
  components: { App }
})

完成到这一步 , 上述例子中的 $store.state.show 就可以使用了。
前面为了方便 , 我们把 store 对象写在了 main.js 里面 , 但实际上为了便于日后的维护 , 我们分开写更好 , 我们在 src 目录下 , 新建一个 store 文件夹 , 然后在里面新建一个 index.js :
import Vue from 'vue'
import vuex from 'vuex'
Vue.use(vuex);

export default new vuex.Store({
    state:{
        show:false
    }
})
那么相应的 , 在 main.js 里的代码应该改成 :
//vuex
import store from './store'

new Vue({
  el: '#app',
  router,
  store,//使用store
  template: '<App/>',
  components: { App }
})
这样就把 store 分离出去了 , 那么还有一个问题是 : 这里 $store.state.show 无论哪个组件都可以使用 , 那组件多了之后 , 状态也多了 , 这么多状态都堆在 store 文件夹下的 index.js 不好维护怎么办 ?
我们可以使用 vuex 的 modules , 把 store 文件夹下的 index.js 改成 :
import Vue from 'vue'
import vuex from 'vuex'
Vue.use(vuex);

import dialog_store from '../components/dialog_store.js';//引入某个store对象

export default new vuex.Store({
    modules: {
        dialog: dialog_store
    }
})
这里我们引用了一个 dialog_store.js , 在这个 js 文件里我们就可以单独写 dialog 组件的状态了 :
export default {
    state:{
        show:false
    }
}
做出这样的修改之后 , 我们将之前我们使用的 $store.state.show 统统改为 $store.state.dialog.show 即可。
如果还有其他的组件需要使用 vuex , 就新建一个对应的状态文件 , 然后将他们加入 store 文件夹下的 index.js 文件中的 modules 中。
modules: {
    dialog: dialog_store,
    other: other,//其他组件
}
mutations
前面我们提到的对话框例子 , 我们对vuex 的依赖仅仅只有一个 $store.state.dialog.show 一个状态 , 但是如果我们要进行一个操作 , 需要依赖很多很多个状态 , 那管理起来又麻烦了 !
mutations 登场 , 问题迎刃而解 :
export default {
    state:{//state
        show:false
    },
    mutations:{
        switch_dialog(state){//这里的state对应着上面这个state
            state.show = state.show?false:true;
            //你还可以在这里执行其他的操作改变state
        }
    }
}
使用 mutations 后 , 原先我们的父组件可以改为 :
<template>
  <div id="app">
    <a href="javascript:;" @click="$store.commit('switch_dialog')">点击</a>
    <t-dialog></t-dialog>
  </div>
</template>

<script>
import dialog from './components/dialog.vue'
export default {
  components:{
    "t-dialog":dialog
  }
}
</script>
使用 $store.commit('switch_dialog') 来触发 mutations 中的 switch_dialog 方法。
这里需要注意的是:
mutations中的方法是不分组件的 , 假如你在 dialog_stroe.js 文件中的定义了switch_dialog方法 , 在其他文件中的一个switch_dialog方法 , 那么$store.commit('switch_dialog')会执行所有的switch_dialog方法。mutations里的操作必须是同步的。
你一定好奇 , 如果在 mutations 里执行异步操作会发生什么事情 , 实际上并不会发生什么奇怪的事情 , 只是官方推荐 , 不要在 mutationss 里执行异步操作而已。
actions
多个 state 的操作 , 使用 mutations 会来触发会比较好维护 , 那么需要执行多个 mutations 就需要用 action 了:
export default {
    state:{//state
        show:false
    },
    mutations:{
        switch_dialog(state){//这里的state对应着上面这个state
            state.show = state.show?false:true;
            //你还可以在这里执行其他的操作改变state
        }
    },
    actions:{
        switch_dialog(context){//这里的context和我们使用的$store拥有相同的对象和方法
            context.commit('switch_dialog');
            //你还可以在这里触发其他的mutations方法
        },
    }
}
那么 , 在之前的父组件中 , 我们需要做修改 , 来触发 action 里的 switch_dialog 方法:
<template>
  <div id="app">
    <a href="javascript:;" @click="$store.dispatch('switch_dialog')">点击</a>
    <t-dialog></t-dialog>
  </div>
</template>

<script>
import dialog from './components/dialog.vue'
export default {
  components:{
    "t-dialog":dialog
  }
}
</script>
使用 $store.dispatch('switch_dialog') 来触发 action 中的 switch_dialog 方法。
官方推荐 , 将异步操作放在 action 中。
getters
getters 和 vue 中的 computed 类似 , 都是用来计算 state 然后生成新的数据 ( 状态 ) 的。
还是前面的例子 , 假如我们需要一个与状态 show 刚好相反的状态 , 使用 vue 中的 computed 可以这样算出来 :
computed(){
    not_show(){
        return !this.$store.state.dialog.show;
    }
}
那么 , 如果很多很多个组件中都需要用到这个与 show 刚好相反的状态 , 那么我们需要写很多很多个 not_show , 使用 getters 就可以解决这种问题 :
export default {
    state:{//state
        show:false
    },
    getters:{
        not_show(state){//这里的state对应着上面这个state
            return !state.show;
        }
    },
    mutations:{
        switch_dialog(state){//这里的state对应着上面这个state
            state.show = state.show?false:true;
            //你还可以在这里执行其他的操作改变state
        }
    },
    actions:{
        switch_dialog(context){//这里的context和我们使用的$store拥有相同的对象和方法
            context.commit('switch_dialog');
            //你还可以在这里触发其他的mutations方法
        },
    }
}
我们在组件中使用 $store.state.dialog.show 来获得状态 show , 类似的 , 我们可以使用 $store.getters.not_show 来获得状态 not_show 。
注意 : $store.getters.not_show 的值是不能直接修改的 , 需要对应的 state 发生变化才能修改。
mapState、mapGetters、mapActions
很多时候 , $store.state.dialog.show 、$store.dispatch('switch_dialog') 这种写法又长又臭 , 很不方便 , 我们没使用 vuex 的时候 , 获取一个状态只需要 this.show , 执行一个方法只需要 this.switch_dialog 就行了 , 使用 vuex 使写法变复杂了 ?
使用 mapState、mapGetters、mapActions 就不会这么复杂了。
以 mapState 为例 :
<template>
  <el-dialog :visible.sync="show"></el-dialog>
</template>

<script>
import {mapState} from 'vuex';
export default {
  computed:{

    //这里的三点叫做 : 扩展运算符
    ...mapState({
      show:state=>state.dialog.show
    }),
  }
}
</script>
相当于 :
<template>
  <el-dialog :visible.sync="show"></el-dialog>
</template>

<script>
import {mapState} from 'vuex';
export default {
  computed:{
    show(){
        return this.$store.state.dialog.show;
    }
  }
}
</script>
mapGetters、mapActions 和 mapState 类似 , mapGetters 一般也写在 computed 中 , mapActions 一般写在 methods中。
弄懂上面这些 , 你可以去看vuex文档了 , 应该能看懂了。
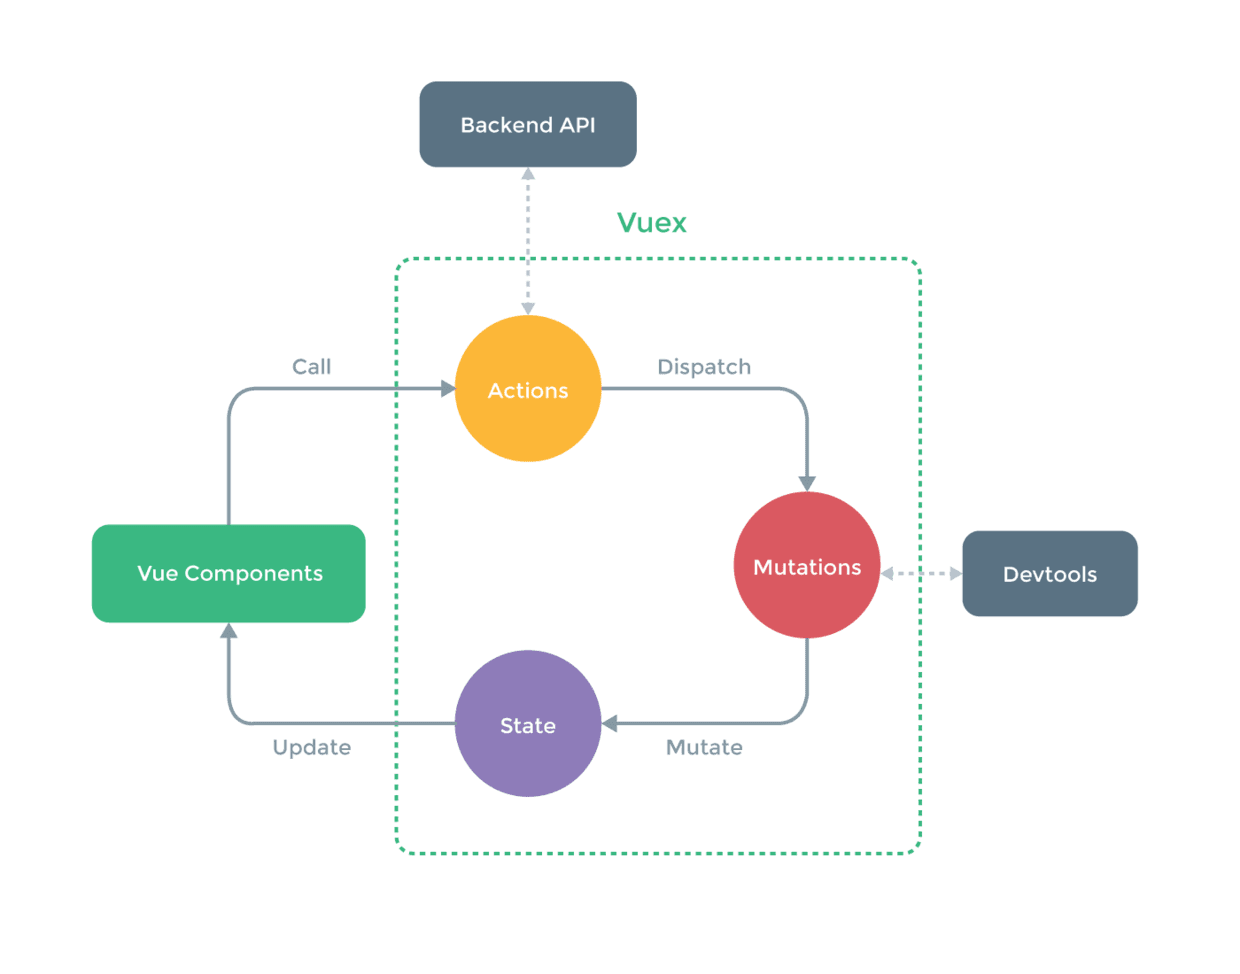
完整的应用Vuex开发的应用结构应该是这样的:
State
State负责存储整个应用的状态数据 ,一般需要在使用的时候在跟节点注入store对象,后期就可以使用this.$store.state直接获取状态
//store为实例化生成的
import store from './store'
new Vue({
el: '#app',
store,
render: h => h(App)
})
这个store可以理解为一个容器,包含着应用中的state等。实例化生成store的过程是:
const mutations = {...};
const actions = {...};
const state = {...};
Vuex.Store({
state,
actions,
mutation
});
后续在组件中使用的过程中,如果想要获取对应的状态你就可以直接使用 this.$store.state 获取,
当然,也可以利用vuex提供的mapState辅助函数将state映射到 计算属性 中去,如
//我是组件
import {mapState} from 'vuex'
export default {
computed: mapState({
count: state => state.count
})
}
这样直接就可以在组件中直接使用了。
Mutations
Mutations的中文意思是“变化”,利用它可以更改状态,本质就是用来处理数据的函数,其接收唯一参数值state。store.commit(mutationName)是用来触发一个mutation的方法。需要记住的是,定义的mutation必须是同步函数,否则devtool中的数据将可能出现问题,使状态改变变得难以跟踪。
const mutations = {
mutationName(state) {
//在这里改变state中的数据
}
}
在组件中触发:
//我是一个组件
export default {
methods: {
handleClick() {
this.$store.commit('mutationName')
}
}
}
或者使用辅助函数mapMutations直接将触发函数映射到methods上,这样就能在元素事件绑定上直接使用了。如:
import {mapMutations} from 'vuex'
//我是一个组件
export default {
methods: mapMutations([
'mutationName'
])
}
Actions
Actions也可以用于改变状态,不过是通过触发mutation实现的,重要的是可以包含异步操作。其辅助函数是mapActions与mapMutations类似,也是绑定在组件的methods上的。如果选择直接触发的话,使用this.$store.dispatch(actionName)方法。
//定义Actions
const actions = {
actionName({ commit }) {
//dosomething
commit('mutationName')
}
}
在组件中使用
import {mapActions} from 'vuex'
//我是一个组件
export default {
methods: mapActions([
'actionName',
])
}
Getters
有些状态需要做二次处理,就可以使用getters。通过this.$store.getters.valueName对派生出来的状态进行访问。或者直接使用辅助函数mapGetters将其映射到本地计算属性中去。
const getters = {
strLength: state => state.aString.length
}
//上面的代码根据aString状态派生出了一个strLength状态
在组件中使用
import {mapGetters} from 'vuex'
//我是一个组件
export default {
computed: mapGetters([
'strLength'
])
}
Plugins
插件就是一个钩子函数,在初始化store的时候引入即可。比较常用的是内置的logger插件,用于作为调试使用。
import createLogger from 'vuex/dist/logger'
const store = Vuex.Store({
...
plugins: [createLogger()]
})
最后,还有一些高级用法,如严格模式,测试等可能使用频率不会特别高。有需要的时候查官方文档就可以了。总的来说,Vuex还是相对比较简单的,特别是如果之前有学过Flux,Redux之类的话,上手起来更加容易。
详解vuex中mapState,mapGetters,mapMutations,mapActions的作用
在开始接触vuex框架的时候对那些state,action,mutation,getter等理解的还挺顺利的,然后突然出来一种加了一个前缀的mapState等,这样的就有点蒙圈了。。。特别是官方的文档并没有给除详细的说明跟例子。。。然后就自己慢慢理解了一下。其实也就是一个重命名而已。。。以下就是例子,希望能帮助理解:
在store中代码
import Vuex from 'vuex' import Vue from 'vue' Vue.use(Vuex); const store = new Vuex.Store({ state: { count: 10, numb: 10086 }, getters: { add: (state, getter) => { state.count = getter.add; return state.count; }, }, mutations: { increment(state,){ state.count += 2; }, }, actions: { actionA({ dispatch, commit }) { return commit('add'); }, } });export default store;
在调用的模块里面的代码如下:
<template> <div class="hello"> <button @click="increment">加{{count}}</button> </div> </template> <script> import {mapState,mapActions} from 'vuex' export default { name: 'hello', data () { return { msg: 'Welcome to Your Vue.js App' } }, methods:{ increment(){ this.$store.dispatch('incrementsync').then(() => { console.log('then'); }); } }, computed: mapState({ // mapState相当于映射 count: 'numb', //这个时候count应该等于多少?!! 是等于store文件里面的count呢还是等于numb?答案是等于numb!这边的意思是mapState把'numb'的值映射给了count,所以count等于10086 }) } </script>这个时候按钮应该显示加10还是显示加10086?答案是加10086,所以map其实就是一个在store文件中的映射而已,就是不用让你要调用一个值需要敲这么多代码:this.$state.count;而只需要用count。。。
界面效果:

好了,其他的mapAction,mapMutations的原理是一样样的。
总结
以上所述是小编给大家介绍的详解vuex中mapState,mapGetters,mapMutations,mapActions的作用,希望对大家有所帮助,如果大家有任何疑问请给我留言,小编会及时回复大家的。在此也非常感谢大家对脚本之家网站的支持!

 浙公网安备 33010602011771号