


spring的maven工程(服务层和表现层分离)配置浅析
使用spring感觉配置特别的多,有配置地狱之称。今天来理一下加深理解。
相对来说pom.xml配置比较简单,主要配置工程所需依赖的jar,对于需要运行的工程(打包方式为war)再配置web服务器和端口信息(如下所示):
<!-- 配置tomcat插件 -->
<build>
<plugins>
<plugin>
<groupId>org.apache.tomcat.maven</groupId>
<artifactId>tomcat7-maven-plugin</artifactId>
<configuration>
<path>/</path>
<port>8081</port>
</configuration>
</plugin>
</plugins>
</build>
好,现在重点说说spring编程配置(为了区分,暂时这么说吧)
当运行一个spring项目时,服务器(比如Tomcat、JBoss等)首先会读取项目web.xml文件里的配置,顺利读取作用后,项目才能正常地被启动起来。
web.xml文件一般是放在src\main\webapp\WEB-INF下的.如果有必要,这个文件可以延伸出更多的配置文件。
一、对于server层的工程来说:
server层主要为表现层服务,和数据库打交道。当接收到表现层的请求时,根据需要做数据库的增删改查并把相关数据反馈给表现层。
web.xml文件主要完成的功能:
1、加载spring容器,生成项目所需要的bean;
<!-- 加载spring容器 -->
<context-param>
<param-name>contextConfigLocation</param-name>
<param-value>classpath:spring/applicationContext-*.xml</param-value>
</context-param>
服务器读到这里便知道,应用上下文的配置文件有多个,放在下图所在的地方:
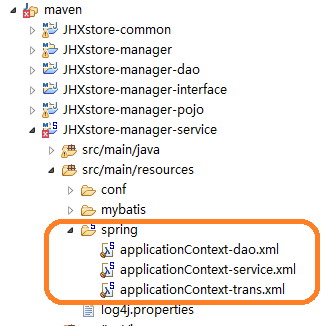
上图红框的地方就是应用上下文配置文件,为了清晰,分别设定了:
(1)applicationContgext-dao.xml(数据库连接池的定义和SessionFactory对象的bean的定义)
<?xml version="1.0" encoding="UTF-8"?>
<beans xmlns="http://www.springframework.org/schema/beans"
xmlns:context="http://www.springframework.org/schema/context" xmlns:p="http://www.springframework.org/schema/p"
xmlns:aop="http://www.springframework.org/schema/aop" xmlns:tx="http://www.springframework.org/schema/tx"
xmlns:xsi="http://www.w3.org/2001/XMLSchema-instance"
xsi:schemaLocation="http://www.springframework.org/schema/beans http://www.springframework.org/schema/beans/spring-beans-4.2.xsd
http://www.springframework.org/schema/context http://www.springframework.org/schema/context/spring-context-4.2.xsd
http://www.springframework.org/schema/aop http://www.springframework.org/schema/aop/spring-aop-4.2.xsd http://www.springframework.org/schema/tx http://www.springframework.org/schema/tx/spring-tx-4.2.xsd
http://www.springframework.org/schema/util http://www.springframework.org/schema/util/spring-util-4.2.xsd">
<!-- 数据库连接池 -->
<!-- 加载配置文件 -->
<context:property-placeholder location="classpath:conf/db.properties" />
<!-- 数据库连接池 -->
<bean id="dataSource" class="com.alibaba.druid.pool.DruidDataSource" destroy-method="close">
<property name="url" value="${jdbc.url}" />
<property name="username" value="${jdbc.username}" />
<property name="password" value="${jdbc.password}" />
<property name="driverClassName" value="${jdbc.driver}" />
<property name="maxActive" value="10" />
<property name="minIdle" value="5" />
</bean>
<!-- 让spring管理sqlsessionfactory 使用mybatis和spring整合包中的 -->
<bean id="sqlSessionFactory" class="org.mybatis.spring.SqlSessionFactoryBean">
<!-- 数据库连接池 -->
<property name="dataSource" ref="dataSource" />
<!-- 加载mybatis的全局配置文件 -->
<property name="configLocation" value="classpath:mybatis/SqlMapConfig.xml" />
</bean>
<bean class="org.mybatis.spring.mapper.MapperScannerConfigurer">
<property name="basePackage" value="cn.jhxcom.mapper" />
</bean>
</beans>
(2)applicationContext-service.xml (扫描服务包、发布服务)
<!-- 配置包扫描器 -->
<context:component-scan base-package="cn.jhxcom.service"/>
<!-- 使用dubbo发布服务 -->
<!-- 提供方应用信息,用于计算依赖关系 -->
<dubbo:application name="JHXstore-manager" />
<dubbo:registry protocol="zookeeper" address="aaa.bbb.ccc.ddd:2181" />
<!-- 用dubbo协议在20880端口暴露服务 -->
<dubbo:protocol name="dubbo" port="20880" />
<!-- 声明需要暴露的服务接口 -->
<dubbo:service interface="cn.jhxcom.service.ItemService" ref="itemServiceImpl" timeout="600000"/>
</beans>
(3)applicationContext-trans.xml (事务管理)
<?xml version="1.0" encoding="UTF-8"?>
<beans xmlns="http://www.springframework.org/schema/beans"
xmlns:context="http://www.springframework.org/schema/context" xmlns:p="http://www.springframework.org/schema/p"
xmlns:aop="http://www.springframework.org/schema/aop" xmlns:tx="http://www.springframework.org/schema/tx"
xmlns:xsi="http://www.w3.org/2001/XMLSchema-instance"
xsi:schemaLocation="http://www.springframework.org/schema/beans http://www.springframework.org/schema/beans/spring-beans-4.2.xsd
http://www.springframework.org/schema/context http://www.springframework.org/schema/context/spring-context-4.2.xsd
http://www.springframework.org/schema/aop http://www.springframework.org/schema/aop/spring-aop-4.2.xsd http://www.springframework.org/schema/tx http://www.springframework.org/schema/tx/spring-tx-4.2.xsd
http://www.springframework.org/schema/util http://www.springframework.org/schema/util/spring-util-4.2.xsd">
<!-- 事务管理器 -->
<bean id="transactionManager"
class="org.springframework.jdbc.datasource.DataSourceTransactionManager">
<!-- 数据源 -->
<property name="dataSource" ref="dataSource" />
</bean>
<!-- 通知 -->
<tx:advice id="txAdvice" transaction-manager="transactionManager">
<tx:attributes>
<!-- 传播行为 -->
<tx:method name="save*" propagation="REQUIRED" />
<tx:method name="insert*" propagation="REQUIRED" />
<tx:method name="add*" propagation="REQUIRED" />
<tx:method name="create*" propagation="REQUIRED" />
<tx:method name="delete*" propagation="REQUIRED" />
<tx:method name="update*" propagation="REQUIRED" />
<tx:method name="find*" propagation="SUPPORTS" read-only="true" />
<tx:method name="select*" propagation="SUPPORTS" read-only="true" />
<tx:method name="get*" propagation="SUPPORTS" read-only="true" />
</tx:attributes>
</tx:advice>
<!-- 切面 -->
<aop:config>
<aop:advisor advice-ref="txAdvice"
pointcut="execution(* cn.jhxcom.service..*.*(..))" />
</aop:config>
</beans>
2、配置监听器
<!-- 让spring随web启动而创建的监听器 -->
<listener>
<listener-class>org.springframework.web.context.ContextLoaderListener</listener-class>
</listener>
二、对于表现层的工程来说
表现层(web层)主要是接受用户请求,并把相关请求传递给服务层。
web.xml文件主要完成的功能:
1、显示项目的首页
<welcome-file-list>
<welcome-file>index.html</welcome-file>
<welcome-file>index.htm</welcome-file>
<welcome-file>index.jsp</welcome-file>
<welcome-file>default.html</welcome-file>
<welcome-file>default.htm</welcome-file>
<welcome-file>default.jsp</welcome-file>
</welcome-file-list>
2、配置前段控制器
<!-- springmvc的前端控制器 -->
<servlet>
<servlet-name>JHXstore-manager</servlet-name>
<servlet-class>org.springframework.web.servlet.DispatcherServlet</servlet-class>
<!--注释 contextConfigLocation不是必须的, 如果不配置contextConfigLocation, springmvc的配置文件默认在:WEB-INF/servlet的name+"-servlet.xml" -->
<init-param>
<param-name>contextConfigLocation</param-name>
<param-value>classpath:spring/springmvc.xml</param-value>
</init-param>
<load-on-startup>1</load-on-startup>
</servlet>
<servlet-mapping>
<servlet-name>JHXstore-manager</servlet-name>
<!-- url的拦截形式 -->
<url-pattern>/</url-pattern>
</servlet-mapping>
3、引入springmvc.xml配置文件
上节红色字符串为引入的spring.xml及文件位置。
springmvc.xml文件内容如下:
<?xml version="1.0" encoding="UTF-8"?>
<beans xmlns="http://www.springframework.org/schema/beans"
xmlns:xsi="http://www.w3.org/2001/XMLSchema-instance" xmlns:p="http://www.springframework.org/schema/p"
xmlns:context="http://www.springframework.org/schema/context"
xmlns:dubbo="http://code.alibabatech.com/schema/dubbo"
xmlns:mvc="http://www.springframework.org/schema/mvc"
xsi:schemaLocation="http://www.springframework.org/schema/beans http://www.springframework.org/schema/beans/spring-beans-4.2.xsd
http://code.alibabatech.com/schema/dubbo http://code.alibabatech.com/schema/dubbo/dubbo.xsd
http://www.springframework.org/schema/mvc http://www.springframework.org/schema/mvc/spring-mvc-4.2.xsd
http://www.springframework.org/schema/context http://www.springframework.org/schema/context/spring-context-4.2.xsd">
<context:component-scan base-package="cn.jhxcom.controller" />
<mvc:annotation-driven />
<!-- 前端的网页所在的位置,默认的网页文件后缀 -->
<bean
class="org.springframework.web.servlet.view.InternalResourceViewResolver">
<property name="prefix" value="/WEB-INF/jsp/" />
<property name="suffix" value=".jsp" />
</bean>
<!-- 配置资源映射 -->
<mvc:resources location="/css/" mapping="/css/**"/>
<mvc:resources location="/js/" mapping="/js/**"/>
<!-- 引用dubbo服务 -->
<dubbo:application name="JHXstore-manager-web"/>
<dubbo:registry protocol="zookeeper" address="aaa.bbb.ccc.ddd:2181"/>
<dubbo:reference interface="cn.jhxcom.service.ItemService" id="itemService" />
</beans>
到这里,项目正常运行,随时等待处理用户发来的请求。

 浙公网安备 33010602011771号