

服务器网卡iPXE的使用介绍
概述
PXE是Intel提出的,用以网卡启动。通过DHCP获取IP以及TFTP获取启动文件。
gPXE/iPXE是PXE的扩展版,支持HTTP等多种获取手段。iPXE由gPXE分支而来(fork),功能更丰富。
iPXE的使用
之前我们使用PXE的时候,要在DHCP配置中设置启动文件为pxelinux.0
# Subnet for new 100 subnetsubnet 172.16.100.0 netmask 255.255.254.0 {range 172.16.101.230 172.16.101.240;option subnet-mask 255.255.254.0;option routers 172.16.100.1;next-server 172.16.10.31;filename "pxelinux.0";}
如果使用的是gpxe,那么这个文件名就是 gpxelinux.0
这两个文件都可以在你syslinux的安装包中找到。
iPXE就没那么好了,需要自己下载。
下载链接是 http://boot.ipxe.org/undionly.kpxe
然后设定DHCP配置文件
next-server 172.16.10.31;filename "undionly.kpxe";
But… 问题来了,你会发现iPXE的启动界面是一个死循环。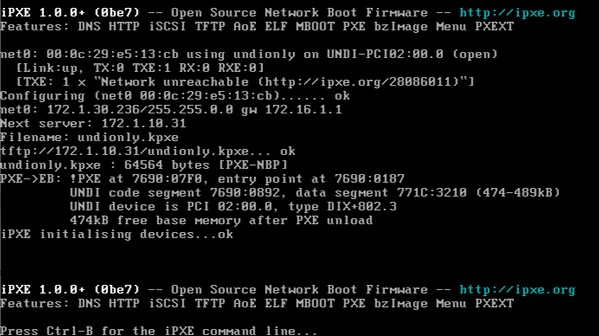
如何打破这个死循环呢?
官方提供了2个办法,一个是改DHCP的配置,貌似很麻烦,我们还是采用第二种办法,重新编译。
git clone git://git.ipxe.org/ipxe.gitcd ipxe/srccat <<EOF >> demo.ipxe#!ipxedhcpchain http://boot.ipcpu.comEOFmake bin/undionly.kpxe EMBED=demo.ipxe
其中的chain需要填写启动网址。
生成新的undionly.kpxe,我们把它覆盖掉原先的文件。
接下来,我们就要处理启动网站了。
启动网站的处理
启动网站需要http服务器,这里我们使用了nginx。
首先我们写入首页文件index.html
#!ipxeechoecho Booting boot.oskarcz.net for ${hostname}set 210:string http://boot.ipcpu.com/set 209:string pxelinux.cfg/defaultset 208:hex f1:00:74:7eset filename ${210:string}pxelinux.0chain ${filename} ||echo Booting ${filename} failed, dropping to shellshell#@加载http://boot.ipcpu.com/pxelinux.0文件#@加载http://boot.ipcpu.com/pxelinux.cfg/default 配置
然后这里就和普通的PXE一样了,唯一不同的是协议全部是HTTP。
配置文件pxelinux.cfg/default
#######################################使用vesamenu.c32菜单DEFAULT res/vesamenu.c32PROMPT 0MENU TITLE PXE NETBOOT TOOLKITS#背景图片MENU BACKGROUND res/back.png#字体设定FONT res/myfont.psf#超时设定TIMEOUT 300MENU VSHIFT 6#超时默认启动hardbootONTIMEOUT hardboot#####custom6.6LABEL centos66MENU LABEL ^1 -- Custom CentOS6.6 64bit Setuplinux http://boot.ipcpu.com/pxe/centos6/isolinux/vmlinuzappend initrd=http://boot.ipcpu.com/pxe/centos6/isolinux/initrd.img ks=http://boot.ipcpu.com/secret/ks/centos66.cfg ksdevice=bootif ip=172.1.30.250 netmask=255.255.0.0 gateway=172.1.1.1 dns=172.1.10.1,172.1.10.2 hostname=IPCPU-30-250######boot from harddiskLABEL hardbootMENU LABEL ^H -- Boot from the first Hard Diskkernel res/chain.c32 hd0
界面截图
QA
QA-1
Q:如何实现公网上的安装服务?
A:我们看到iPXE配置里写的是一个网址,将网站发布出去就可以利用公网安装了。http://boot.oskarcz.net/ 以及 https://netboot.xyz/boot-ipxe/index.html 就是这样一种服务
QA-2
Q:如何使用公网上的安装服务
A:在iPXE启动界面中按下Ctrl+B,中断默认启动方式,然后输入以下内容,即可使用。
iPXE> dhcpiPXE> chain http://boot.oskarcz.net
QA-3
Q:如何实现http://boot.oskarcz.net/这种方式呢,浏览器访问时显示帮助文件。
A:这里是采用nginx对UserAgent进行判断,UA为iPXE时,根目录是脚本目录,其他UA时,根目录是帮助文件。
QA-4
Q:gPXE有什么缺点呢?
A:gPXE已经停止开发,没有技术支持了,并且在实际使用中,发现VMWARE ESXi使用gpxe后,下载配置文件特别慢,无法忍受。


 浙公网安备 33010602011771号