12 uniapp-话题相关页面(标题三涉及绝对定位,相对定位,margin定位对比)
12 话题相关页面(标题三绝对定位,相对定位,margin定位对比)
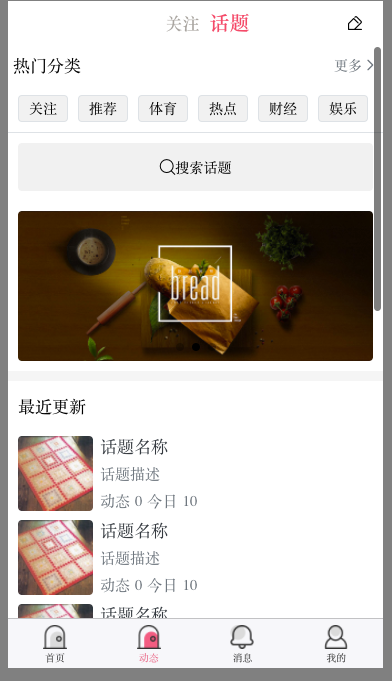
一 话题页
1 总览效果图:
2 简单布局前两行

<view class="flex align-center justify-between p-1">
						<view class="font-md">
							<text>热门分类</text>
						</view>
						<view class="flex align-center justify-center text-secondary animated"
						hover-class="jello">
							<text>更多</text>
							<text class="iconfont icon-jinru  "></text>
						</view>
					</view>

					<view class="flex align-center border-bottom p-1">
						<view class=" px-2 border rounded m-1 animated" style="background-color: #f1f1f1;"
						hover-class="jello">
							<text>关注</text>
						</view>

						<view class=" px-2 border rounded m-1" style="background-color: #f1f1f1;">
							<text>关注</text>
						</view>

						<view class=" px-2 border rounded m-1" style="background-color: #f1f1f1;">
							<text>关注</text>
						</view>
					</view>
3 封装前两行内容(略)
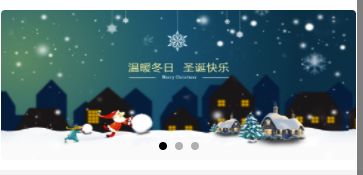
4 搜索框+轮播图
效果图
要点
1 搜索框硬写就行
2 轮播图 记得要给高度,其余正常写就行关于那几个参数猜也能猜出来。
猜不粗来自己去官网看swiper容器相关内容
https://uniapp.dcloud.io/component/swiper
代码
<!-- 搜索框 -->
					<view class="p-2">
						<view class="rounded w-100 flex align-center justify-center py-2" style="background-color: #F1F1F1;">
							<text class="iconfont icon-sousuo"></text>
							搜索话题
						</view>
					</view>
					<!-- 轮播图 -->
					<swiper class="px-2"
					:indicator-dots="true" :autoplay="true"
					:interval="3000" :duration="1000">
						<swiper-item>
							<image src="/static/demo/banner1.jpg"
							style="height: 300rpx;" class="w-100 rounded"></image>
						</swiper-item>
						<swiper-item>
							<image src="/static/demo/banner2.jpg"
							style="height: 300rpx;" class="w-100 rounded"></image>
						</swiper-item>
						<swiper-item>
							<image src="/static/demo/banner3.jpg"
							style="height: 300rpx;" class="w-100 rounded"></image>
						</swiper-ite
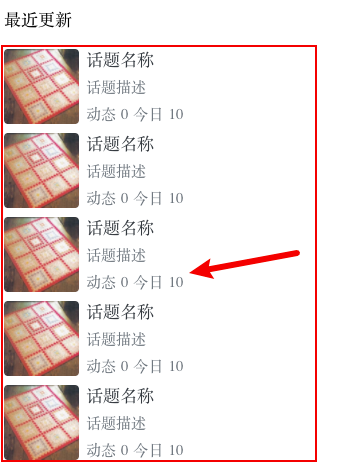
5 封装话题列表组件
效果图
代码
新建components/common/news/toplic-list.vue
<template>
	<view>
		<view class="px-2 flex align-center">
			<image class="rounded mr-15" :src="item.cover" style="width: 150rpx; height: 150rpx;"></image>
			<view class="flex-1">
				<view class="font-md text-dark">
					{{item.title}}
				</view>
				<view class="font text-secondary">
					{{item.desc}}
				</view>
				<view class="font text-secondary">
					动态<text class="mx-1">{{item.today_count}}</text>
					今日<text class="mx-1">{{item.news_count}}</text>
				</view>
			</view>
		</view>
	</view>
</template>

<script>
	export default {
		props:{
			item:Object,
			index:Number
		},
		data() {
			return {

			}
		},
		methods: {

		}
	}
</script>

<style>

</style>
pages/news/news.vue
...
<!-- 话题列表 -->
					<block v-for="(item,index) in topicListData" :key="index">
						<topic-list :item="item" :index="index"></topic-list>
					</block>
...
import topicList from '@/components/news/topic-list.vue'
	export default {
		components: {
			uniNavBar,
			commonList,
			loadMore,
			hotCate,
			topicList
		},
...
topicListData:[{
					cover:"/static/demo/topicpic/1.jpeg",
					title:"话题名称",
					desc:"话题描述",
					today_count:0,
					news_count:10
				},{
					cover:"/static/demo/topicpic/1.jpeg",
					title:"话题名称",
					desc:"话题描述",
					today_count:0,
					news_count:10
				},{
					cover:"/static/demo/topicpic/1.jpeg",
					title:"话题名称",
					desc:"话题描述",
					today_count:0,
					news_count:10
				},{
					cover:"/static/demo/topicpic/1.jpeg",
					title:"话题名称",
					desc:"话题描述",
					today_count:0,
					news_count:10
				},{
					cover:"/static/demo/topicpic/1.jpeg",
					title:"话题名称",
					desc:"话题描述",
					today_count:0,
					news_count:10
				},{
					cover:"/static/demo/topicpic/1.jpeg",
					title:"话题名称",
					desc:"话题描述",
					today_count:0,
					news_count:10
				},{
					cover:"/static/demo/topicpic/1.jpeg",
					title:"话题名称",
					desc:"话题描述",
					today_count:0,
					news_count:10
				},{
					cover:"/static/demo/topicpic/1.jpeg",
					title:"话题名称",
					desc:"话题描述",
					today_count:0,
					news_count:10
				},{
					cover:"/static/demo/topicpic/1.jpeg",
					title:"话题名称",
					desc:"话题描述",
					today_count:0,
					news_count:10
				},{
					cover:"/static/demo/topicpic/1.jpeg",
					title:"话题名称",
					desc:"话题描述",
					today_count:0,
					news_count:10
				}]
二 话题分类页开发(copy index.vue)
效果图

修改全局标题名字
,{
            "path" : "pages/topic-nav/topic-nav",
            "style" : {
				"navigationBarTitleText":"话题分类"
			}
        }
新建pages/topic/topic-nav.vue
ps: 基本拷贝index.vue 稍微改改就行
<template>
	<view>
		<!-- <block v-for="(item,index) in list" :key="index"> -->
			<!-- 列表样式 -->
			<!-- <common-list :item="item" :index="index" @follow="follow" @doSupport="doSupport"></common-list> -->
			<!-- 全局分割线 -->
			<!-- <divider></divider> -->
		<!-- </block> -->
		<!-- 顶部选项卡 -->
		<scroll-view scroll-x="true" :scroll-into-view="scrollIndex" scroll-with-animation
		class="scroll-row"
		style="height: 100rpx;">
			<view v-for="(item,index) in tabBars"
			:key="index"
			:id="'tab'+index"
			class="scroll-row-item px-2 py-2 font-md"
			:class="tabIndex === index? 'text-main font-lg font-weight-bold':''"
			@click="changeTab(index)">
				{{item.name}}
			</view>
		</scroll-view>

		<!-- 定制选项卡对应的内容 -->
							<!-- current	聚焦在当前子滑块实例的 index 默认会从0 1 2 3。。。依次排列 -->
		<swiper :duration="150" :current="tabIndex" @change="onChangeTab"
		:style="'height:'+scrollH+'px'">
		<!-- 会默认分配索引 0 1 2 3 4 5  -->
			<swiper-item v-for="(item,index) in newsList" :key="index">

				<scroll-view scroll-y="true" :style="'height:'+scrollH+'px;'" @scrolltolower="loadmore(index)">
					<template v-if="item.list.length>0">
						<!-- 列表 -->
						<block v-for="(item2,index2) in item.list" :key="index2">
							<!-- 列表样式 -->
							<topic-list :item="item2" :index="index2" ></topic-list>
							<!-- 全局分割线 -->
							<divider></divider>
						</block>
						<!-- 上拉加载 -->
						<load-more :loadmore="item.loadmore"></load-more>
					</template>
					<template v-else>
						<!-- 无数据渲染页面 -->
						<no-thing></no-thing>

					</template>


				</scroll-view>

			</swiper-item>

		</swiper>
	</view>
</template>

<script>
	import loadMore from '@/components/common/load-more.vue'
	import topicList from '@/components/news/topic-list.vue'

	export default {
		components: {
			topicList,
			loadMore,
		},
		data() {
			return {
				scrollIndex:"",
				tabIndex: 0,
				tabBars: [{
				    name: '关注',
				}, {
				    name: '推荐',
				}, {
				    name: '体育',
				}, {
				    name: '热点',
				}, {
				    name: '财经',
				}, {
				    name: '娱乐',
				}, {
				    name: '军事',
				}, {
				    name: '历史',
				}, {
				    name: '本地',
				}, {
				    name: '历史',
				}, {
				    name: '历史',
				}, {
				    name: '历史',
				}, {
				    name: '历史',
				}, {
				    name: '历史',
				}, {
				    name: '历史',
				}, {
				    name: '历史',
				},],
				newsList: [],
				topicListData:[{
					cover:"/static/demo/topicpic/1.jpeg",
					title:"话题名称",
					desc:"话题描述",
					today_count:0,
					news_count:10
				},{
					cover:"/static/demo/topicpic/1.jpeg",
					title:"话题名称",
					desc:"话题描述",
					today_count:0,
					news_count:10
				},{
					cover:"/static/demo/topicpic/1.jpeg",
					title:"话题名称",
					desc:"话题描述",
					today_count:0,
					news_count:10
				},{
					cover:"/static/demo/topicpic/1.jpeg",
					title:"话题名称",
					desc:"话题描述",
					today_count:0,
					news_count:10
				},{
					cover:"/static/demo/topicpic/1.jpeg",
					title:"话题名称",
					desc:"话题描述",
					today_count:0,
					news_count:10
				},{
					cover:"/static/demo/topicpic/1.jpeg",
					title:"话题名称",
					desc:"话题描述",
					today_count:0,
					news_count:10
				},{
					cover:"/static/demo/topicpic/1.jpeg",
					title:"话题名称",
					desc:"话题描述",
					today_count:0,
					news_count:10
				},{
					cover:"/static/demo/topicpic/1.jpeg",
					title:"话题名称",
					desc:"话题描述",
					today_count:0,
					news_count:10
				},{
					cover:"/static/demo/topicpic/1.jpeg",
					title:"话题名称",
					desc:"话题描述",
					today_count:0,
					news_count:10
				},{
					cover:"/static/demo/topicpic/1.jpeg",
					title:"话题名称",
					desc:"话题描述",
					today_count:0,
					news_count:10
				}]
		}
		},
		//监听原生标题栏按钮点击事件,参数为Object
		onNavigationBarSearchInputClicked(){
			uni.navigateTo({
				url:'../search/search',
			})

		},
		// 监听导航按钮点击事件
		onNavigationBarButtonTap() {
			uni.navigateTo({
				url: '../add-input/add-input',
			})
		},
		onLoad() {
			uni.getSystemInfo({
				success:res=>{
								// 可用窗口高度(屏幕高度-导航栏高度-底部栏高度。) -  选项卡高度
					this.scrollH = res.windowHeight - uni.upx2px(101)
					// console.log(this.scrollH)
				}
			})
			// 根据选项生成列表
			this.getData()
		},
		methods: {
			// 上拉加载更多
			loadmore(index){
				// 拿到当前列表
				let item = this.newsList[index]
				// 修改当前加载状态
				item.loadmore = '加载中。。。'
				// 模拟数据请求
				setTimeout(()=>{
					// 加载数据
								// ... 相当于取出来当前对象可以遍历出来的内容放到了当前对象里面。
								// 这个可以粗糙的理解为把合并了两个一摸一样的列表,列表里面原来的内容*2了
					item.list = [...item.list,...item.list]
					item.loadmore = '上拉加载更多'
				},2000)
			},
			// 制作列表+上拉加载数据初始值
			getData(){
				var arr=[]
				for (let i = 0; i < this.tabBars.length;i++ ){
					let obj ={
						loadmore:"上拉加载更多",
						list:[]
					}
					if (i < 2) {
						obj.list = this.topicListData
					}
					arr.push(obj)
				}
				this.newsList = arr
			},
			// 切换选项
			changeTab(index){
				if (this.tabIndex === index){
					return;
				}
				this.tabIndex = index
				// 视角滚动到指定元素
				this.scrollIndex = 'tab'+index
			},
			// 监听选项内容滑动
			onChangeTab(e){
				this.changeTab(e.detail.current)
			},

		}
	}
</script>

<style>

</style>
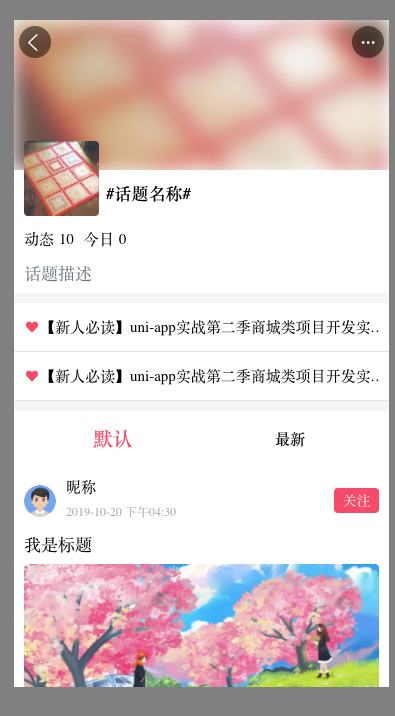
三 话题详情页开发
纵览效果图:
1 修改全局pages
实现效果:
代码
,{
            "path" : "pages/topic-detail/topic-detail",
            "style" : {
				"app-plus":{
					"titleNView":{
						"type":"transparent",
						//titleNView 的 type 值为 transparent 时,
						//导航栏为滚动透明渐变导航栏,默认只有button,
						//滚动后标题栏底色和title文字会渐变出现
						"buttons":[{
							"type":"menu"
						}]
					}
				}
			}
        }
2 进行页面传参跳转
topic-list.vue
openTopicDetail(){
				uni.navigateTo({
					url:'/pages/topic-detail/topic-detail?detail='+JSON.stringify(this.item)
				})
			}
topic-detail.vue
<template>
	<view>

	</view>
</template>

<script>
	export default {
		data() {
			return {

			}
		},
		onLoad(e){
			console.log('我执行l',e)

			if (e.detail) {
				let res = JSON.parse(e.detail)
				console.log(res)
			}
		},
		methods: {

		}
	}
</script>

<style>

</style>
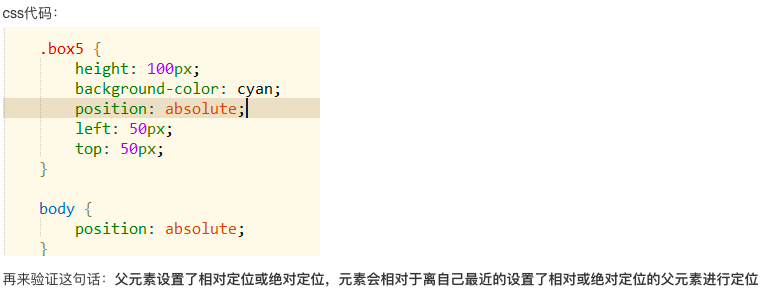
3 补充相对定位和绝对定位
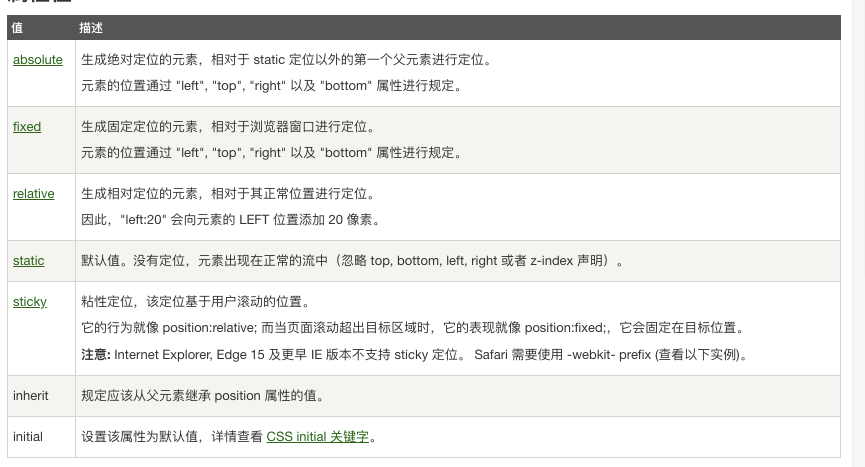
## 总结
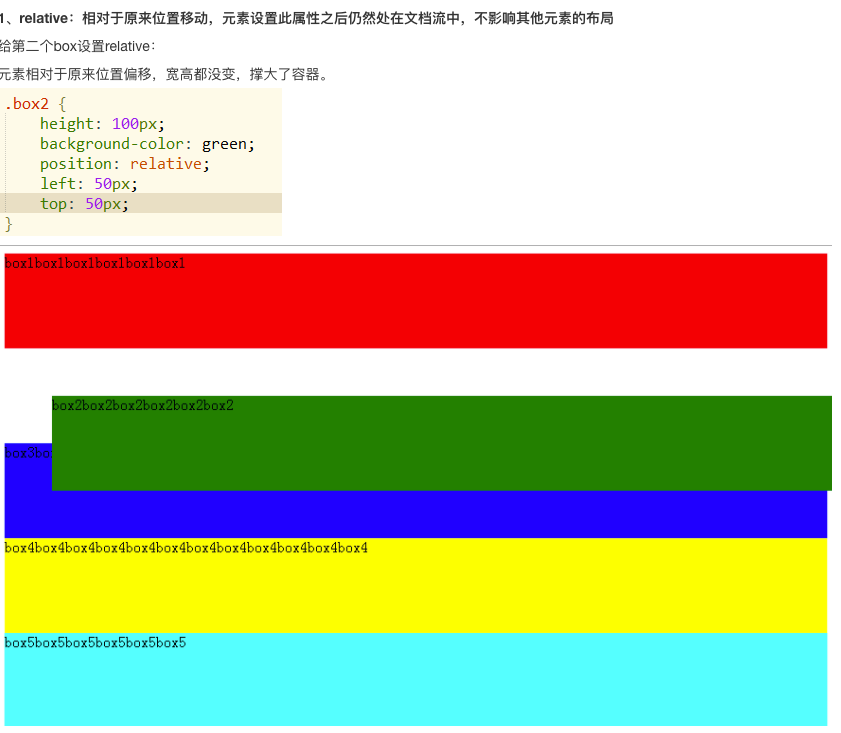
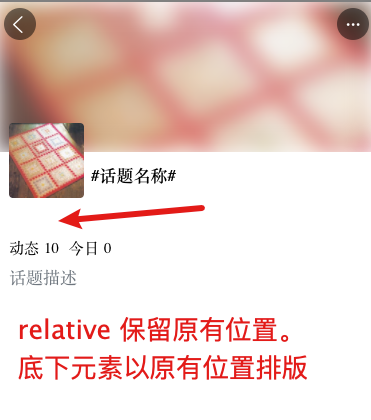
relative:定位是相对于自身位置定位(设置偏移量的时候,会相对于自身所在的位置偏移)。设置了relative的元素仍然处在文档流中,元素的宽高不变,设置偏移量也不会影响其他元素的位置。最外层容器设置为relative定位,在没有设置宽度的情况下,宽度是整个浏览器的宽度。
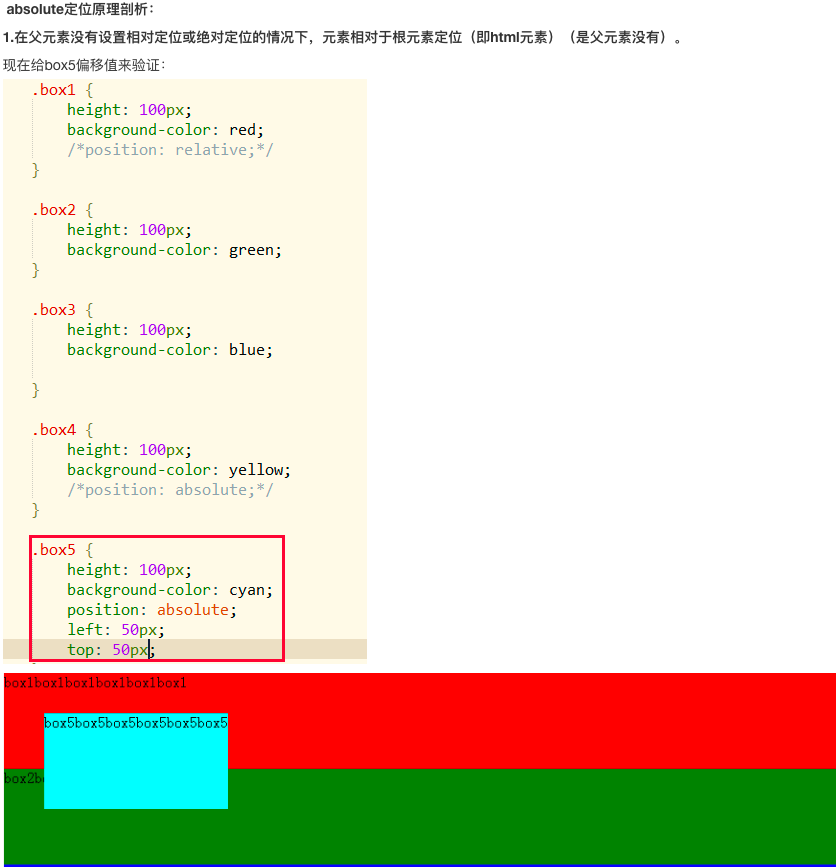
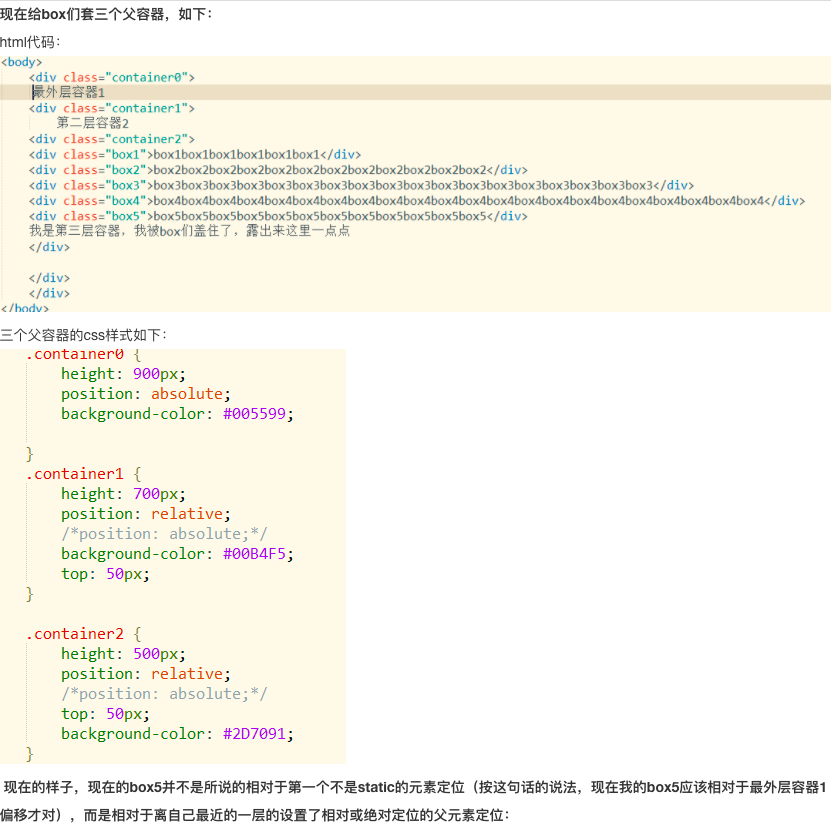
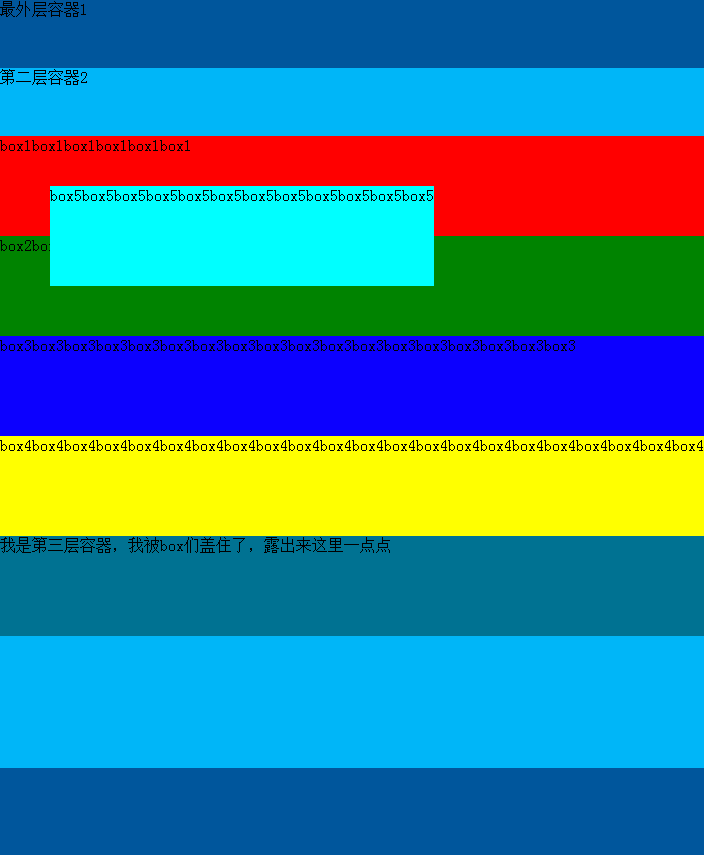
absolute:定位是相对于离元素最近的设置了绝对或相对或固定(只要做了定位的)定位的父元素决定的,如果没有父元素设置绝对或相对定位,则元素相对于根元素即html元素定位。设置了absolute的元素脱了了文档流,元素在没有设置宽度的情况下,宽度由元素里面的内容决定。脱离后原来的位置相当于是空的,下面的元素会来占据位置。
参考博客:https://www.runoob.com/w3cnote/css-position-static-relative-absolute-fixed.html
相对定位案例
绝对定位案例1
绝对定位案例2
margin系列的定位用法
对比relative top=-75px 和 margin-top=-75

对比一下
所以很多时候margin更为实用,具体视情况而定。
4 实现导航背景和标题图片浮动
效果图:

代码:
<template>
	<!-- 导航图 -->
	<view>

		<view class="position-relative">
			<image :src="info.cover" mode="aspectFill"
			style="height: 300rpx;" class="w-100 filter"></image>
		</view>


		<!-- 图标话题名称 动态 今日 话题描述-->
		<view class="position-relative bg-white px-2" style="z-index: 10;" >
			<!-- 图标 话题名称 -->
			<view class="flex">
				<image :src="info.cover"
				style="height:150rpx; width:150rpx; margin-top: -75rpx;"
				class="rounded mr-15 "></image>
				<text class="font-md font-weight-bold">#{{info.title}}#</text>
			</view>

			<view class="flex align-center font mt-2">
				动态<text class="ml-1 mr-2">{{info.news_count}}</text>
				今日<text class="ml-1">{{info.today_count}}</text>
			</view>

			<!-- 话题描述 -->
			<view class="font-md text-secondary my-1">
				{{info.desc}}
			</view>
		</view>

	</view>

</template>

<script>
	export default {
		data() {
			return {
				info:{
					cover: "/static/demo/topicpic/1.jpeg",
					title: "话题名称",
					desc: "话题描述",
					today_count: 0,
					news_count: 10
				}
			}
		},
		onLoad(e){
			console.log('我执行l',e)

			if (e.detail) {
				let res = JSON.parse(e.detail)
				console.log(res)
			}
		},
		methods: {

		}
	}
</script>

<style>
	.filter{
		filter: blur(10px)
	}

</style>
5 封装组件(略)
6 精华帖子+tab选项卡续建开发
效果图:
代码
 <view class="p-2 flex align-center border-bottom">
			<text class="iconfont icon-xihuan text-main "></text>
			<text class="font text-ellipsis">【新人必读】uni-app实战第二季商城类项目开发实战第二季商城类项目开发</text>
		</view>
		<divider></divider>

		<view class="p-2 flex">
			<view class="font flex-1 flex align-center justify-center font-weight-bold"
			v-for="(item,index) in tabBars" :key="index"
			:class="index===tabIndex?'text-main font-lg':''"
			@click="changeTab(index)"
			>{{item.name}}</view>
		</view>
7 列表组件联动(应用计算属性方式实现联动)
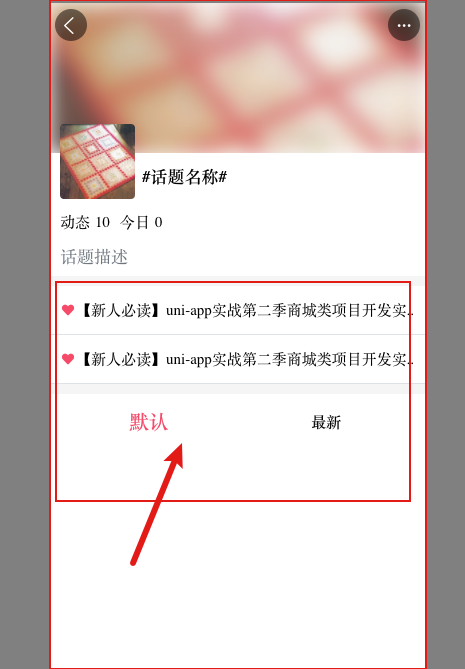
效果图

代码(注意列表组件注释部分就可以)
<template>
<!-- 导航图 -->
<view>
<!-- 标题信息组件 -->
<topic-info :info="info"></topic-info>
<divider></divider>
<!-- 置顶帖子 -->
<view class="p-2 flex align-center border-bottom">
<text class="iconfont icon-xihuan text-main "></text>
<text class="font text-ellipsis">【新人必读】uni-app实战第二季商城类项目开发实战第二季商城类项目开发</text>
</view>
<view class="p-2 flex align-center border-bottom">
<text class="iconfont icon-xihuan text-main "></text>
<text class="font text-ellipsis">【新人必读】uni-app实战第二季商城类项目开发实战第二季商城类项目开发</text>
</view>
<divider></divider>
<!-- 默认更新选项卡 -->
<view class="p-2 flex">
<view class="font flex-1 flex align-center justify-center font-weight-bold"
v-for="(item,index) in tabBars" :key="index"
:class="index===tabIndex?'text-main font-lg':''"
@click="changeTab(index)"
>{{item.name}}</view>
</view>
<!-- 列表组件 -->
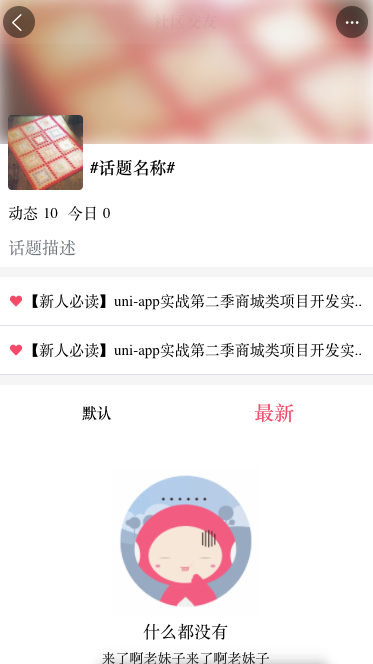
<!-- 这个列表组件的联动逻辑是通过计算属性,统一循环一个计算变量,这个变量的值是由tabList决定的 -->
<template v-if="listData.length >0">
<block v-for="(item,index) in listData" :key="index">
<common-list :item="item" :index="index"></common-list>
</block>
</template>
<template v-else>
<no-thing></no-thing>
</template>
</view>
</template>
<script>
const demo = [{
username:"昵称",
userpic:"/static/default.jpg",
newstime:"2019-10-20 下午04:30",
isFollow:false,
title:"我是标题",
titlepic:"/static/demo/datapic/11.jpg",
support:{
type:"support", // 顶
support_count:1,
unsupport_count:2
},
comment_count:2,
share_num:2
},
{
username:"昵称",
userpic:"/static/default.jpg",
newstime:"2019-10-20 下午04:30",
isFollow:false,
title:"我是标题",
titlepic:"",
support:{
type:"unsupport", // 踩
support_count:1,
unsupport_count:2
},
comment_count:2,
share_num:2
},
{
username:"昵称",
userpic:"/static/default.jpg",
newstime:"2019-10-20 下午04:30",
isFollow:false,
title:"我是标题",
titlepic:"",
support:{
type:"", // 未操作
support_count:1,
unsupport_count:2
},
comment_count:2,
share_num:2
}];
import topicInfo from '@/components/topic-detail/topic-info.vue'
import commonList from '@/components/common/common-list.vue'
export default {
components:{
topicInfo,
commonList
},
data() {
return {
info:{
cover: "/static/demo/topicpic/1.jpeg",
title: "话题名称",
desc: "话题描述",
today_count: 0,
news_count: 10
},
tabBars:[{
name:"默认"
},{
name:"最新"
}],
tabIndex:0,
list1:[],
list2:[]
}
},
computed:{
listData(){
if (this.tabIndex===0){
return this.list1
}
return this.list2
}
},
onLoad(e){
console.log('我执行l',e)
if (e.detail) {
let res = JSON.parse(e.detail)
console.log(res)
}
},
onLoad(){
this.list1 = demo
},
methods: {
changeTab(index){
this.tabIndex = index
}
}
}
</script>
<style>
</style>
6 页面级别触底事件
思路:
1 分为两个阶段渲染和触底
2 渲染:没有触底渲染(渲染计算属性,计算属性根据当前的tabIndex找到对应的loadtest1或loadtest2)
触底渲染(触发触底事件修改当前tabindex对应的loadtest1或loadtet2,渲染计算属性,计算属性根据当前的tabIndex找到对应的loadtest1或loadtest2)
3 触底:拿到当前tabIndex,修改tabIndex对应的loadtext1或loadtet2 为“加载中。。。”,2s后修改tabindex对应的loadtext1或loadtet2。
NB图解:

代码:
...
<!-- 上拉加载 -->
		<load-more :loadmore="loadtext"></load-more>
...
import loadMore from '@/components/common/load-more.vue'
	export default {
		components:{
			...
			loadMore
...
    data(){
    ...
    		tabIndex:0,
				list1:[],
				loadtext1:"上拉加载更多",
				list2:[],
				loadtext2:"上拉加载更多"
  	}
...
   // 计算属性
	 computed:{
			listData(){
				if (this.tabIndex===0){
					return this.list1
				}
				return this.list2
			},
			loadtext(){
				if (this.tabIndex === 0){
					return this.loadtext1
				}
				return this.loadtext2
			}
		},
  	// 页面触底事件
		onReachBottom(){
			this.loadmorefunc()
		},
    methods: {
            changeTab(index){
              this.tabIndex = index

            },
            loadmorefunc(){
                // 拿到当前索引
                let index = this.tabIndex
                // 判断是否处于可加载状态
                if (this.loadtext !== '上拉加载更多') return;
                // 设置上拉加载状态处于加载中。。。
                this['loadtext'+(index+1)] = "加载中..."
                // 模拟请求数据
                setTimeout(()=>{
                  this['list'+(index+1)] = [...this['list'+(index+1)],...this['list'+(index+1)]]
                  this['loadtext'+(index+1)] = '上拉加载更多'
                },2000)
              }
            }
...
