

树莓派4B(centos7.9)安装宝塔
安装Linux系统、软件
安装centos7系统
树莓派无显示器安装系统Centos7_树莓派centos无显示_范枝洲的博客-CSDN博客
先格式化SD卡,再刻录系统,注意是aarch64
下载地址:
http://isoredirect.centos.org/		#官方网址
http://mirror-hk.koddos.net/centos-altarch/7.9.2009/isos/armhfp/	#armv7 32位
https://mirror-hk.koddos.net/centos-altarch/7.9.2009/isos/aarch64/	#aarch64 64位

https://mirrors.bfsu.edu.cn/centos-altarch/7.9.2009/isos/aarch64/images/CentOS-Userland-7-aarch64-RaspberryPI-Minimal-4-2009-sda.raw.xz#下载链接 aarch64 64位
将SD卡插入树莓派,通电开机。
root		#帐号
centos		#密码
这里我是连接了一根网线到路由器上,然后在相同局域网上的笔记本上通过PowerShell通过ssh连接
PS C:\Users\Zeta> ssh root@192.168.1.2

The authenticity of host '192.168.1.2 (192.168.1.2)' can't be established.
ED25519 key fingerprint is SHA256:bNR/bvpQ9CbXQCsfK0d5yeAt6VPi6DDksIbQoHayJe0.
This key is not known by any other names
Are you sure you want to continue connecting (yes/no/[fingerprint])? yes
Warning: Permanently added '192.168.1.2' (ED25519) to the list of known hosts.
root@192.168.1.2's password:
[root@localhost ~]#
设置主机名称
hostnamectl set-hostname RaspberryPiCentos7_9  #设置主机名称
#http://www.kaixinit.com/linux/centos/8836.html
扩容、挂载硬盘
树莓派无显示器安装系统Centos7_树莓派centos无显示_范枝洲的博客-CSDN博客
(221条消息) Centos 添加新硬盘,分区格式化、挂载硬盘_centos 挂载新硬盘_China-P的博客-CSDN博客
-
df -h查看当前空间情况:[root@localhost ~]# df -h Filesystem Size Used Avail Use% Mounted on /dev/root 3.7G 2.9G 757M 80% / #发现总空间3.7G,只利用到了2.9G devtmpfs 459M 0 459M 0% /dev tmpfs 464M 0 464M 0% /dev/shm tmpfs 464M 13M 451M 3% /run tmpfs 464M 0 464M 0% /sys/fs/cgroup /dev/mmcblk0p1 286M 55M 232M 20% /boot tmpfs 93M 0 93M 0% /run/user/0 tmpfs 93M 8.0K 93M 1% /run/user/992 -
fdisk -l查看是否有可用空间Disk /dev/ram15: 4 MB, 4194304 bytes, 8192 sectors Units = sectors of 1 * 512 = 512 bytes Sector size (logical/physical): 512 bytes / 4096 bytes I/O size (minimum/optimal): 4096 bytes / 4096 bytes Disk /dev/mmcblk0: 63.9 GB, 63864569856 bytes, 124735488 sectors ##发现有63G总空间 Units = sectors of 1 * 512 = 512 bytes Sector size (logical/physical): 512 bytes / 512 bytes I/O size (minimum/optimal): 512 bytes / 512 bytes Disk label type: dos Disk identifier: 0x00097f72 Device Boot Start End Blocks Id System /dev/mmcblk0p1 * 8192 593919 292864 c W95 FAT32 (LBA) /dev/mmcblk0p2 593920 1593343 499712 82 Linux swap / Solaris /dev/mmcblk0p3 1593344 9406463 3906560 83 Linux -
用
fdisk /dev/mmcblk0开始扩容[root@localhost ~]# fdisk /dev/mmcblk0 ##对mmcblk0进行操作 Welcome to fdisk (util-linux 2.23.2). Changes will remain in memory only, until you decide to write them. Be careful before using the write command. Command (m for help): p #查看当前分区情况 Disk /dev/mmcblk0: 63.9 GB, 63864569856 bytes, 124735488 sectors Units = sectors of 1 * 512 = 512 bytes Sector size (logical/physical): 512 bytes / 512 bytes I/O size (minimum/optimal): 512 bytes / 512 bytes Disk label type: dos Disk identifier: 0x00097f72 Device Boot Start End Blocks Id System /dev/mmcblk0p1 * 8192 593919 292864 c W95 FAT32 (LBA) /dev/mmcblk0p2 593920 1593343 499712 82 Linux swap / Solaris /dev/mmcblk0p3 1593344 9406463 3906560 83 Linux #计划删除该分区,一定要记住Start值,后面有用 Command (m for help): d #输入d Partition number (1-3, default 3): 3 #输入3,完成删除3分区 Partition 3 is deleted Command (m for help): p #再查看,发现3号分区已经删除 Disk /dev/mmcblk0: 63.9 GB, 63864569856 bytes, 124735488 sectors Units = sectors of 1 * 512 = 512 bytes Sector size (logical/physical): 512 bytes / 512 bytes I/O size (minimum/optimal): 512 bytes / 512 bytes Disk label type: dos Disk identifier: 0x00097f72 Device Boot Start End Blocks Id System /dev/mmcblk0p1 * 8192 593919 292864 c W95 FAT32 (LBA) /dev/mmcblk0p2 593920 1593343 499712 82 Linux swap / Solaris Command (m for help): n #输入n新建分区 Partition type: p primary (2 primary, 0 extended, 2 free) e extended Select (default p): p #输入p 新建primary分区 Partition number (3,4, default 3): 3 #输入分区编号3 First sector (2048-124735487, default 2048): 1593344 #输入刚才start记录的值,否则系统会崩溃 Last sector, +sectors or +size{K,M,G} (1593344-124735487, default 124735487): #默认最大 Using default value 124735487 Partition 3 of type Linux and of size 58.7 GiB is set Command (m for help): p #再查看分区情况,发现已经新增完成 Disk /dev/mmcblk0: 63.9 GB, 63864569856 bytes, 124735488 sectors Units = sectors of 1 * 512 = 512 bytes Sector size (logical/physical): 512 bytes / 512 bytes I/O size (minimum/optimal): 512 bytes / 512 bytes Disk label type: dos Disk identifier: 0x00097f72 Device Boot Start End Blocks Id System /dev/mmcblk0p1 * 8192 593919 292864 c W95 FAT32 (LBA) /dev/mmcblk0p2 593920 1593343 499712 82 Linux swap / Solaris /dev/mmcblk0p3 1593344 124735487 61571072 83 Linux Command (m for help): w #保存 The partition table has been altered! Calling ioctl() to re-read partition table. WARNING: Re-reading the partition table failed with error 16: Device or resource busy. The kernel still uses the old table. The new table will be used at the next reboot or after you run partprobe(8) or kpartx(8) Syncing disks. [root@localhost ~]# reboot #重启 Last login: Mon Dec 30 09:31:28 2019 from 192.168.1.3 [root@localhost ~]# df -h Filesystem Size Used Avail Use% Mounted on /dev/root 3.7G 2.9G 756M 80% / devtmpfs 459M 0 459M 0% /dev tmpfs 464M 0 464M 0% /dev/shm tmpfs 464M 13M 451M 3% /run tmpfs 464M 0 464M 0% /sys/fs/cgroup /dev/mmcblk0p1 286M 55M 232M 20% /boot tmpfs 93M 8.0K 93M 1% /run/user/992 tmpfs 93M 0 93M 0% /run/user/0 [root@localhost ~]# resize2fs /dev/mmcblk0p mmcblk0p1 mmcblk0p2 mmcblk0p3 [root@localhost ~]# resize2fs /dev/mmcblk0p3 #重载分区3 resize2fs 1.42.9 (28-Dec-2013) Filesystem at /dev/mmcblk0p3 is mounted on /; on-line resizing required old_desc_blocks = 1, new_desc_blocks = 8 The filesystem on /dev/mmcblk0p3 is now 15392768 blocks long. [root@localhost ~]# df -h #查看,已经扩容到58G了 Filesystem Size Used Avail Use% Mounted on /dev/root 58G 2.9G 55G 5% / devtmpfs 459M 0 459M 0% /dev tmpfs 464M 0 464M 0% /dev/shm tmpfs 464M 13M 451M 3% /run tmpfs 464M 0 464M 0% /sys/fs/cgroup /dev/mmcblk0p1 286M 55M 232M 20% /boot tmpfs 93M 8.0K 93M 1% /run/user/992 tmpfs 93M 0 93M 0% /run/user/0
安装GCC
gcc --version

sudo yum install gcc

yum -y install gcc automake autoconf libtool make		#安装make以及一些其他的开发工具
yum install gcc gcc-c++									#安装g++
安装vim
yum install -y vim #-y是一个选项,表示"yes"
配置源、更新yum
https://blog.csdn.net/qq_45179361/article/details/128803868
https://blog.csdn.net/qq_32939413/article/details/125955064
这里我没改yum源,更新了一下
#yum clean all
#yum makecache
sudo yum update #更新yum
Centos7配置阿里云yum源及epel源_阿里yum源_WaiSaa的博客-CSDN博客
阿里云yum地址:centos镜像_centos下载地址_centos安装教程-阿里巴巴开源镜像站 (aliyun.com)
阿里云epel地址:epel镜像_epel下载地址_epel安装教程-阿里巴巴开源镜像站 (aliyun.com)
#1、备份
#mv /etc/yum.repos.d/epel.repo /etc/yum.repos.d/myBackup/epel.repo
#mv /etc/yum.repos.d/epel-testing.repo /etc/yum.repos.d/myBackup/epel-testing.repo
#从备份恢复
#mv /etc/yum.repos.d/myBackup/epel.repo /etc/yum.repos.d/epel.repo
#mv /etc/yum.repos.d/myBackup/epel-testing.repo /etc/yum.repos.d/epel-testing.repo
更新/安装Python3.9
CentOS 7.X 升级 Python 3.9.5_51CTO博客_centos升级python3.8
python 升级第三方包 python3.8升级3.9_mob6454cc6d81c9的技术博客_51CTO博客
这里我是把tgz文件下载到/usr/local/src再进行解压到/usr/local/python3
#方法一、下载后上传到/usr/local/src
https://www.python.org/ftp/python/3.9.5/Python-3.9.5.tgz		#python3.9下载地址
tar zxvf Python-3.9.5.tgz -C /usr/local/python3			#解压

#方法二、直接下载、解压
wget  https://www.python.org/ftp/python/3.9.5/Python-3.9.5.tgz && tar zxvf Python-3.9.5.tgz
cd Python-3.9.5					#切换目录

./configure --prefix=/usr/local/python3.9 --with-ssl
#在/usr/local/python3.9目录下配置Python,并启用SSL。
#prefix=/usr/local/python3.9是指定的python3.9安装目录

make && make install			#编译并安装源代码包
修改软连接
#ln -fs /usr/local/python3.9/bin/python3.9 /usr/bin/python
#ln -fs /usr/local/python3.9/bin/pip3.9 /usr/bin/pip

#将在 /usr/bin/python3 处创建一个指向 /usr/local/python3.9/bin/python3.9 的软链接
ln -fs /usr/local/python3.9/bin/python3.9 /usr/bin/python3
#将在 /usr/bin/pip3 处创建一个指向 /usr/local/python3.9/bin/pip3.9 的软链接
ln -fs /usr/local/python3.9/bin/pip3.9 /usr/bin/pip3

#ln -fs /usr/bin/python2.7 /usr/bin/python
#ln -fs /usr/bin/pip2.7 /usr/bin/pip
#配置系统环境变量
vim ~/.bash_profile
打开配置文件,在最后一行添加配置
【export PYTHON_HOME=安装路径 #例如 export PYTHON_HOME=/usr/local/python3】
export PYTHON_HOME=/usr/local/python3
export PATH=$PYTHON_HOME/bin:$PATH
执行source ~/.bash_profile使环境变量生效
执行echo $PYTHON_HOME查看环境变量是否生效
输入python3 --version查看python3版本,出现版本号
安装/更新pip2、3
目的是安装pip2、pip3,并且更新一下。
更新pip
You are using pip version 9.0.1, however version 23.3.2 is available.
You should consider upgrading via the 'pip install --upgrade pip' command.
[root@raspberrypicentos7_9 ~]# pip install --upgrade pip
Collecting pip
  Downloading https://pypi.tuna.tsinghua.edu.cn/packages/27/79/8a850fe3496446ff0d584327ae44e7500daf6764ca1a382d2d02789accf7/pip-20.3.4-py2.py3-none-any.whl (1.5MB)
    100% |████████████████████████████████| 1.5MB 12.4MB/s
Installing collected packages: pip
  Found existing installation: pip 9.0.1
    Uninstalling pip-9.0.1:
      Successfully uninstalled pip-9.0.1
Successfully installed pip-20.3.4
You are using pip version 20.3.4, however version 23.3.2 is available.
You should consider upgrading via the 'pip install --upgrade pip' command.
[root@raspberrypicentos7_9 ~]# pip -V
pip 20.3.4 from /usr/lib/python2.7/site-packages/pip (python 2.7)
(221条消息) CentOS7 安装pip和pip3_centos7安装pip3_太阳上的雨天的博客-CSDN博客
#安装pip
#yum -y install epel-release

yum -y install python-pip
pip --version  				#查看pip版本
#安装pip3
#yum -y install epel-release

sudo yum install python3-pip
pip3 --version				#查看pip3版本
安装宝塔
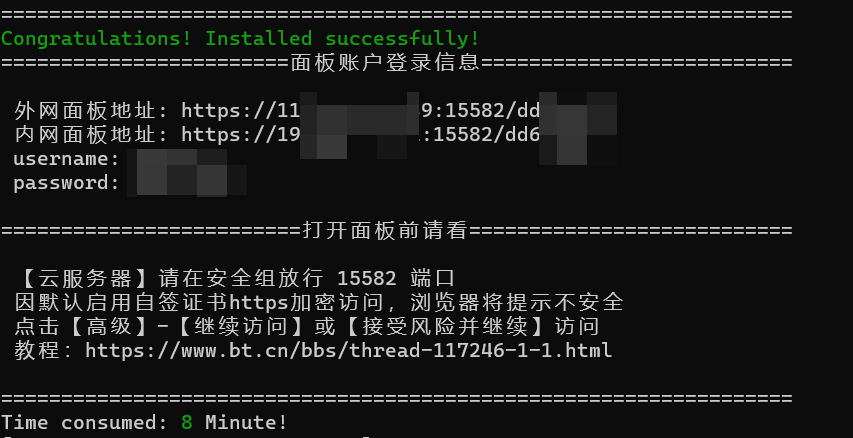
yum install -y wget && wget -O install.sh http://download.bt.cn/install/install_6.0.sh && sh install.sh
到这里就安装成功了
安装失败可执行以下命令再重新安装(仅供参考)
停止宝塔面板并删除相关文件:/etc/init.d/bt stop && rm -f /etc/init.d/bt && rm -rf /www/server/panel
清空数据环境目录:rm -rf /www/*
注意:不要输入脚本命令最后那串字符。
其他
若想使用GUI图形界面,并远程控制,需安装GNOME Desktop桌面服务,在安装VNC服务。
安装GNOME Desktop 桌面服务
[Centos7安装和配置VNC服务器 - GNOME篇_centos 7 install vnc server-CSDN博客](https://blog.csdn.net/lxyoucan/article/details/113179208?ops_request_misc=&request_id=&biz_id=102&utm_term=CentOS7 vnc安装&utm_medium=distribute.pc_search_result.none-task-blog-2allsobaiduweb~default-0-113179208.142v99pc_search_result_base2&spm=1018.2226.3001.4187)
(65条消息) 从centos minimal 安装桌面_junzixing1985的博客-CSDN博客
(65条消息) Centos安装Gnome Desktop_跑路的飞鱼的博客-CSDN博客_centos安装gnome桌面
[(65条消息) Centos 7 安装GNOME桌面环境_xx先森-CSDN博客](https://blog.csdn.net/chengshiruxia/article/details/112179750?ops_request_misc=&request_id=&biz_id=102&utm_term=安装gnome &utm_medium=distribute.pc_search_result.none-task-blog-2allsobaiduweb~default-9-112179750.nonecase&spm=1018.2226.3001.4187)
yum groupinstall "GNOME Desktop"
设置开机启动为GNOME
systemctl set-default graphical.target
重启
reboot
安装VNC
(65条消息) CentOS7.x安装VNC实录_呐喊的专栏-CSDN博客_centos7 vnc
[Centos7安装和配置VNC服务器 - GNOME篇_centos 7 install vnc server-CSDN博客](https://blog.csdn.net/lxyoucan/article/details/113179208?ops_request_misc=&request_id=&biz_id=102&utm_term=CentOS7 vnc安装&utm_medium=distribute.pc_search_result.none-task-blog-2allsobaiduweb~default-0-113179208.142v99pc_search_result_base2&spm=1018.2226.3001.4187)
yum install tigervnc-server -y
验证是否安装成功:
rpm -qa|grep tigervnc-server
第四步:
创建用户vncuser
sudo adduser vncuser
设置密码
sudo passwd vncuser
创建 vncuser 并设置登录密码后,还需要为此用户设置唯一的 VNC 密码
输入完成后会提示是否设置view-only password(“View-only password”密码,只允许查看,无控制权限。)这个可设可不设:
vncpasswd
操作记录
[root@localhost ~]# sudo adduser vncuser
[root@localhost ~]# sudo passwd vncuser
更改用户 vncuser 的密码。
新的 密码:
重新输入新的 密码:
passwd:所有的身份验证令牌已经成功更新。
[root@localhost ~]# su - vncuser
[vncuser@localhost ~]$ pwd
/home/vncuser
[vncuser@localhost ~]$ ls
[vncuser@localhost ~]$ vncpasswd
Password:
Verify:
Would you like to enter a view-only password (y/n)?n
A view-only password is not used
[vncuser@localhost ~]$
第二步:复制vnc的启动操作脚本, vncserver@:1.service中的:1表示"桌面号",启动的端口号就是5900+桌面号,即是5901,如果再有一个就是2啦,端口号加1就是5902,以此类推:
cp /lib/systemd/system/vncserver@.service /etc/systemd/system/vncserver@:1.service
第三步:编辑 /etc/systemd/system/vncserver@:1.service
vim /etc/systemd/system/vncserver@\:1.service
找到其中的
修改完毕后保存退出vim。
第五步:
重载配置文件:
systemctl daemon-reload
启动服务:
systemctl start vncserver@\:1.service #systemctl start vncserver@:1
查看是否成功:
systemctl status vncserver@:1

#或者
netstat -lnpt|grep Xvnc  #查看端口是否监听
设置开机启动:
systemctl enable vncserver@\:1.service
#systemctl enable vncserver@:1
在尝试连接到服务器之前,您可以执行的另一个测试是使用ss命令查看活动网络套接字:如果一切工作正常,您应该会看到 VNC 服务器工作正常并使用 TCP 端口 5901。执行命令:
ss -tulpn| grep vnc
第七步:
通过命令开放端口,也可先关闭防火墙,等安装好宝塔后在宝塔里开放端口。
firewall-cmd --zone=public --add-port=5901/tcp --permanent #开放防火墙的5901端口
或停止防火墙(不推荐):
systemctl stop firewalld.service
systemctl disable firewalld.service #停止之后该需要禁止开机启动
在Windows中删除ssh记录
当第一次刻录系统后,在powershell中通过ssh连接过一次后,若由于种种原因想重新刻录系统,在第二次刻录后插入树莓派开机后,此时再powershell中通过ssh连接,会有一个错误。因为本地有缓存,要删掉缓存,再重新连接。(仅供参考,我是半吊子)
删除known_hosts文件。
%USERPROFILE%\\.ssh\\known_hosts

C:\Users\Zeta\.ssh
连接WiFi
nmcli d wifi connect 你的wifi名称 password 'yourWiFi密码'
#nmcli dev wifi connect wifiname password wifipassword

nmcli d    # 查看网络连接情况

nmcli d wifi    # 查看周围可用的WiFi

nmcli d show wlan0    # 查看wlan0网卡的状态

 浙公网安备 33010602011771号