

2. 导航组件封装和实现
对于微信App, 导航用的是非常多的,几乎每个页面都需要,我们先将它简单地封装以下。
1. free-icon组件, 用来定义每个icon图标
<template>
<view :style="getSize" class="flex justify-center align-center">
<text class="iconfont font-md"></text>
</view>
</template>
<script>
export default {
props: {
size: {
type: [Number, String],
default: 90
},
icon: {
type: String,
default: "",
}
},
computed:{
getSize() {
return `height: ${this.size}rpx; width: ${this.size}rpx;`
}
}
}
</script>
2. h-nav-bar导航组件:
<template>
	<view>
		<!-- 导航栏 -->
		<view class="bg-light" :class="fixed ? 'position-fixed fixed-top' : ''">
			<view>
				<!-- 状态栏 -->
				<view :style="'height:' + statusBarHeight + 'px'"></view>
				<!-- 导航 -->
				<view class="flex justify-between w-100 align-center border" style="height: 90rpx;">
					<view class="ml-3" v-if="title">{{title}}</view>
					<view class="flex">
						<free-icon :size="90" :icon="'\ue62c'"></free-icon>
						<free-icon :size="90" :icon="'\ue621'"></free-icon>
					</view>
				</view>
			</view>
		</view>

		<!-- 占位 -->
		<view :style="fixedStyle" v-if="fixed"></view>
	</view>
</template>

<script>
	import freeIcon from '@/components/free-ui/free-icon.vue'
	export default {
		props: {
			title: {
				type: [String, Boolean],
				default: ""
			},
			//是否fixed定位到顶部
			fixed: {
				type: Boolean,
				default: true
			}
		},
		components: {
			freeIcon
		},
		data() {
			return {
				// 状态栏
				statusBarHeight: 0,
				navBarHeight: 0
			}
		},
		mounted() {
			// #ifdef APP-PLUS-NVUE
			this.statusBarHeight = plus.navigator.getStatusbarHeight()
			console.log(this.statusBarHeight)

			// #endif
			this.navBarHeight = this.statusBarHeight + uni.upx2px(90)
		},
		methods: {

		},
		computed: {
			fixedStyle() {
				return `height: ${this.navBarHeight}px;`
			}
		}
	}
</script>
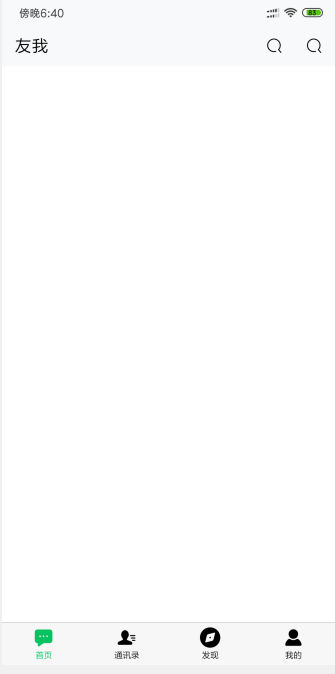
3. 在index.nvue中调用即可
<template>
	<view>
		<h-nav-bar :title="'友我'" :fixed="true"></h-nav-bar>
	</view>
</template>

<script>
	import hNavBar from '@/components/free-ui/h-nav-bar.vue'
	export default {
		components: {
			hNavBar
		}
	}
</script>
导航组件中需要注意的点:
1. 需要计算app端的状态栏高度
2. 当我们将导航fixed定位到顶部时,需要创建一个占位view,否则就会有一部分内容会被遮挡
最终效果如下:

 浙公网安备 33010602011771号