

webpack笔记二:html-webpack-plugin的使用
这个插件的两个作用:
-
为html文件中引入的外部资源如
script、link动态添加每次compile后的hash,防止引用缓存的外部文件问题 -
可以生成创建html入口文件,比如单页面可以生成一个html文件入口,配置N个
html-webpack-plugin可以生成N个页面入口
安装使用如下:
一、首先安装html-webpack-plugin插件
在cmd中打开项目,输入cnpm install html-webpack-plugin;
二、在webpack-config.js的plugins里面添加 信息,如下图

然后在cmd中输入,webpack,即可以在项目文件夹下自动生成index.html。如果报错,则表示,未安装html-webpack-plugin插件。
注:不配置任何选项的html-webpack-plugin插件,他会默认将webpack中的entry配置所有入口thunk和extract-text-webpack-plugin抽取的css样式都插入到文件指定的位置。
三、多页面配置
对于生成多页面的情况,在plugins配置多个plugin即可
1 plugins:[
 2         new webpack.BannerPlugin('测试webpack搭建   '),
 3         new HtmlWebpackPlugin(),
 4         new HtmlWebpackPlugin({
 5           title:'测试webpack',
 6           template: 'src/template/index.html', // 源模板文件
 7           filename: './index1.html', // 输出文件【注意:这里的根路径是module.exports.output.path】
 8           showErrors: true,
 9           inject: 'body',
10           chunks: ["index"],
11           favicon:"./src/fav.ico",
12           hash:true,
13           minify:{
14                 caseSensitive: false, //是否大小写敏感
15                 removeComments:true, // 去除注释
16                 removeEmptyAttributes:true, // 去除空属性
17                 collapseWhitespace: true //是否去除空格
18             }
19       }),
20         new HtmlWebpackPlugin({
21           title:'测试webpack',
22           template: 'src/template/index.html', // 源模板文件
23           filename: './index2.html', // 输出文件【注意:这里的根路径是module.exports.output.path】
24           showErrors: true,
25           inject: 'body'
26       })
27     ]
四、使用template模板页面
增加模板页面
1 <!DOCTYPE html>
 2 <html>
 3 <head>
 4     <meta charset="utf-8">
 5     <title><%= htmlWebpackPlugin.options.title %></title>
 6     <% for (var css in htmlWebpackPlugin.files.css) { %>
 7     <link href="<%=htmlWebpackPlugin.files.css[css] %>" rel="stylesheet">
 8     <% } %>
 9 </head>
10 <body>
11 <!-- 测试 -->
12 <div id="app" style=""></div>
13 </body>
14 <script type="text/babel">
15 </script>
16 </html>

 1 <!DOCTYPE html>
 2 <html>
 3 <head>
 4     <meta charset="utf-8">
 5     <title><%= htmlWebpackPlugin.options.title %></title>
 6     <% for (var css in htmlWebpackPlugin.files.css) { %>
 7     <link href="<%=htmlWebpackPlugin.files.css[css] %>" rel="stylesheet">
 8     <% } %>
 9 </head>
10 <body>
11 <!-- 测试 -->
12 <div id="app" style=""></div>
13 </body>
14 <script type="text/babel">
15 </script>
16 </html>
在配置中配置模板页面

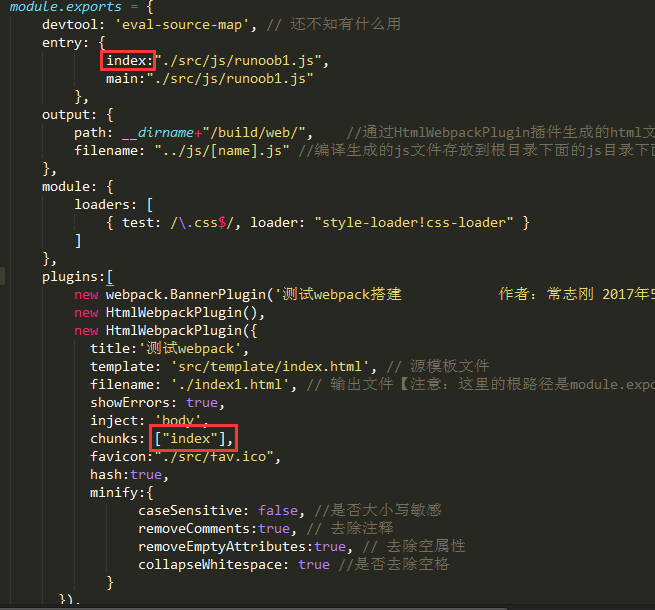
五、自定义增加的js文件
在配置文件中,chunks选项添加对应的内容即可。
对应的内容为entry中的属性。具体如下图
六、生成页面压缩
配置minify配置项,常用的几个配置见上图
七、其他配置项解释如下
-
title: 生成的HTML模板的title,如果模板中有设置title的名字,则会忽略这里的设置
-
filename: 生成的模板文件的名字
-
关于filename补充两点:
1、filename配置的html文件目录是相对于webpackConfig.output.path路径而言的,不是相对于当前项目目录结构的。
2、指定生成的html文件内容中的link和script路径是相对于生成目录下的,写路径的时候请写生成目录下的相对路径。 -
template: 模板来源文件
-
关于template补充几点:
1、template配置项在html文件使用
file-loader时,其所指定的位置找不到,导致生成的html文件内容不是期望的内容。
2、为template指定的模板文件没有指定任何loader的话,默认使用ejs-loader。如template: './index.html',若没有为.html指定任何loader就使用ejs-loader -
inject: 引入模块的注入位置;取值有true/false/body/head;true | 'head' | 'body' | false ,注入所有的资源到特定的 template 或者 templateContent 中,如果设置为 true 或者 body,所有的 javascript 资源将被放置到 body 元素的底部,'head' 将放置到 head 元素中。
- true或者body:所有JavaScript资源插入到body元素的底部
2、head: 所有JavaScript资源插入到head元素中
3、false: 所有静态资源css和JavaScript都不会注入到模板文件中 -
favicon: 指定页面图标;
-
minify: {} | false , 传递 html-minifier 选项给 minify 输出。是
html-webpack-plugin中集成的html-minifier,生成模板文件压缩配置,有很多配置项,可以查看详细文档caseSensitive: false, //是否大小写敏感 collapseBooleanAttributes: true, //是否简写boolean格式的属性如:disabled="disabled" 简写为disabled collapseWhitespace: true //是否去除空格 -
hash: 是否生成hash添加在引入文件地址的末尾,类似于我们常用的时间戳,比如最终引入是:
<script type="text/javascript" src="bundle.049424f7d7ea5fa50656.js?049424f7d7ea5fa50656"></script>。这个可以避免缓存带来的麻烦 -
cache: 是否需要缓存,如果填写true,则文件只有在改变时才会重新生成
-
showErrors: 是否将错误信息写在页面里,默认true,出现错误信息则会包裹在一个
pre标签内添加到页面上 -
chunks: 引入的模块,这里指定的是entry中设置多个js时,在这里指定引入的js,如果不设置则默认全部引入
-
chunksSortMode: 引入模块的排序方式,支持的值:'none' | 'default' | {function}-default:'auto'
-
excludeChunks: 排除的模块
-
xhtml: 生成的模板文档中标签是否自动关闭,针对xhtml的语法,会要求标签都关闭,默认false
八、插件事件(引用位置)
不知道你发现没有,html-webpack-plugin插件在插入静态资源时存在一些问题:
- 在插入js资源只能插入head或者body元素中,不能一些插入head中,另一些插入body中
- 不支持在html中文件内联*,例如在文件的某个地方用
<script src="xxx.js?__inline"></script>来内联外部脚本
为此,有人专门给插件作者提问了这个问题;对此插件作者提供了插件事件,允许其他插件来改变html文件内容。具体的事件如下:
Async(异步事件):
    * html-webpack-plugin-before-html-generation
    * html-webpack-plugin-before-html-processing
    * html-webpack-plugin-alter-asset-tags
    * html-webpack-plugin-after-html-processing
    * html-webpack-plugin-after-emit
Sync(同步事件):
* html-webpack-plugin-alter-chunks这些事件是提供给其他插件使用的,用于改变html的内容。因此,要用这些事件需要提供一个webpack插件。例如下面定义的MyPlugin插件。
function MyPlugin(options) {
  // Configure your plugin with options...
}

MyPlugin.prototype.apply = function(compiler) {
  // ...
  compiler.plugin('compilation', function(compilation) {
    console.log('The compiler is starting a new compilation...');

    compilation.plugin('html-webpack-plugin-before-html-processing', function(htmlPluginData, callback) {
      htmlPluginData.html += 'The magic footer';
      callback(null, htmlPluginData);
    });
  });

};

module.exports = MyPlugin;然后,在webpack.config.js文件中配置Myplugin信息:
plugins: [
  new MyPlugin({options: ''})
]
注:一个比较全的配置
var webpack=require('webpack');
var HtmlWebpackPlugin = require('html-webpack-plugin');
module.exports = {
devtool: 'eval-source-map', // 还不知有什么用
entry: {
index:"./src/js/runoob1.js",
main:"./src/js/runoob1.js"
},
output: {
path: __dirname+"/build/web/", //通过HtmlWebpackPlugin插件生成的html文件存放在这个目录下面
filename: "../js/[name].js" //编译生成的js文件存放到根目录下面的js目录下面,如果js目录不存在则自动创建,相对于path
},
module: {
loaders: [
{ test: /\.css$/, loader: "style-loader!css-loader" }
]
},
plugins:[
new webpack.BannerPlugin('测试webpack搭建 '),
new HtmlWebpackPlugin(),
new HtmlWebpackPlugin({
title:'测试webpack',
template: 'src/template/index.html', // 源模板文件
filename: './index1.html', // 输出文件【注意:这里的根路径是module.exports.output.path】
showErrors: true,
inject: 'body',
chunks: ["index"],
favicon:"./src/fav.ico",
hash:true,
minify:{
caseSensitive: false, //是否大小写敏感
removeComments:true, // 去除注释
removeEmptyAttributes:true, // 去除空属性
collapseWhitespace: true //是否去除空格
}
}),
new HtmlWebpackPlugin({
title:'测试webpack',
template: 'src/template/index.html', // 源模板文件
filename: './index2.html', // 输出文件【注意:这里的根路径是module.exports.output.path】
showErrors: true,
inject: 'body'
})
]
};
完整配置
 1 var webpack=require('webpack');
 2 var HtmlWebpackPlugin = require('html-webpack-plugin');
 3
 4 module.exports = {
 5     devtool: 'eval-source-map', // 还不知有什么用
 6     entry: {
 7             index:"./src/js/runoob1.js",
 8             main:"./src/js/runoob1.js"
 9         },
10     output: {
11         path: __dirname+"/build/web/",    //通过HtmlWebpackPlugin插件生成的html文件存放在这个目录下面
12         filename: "../js/[name].js" //编译生成的js文件存放到根目录下面的js目录下面,如果js目录不存在则自动创建,相对于path
13     },
14     module: {
15         loaders: [
16             { test: /\.css$/, loader: "style-loader!css-loader" }
17         ]
18     },
19     plugins:[
20         new webpack.BannerPlugin('测试webpack搭建           '),
21         new HtmlWebpackPlugin(),
22         new HtmlWebpackPlugin({
23           title:'测试webpack',
24           template: 'src/template/index.html', // 源模板文件
25           filename: './index1.html', // 输出文件【注意:这里的根路径是module.exports.output.path】
26           showErrors: true,
27           inject: 'body',
28           chunks: ["index"],
29           favicon:"./src/fav.ico",
30           hash:true,
31           minify:{
32                 caseSensitive: false, //是否大小写敏感
33                 removeComments:true, // 去除注释
34                 removeEmptyAttributes:true, // 去除空属性
35                 collapseWhitespace: true //是否去除空格
36             }
37       }),
38         new HtmlWebpackPlugin({
39           title:'测试webpack',
40           template: 'src/template/index.html', // 源模板文件
41           filename: './index2.html', // 输出文件【注意:这里的根路径是module.exports.output.path】
42           showErrors: true,
43           inject: 'body'
44       })
45     ]
46 };

 浙公网安备 33010602011771号