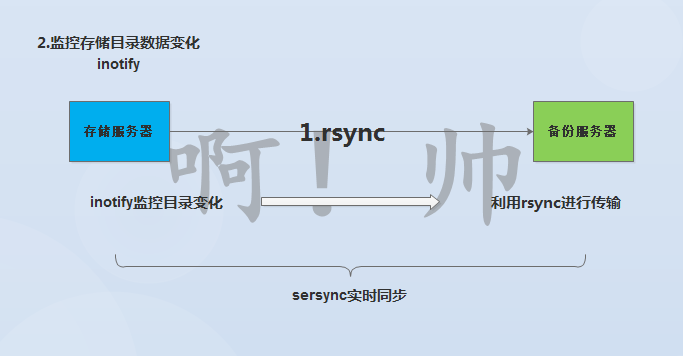
sersync实时同步
1.实时同步数据的工作原理
(1)需要部署好rsync守护进程服务,实现数据传输
(2)需要部署好inotify服务,实现目录中数据变化监控
(3)将rsync和inotify服务建立联系,将变化的数据进行实时备份传输
2.实时同步服务部署
(1)部署好rsync守护进程
服务端配置操作
客户端配置操作
(2)部署inotify监控服务
a.安装软件
[root@nfs01 ~]# yum install inotify-tools -y
b.命令的使用和参数说明
[root@nfs01 ~]# rpm -ql inotify-tools
/usr/bin/inotifywait          #监控目录数据信息变化
/usr/bin/inotifywatch         #对监控的变化信息进行统计
[root@nfs01 ~]# inotifywait --help
    -m|--monitor         #一直监控目录的数据变化
    -r|--recursive       #进行递归监控
    -q|--quiet           #尽量减少信息的输出
    -format <fmt>        #指定输出信息的格式
    --timefmt <fmt>      #指定输出信息的时间格式
    -e|--event           #指定监控的时间信息
c.inotify事件说明
| 事件名称 | 事件说明 |
|---|---|
| access | file or directory contents were read (文件或目录内容被读取) |
| modify | file or directory contents were written(文件或目录内容被写入) |
| attrib | file or directory attributes changed(文件或目录属性改变) |
| close_write | file or directory closed, after being opened in writeable mode (文件或目录关闭,在写入模式打开之后关闭的) |
| close_nowrite | file or directory closed, after being opened in read-only mode(文件或目录关闭,在只读模式打开之后关闭的) |
| close | file or directory closed, regardless of read/write mode(文件或目录关闭,不管读或是写模式) |
| open | file or directory opened(文件或目录被打开) |
| moved_to | file or directory moved to watched directory(文件或目录被移动到磁盘监控的目录中) |
| moved_from | file or directory moved from watched directory(文件或目录被移动出磁盘监控的目录中) |
| move | file or directory moved to or from watched directory(文件或目录不管是移动到或移动出监控目录都触发事件) |
| create | file or directory created within watched directory(文件或目录创建在监控的目录中) |
| delete | file or directory deleted within watched directory(文件或目录被删除在监控的目录中) |
| delete_self | file or directory was deleted(文件或目录被删除) |
| unmount | file system containing file or directory unmounted(文件系统包含的文件或目录不能卸载) |
d.inotift监控命令格式:
[root@nfs01 ~]# inotifywait -mrq --timefmt "%F" --format "%T %w %f 事件信息:%e" /data -e create
2020-08-05 /data/ shuai 事件信息:CREATE,ISDIR
2020-08-05 /data/shuai/ shuai.txt 事件信息:CREATE
#create创建、delete删除、move_to移入、close_write修改
e.企业应用:防止系统重要文件被破坏
利用inotify进行实时一直监控
[root@nfs01 ~]# inotifywait -mrq --timefmt "%F" --format "%T %w %f 事件信息:%e" /data /etc >> ~shuai.txt
3.部署sersync
(1)下载软件,并上传到服务器中
https://github.com/wsgzao/sersync
(2)解压软件
[root@nfs01 /server/tools]# tar xf sersync2.5.4_64bit_binary_stable_final.tar.gz
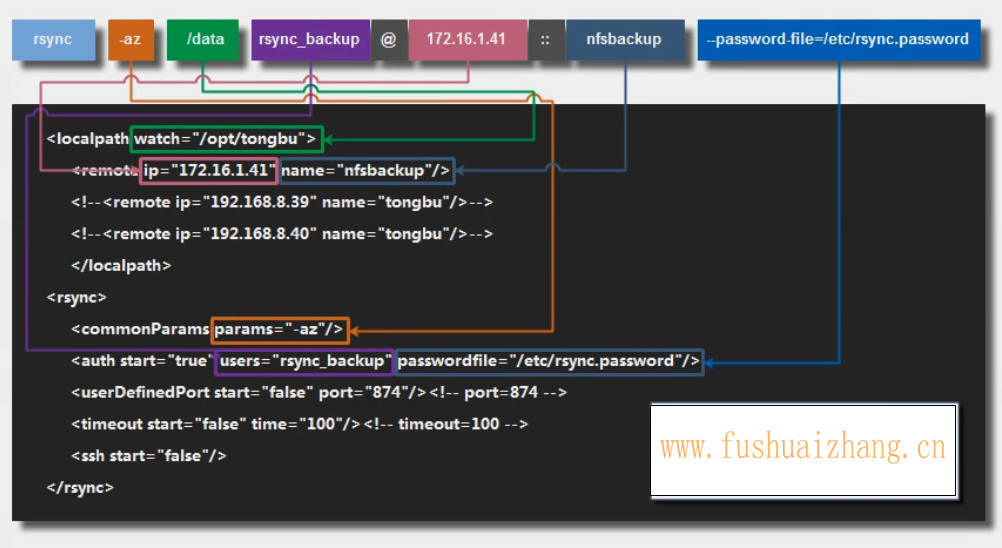
(3)修改配置文件
[root@nfs01 /server/tools/GNU-Linux-x86]# vim confxml.xml
<?xml version="1.0" encoding="ISO-8859-1"?>
<head version="2.5">
    <host hostip="localhost" port="8008"></host>
    <debug start="false"/>
    <fileSystem xfs="false"/>
    #排除指定数据信息不要进行数据同步
    <filter start="false">
        <exclude expression="(.*)\.svn"></exclude>
        <exclude expression="(.*)\.gz"></exclude>
        <exclude expression="^info/*"></exclude>
        <exclude expression="^static/*"></exclude>
    </filter>
    #定义inotify程序需要监控的事件
    <inotify>
        <delete start="true"/>
        <createFolder start="true"/>
        <createFile start="false"/>
        <closeWrite start="true"/>
        <moveFrom start="true"/>
        <moveTo start="true"/>
        <attrib start="false"/>
        <modify start="false"/>
    </inotify>
    #sersync配置说明
    <sersync>
        <localpath watch="/data/">        #指定监控的目录
            <remote ip="172.16.1.41" name="backup"/>  #指定备份服务器地址,指定备份服务器模块名称
            <!--<remote ip="192.168.8.39" name="tongbu"/>-->
            <!--<remote ip="192.168.8.40" name="tongbu"/>-->
        </localpath>
        <rsync>
            <commonParams params="-az"/>   #指定rsync命令推送参数
            <auth start="true" users="rsync_backup" passwordfile="/etc/rsync.password"/>  指定rsync认证用户,指定rsync密码文件
            <userDefinedPort start="false" port="874"/><!-- port=874 --> #rsync端口
            <timeout start="false" time="100"/><!-- timeout=100 -->  #超时时间
            <ssh start="false"/>
        </rsync>
(4)启动sersync服务程序
[root@nfs01 ~]# /usr/local/sersync -h
set the system param
execute:echo 50000000 > /proc/sys/fs/inotify/max_user_watches
execute:echo 327679 > /proc/sys/fs/inotify/max_queued_events
parse the command param
_______________________________________________________
参数-d:启用守护进程模式                          ****重要
参数-r:在监控前,将监控目录与远程主机用rsync命令推送一遍
c参数-n: 指定开启守护线程的数量,默认为10个
参数-o:指定配置文件,默认使用confxml.xml文件
参数-m:单独启用其他模块,使用 -m refreshCDN 开启刷新CDN模块
参数-m:单独启用其他模块,使用 -m socket 开启socket模块
参数-m:单独启用其他模块,使用 -m http 开启http模块
不加-m参数,则默认执行同步程序
________________________________________________________________
[root@nfs01 /data]# /usr/local/sersync -dro /server/tools/GNU-Linux-x86/confxml.xml      #启动实时同步
set the system param
execute:echo 50000000 > /proc/sys/fs/inotify/max_user_watches
execute:echo 327679 > /proc/sys/fs/inotify/max_queued_events
parse the command param
option: -d  run as a daemon
option: -r  rsync all the local files to the remote servers before the sersync work
option: -o  config xml name:  /server/tools/GNU-Linux-x86/confxml.xml
daemon thread num: 10
parse xml config file
host ip : localhost host port: 8008
daemon start,sersync run behind the console
use rsync password-file :
user is rsync_backup
passwordfile is     /etc/rsync.password
config xml parse success
please set /etc/rsyncd.conf max connections=0 Manually
sersync working thread 12  = 1(primary thread) + 1(fail retry thread) + 10(daemon sub threads)
Max threads numbers is: 22 = 12(Thread pool nums) + 10(Sub threads)
please according your cpu ,use -n param to adjust the cpu rate
------------------------------------------
rsync the directory recursivly to the remote servers once
working please wait...
execute command: cd /data && rsync -az -R --delete ./  --port=873 rsync_backup@172.16.1.41::backup --password-file=/etc/rsync.password >/dev/null 2>&1
run the sersync:
watch path is: /data
[root@backup /backup]# ll
total 0
-rw-r--r-- 1 rsync rsync 0 Aug  4 14:35 backup.txt
drwxr-xr-x 2 rsync rsync 6 Aug  5 14:06 shuai
drwxr-xr-x 2 rsync rsync 6 Aug  5 14:04 shuai01
-rw-r--r-- 1 rsync rsync 0 Aug  5 15:14 shuai09.txt
-rw-r--r-- 1 rsync rsync 0 Aug  3 16:17 shuai.txt
[root@nfs01 /data]#echo "/usr/local/sersync -dro /server/tools/GNU-Linux-x86/confxml.xml" >> /etc/rc.local #开机自动同步
(5)停止监控
[root@nfs01 ~]# yum install psmisc -y
[root@nfs01 /data]# killall sersync
4.实时同步服务概念总结
(1) 实现实时同步的原理
a.监控目录数据变化 — inotify
b.将数据进行传输 — rsync
c.将监控和传输进行整合 — sersync
(2)实现实时同步部署方法
a.部署rsync守护进程
b.部署inotify软件
c.部署sersync软件
Linux运维

 浙公网安备 33010602011771号