Linux-ansible批量管理
1.ansible批量管理服务概念
(1)是基于Python语言开发的自动化软件工具
(2)是基于SSH远程管理服务实现远程主机批量管理
2.ansible批量管理服务意义
(1)提高工作的效率
(2)提高工作准确度
(3)减少维护的成本
(4)减少重复性工作
3.ansible批量管理服务功能
(1)可以实现批量系统操作配置
(2)可以实现批量软件的部署
(3)可以实现批量文件数据分发
(4)可以实现批量系统信息收集
4.ansible批量管理的特点
- 管理端不需要启动服务程序(no server)
- 管理端不需要编写配置文件(/etc/ansible/ansible.cfg)
- 受控端不需要安装软件程序(libselinux-python)
- 被管理端selinux服务没有关闭 — 影响ansible软件的管理
- libselinux-python让selinux开启的状态也可以使用ansible程序
- 受控端不需要启动服务程序(no agent)
- 服务程序管理操作模块众多(module)
- 利用剧本编写来实现自动化(playbook)
5.ansible批量管理服务部署
管理端服务器
(1)安装部署软件
[root@m01 ~]# yum install -y ansible --------需要配置epel源 /etc/ansible -----主程序目录 /etc/ansible/ansible.cfg -----配置文件 /etc/ansible/hosts ----- 主机清单配置文件 /etc/ansible/roles ----- 角色目录
(2)编写主机清单文件(/etc/ansible/hosts)
a.根据主机进行编写
[root@m01 ~]# vim /etc/ansible/hosts
172.16.1.61
172.16.1.7
b.主机分组编写
[shuai]
172.16.1.41
172.16.1.31
172.16.1.7
c.主机名符号匹配编写
[shuai]
172.16.1.[41:43]   #代表172.16.1.42-43
web[01:03]         #代表web01-03,要做hosts做主机名解析
d.跟上非标准远程端口
[shuai]
172.16.1.41:52113   #52113代表ssh远程管理端口
f.主机使用特殊的变量
[shuai]
172.16.1.7 ansible_ssh_port=52113 ansible_ssh_user=root ansible_ssh_pass=123456
[shuai]
web01 ansible_ssh_host=172.16.1.7 ansible_ssh_port=52113 ansible_ssh_user=root ansible_ssh_pass=123456
g.主机组嵌入式配置
#########################################################
[rsync:children]    --- 嵌入子组信息                     #
rsync_server                                             #
rsync_client                                             #
                                                         #
[rsync_server]                                           #
172.16.1.41                                              #
                                                         #
[rsync_client]                                           #
172.16.1.31                                              #
172.16.1.7                                               #
###########################################################
[shuai:vars]         --- 对shuai组进行嵌入式变量           #
ansible_ssh_host=172.16.1.7                               #
ansible_ssh_port=52113                                    #
ansible_ssh_user=root                                     #
ansible_ssh_pass=123456                                   #
[shuai]                                                   #
web01                                                     #
###########################################################
(3)测试是否可以管理主机
[root@m01 ~]# ansible all -a "hostname"
172.16.1.31 | CHANGED | rc=0 >>
nfs01
172.16.1.41 | CHANGED | rc=0 >>
backup
172.16.1.7 | CHANGED | rc=0 >>
web01
(4)ansible服务架构介绍
a.主机清单信息
b.软件模块信息
c.基于秘钥连接主机
d.软件剧本功能playbook

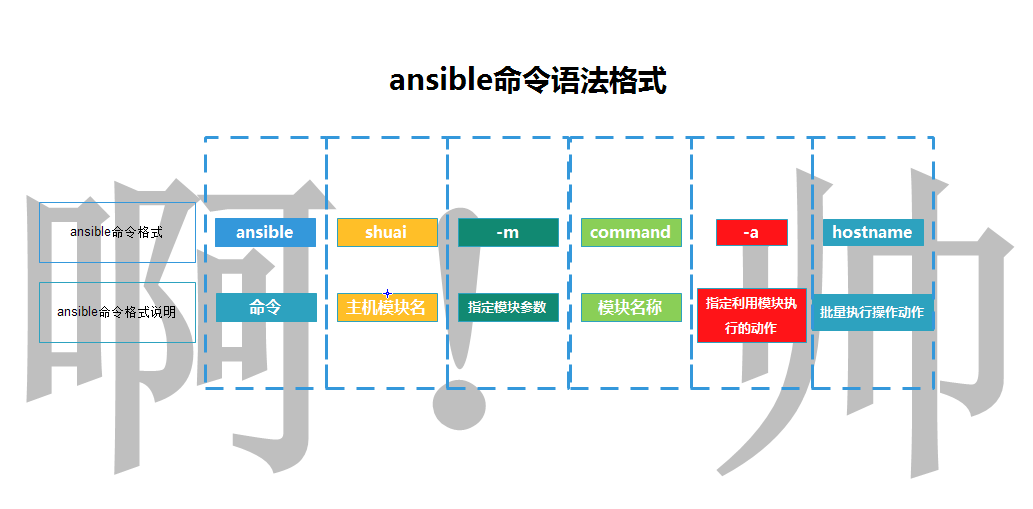
(5)ansible软件模块应用
模块应用的语法格式
ansible 主机名称|主机组|主机地址信息|all -m(指定应用的模块信息) 模块名称 -a(指定动作信息) "动作执行" 例如: [root@m01 ~]# ansible all -m command -a "hostname"
6.ansible常用模块介绍
6.1 command模块
a.chdirChange into this directory before running the command #在命令执行之前切换目录
[root@m01 ~]# ansible shuai -m command -a "chdir=/tmp touch shuai.txt"
b.creates If it already exists, this step won’t be run. #如果它已经存在,则不会运行此步骤 ,做判断
[root@m01 ~]# ansible 172.16.1.7 -m command -a "creates=/tmp/shuai.txt chdir=/tmp touch shuai.txt" #如果172.16.1.7远程主机的/tmp目录没有shuai.txt文件则在/tmp文件下创建shuai.txt。如果有则跳过
c.removes If it already exists, this step will be run. #如果文件存在,这个步骤将执行
[root@m01 ~]# ansible 172.16.1.7 -m command -a "removes=/tmp/shuai.txt chdir=/tmp touch shuai.txt"
command模块注意事项:
1.有些特殊符号无法识别: "<", ">", "|", ";" "&"
2.命令模块后使用空格分隔的参数。
3.命令将在所有选定的节点上执行
6.2 shell模块(万能模块)
a.chdirChange into this directory before running the command #在命令执行之前切换目录
[root@m01 ~]# ansible 172.16.1.7 -m shell -a "chdir=/tmp touch shuai01.txt"
b.creates If it already exists, this step won’t be run. #如果它已经存在,则不会运行此步骤 ,做判断
[root@m01 ~]# ansible 172.16.1.7 -m shell -a "creates=/tmp/shuai01.txt chdir=/tmp touch shuai02.txt"
c.removes If it already exists, this step will be run. #如果文件存在,这个步骤将执行
c.removes If it already exists, this step will be run. #如果文件存在,这个步骤将执行
6.3script脚本模块
a.chdirChange into this directory before running the command #在命令执行之前切换目录
b.creates If it already exists, this step won’t be run. #如果它已经存在,则不会运行此步骤 ,做判断
c.removes If it already exists, this step will be run. #如果文件存在,这个步骤将执行脚本
[root@m01 /scripts]# ansible 172.16.1.7 -m script -a "/scripts/yum.sh"
6.3 copy模块 Copy files to remote locations拷贝文件到远程主机
[root@m01 ~]# ansible 172.16.1.7 -m copy -a "src=/scripts/yum.sh dest=/tmp/"
172.16.1.7 | CHANGED => {                                                                 ------->在那台主机上操作
    "ansible_facts": {
        "discovered_interpreter_python": "/usr/bin/python"
    },
    "changed": true,                                                                      ------->是否做了改变(true|false)
    "checksum": "de2b2980db930dc11f23774899494c89a8bc4206",                               ------->生成一个校验码
    "dest": "/tmp/yum.sh",                                                                ------->显示目标路径信息
    "gid": 0,                                                                             ------->显示文件的gid信息
    "group": "root",                                                                      ------->显示文件的用户组信息
    "md5sum": "840212375ea9201ff1aaed70575f1fd5",                                         ------->生成一个校验码
    "mode": "0644",                                                                       ------->显示复制后权限
    "owner": "root",                                                                      ------->显示复制后拥有者
    "size": 33,                                                                           ------->显示文件的大小
    "src": "/root/.ansible/tmp/ansible-tmp-1597911358.94-17987-220899881277199/source",
    "state": "file",                                                                      ------->显示文件的类型信息
    "uid": 0                                                                              ------->显示文件的uid信息
}
ownerName of the user that should own the file/directory, as would be fed to chown. #在传输文件是改变文件的属主
[root@m01 ~]# ll 1000
-rw-------. 1 root root 884 May 22  2019 1000
[root@m01 ~]# ansible a -m copy -a "src=/root/1000 dest=/tmp/ owner=shuai"
[root@web01 /tmp]# ll /tmp/1000
-rw-r--r-- 1 shuai root 884 Aug 20 16:28 /tmp/1000
groupName of the group that should own the file/directory, as would be fed to chown. #在传输文件是改变文件的属组
[root@m01 ~]# ll 1000
-rw-------. 1 root root 884 May 22  2019 1000
[root@m01 ~]# ansible a -m copy -a "src=/root/1000 dest=/tmp/ group=shuai"
[root@web01 /tmp]# ll /tmp/1000
-rw-r--r-- 1 shuai shuai 884 Aug 20 16:28 /tmp/1000
modeThe permissions of the destination file or directory. #在传输文件是改变文件的权限
[root@m01 ~]# ansible a -m copy -a "src=/root/1000 dest=/tmp/1000 mode=755"
backupCreate a backup file including the timestamp information so you can get the original file back if you somehow clobbered it incorrectly #创建一个包含时间戳信息的备份文件,这样,如果不正确地删除了原始文件,就可以将其取回。 (默认为no)
[root@m01 ~]# ansible a -m copy -a "src=/root/1000 dest=/tmp/ backup=yes"
content #在远程主机生成文件
[root@m01 ~]# ansible a -m copy -a "content=你真帅!  dest=/tmp/shuai0 2.txt"
[root@web01 ~]# cat /tmp/shuai02.txt
你真帅!
remote_src #scr参数指定文件信息,会从远程主机上进行查找
[root@m01 ~]# ansible a -m copy -a "src=/root/shuai.txt  dest=/tmp/ remote_src=yes"
[root@web01 ~]# echo "你真丑" >> shuai.txt
[root@web01 ~]# cat /tmp/shuai.txt
你真丑
directory_mode #递归的设定目录的权限,默认为系统默认权限match
follow #当拷贝的文件夹内有link存在的时候,那么拷贝过去的也会有link
local_follow#是否遵循本地机器中的文件系统链接
6.4 file 文件模块
[root@m01 ~/shuai]# ansible a -m file -a "dest=/tmp/shuai/ owner=shuai group=shuai mode=000"
[root@web01 /tmp]# ll
d--------- 7 shuai shuai 155 Aug 21 11:28 shuai
可以利用模块创建数据信息 (文件 目录 链接文件)
state 参数
=absent — 删除数据信息
=directory — 创建一个目录信息
=file — 检查创建的数据信息是否存在 (绿色存在 红色不存在)
=hard — 创建一个硬链接文件
=link — 创建一个软链接文件
=touch — 创建一个文件信息
[root@m01 ~]# ansible a -m file -a "dest=/shuai/shuai.txt state=absent"
[root@m01 ~]# ansible 172.16.1.31 -m file -a "dest=/shuai/ state=directory"
[root@m01 ~]# ansible a -m file -a "dest=/shuai state=file"
[root@m01 ~]# ansible a -m file -a "src=/shuai/shuai.txt dest=/shuai/shuai_hard.txt state=hard"
[root@m01 ~]# ansible a -m file -a "src=/shuai/shuai.txt dest=/shuai/shuai_link.txt state=link"
[root@m01 ~]# ansible a -m file -a "dest=/shuai/shuai.txt state=touch"
recurse归修改文件权限
[root@m01 ~]# ansible a -m file -a "dest=/shuai/ owner=shuai mode=133 recurse=yes"
[root@web01 /shuai]# ll
total 0
-rw-r--r-- 1 root root 0 Aug 21 16:09 shuai.txt
[root@web01 /shuai]# ll -d
d--x-wx-wx 2 shuai root 23 Aug 21 16:09 .
[root@web01 /shuai]# ll
total 0
---x-wx-wx 1 shuai root 0 Aug 21 16:09 shuai.txt
6.5 fetch模块 ( 拉取模块)
| 参数 | 详细信息 |
|---|---|
| src | 要拉取的目标文件位置 |
| dest | 本地存储目录文章 |
[root@m01 ~/shuai]# ansible a -m fetch -a "src=/root/shuai/fatch.txt dest=/tmp"
[root@m01 ~]# tree /tmp
/tmp
├── 172.16.1.7
│   └── root
│       └── shuai
│           └── fatch.txt
6.6 yum模块 批量安装软件
| 参数 | 详细信息 |
|---|---|
| name | 安装软件的名称 |
| state | installed 安装 present 安装 latest 安装 absent 卸载 removed 卸载 |
[root@m01 ~]# ansible a -m yum -a "name=tcpdump state=installed"
[root@m01 ~]# ansible a -m yum -a "name=tcpdump state=removed"     ---卸载软件
6.7 service模块 (管理服务的运行状态)
| 参数 | 详细信息 |
|---|---|
| name | 服务名称 |
| state | started 开启 stopped 停止 restarted 重启 reloaded 平滑重启 |
| enable |
yes 是 no 否 |
[root@m01 ~]# ansible a -m service -a "name=nfs state=started enable=yes"
6.8 cron模块 (批量设置多个主机的定时任务模块)
| 参数 | 详细信息 |
|---|---|
| minute | Minute when the job should run ( 0-59, *, */2, etc ) 分钟 |
| month | Month of the year the job should run ( 1-12, *, */2, etc ) 月 |
| hour | Hour when the job should run ( 0-23, *, */2, etc ) 小时 |
| day | Day of the month the job should run ( 1-31, *, */2, etc ) 天 |
| weekda | Day of the week that the job should run ( 0-6 for Sunday-Saturday, *, etc ) 周 |
| job | 用于定义定时任务需要做的事情 |
| name | 定时任务添加注释信息 |
| state | absent 删除定时任务 present 新建定时任务(默认不用添加) |
| disabled | yes 注释定时任务 no 开启定时任务 |
(1)批量创建定时任务
[root@m01 ~]# ansible a -m cron -a "minute=*/2 job='/usr/sbin/ntpdate ntp1.aliyun.com > /dev/null 2>&1' name='sync time'"
[root@web01 ~/shuai]# crontab -l
#Ansible: sync time
*/2 * * * * /usr/sbin/ntpdate ntp1.aliyun.com > /dev/null 2>&1
(2)删除定时任务(只能是ansible创建的才可以批量删除)
[root@m01 ~]# ansible a -m cron -a "name='sync time' state=absent
(3)注释定时任务(只能是ansible创建的才可以批量注释)
[root@m01 ~]# ansible a -m cron -a "job='/usr/sbin/ntpdate ntp1.aliyun.com > /dev/null 2>&1' name='sync time' disabled=yes"
[root@web01 ~/shuai]# crontab -l
#Ansible: sync time
#* * * * * /usr/sbin/ntpdate ntp1.aliyun.com > /dev/null 2>&1
6.9 mount模块 (批量挂载模块)
| 参数 | 详细信息 |
|---|---|
| src | 需要挂载的存储设备或文件信息 |
| path | 指定目标挂载点目录 |
| fstype | 指定挂载时的文件系统类型 |
| state | present 不会立即挂载,修改fstab,实现开机自动挂载 mounted 立即挂载,并且实现开机自动挂载 absent 立即卸载,fstab也会删除 unmounted 立即卸载,fstab不会被删除,下次开机自动挂载 |
[root@m01 ~]# ansible a -m mount -a "src=172.16.1.7:/data path=/mnt fstype=nfs state=mounted"
[root@web01 ~]# df -h | tail -1
172.16.1.7:/data   50G  1.7G   49G   4% /mnt
7. user模块
| 参数 | 详细信息 |
|---|---|
| name | 用户名 |
| uid | 用户uid |
| group | 用户组 |
| groups | 附加到另一个组 |
| password | 密码 |
| shell | 解释器 |
| create_home | yes 创建家目录(默认是yes) no 不创建家目录 |
[root@m01 ~]# ansible a -m user -a "name=rsync create_home=no shell=/sbin/nologin"
[root@web01 ~]# id rsync
uid=1002(rsync) gid=1002(rsync) groups=1002(rsync)
(1) 给指定用户创建密码 PS: 利用ansible程序user模块设置用户密码信息,需要将密码明文信息转换为密文信息进行设置 生成密文密码信息方法: 方法一:
ansible all -i localhost, -m debug -a "msg={{ '密码信息123456' | password_hash('sha512', 'shuai') }}"
##演示
[root@m01 ~]# ansible all -i localhost, -m debug -a "msg={{ '123456' | password_hash('sha512', 'shuai') }}"
localhost | SUCCESS => {
    "msg": "$6$shuai$CcqYhe8GgtTbQFxbarWVJAAt.02WAVe03DQEc9tSH0oK0oW3bm6M0gsHUmaw4KDkgul2U9kLzN1Bde54J7nA7/"
}
方法二:
[root@m01 ~]# yum install -y python-pip
[root@m01 ~]# pip install passlib
[root@m01 ~]# python -c "from passlib.hash import sha512_crypt; import getpass; print(sha512_crypt.using(rounds=5000).hash(getpass.getpass()))"
Password:
$6$DUHCNOQ58xnSFVB/$Csd36ECimmg2DPgYfD5doEEfyD.ZBt5zKQeGXyA6fOTrWVinKp7Wy5mx6IEtTKlgIsABoKaRYsadcTKnFPvhG1
[root@m01 ~]# ansible a -m user -a "name=shuai password='$6$oldboy$MVd3DevkLcimrBLdMICrBY8HF82Wtau5cI8D2w4Zs6P1cCfMTcnnyAmmJc7mQaE9zuHxk8JFTRgYMGv9uKW7j1'"
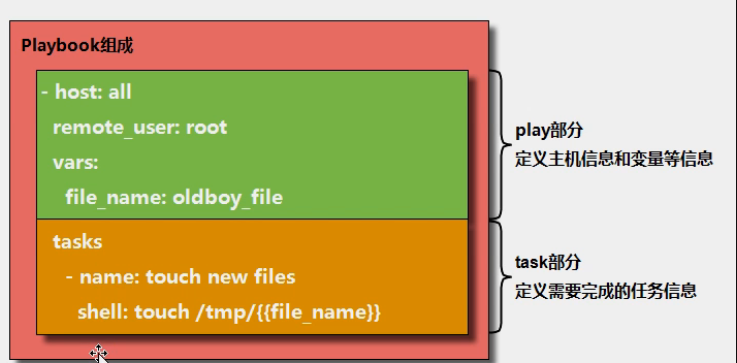
7.剧本的编写方法
7.1剧本的作用:一键化完成多个任务
7.2剧本的组成部分:
| 模块 | 含义 |
|---|---|
| hosts | 定义主机 |
| tasks |
任务 |
7.3剧本的编写规范(yaml)
7.3.1.合理的缩进信息,两个空格表示一个缩进关系
标题一
  标题二
    标题三
7.3.2.冒号的使用方法,冒号后边要跟空格
hosts: 172.16.1.7
tasks:
  yum: name=rsync

#ps:以冒号结尾,冒号信息出现在注释说明中,后面不需要加上空格
7.3.3.短横线的使用(-)列表功能
- 张三
  男
    - 打游戏
    - 运动
- 李四
  女
    学习
      北京
- 王五
  男
    运动
      天津
#ps:使用短横线构成列表信息,短横线后面需要有空格
7.4开始编写剧本
rsync剧本
[root@m01 /etc/ansible/ansible-playbook]# cat rsync_server.yaml - hosts: 172.16.1.7 tasks: - name: 1.服务端安装rsync yum: name=rsync state=installed - name: 2.将配置文件推送到客户端 copy: src=/tmp/rsyncd.conf dest=/etc/ - name: 3.创建rsync虚拟用户 user: name=rsync create_home=no shell=/sbin/nologin - name: 创建目录并修改目录属主属组 file: dest=/backup state=directory owner=rsync group=rsync - name: 创建密码文件并修改权限 copy: content='rsync_backup:shuai123' dest=/etc/rsync.password mode=600 - name: 启动服务并设置为开机自启 service: name=rsyncd.service state=started enabled=yes - hosts: 172.16.1.61 tasks: - name: 创建密码文件并修改权限 copy: content='shuai123' dest=/etc/rsync.password mode=600 - name: 检查测试 shell: rsync -avz /etc/hosts rsync_backup@172.16.1.7::backup --password-file=/etc/rsync.password
7.4.1执行剧本
#######################检查剧本格式################################# [root@m01 /etc/ansible/ansible-playbook]# ansible-playbook --syntax-check rsync_server.yaml playbook: rsync_server.yaml
######################模拟执行######################################
[root@m01 /etc/ansible/ansible-playbook]# ansible-playbook -C rsync_server.yaml
######################执行剧本#####################################
[root@m01 /etc/ansible/ansible-playbook]# ansible-playbook rsync_server.yaml
NFS剧本
[root@m01 /etc/ansible/ansible-playbook]# cat nfs_server.yaml - hosts: 172.16.1.7 tasks: - name: 1.服务端安装软件 yum: name=nfs-utils state=installed name=rpcbind state=installed - name: 2.推送nfs的配置文件 copy: src=/tmp/exports dest=/etc/ - name: 3.创建目录并修改权限 file: dest=/data state=directory owner=nfsnobody group=nfsnobody - name: 4.启动服务并设置开机自启 service: name=rpcbind.service enabled=yes name=nfs enabled=yes - hosts: 172.16.1.61 tasks: - name: 1.客户端下载软件 yum: name=nfs-utils state=installed - name: 2.远程挂载 mount: src=172.16.1.7:/data path=/mnt fstype=nfs state=mounted
8.剧本功能实践介绍
8.1编写剧本的重要功能介绍
a. 在剧本中设置变量信息
方式一:直接在剧本文件编写 vars: shuai01:data01 shuai02:data02 方式二:在命令行中进行指定 ansible-playbook -e shuai01=data01 -e shuai02=data02 rsync_server.yaml 方式三:在主机清单文件编写 [shuai] 172.16.1.61 172.16.1.7 [shuai:vars] shuai01=/data ####三种方式的优先级#### 最优先:命令行变量设置 次优先:剧本中变量设置 最后:主机清单变量设置 如何全局设置变量: roles 剧本整合
b. 在剧本中设置注册信息 (执行剧本时,可以显示输出命令结果信息)
- hosts: 172.16.1.61
  tasks:
    - name: 1.客户端下载软件
      yum: name=nfs-utils state=installed
    - name: 2.远程挂载
      mount: src=172.16.1.7:/data path=/mnt fstype=nfs state=mounted
    - name: 3.查看结果
      shell: df  -h|tail -1
      register: check_mount             #将输出及结果定义变量
    - name: 显示结果
      debug: msg={{ check_mount.stdout_lines }}   #调用变量
c. 在剧本中设置判断信息
获取内置变量的方法
[root@m01 /etc/ansible/ansible-playbook]# ansible a -m setup -a "filter=ansible_hostname" 172.16.1.7 | SUCCESS => { "ansible_facts": { "ansible_hostname": "web01", "discovered_interpreter_python": "/usr/bin/python" }, "changed": false } #########获取子项的方法############# ansible_eth0[ipv4] -----添加到剧本才生效
| 主机信息 | 含义 |
|---|---|
| ansible_all_ipv4_addresses: | 仅显示ipv4的信息。 |
| ansible_devices: | 仅显示磁盘设备信息 |
| ansible_distribution: | 显示是什么系统,例:centos,suse等 |
| ansible_distribution_major_version: | 显示是系统主版本 |
| ansible_distribution_version: | 仅显示系统版本。 |
| ansible_machine: | 显示系统类型,例:32位,还是64位。 |
| ansible_eth0: | 仅显示eth0的信息。 |
| ansible_hostname: | 仅显示主机名。 |
| ansible_kernel: | 仅显示内核版本 |
| ansible_lvm: | 显示lvm相关信息 |
| ansible_memtotal_mb: | 显示系统总内存。 |
| ansible_memfree_mb: | 显示可用系统内存 |
| ansible_memory_mb: | 详细显示内存情况。 |
| ansible_swaptotal_mb: | 显示总的swap内存 |
| ansible_swapfree_mb: | 显示swap内存的可用内存 |
| ansible_mounts: | 显示系统磁盘挂载情况 |
| ansible_processor: | 显示cpu个数(具体显示每个cpu的型号) |
| ansible_processor_vcpus: | 显示cpu个数(只显示总的个数)。 |
例子:
- hosts: a
      remote_user: root
      tasks:
        - name: Check File
          file: path=/tmp/this_is_{{ ansible_hostname }}_file state=touch
          when: (ansible_hostname == "nfs") or (ansible_hostname == "backup")

        - name: install httpd
          yum: name=httpd state=installed
          when: (系统情况 == "CentOS")

        - name: install httpd2
          yum: name=httpd2 state=installed
          when: (系统情况 == "ubuntu")
d. 在剧本中设置循环信息
vim test04.yml
    - hosts: all
      remote_user: root
      tasks:
        - name: Add Users
          user: name={{ item.name }} groups={{ item.groups }} state=present
          with_items:
            - { name: 'testuser1', groups: 'bin' }
            - { name: 'testuser2', groups: 'root' }
vim test05.yml
    - hosts: all
      remote_user: root
      tasks:
        - name: Installed Pkg
          yum: name={{ item }}  state=present
          with_items:
            - wget
            - tree
            - lrzsz
f. 在剧本中设置错误忽略
vim test06.yml
    - hosts: all
      remote_user: root
      tasks:
        - name: Ignore False
          command: /bin/false
          ignore_errors: yes          #忽略错误继续执行
        - name: touch new file
          file: path=/tmp/oldboy_ignore state=touch
g 在剧本中设置标签信息(单独调试某一个name时需要)
- hosts: oldboy
      ignore_errors: yes
      remote_user: root
      tasks:
        - name: Check File
          file: path=/tmp/this_is_{{ ansible_hostname }}_file state=touch
          when: (ansible_hostname == "nfs01") or (ansible_hostname == "backup")
          tags: t1

        - name: bad thing
          command: ech 123
          #ignore_errors: yes
          tags: t2

        - name: install httpd
          yum: name=httpd state=installed
          when: (ansible_all_ipv4_addresses == ["172.16.1.7","10.0.0.7"])
          tags: t3

        - name: install httpd2
          yum: name=httpd2 state=installed
          when: (ansible_distribution == "ubuntu")
          tags: t4

#指定执行哪个标签任务: ansible-playbook --tags=t2 test05.yml
#跳过指定标签任务:    ansible-playbook --skip-tags=t2 test05.yml
h.在剧本中设置触发信息
- hosts: backup remote_user: root tasks: - name: 01 Install rsync yum: name=rsync state=present - name: 02 push config file copy: src=./file/{{ item.src }} dest=/etc/{{ item.dest }} mode={{ item.mode }} with_items: - { src: "rsyncd.conf", dest: "rsyncd.conf", mode: "0644" } - { src: "rsync.password", dest: "rsync.password", mode: "0600" } notify: restart rsync server #触发条件 handlers: - name: restart rsync server #触发器 service: name=rsyncd state=restarted
i. 在剧本中进行剧本整合
方式一:include_tasks: f1.yml - hosts: all remote_user: root tasks: - include_tasks: f1.yml - include_tasks: f2.yml 方式二:include: f1.yml - include:f1.yml - include:f2.yml 方式三:- import_playbook: [root@m01 ansible-playbook]# cat main.yml - import_playbook: base.yml - import_playbook: rsync.yml - import_playbook: nfs.yml - import_playbook: oxxx.yml - import_playbook: rsync.yml - import_playbook: nfs.yml
9.ansible角色配置roles
第一个历程: 规范目录结构 cd /etc/ansible/roles mkdir {rsync,nfs} --- 创建相应角色目录 mkdir {nfs,rsync}/{vars,tasks,templates,handlers,files} --- 创建角色目录下面的子目录 [root@m01 roles]# tree . ├── nfs │ ├── files --- 保存需要分发文件目录 │ ├── handlers --- 保存触发器配置文件信息 │ ├── tasks --- 保存要执行的动作信息文件 │ ├── templates --- 保存需要分发模板文件 模板文件中可以设置变量信息 │ └── vars --- 保存变量信息文件 └── rsync ├── files ├── handlers ├── tasks ├── templates └── vars 第二个历程: 在roles目录中创建相关文件 编写文件流程图: 1) 编写tasks目录中的main.yml文件 vim main.yml - include_tasks: copy_info.yml - include_tasks: create_dir.yml - include_tasks: boot_server.yml vim copy_info.yml - name: 01-copy conf file copy: src=exports dest=/etc notify: restart nfs server vim create_dir.yml - name: 02-create data dir file: path={{ Data_dir }} state=directory owner=nfsnobody group=nfsnobody vim boot_server.yml - name: 03-boot server service: name={{ item }} state=started enabled=yes with_items: - rpcbind - nfs 2) 编写vars目录中的main.yml文件 [root@m01 vars]# vim main.yml Data_dir: /data 3) 编写files目录中的文件 [root@m01 files]# ll total 4 -rw-r--r-- 1 root root 29 May 17 15:23 exports 4) 编写handlers目录中的main.yml文件 vim main.yml - name: restart nfs server service: name=nfs state=restarted 目录中文件编写好汇总结构 [root@m01 nfs]# tree . ├── files │ └── exports ├── handlers │ └── main.yml ├── tasks │ └── main.yml ├── templates └── vars └── main.yml 第三个历程: 编写一个主剧本文件 [root@m01 roles]# cat site.yml - hosts: nfs_server roles: - nfs-server - hosts: rsync_server roles: - rsync
补充:ansible学习帮助手册如何查看
[root@m01 ~]# ansible-doc -l        --模块简介
[root@m01 ~]# ansible-doc -s  command  --模块的详细信息
[root@m01 ~]# ansible-doc file   --查询模块在剧本中的应用方法

 浙公网安备 33010602011771号