一. ES 安装
从网站下站 https://www.elastic.co/cn/downloads/elasticsearch 下载elasticsearch 的包
安装环境需要安装java8以上运行环境,并配置java环境变量
我安装 /usr/local/elasticsearch
groupadd es
useradd es
chown -R es:es /usr/local/elasticsearch
chmod -R 700 /usr/local/elasticsearch
进入到es 用户,并且进入 /usr/local/elasticsearch 目录,执行bin/elasticsearch -d 命令
![]()
confing/elasticsearch.yml
cluster.name: my-application //集群名称
node.name: node-1 //节点名称
node.attr.rack: r1 //节点打个标签名称(可以不填)
path.data: /path/to/data //数据存放目录
path.logs: /path/to/logs //日志存放目录
network.host: 0.0.0.0 //设置全网可访问
http.port: 9200 //web对外端口
discovery.seed_hosts: ["120.26.40.212", "127.0.0.1"]
cluster.initial_master_nodes: ["node-1"]
confing/jvm.options
# -Xms2g
# -Xmx2g
设置堆内存的大小,推荐最大设置32G ,一般为内存的一半
二、kibana 安装
从网站下站 https://www.elastic.co/cn/downloads/kibana 下载kibana 的包
groupadd kibana
useradd kibana -g kibana
chown -R kibana:kibana /usr/local/kibana
chmod 700 /usr/local/kibana -R
进入kibana 用户启动kibana 执行命令 bin/kibana &
elasticsearch.hosts: ["http://120.26.40.213:9200"] 配置此项,当kibana 启动的时候会自动连接elasticsearch
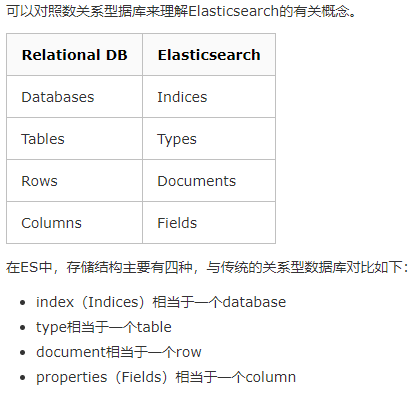
三,ES的数据管理
![]()
1、查询ES基本设置
get http://120.26.40.212:9200/
2.查询索引mapping
get http://120.26.40.212:9200/database_1/_mappings?pretty
3.索引配置查询
get http://120.26.40.212:9200/database_2/_settings?pretty
4. 创建索引结构
put http://120.26.40.212:9200/database_2
{
"settings": {
"number_of_shards" : 1,
"number_of_replicas" : 0
},
"mappings":{
"properties":{
"ip" :{"type":"keyword"},
"mac":{"type":"integer"},
"tables":{"type":"text","analyzer":"whitespace"},
"columns":{"type":"text","analyzer":"whitespace"},
"values":{"type":"text","analyzer":"whitespace"},
"sql" : {"type" : "text","analyzer": "ik_smart" }
}
}
}
5. 查询语句
get http://120.26.40.212:9200/database/_search?pretty
{
"query": {
"match": {
"tables": "t_user218236"
}
}
}
6.查询所有数据
http://120.26.40.212:9200/database_1/_search?pretty
7.查询AND
http://120.26.40.212:9200/database/_search?pretty
{
"query": {
"bool": {
"must": [
{ "match": { "tables": "t_user218236" }},
{ "match": { "values": "zdb218236" }}
]
}
}
}
8.复杂查询OR
http://120.26.40.212:9200/database/_search?pretty
{
"query": {
"bool": {
"should": [
{ "match": { "tables": "t_user218236" }},
{ "match": { "ip": "zdb218236" }}
]
}
}
}
9.复杂条件And与OR
get http://120.26.40.212:9200/database/_search?pretty
{
"query": {
"bool": {
"should": [
{ "match": { "tables": "t_user218236" }},
{ "match": { "values": "DDDD" }}
],
"must": [
{ "match": { "tables": "t_user218236" }},
{ "match": { "values": "zdb218236" }}
]
}
},
"from":0,
"size":100
}
10.添加数据
post http://120.26.40.212:9200/database/_search?pretty
{
"columns": "wali",
"ip": "China",
"mac": 20,
"sql": "1996-04-20",
"tables": "19960420 12345",
"values": "11,12,13"
}
11.修改数据
post http://120.26.40.212:9200/database_1/_doc/Oxmc1XkBMo5e7cx7xynE/_update?
{
"doc" : {
"mac": 10000
}
}
12 删除数据
delete http://120.26.40.212:9200/database_1/_doc/Oxmc1XkBMo5e7cx7xynE
四,数据分词
ik分词器
ik_max_word 会将文本做最细粒度的拆分;
ik_smart 会做最粗粒度的拆分。
github 下载ik 分词器 下载到plugins 目录下 改名称为ik 重新启动即可使用
POST _analyze
{
  "analyzer": "whitespace",
  "text":     "The quick brown fox."
}
分词结果
{
"tokens": [
{
"token": "The",
"start_offset": 0,
"end_offset": 3,
"type": "word",
"position": 0
},
{
"token": "quick",
"start_offset": 4,
"end_offset": 9,
"type": "word",
"position": 1
},
{
"token": "brown",
"start_offset": 10,
"end_offset": 15,
"type": "word",
"position": 2
},
{
"token": "fox.",
"start_offset": 16,
"end_offset": 20,
"type": "word",
"position": 3
}
]
}


 浙公网安备 33010602011771号