

ELK 之一:ElasticSearch 基础和集群搭建
一:需求及基础:
场景:
1、开发人员不能登录线上服务器查看详细日志
2、各个系统都有日志,日志数据分散难以查找
3、日志数据量大,查询速度慢,或者数据不够实时
4、一个调用会涉及到多个系统,难以在这些协调中快速定位数据
Elastic Search + LogStash + Kibana = ELK Stack
logstash1----| (redis实现松耦合功能)
logstash2----|----->broker redis----->indexer logstash---->search storage<--------Web Logstash
logstash3----|
ELS的概念:
1、索引:数据会放在多个索引中,索引可以理解为database,索引里面存放的基本单位是文档,LES会把索引分片,便于横向扩展,分别可以做备份,多个分片读比较快,备份分片在主的挂掉之后可以自动将自己提升为主分片(实现横向扩展和冗余)
2、文档类型:和redis一样,key是有类型的
3、节点:一个ELS的实例是一个节点
4、集群:多节点的集合组成集群,类似于zookeeper会选举出主节点,客户端不需要关注主节点,连接任何一个都可以,数据会自动同步,因此应用不需要关注那个是主节点。前提是要把
配置文件:
[root@elk-server1 config]# vim elasticsearch.yml
cluster.name: hfelk-server  #集群的名称,名称相同就是一个集群
node.name: Server1  #集群情况下,当前node的名字,每个node应该不一样
node.master: true  #当前节点是否可以被选举为master节点,可以不选举master做保存数据
node.data: true #当前节点是否存储数据,也可以不存储数据,只做master
bootstrap.mlockall: true #锁住内存,不做swap,提高效率
http.port: 9200  #客户端访问端口
transport.tcp.port: 9300 #集群访问端口:
index.number_of_shards: 5 #默认每个项目5个分片
index.number_of_replicas: 1  #每个主分片一个副本分片,即5个主分片就有5个副本
二:安装及配置:
官网下载地址:
https://www.elastic.co/downloads
官方文档:
https://www.elastic.co/guide/index.html
1、安装:
安装java环境,1.8.20或以上的版本
配置yum源或使用源码安装
2、启动:
 /usr/local/elasticsearch/bin/elasticsearch  -d  #后台进程方式启动
/etc/init.d/elasticsearch  restart
3、设置启动脚本:
下载:elasticsearch-servicewrapper-master.zip
[root@elk-server1 tianqi]# mv elasticsearch-servicewrapper-master/service/ /usr/local/elasticsearch/bin/
帮助信息:
[root@elk-server1 tianqi]# /usr/local/elasticsearch/bin/service/elasticsearch
Usage: /usr/local/elasticsearch/bin/service/elasticsearch [ console | start | stop | restart | condrestart | status | install | remove | dump ]

Commands:
  console      Launch in the current console.
  start        Start in the background as a daemon process.
  stop         Stop if running as a daemon or in another console.
  restart      Stop if running and then start.
  condrestart  Restart only if already running.
  status       Query the current status.
  install      Install to start automatically when system boots.
  remove       Uninstall.
  dump         Request a Java thread dump if running.
4、安装启动脚本:
[root@elk-server1 tianqi]# /usr/local/elasticsearch/bin/service/elasticsearch install  #安装脚本
Detected RHEL or Fedora:
Installing the Elasticsearch daemon..
[root@elk-server1 tianqi]# ls /etc/init.d/elasticsearch  #验证是否安装完成
/etc/init.d/elasticsearch
[root@elk-server1 tianqi]# chkconfig  --list | grep ela #自动设置为开机启动
elasticsearch      0:off    1:off    2:on    3:on    4:on    5:on    6:off
5、启动elasticsearch服务:
[root@elk-server1 tianqi]# /etc/init.d/elasticsearch   start
Starting Elasticsearch...
Waiting for Elasticsearch......
running: PID:14183
[root@elk-server1 tianqi]# /etc/init.d/elasticsearch   status
Elasticsearch is running: PID:14183, Wrapper:STARTED, Java:STARTED
6、java的配置文件:
[root@elk-server1 service]# ls /usr/local/elasticsearch/bin/service/elasticsearch.conf
9200:访问的都端口
9300:服务器之间通信的端口
7、测试:
[root@elk-server1 elasticsearch]# curl  -i -XGET http://192.168.0.251:9200
HTTP/1.1 200 OK
Content-Type: application/json; charset=UTF-8
Content-Length: 335

{
  "status" : 200,
  "name" : "Server1",
  "cluster_name" : "HFELK-Server1",
  "version" : {
    "number" : "1.7.0",
    "build_hash" : "929b9739cae115e73c346cb5f9a6f24ba735a743",
    "build_timestamp" : "2015-07-16T14:31:07Z",
    "build_snapshot" : false,
    "lucene_version" : "4.10.4"
  },
  "tagline" : "You Know, for Search"
}
三:ES 概念和集群:
1、基于http的RESTful API
以jsop返回查询结果:
[root@elk-server1 config]# curl  -XGET  'http://192.168.0.251:9200/_count?pretty' -d '
> {
>     "query":{
>            "match_all":{}
>       }
> }
>
> '
{
  "count" : 1,
  "_shards" : {
    "total" : 1,
    "successful" : 1,
    "failed" : 0
  }
}
curl -i:
[root@elk-server1 config]# curl  -i -XGET  'http://192.168.0.251:9200/_count?pretty' -d '
{
    "query":{
           "match_all":{}
      }
}

'
HTTP/1.1 200 OK
Content-Type: application/json; charset=UTF-8
Content-Length: 95

{
  "count" : 1,
  "_shards" : {
    "total" : 1,
    "successful" : 1,
    "failed" : 0
  }
}
2、安装ELS监控管理插件:
[root@elk-server1 service]# /usr/local/elasticsearch/bin/plugin  -i elasticsearch/marvel/latest/
-> Installing elasticsearch/marvel/latest/...
Trying http://download.elasticsearch.org/elasticsearch/marvel/marvel-latest.zip...
Downloading ......................................................................................................................................................................................................................................................DONE
Installed elasticsearch/marvel/latest/ into /usr/local/elasticsearch/plugins/marvel
3、web访问:http://xx.chinacloudapp.cn:9200/_plugin/marvel/
选选免费试用:

4、进入测试界面:
5、界面效果:
提交内容:

6、提交的代码如下:
POST  /index-demo/test
{
  "user":"jack",
  "message":"hello word"
  }
}
7、 查看和删除指定文档内容:
GET  /index-demo/test/AVP0y8ANAZWiuuxBK3mq/_source
DELETE  /index-demo/test/AVP0y8ANAZWiuuxBK3mq/_source
8、搜索文档:
GET  /index-demo/test/_search?q=hello

{
   "took": 97,
   "timed_out": false,
   "_shards": {
      "total": 5,
      "successful": 5,
      "failed": 0
   },
   "hits": {
      "total": 1,
      "max_score": 0.15342641,
      "hits": [
         {
            "_index": "index-demo",
            "_type": "test",
            "_id": "AVP0y8ANAZWiuuxBK3mq",
            "_score": 0.15342641,
            "_source": {
               "user": "jack",
               "message": "hello word"
            }
         }
      ]
   }
}
四:elasticsearch集群管理程序之head:
1、安装集群的管理插件head:
集群更换了虚拟机环境,所以主机名不一样,安装的时候要多安装几次,有的时候会因为网络问题无法一次 安装完成。
[root@node6 local]#  /usr/local/elasticsearch/bin/plugin  -i mobz/elasticsearch-head/
-> Installing mobz/elasticsearch-head/...
Trying https://github.com/mobz/elasticsearch-head/archive/master.zip...
Downloading ....................................................................................................................................................................................................................................................................................................................................................................................................................................................................................................................................................................................................................................................................................DONE
Installed mobz/elasticsearch-head/ into /usr/local/elasticsearch/plugins/head
2、打开web管理端,查看是否已经有本机被管理了:
3、在另外一台主机上配置好java和elasticsearch,配置文件只要吧node节点的名字改了就行,其他的不需要改,然后配置脚本启动服务,再把elasticsearch启动即可,会自动在集群显示,推荐三台或以上的节点,因为其中一台主机挂掉不影响整个服务的访问
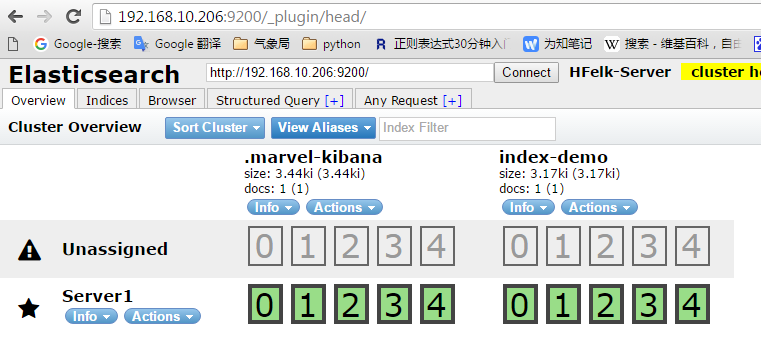
绿色代表分片都正常运行,20个分片都正常,表示集群非常健康
黄色表示所有主分片都正常,但是副本分片有丢失,意味着ELS可以正常工作,但是有一定的风险,性能也不是最好的
红色代表有主分片丢失,此部分数据就无法使用了
4、成功的集群效果:

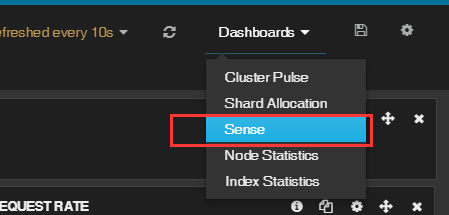
5、以上是在监控程序marvel的界面创建了两个项目:
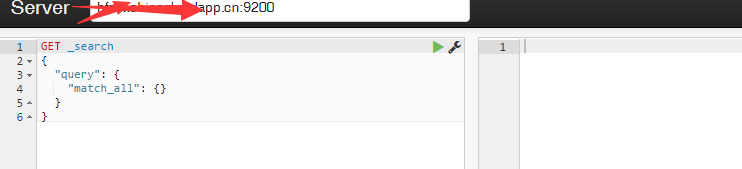
打开连接:http://192.168.10.206:9200/_plugin/marvel/sense/index.html
POST  /index-demo/hi
{
  "user":"tom1",
  "message":"hello word"
  }
}

POST  /index-hello/hi
{
  "user":"tom1",
  "message":"hello word"
  }
}

 浙公网安备 33010602011771号