
pytest
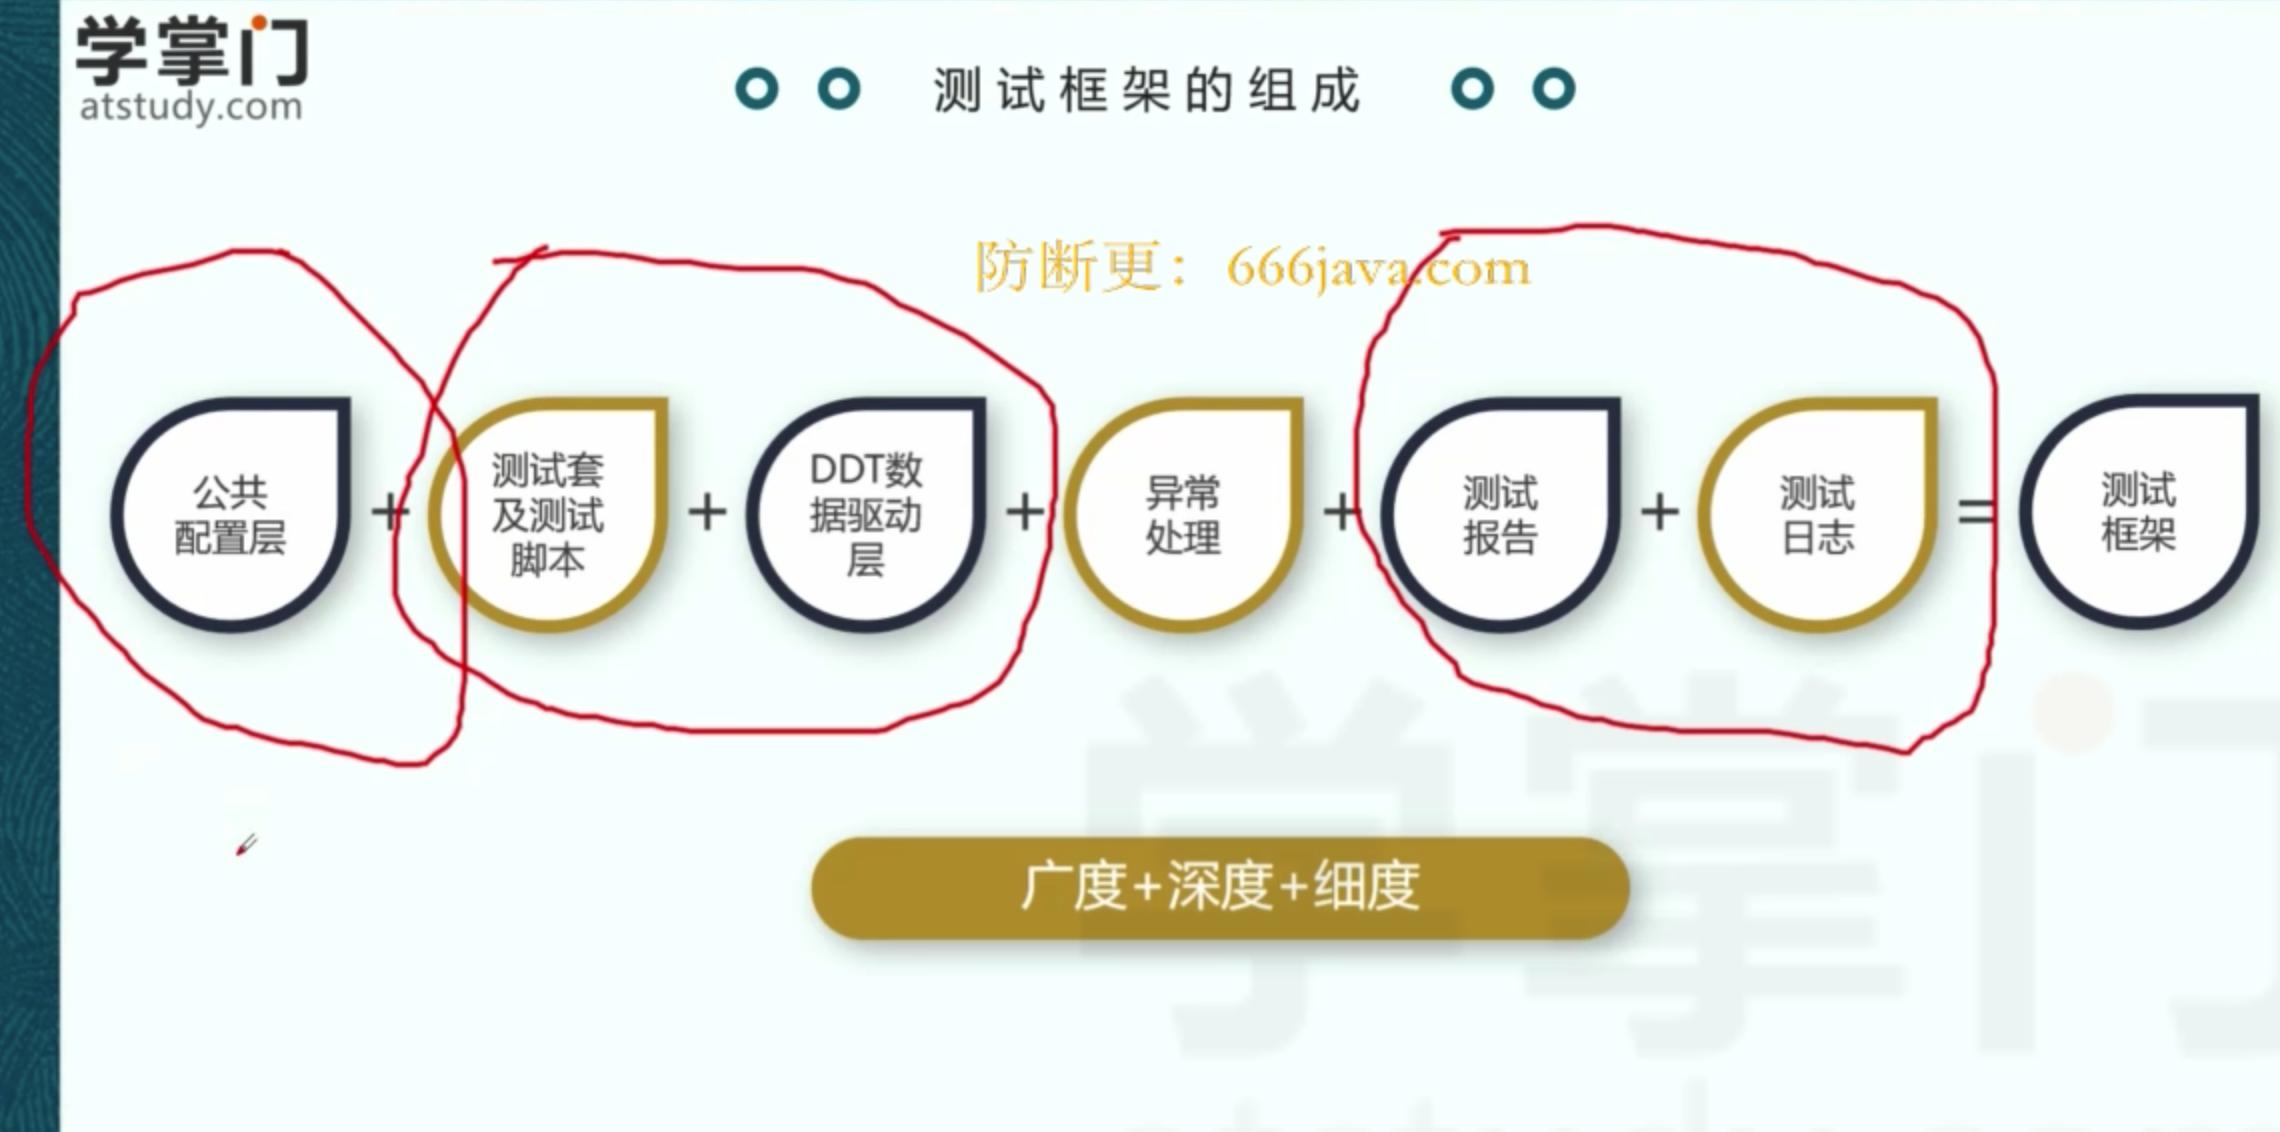
自动化框架包含内容
一、命名规范、setup_method、teardown_method
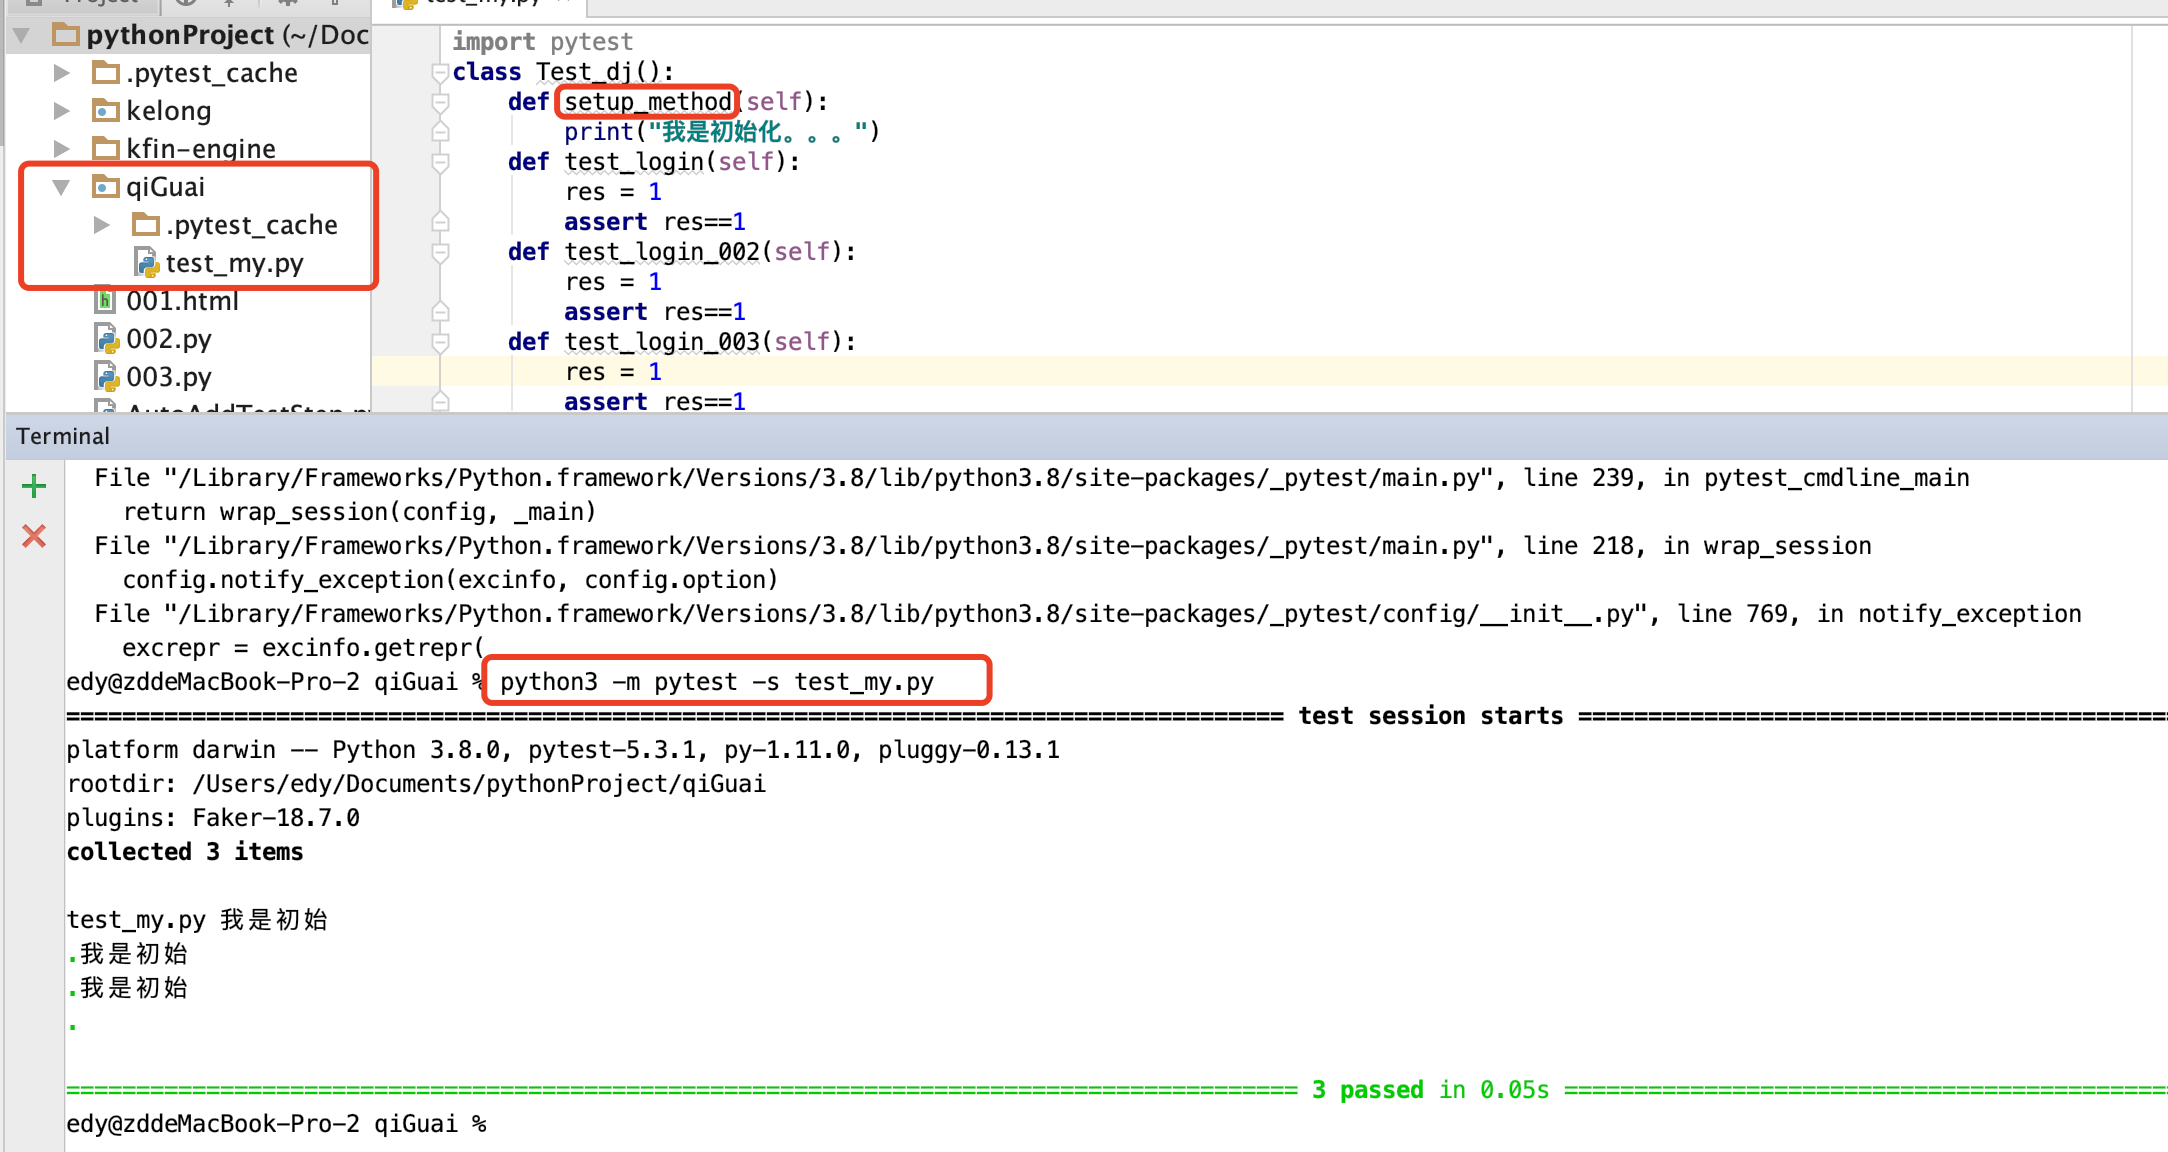
1、文件名称,要以"test_xx"开头
2、类名要以"Test_xx""开头
3、方法名要以"test_xx""开头
4、setup_method 每个方法都会执行一遍setup_method 里的内容 ; teardown_method 对每个方法结束时执行
5、命令 -s 会把print 的内容打印出来
6、执行脚本的命令:python3 -m pytest -s xx.py 或者 pytest -s xx.py
二、数据驱动(pytest.mark.parametrize)、pytest.main用法
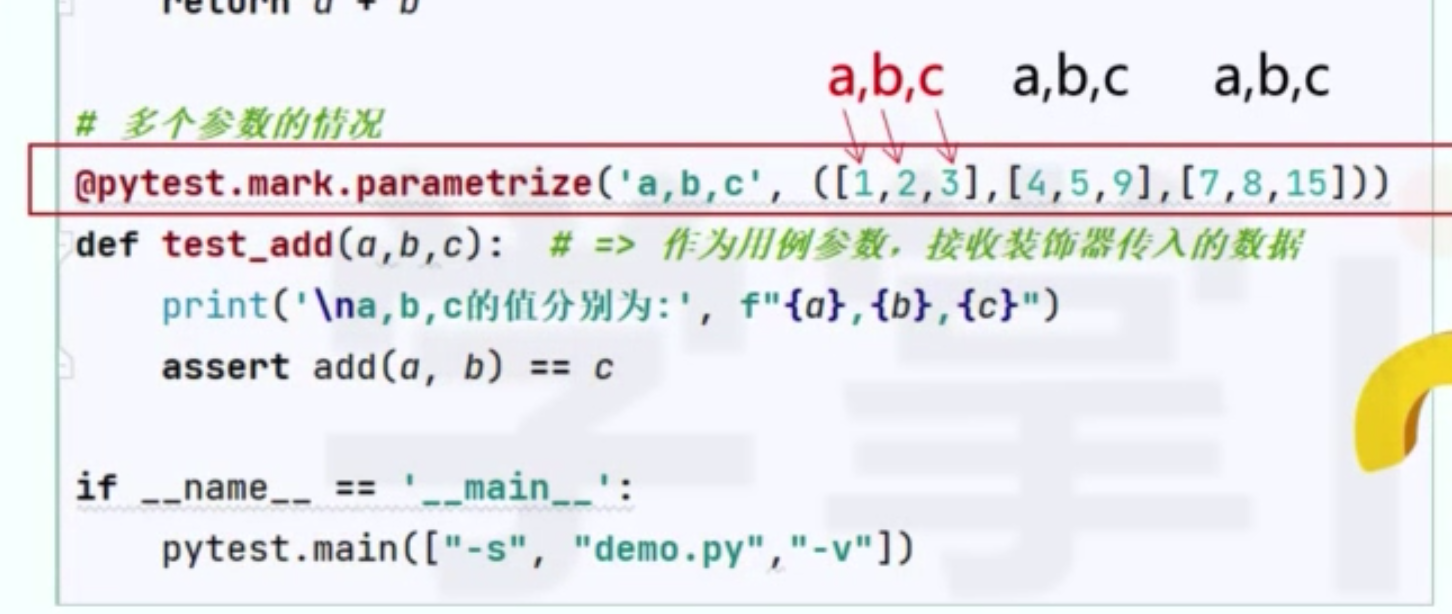
1     # @pytest.mark.parametrize("a",(1,2,3))
2     @pytest.mark.parametrize("a,b",([1,2],[3,4],[5,6])) # 还可以填入方法@pytest.mark.parametrize("a",func()) func返回的是列表、字典、json
3 def test_canshu(self,a,b): 4 print(a,b) 5 # assert self.add(a,1)==a+1 6 7 if __name__ == '__main__': 8 pytest.main(["-s","test_djangp_login.py","-v"])
三、setup_class、setup_method、teardown_method、teardown_class 执行顺序
先setup_class 执行一次
setup_method、teardown_method 有几个以test打头的方法就执行几次
teardown_class 最后执行一次
四、assert 断言方法
1 assert "9" in result
2 assert return_result ==1
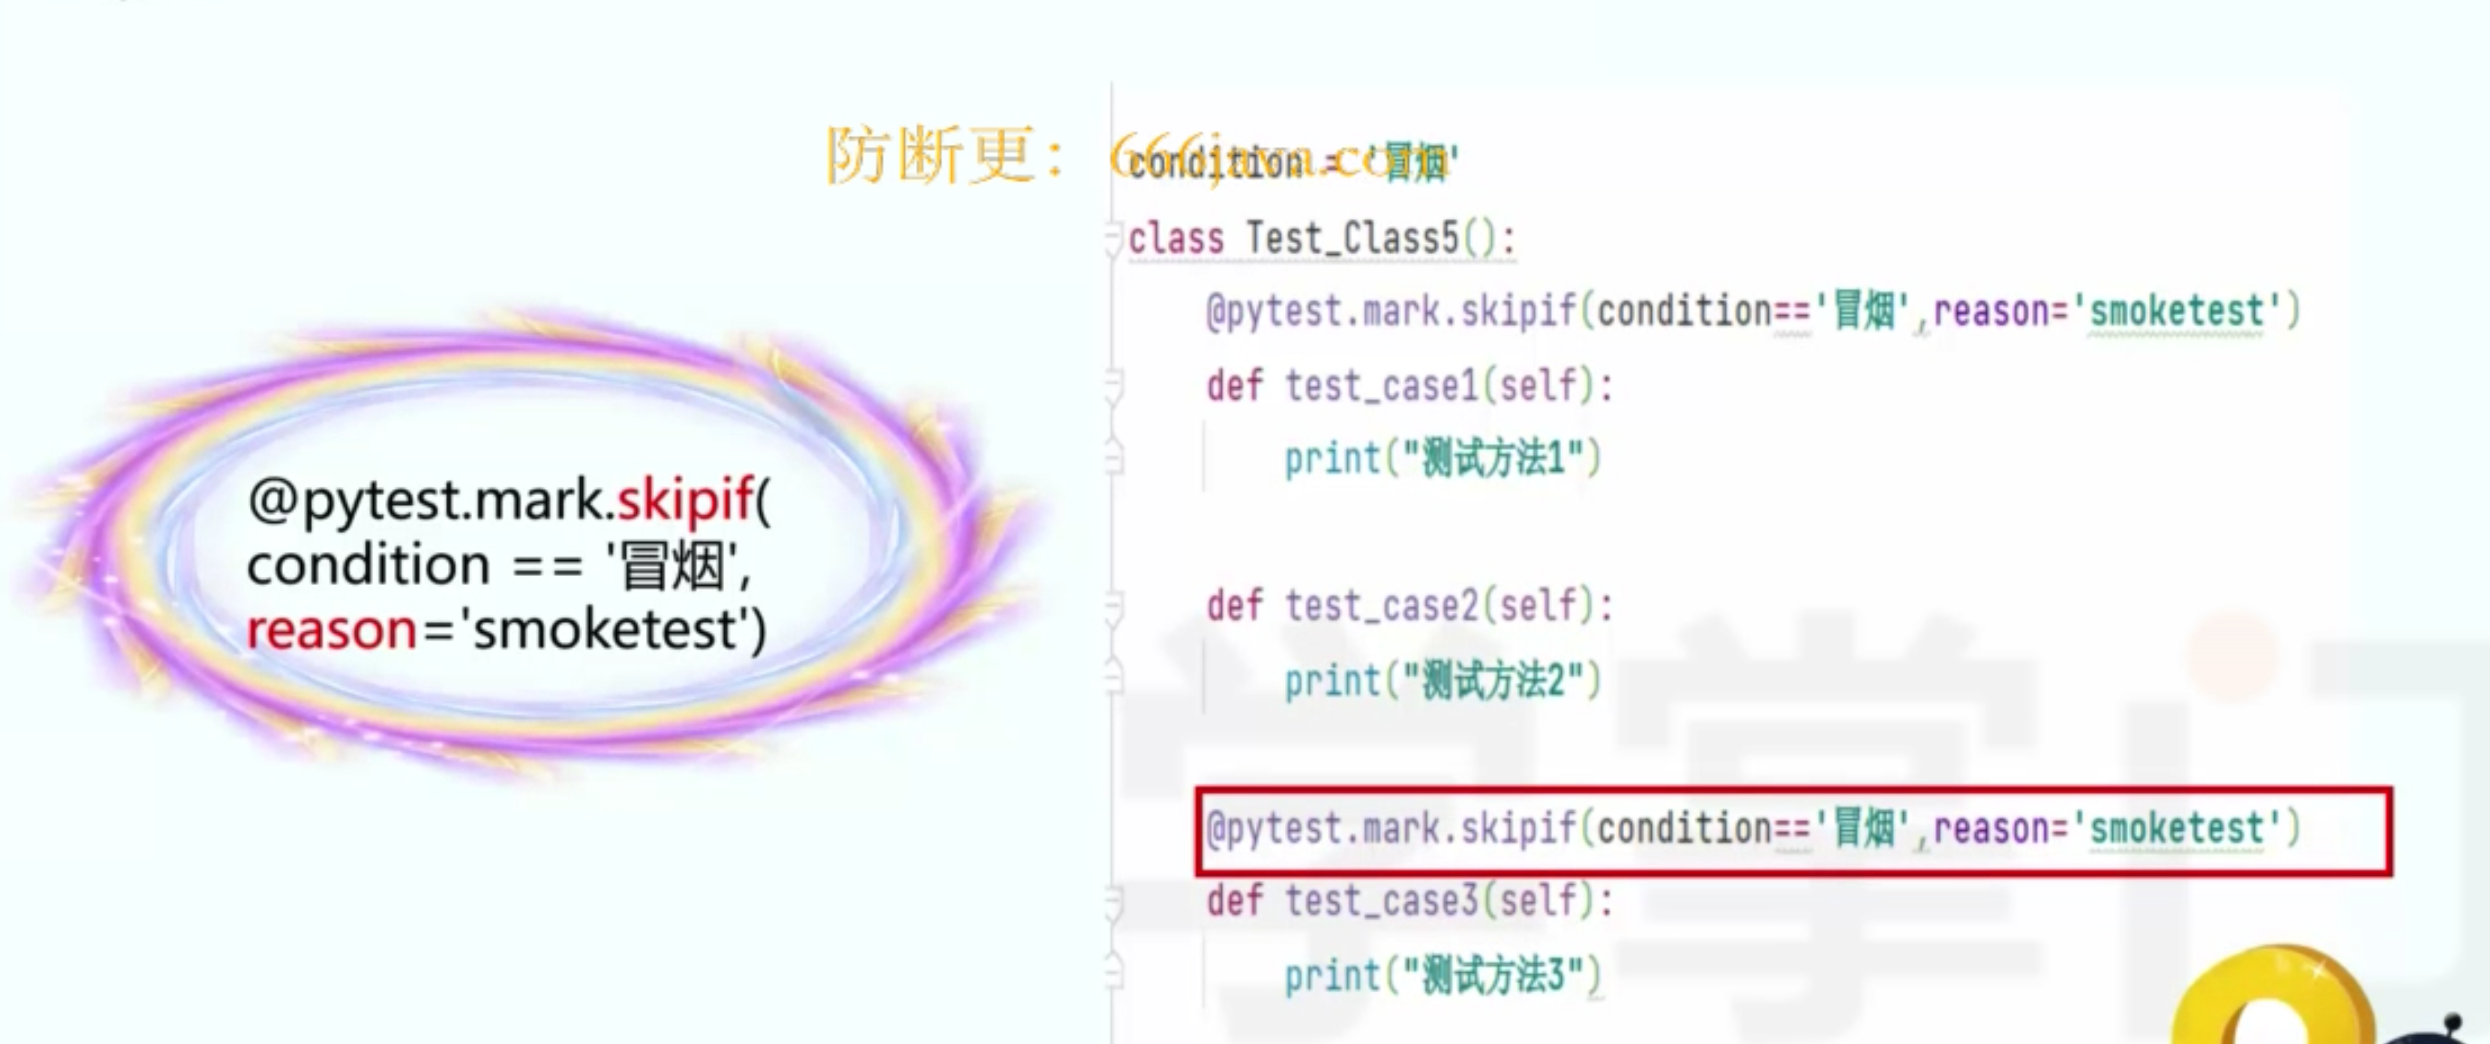
五、执行顺序 order、skip、skipif
- 默认从上到下
- order,需要安装插件pytest-ordering
- skip、skipif
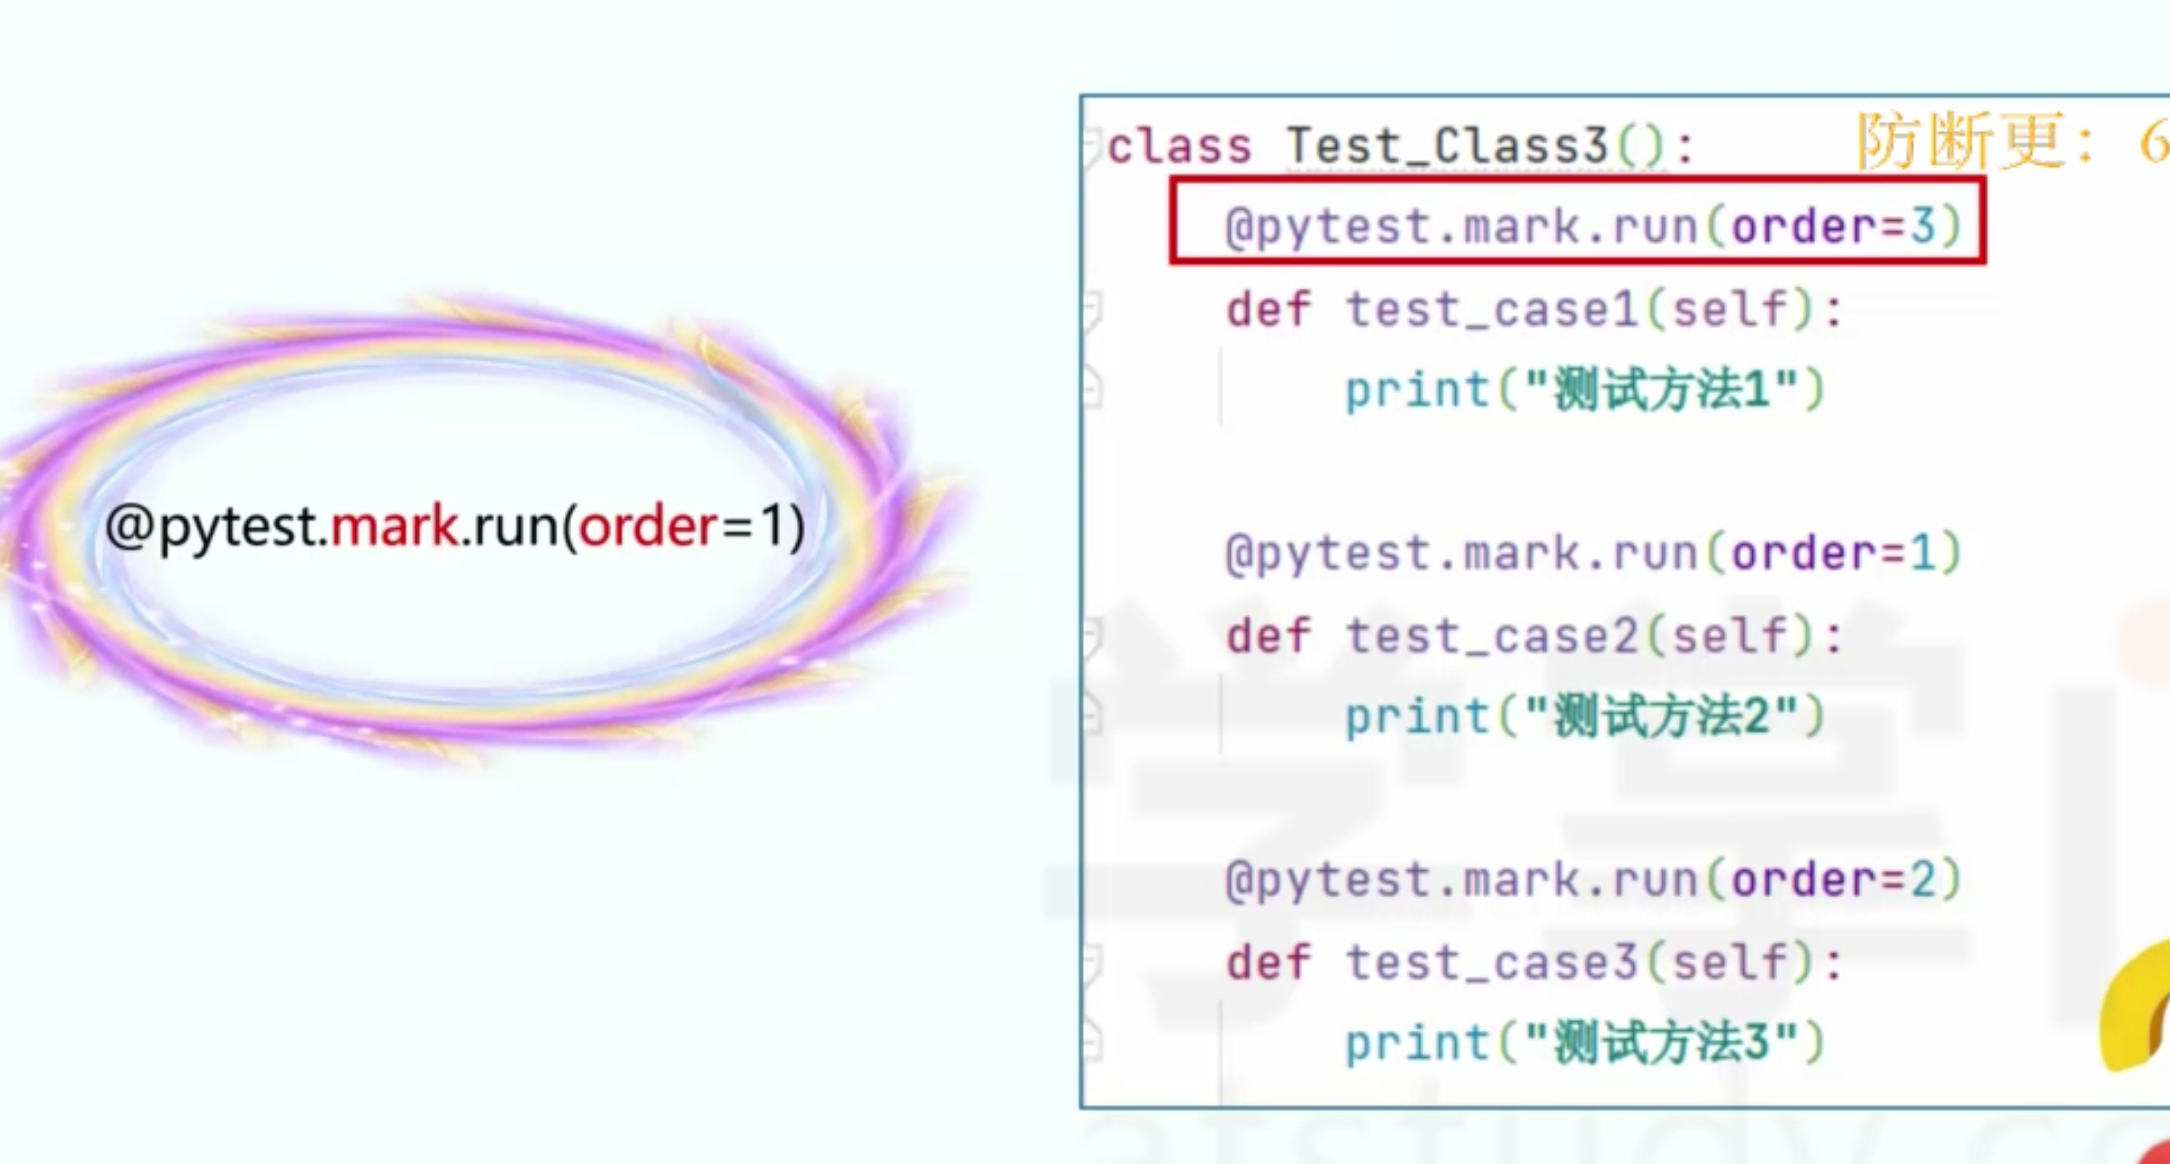
 1 class Test_Django_Login():
 2     @pytest.mark.run(order=2) # 需要安装插件pytest-ordering
 3     def test_login_01(self,test_login_02):
 4         return_result = test_login_02
 5         result = 9
 6         assert return_result ==1
 7     @pytest.fixture()
 8     @pytest.mark.run(order=1)
 9     def test_login_02(self):
10         result = "9"
11         assert "9" in result
12         return 1
 1 class Test_Django_Login():
 2     @pytest.mark.skip("不执行")
 3     def test_login_03(self):
 4         result = "9"
 5         assert "9" in result
 6     res = 1
 7     @pytest.mark.skipif(res==1,reason="不执行1")
 8     def test_login_04(self):
 9         result = "9"
10         assert "9" in result
11
12 if __name__ == '__main__':
13     # pytest.main(["-s","test_djangp_login.py"])
14     pytest.main(["-rs -v","test_djangp_login.py"]) # -r 把skip里面的“不执行”文本打出来 -v 详情
六、参数传递 @pytest.fixture()

 1 class Test_Django_Login():
 2     @pytest.mark.run(order=2) # 需要安装插件pytest-ordering
 3     def test_login_01(self,test_login_02):
 4         return_result = test_login_02
 5         result = 9
 6         assert return_result ==1
 7     @pytest.fixture()
 8     @pytest.mark.run(order=1)
 9     def test_login_02(self):
10         result = "9"
11         assert "9" in result
12         return 1
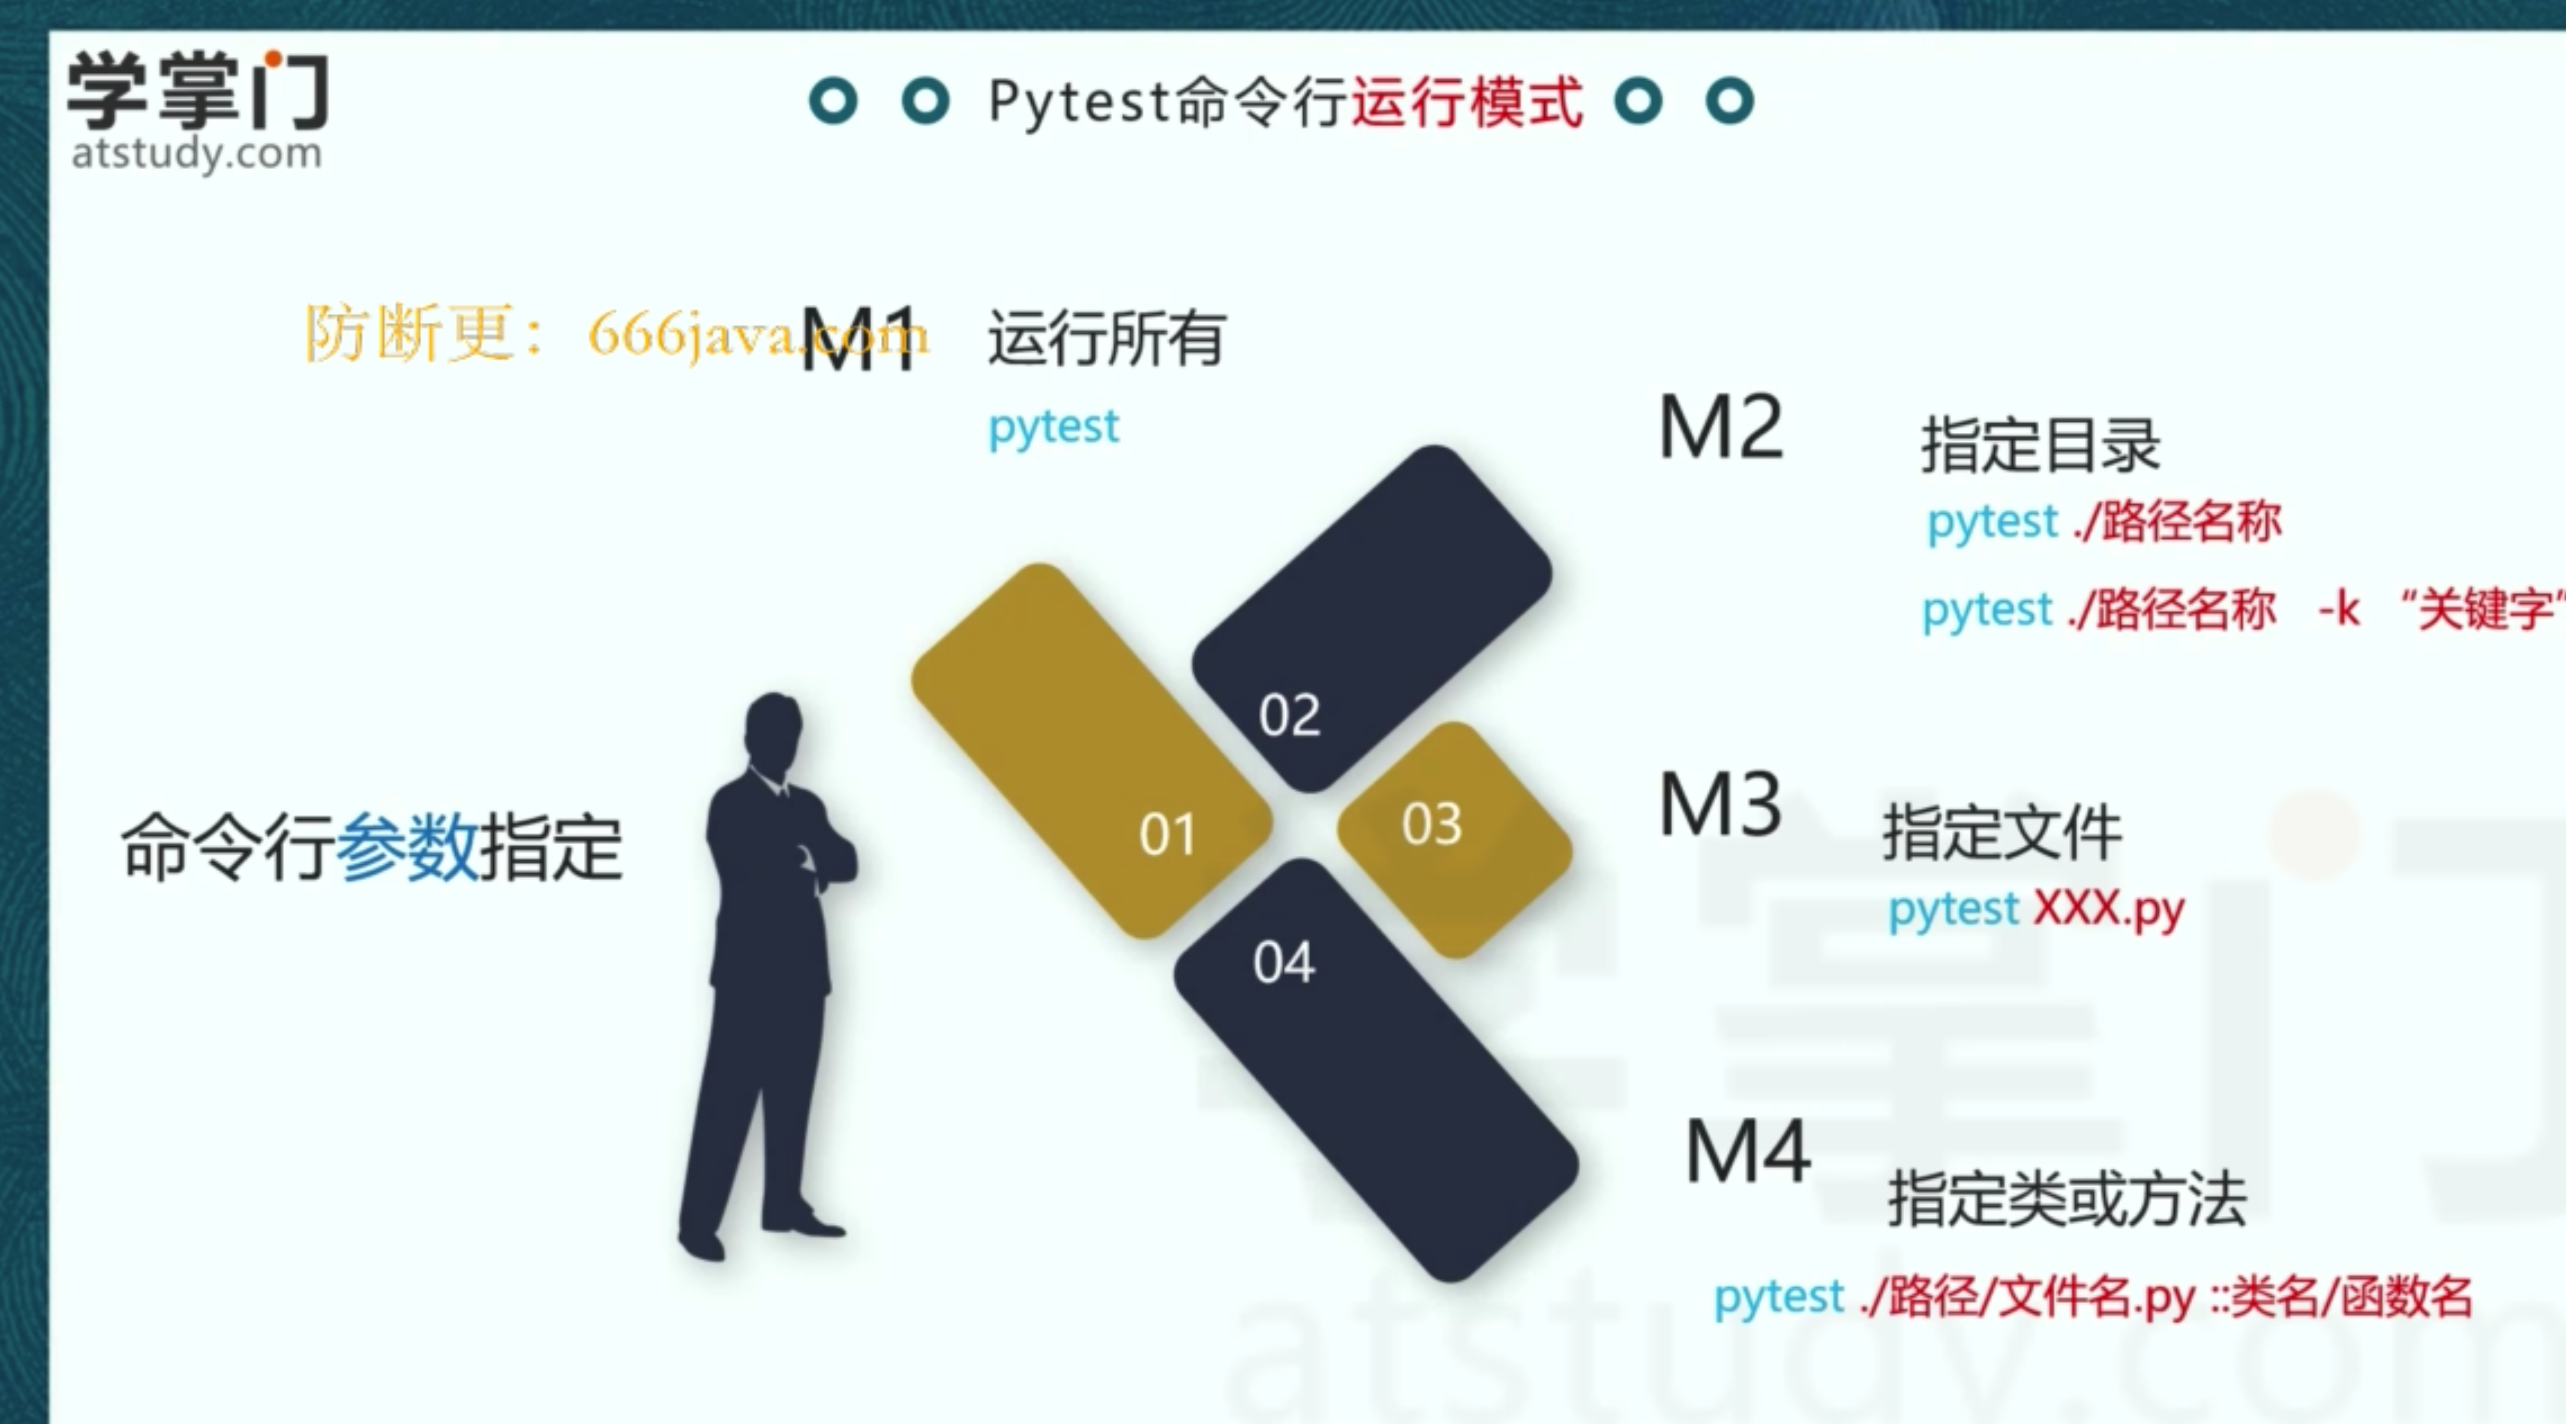
七、命令行运行模式
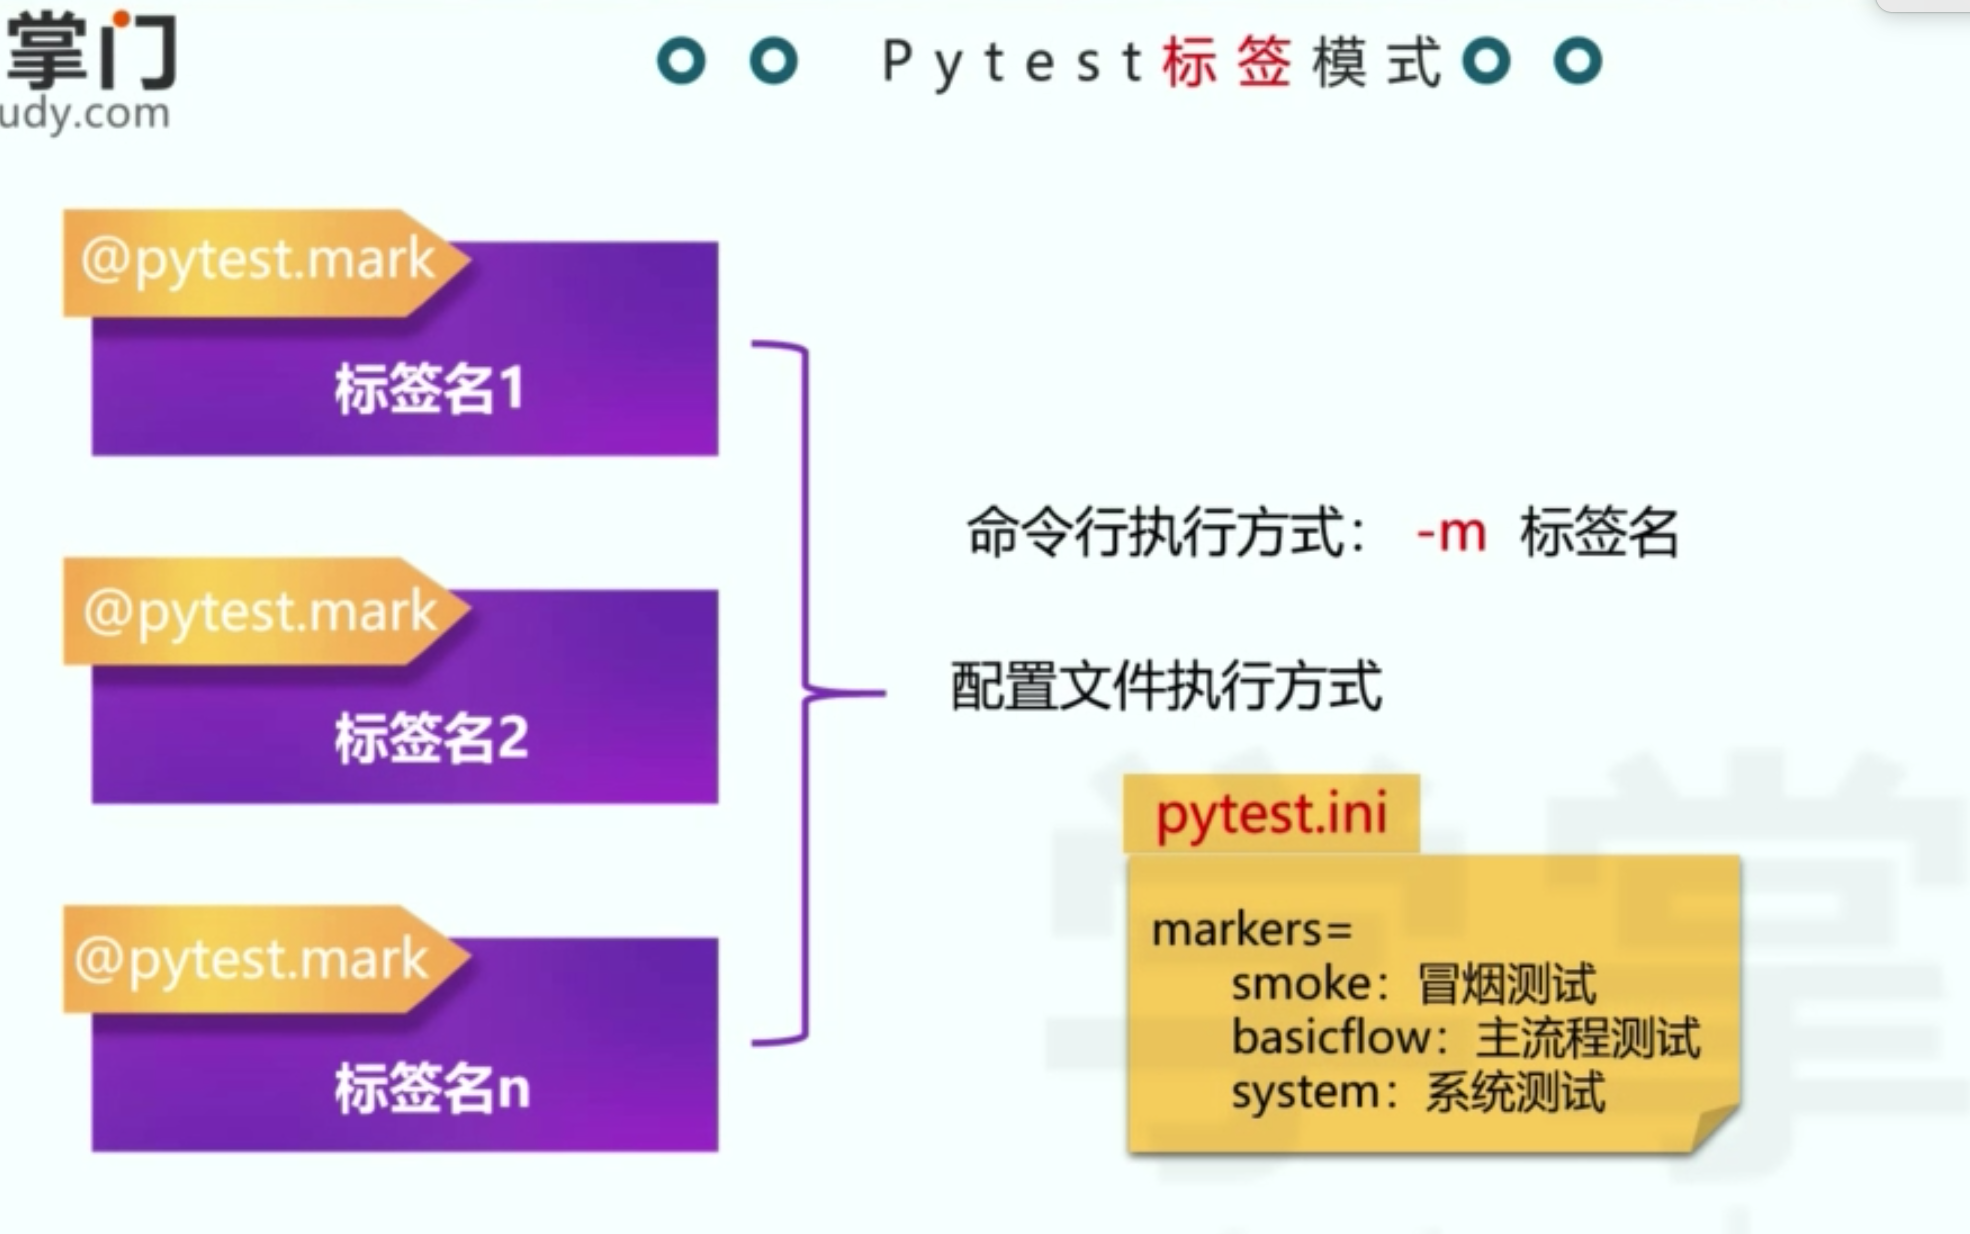
八、标签模式制定执行内容 pytest.ini (一)
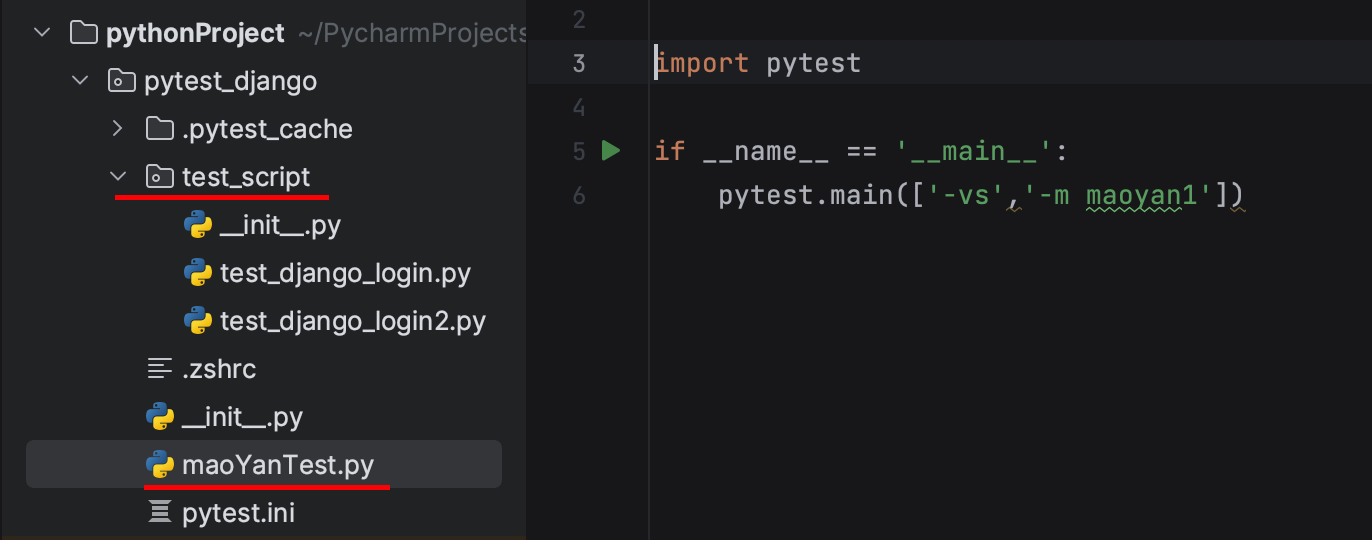
目录结构如下
pytest.ini :主要目的是去掉提示信息,不然运行结果含带warming....
[pytest]
markers=
    maoyan1:冒烟测试1
test_django_login.py
1 @pytest.mark.maoyan1
2 class Test_Django_Login2():
3     def test_login_011(self):
4         result = "9"
5         assert "9" in result
moYanTest.py :执行标签为maoyan1 的脚本
import pytest

if __name__ == '__main__':
    pytest.main(['-vs','-m maoyan1'])
九、pytest.ini (二)
 1 [pytest]
 2 markers=
 3     maoyan1:冒烟测试1
 4 addopts = -vs -m maoyan1 #制定执行命令
 5
 6 ;多个路径用空格隔开
 7 testpaths = ./test_script/test_django_login.py ./test_script/test_django_login2.py
 8
 9 ;指定文件
10 python_files = test_django_*
11
12 ;指定类名
13 python_classes = Test_Django_Login2
14
15 ;指定方法名,是独立的方法,不是类里面的方法
16 python_functions = func001
import pytest
if __name__ == '__main__':
    pytest.main()
十、全局方法DDT——fixture+conftest.py
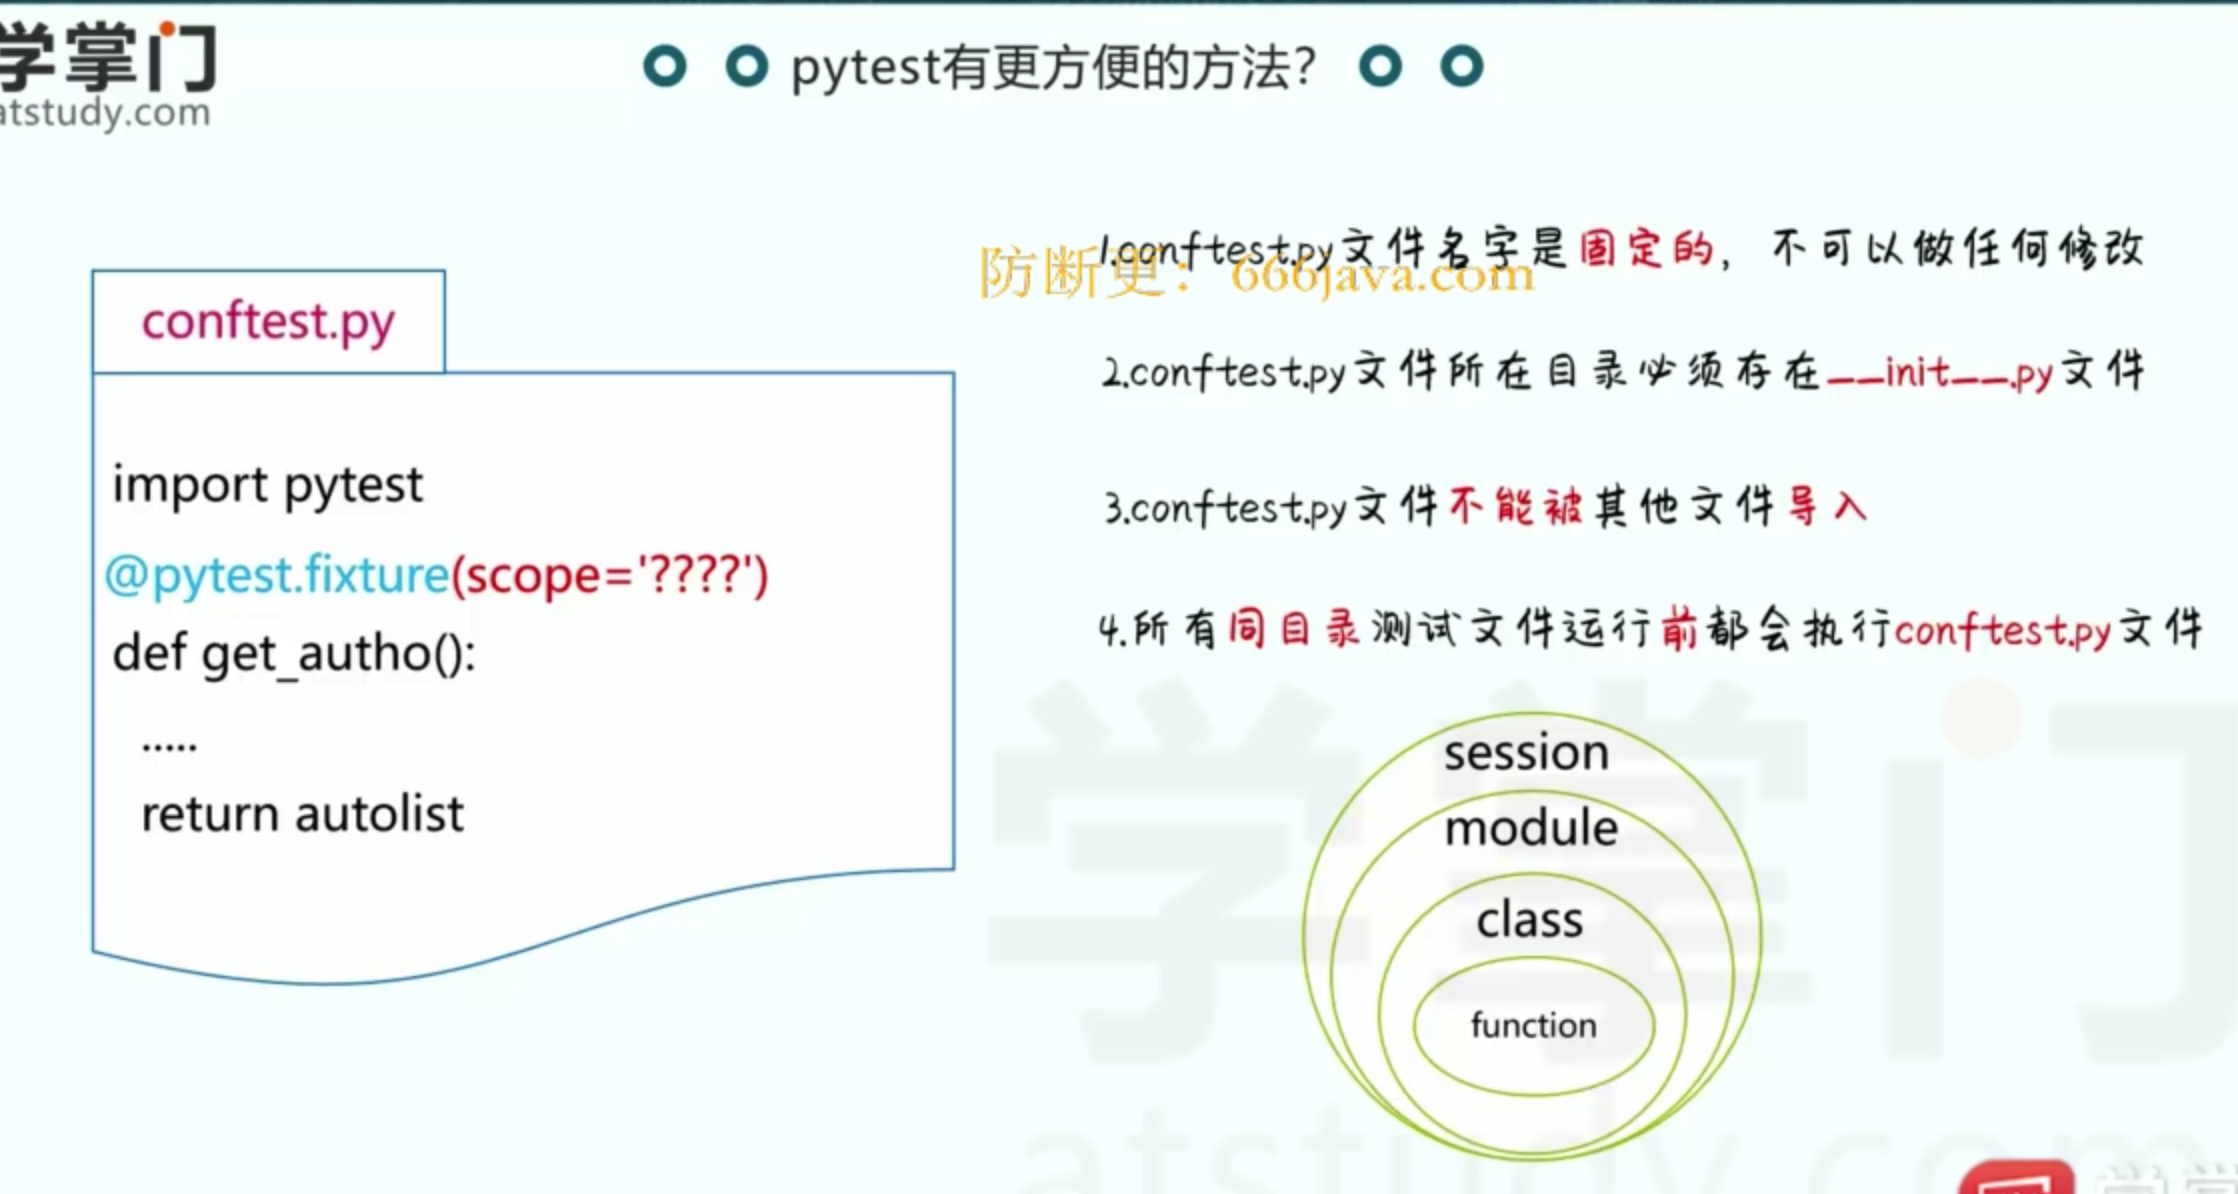
在根目录下创建文件conftest.py
1 import pytest
2
3 @pytest.fixture(scope="session")
4 def get_data():
5     return [1,2,3]
在其他文件里可以引用该方法
1 class Test_Django_Login():
2     def test_login_01(self,get_data):
3         for i in get_data:
4             print(i)
5         result = "9"
6         assert "9" in result
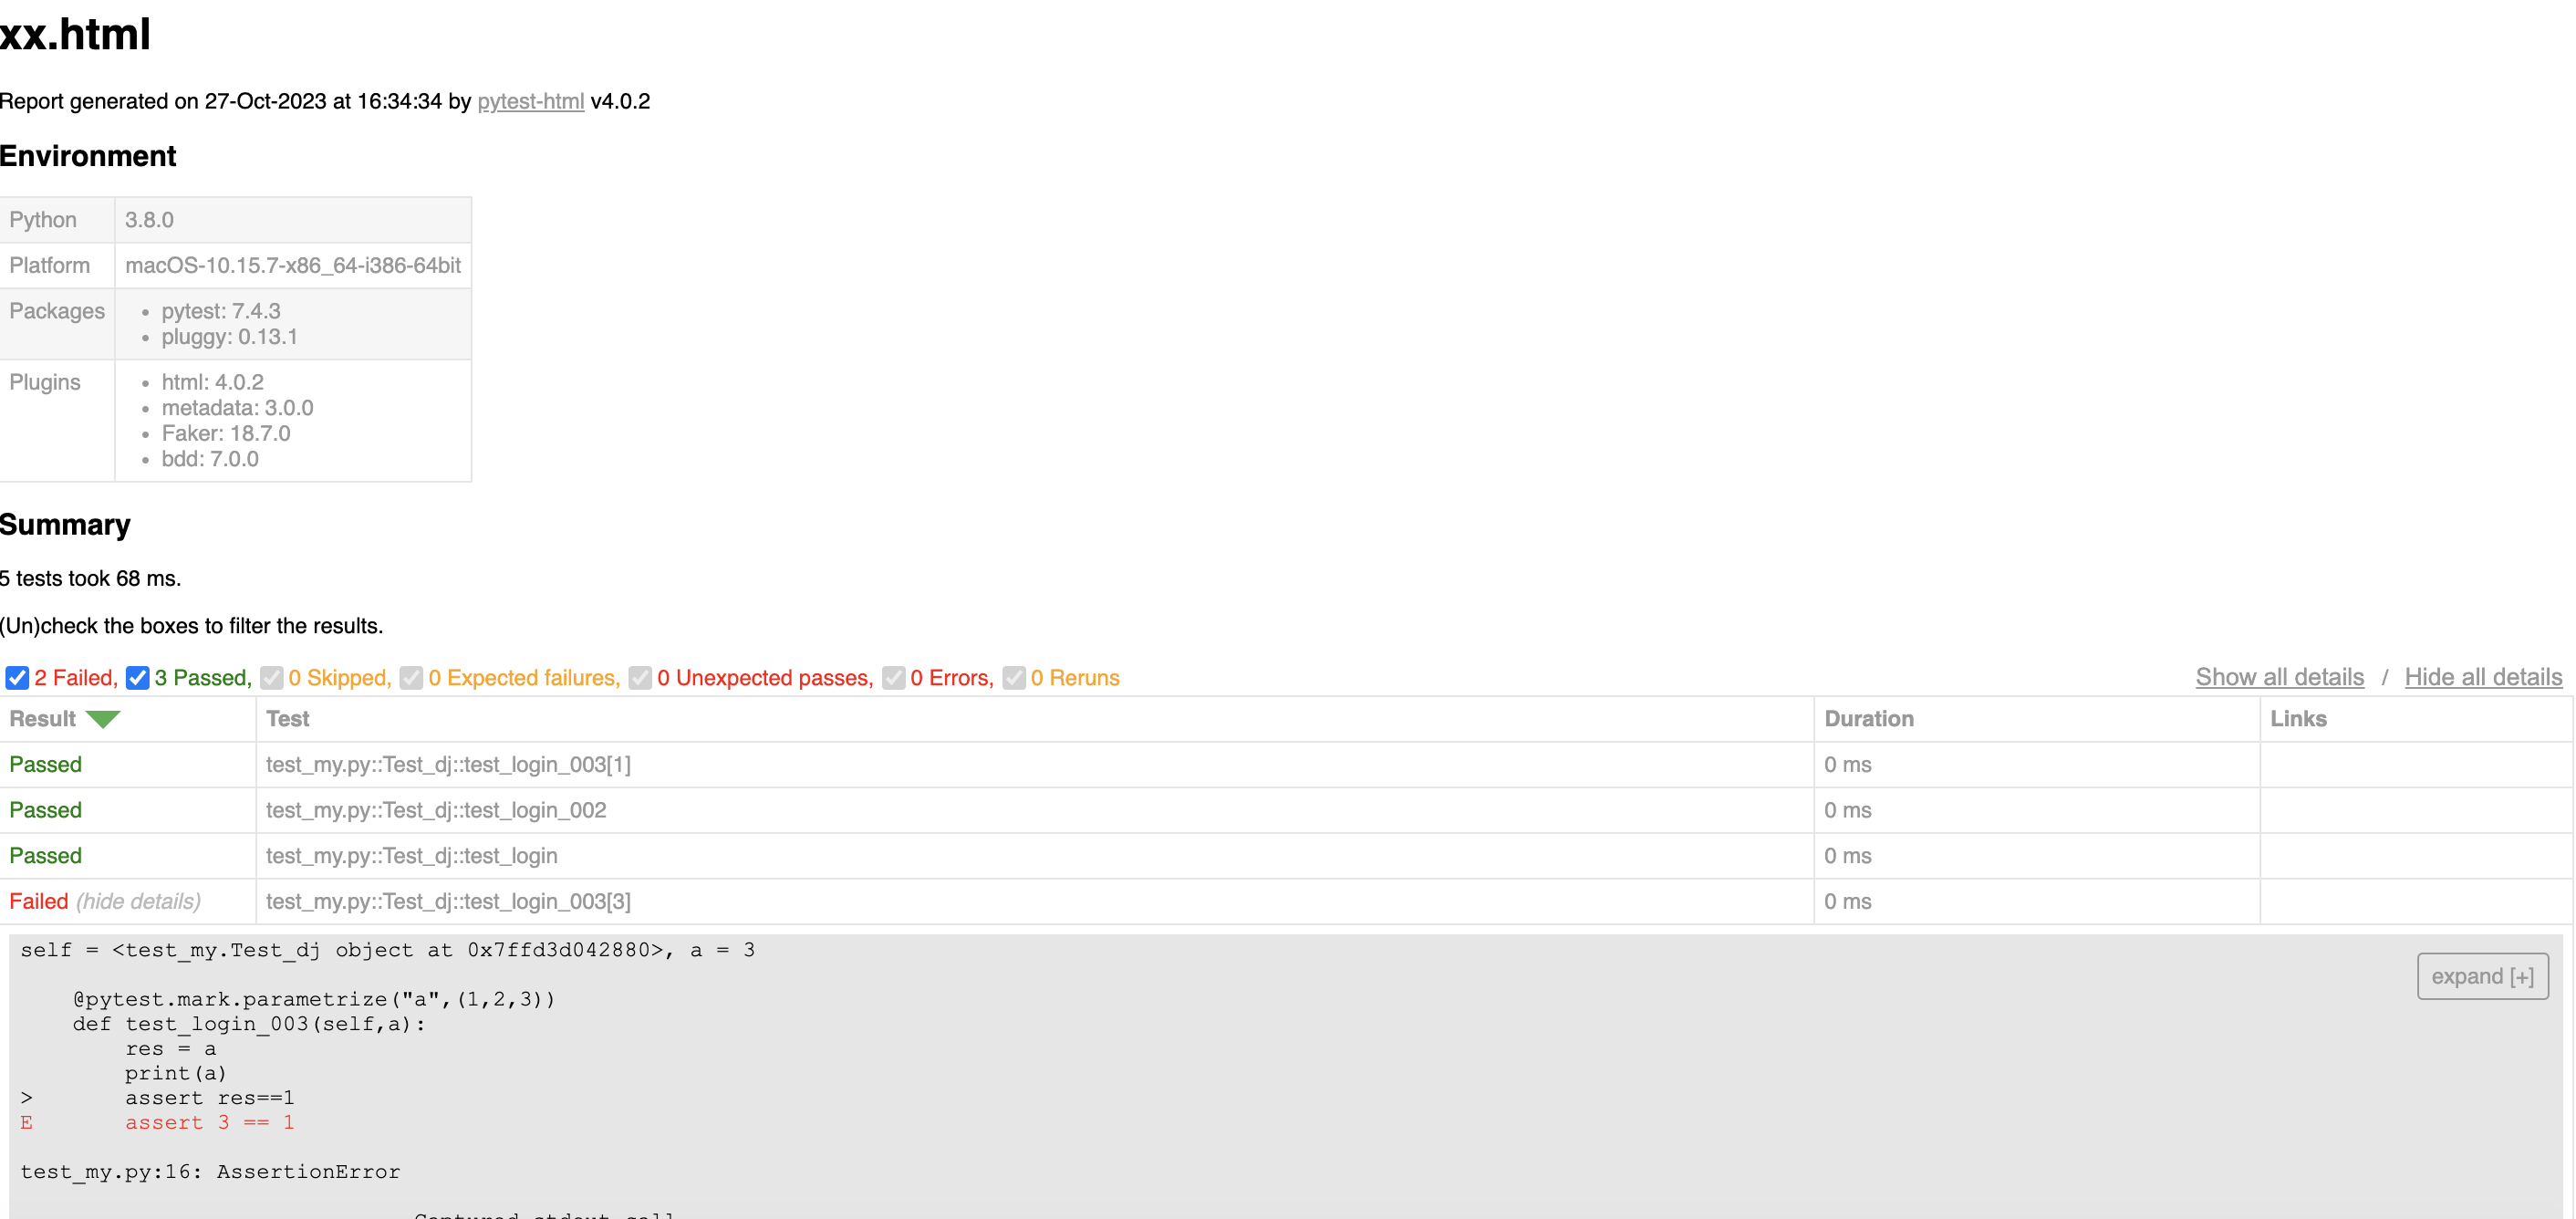
十一、pytest 自身带的报告
1、安装类库:pip install pytest-html
2、生成测试报告:pytest --html=xx.html
样式如下
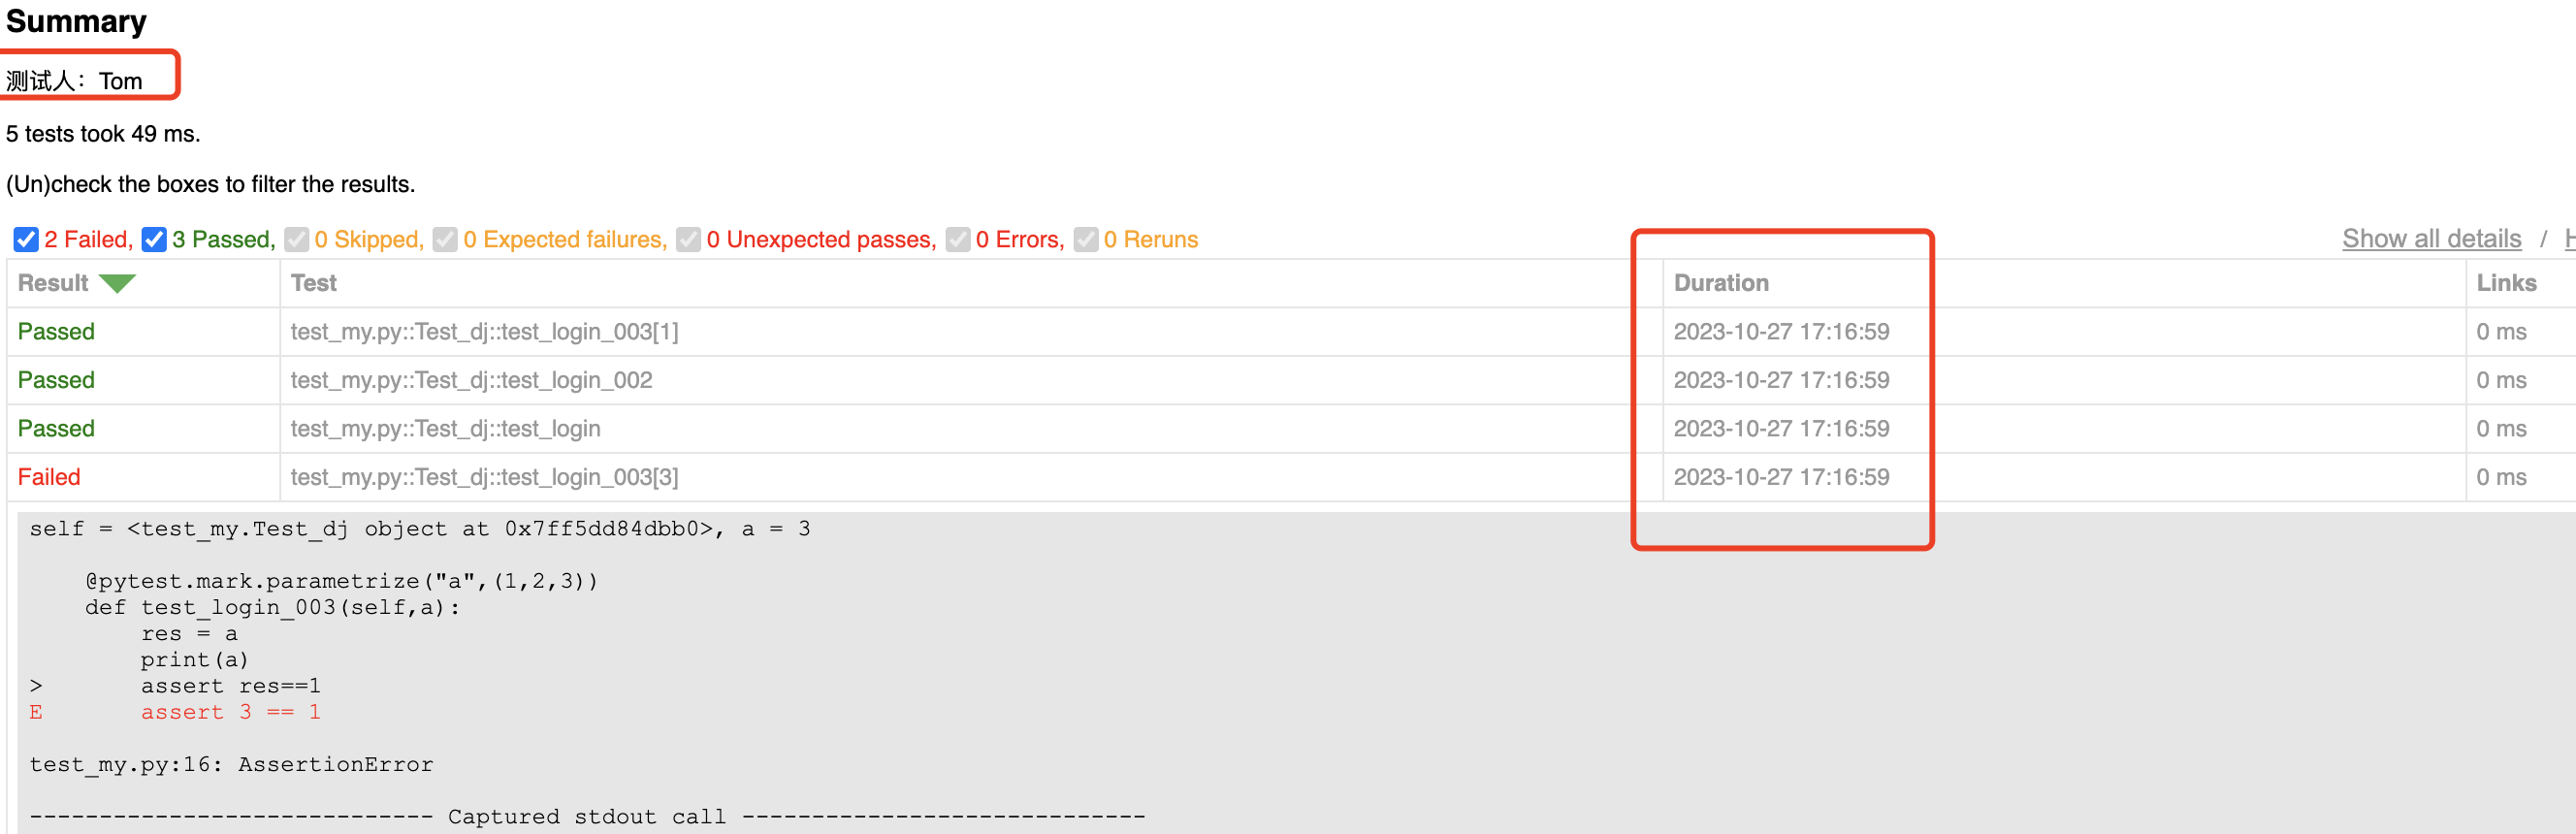
十二、pytest 自身带的报告钩子方法
在根目录下先创建conftest.py , 以下内容都在该文件里添加
添加测试人和执行时间
 1 from py._xmlgen  import html
 2 import pytest
 3 import time
 4 # 添加测试人信息
 5 @pytest.mark.optionalhook
 6 def pytest_html_results_summary(prefix,summary,postfix):
 7     prefix.extend([html.p("测试人:Tom")])
 8
 9
10 # 添加测试执行时间
11 @pytest.mark.optionalhook
12 def pytest_html_results_table_row(report,cells):
13     cells.insert(2,html.td(time.strftime("%Y-%m-%d %H:%M:%S",time.localtime()),class_="col-time"))
14     cells.pop()
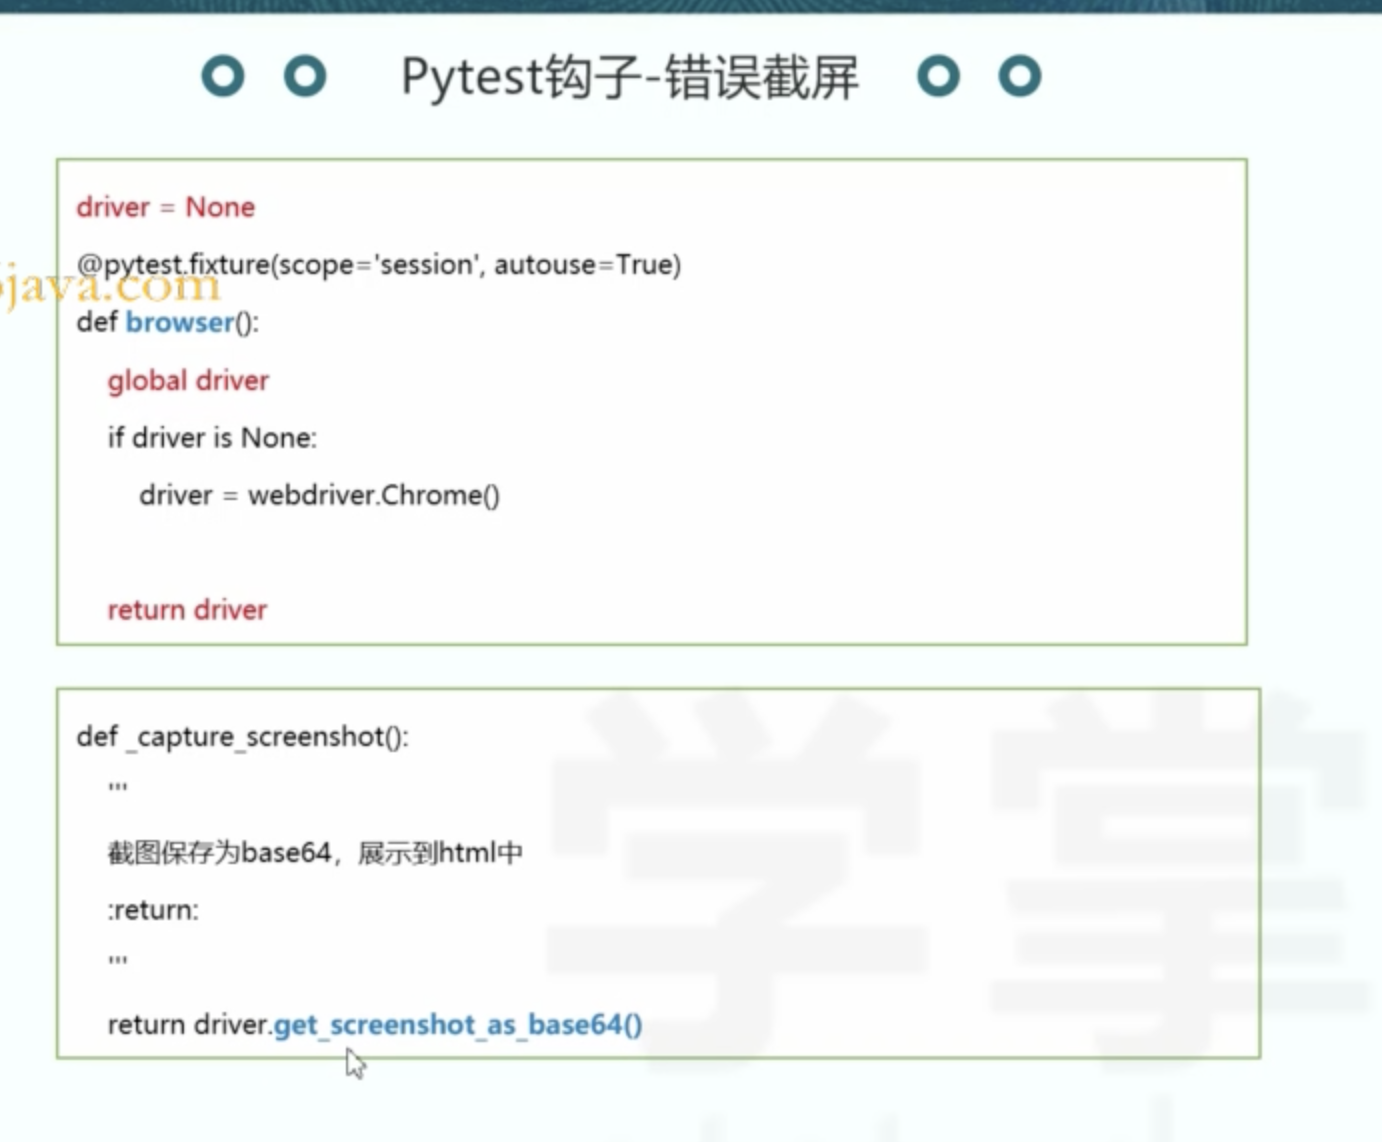
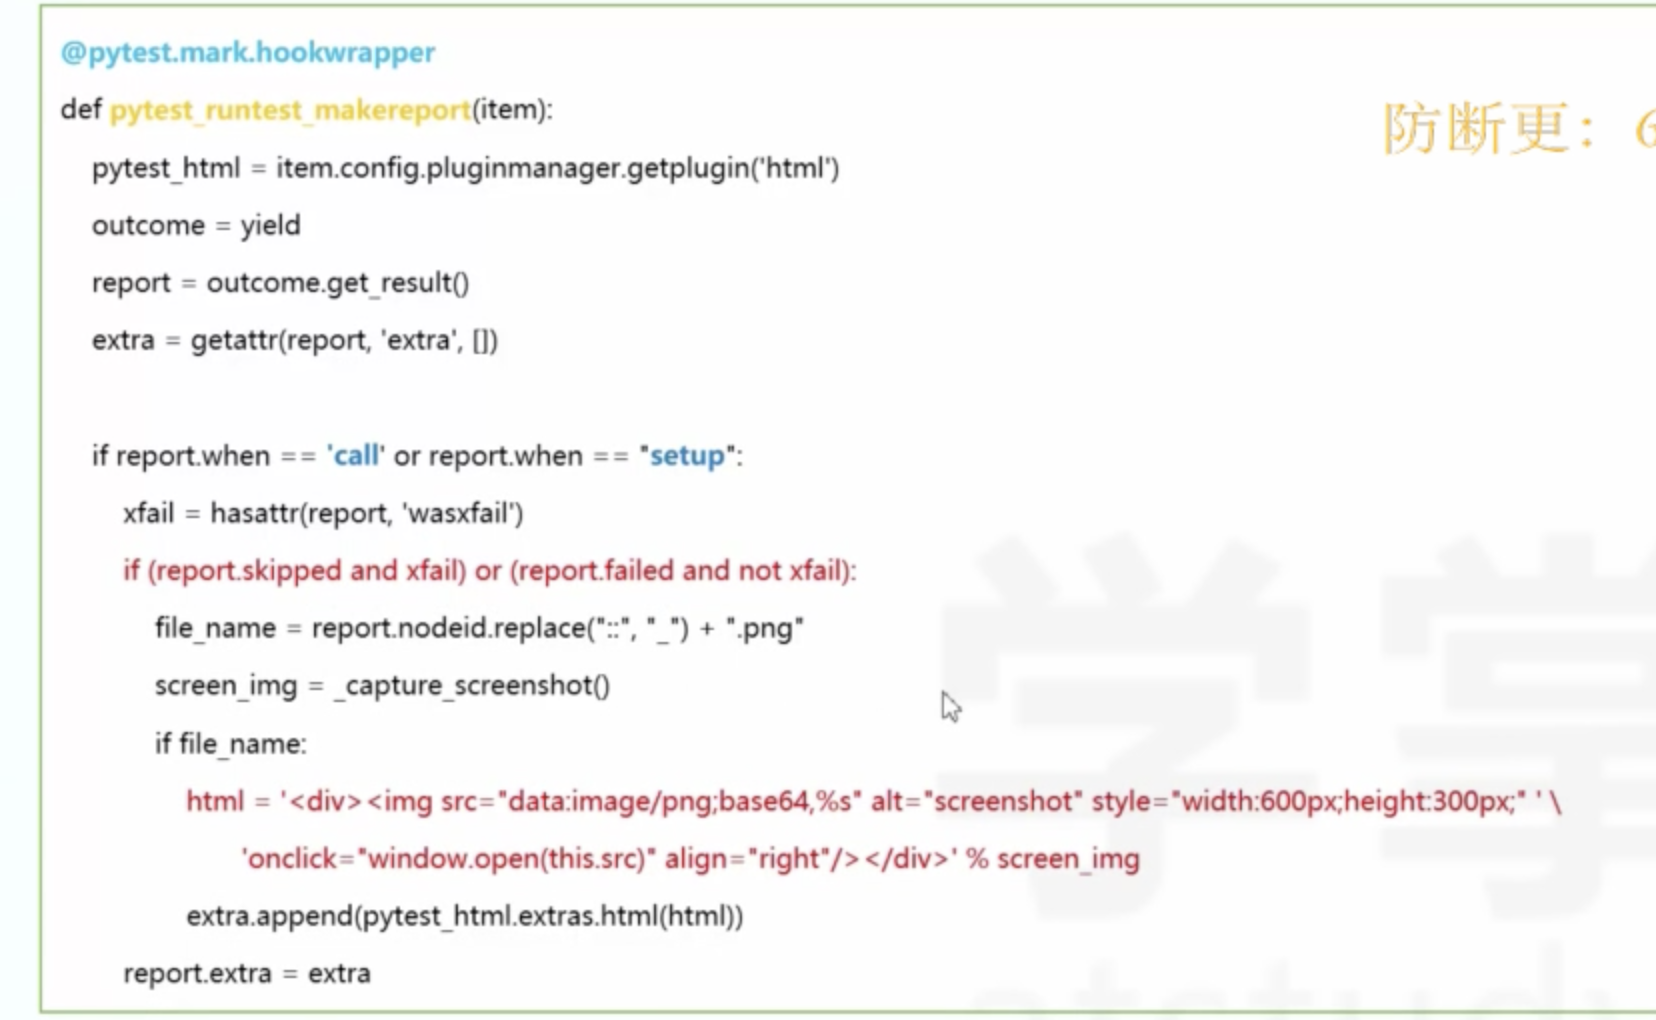
添加错误信息截图
十三、allure
下载allure
mac 安装:https://blog.csdn.net/fuxiu_/article/details/131697534
jdk下载地址官网:https://www.oracle.com/java/technologies/downloads/#jdk19-mac
生成数据:pytest test_django_login.py --alluredir ./alreport
生成报告:allure generate ./alreport

 浙公网安备 33010602011771号