

windows nginx的安装及使用
1.下载nginx
http://nginx.org/en/download.html 下载稳定版本,以nginx/Windows-1.12.2为例,直接下载 nginx-1.12.2.zip
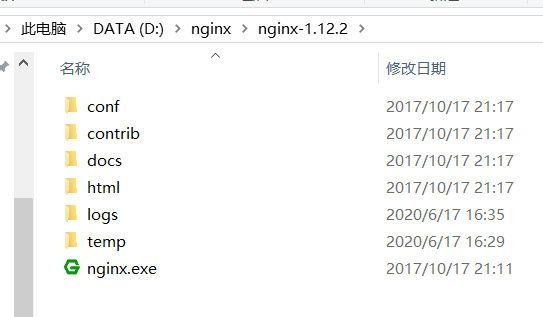
下载后解压,解压后如下
2.启动nginx
启动的方式有好几种
2.1 直接点击nginx.exe即可启动成功
注意:如果直接双击nginx.exe,这样会导致修改配置后重启、停止nginx无效,需要手动关闭任务管理器内的所有nginx进程,再启动才可以
2.2 打开cmd命令窗口,切换到当前nginx.exe目录下,输入命令 nginx.exe 或者 start nginx ,回车即可
2.3 全局启动方式,较麻烦
首先想到的是配置环境变量的方式:添加环境变量NGINX_HOME:D:\work\nginx。追加环境变量Path:%NGINX_HOME%;。 但是配置环境变量的方式并不能启动成功
这样的确可以全局使用nginx,但是仍然不能启动nginx,因为nginx的start stop reload等操作需要使用配置文件,而conf-path默认是相对路径conf/nginx.conf,所以无法启动nginx。
2.3.1
创建一个 bat 文件(我的是 nginxd.bat),使用 bat 来运行 nginx 命令。创建了之后,就可以使用如下命令:
nginxd [-h,help] [-v,version] [start] [stop] [stop -a] [reload] [reopen] [find]
@echo off
if "%1"=="help" (goto help) else (if "%1"=="-h" goto help)
if "%1"=="version" (goto version) else (if "%1"=="-v" goto version)
if "%1"=="start" goto start
if "%1"=="stop" goto stop
if "%1"=="reload" goto reloadmd
if "%1"=="reopen" goto reopen
if "%1"=="find" goto find
goto error

:help
nginx -v
echo Usage: nginxd [-h,help] [-v,version] [start] [stop] [stop -a] [reload] [reopen] [find]
echo=
echo Options:
echo   help,-h         : this help
echo   version,-v      : show current nginx version
echo   start           : start nginx master process
echo   stop            : stop the newest nginx master process
echo   stop -a         : stop all nginx master processes
echo   reload          : reload configuration
echo   reopen          : reopen nginx
echo   find            : show the nginx master process list
echo=
exit /B

:version
nginx -v
exit /B

:start
start nginx -p D:\Software\nginx
exit /B

:stop
if "%2"=="-a" (taskkill /F /IM nginx.exe) else (if "%2"=="" (nginx -s stop -p D:\Software\nginx) else goto error)
exit /B

:reload
nginx -s reload -p D:\Software\nginx
exit /B

:find
tasklist /fi "imagename eq nginx.exe"
exit /B

:error
echo nginxd: invalid option: "%1 %2"
echo=
exit /B
3.检验nginx是否启动成功
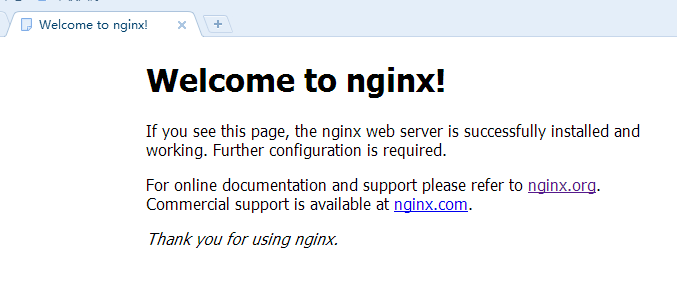
在浏览器地址栏访问网址 http://localhost:80,出现以下页面说明启动成功
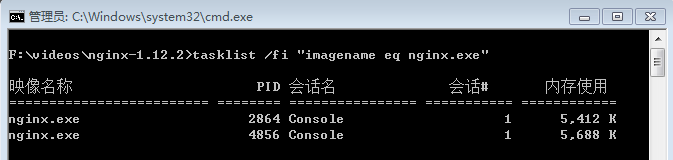
也可以在cmd命令窗口输入命令 tasklist /fi "imagename eq nginx.exe" ,出现如下结果说明启动成功
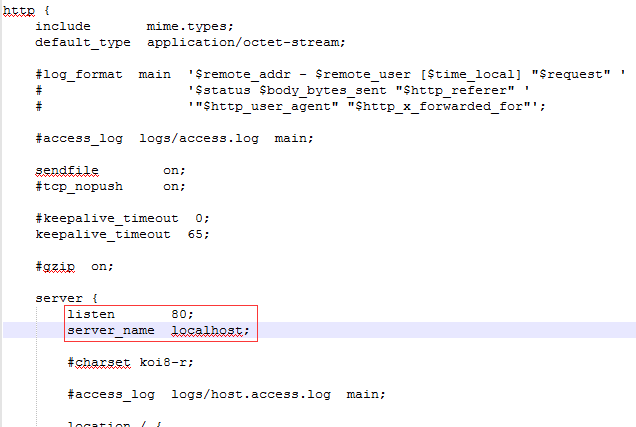
nginx的配置文件是conf目录下的nginx.conf,默认配置的nginx监听的端口为80,如果80端口被占用可以修改为未被占用的端口即可
检查80端口是否被占用的命令是: netstat -ano | findstr 0.0.0.0:80 或 netstat -ano | findstr "80"
当我们修改了nginx的配置文件nginx.conf 时,不需要关闭nginx后重新启动nginx,只需要执行命令 nginx -s reload 即可让改动生效
4.关闭nginx
如果使用cmd命令窗口启动nginx,关闭cmd窗口是不能结束nginx进程的,可使用两种方法关闭nginx
(1)输入nginx命令 nginx -s stop(快速停止nginx) 或 nginx -s quit(完整有序的停止nginx)
(2)使用taskkill taskkill /f /t /im nginx.exe
5.使用nginx代理服务器做负载均衡
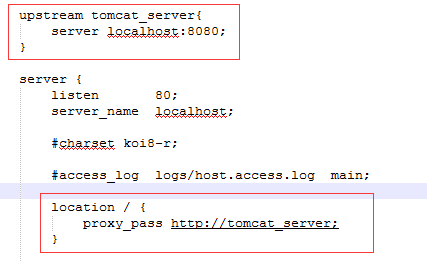
我们可以修改nginx的配置文件nginx.conf 达到访问nginx代理服务器时跳转到指定服务器的目的,即通过proxy_pass 配置请求转发地址,即当我们依然输入http://localhost:80 时,请求会跳转到我们配置的服务器
同理,我们可以配置多个目标服务器,当一台服务器出现故障时,nginx能将请求自动转向另一台服务器,例如配置如下:
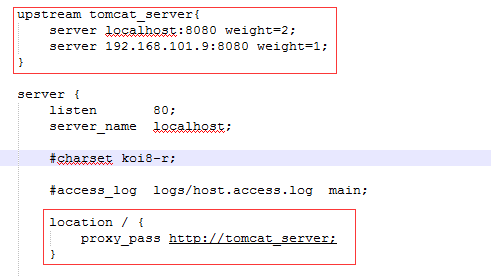
当服务器 localhost:8080 挂掉时,nginxnginx能将请求自动转向服务器 192.168.101.9:8080 。上面还加了一个weight属性,此属性表示各服务器被访问到的权重,weight
越高被访问到的几率越高。
6.nginx配置静态资源
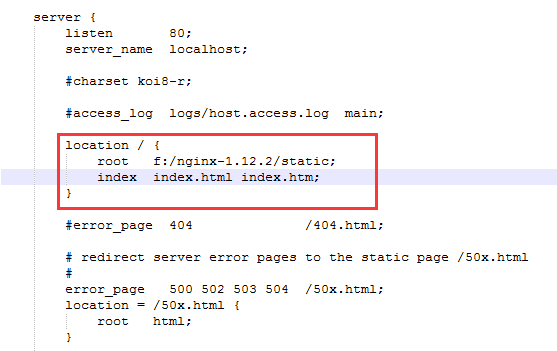
将静态资源(如jpg|png|css|js等)放在如下配置的f:/nginx-1.12.2/static目录下,然后在nginx配置文件中做如下配置(注意:静态资源配置只能放在 location / 中),浏览器中访问 http://localhost:80/1.png 即可访问到 f:/nginx-1.12.2/static目录下的 1.png图片
转载:https://www.cnblogs.com/jiangwangxiang/p/8481661.html
转载:https://www.cnblogs.com/ricolee/p/nginx.html
转载:https://blog.csdn.net/zhuojiamin/article/details/81140096
追魂夺命流水线,暗无天日鬼车间。生死轮回两班倒,废寝忘食终无言。加班加点不加薪,提桶跑路在明天!初见不知提桶意,再见已是提桶人!
本文来自博客园,作者:不可丶结缘,转载请注明原文链接:https://www.cnblogs.com/zh9311/p/13153721.html

 浙公网安备 33010602011771号