
Java-NIO之Buffer(缓冲区)
1:Buffer 是什么
Buffer(缓冲区)本质上是一个由基本类型数组构成的容器。
我们先看看Buffer类的基本构成:
public abstract class Buffer {
    // Invariants: mark <= position <= limit <= capacity
    private int mark = -1;
    private int position = 0;
    private int limit;
    private int capacity;
}
再看看子类ByteBuffer 的构成:
public abstract class ByteBuffer extends Buffer implements Comparable<ByteBuffer>{
    // These fields are declared here rather than in Heap-X-Buffer in order to
    // reduce the number of virtual method invocations needed to access these
    // values, which is especially costly when coding small buffers.
    //
    final byte[] hb;                  // Non-null only for heap buffers
    final int offset;
    boolean isReadOnly;
}
因此一个ByteBuffer 对象由基本的五大属性组成:
核心属性:
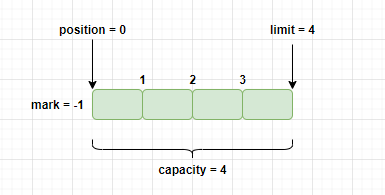
● mark 初始值为-1,用以标记当前position的位置。对应方法为 mark()。
● position 初始值为0,读、写数据的起点位置。对应方法为 position()。
● limit 界限,和position 组成可读、可写的数据操作区间。对应方法为 limit()。
● capacity 缓冲区的大小。对应方法为capacity()。
数据存储:
● hb 一个基本类型构成的数据,大小等于capacity。
2:Buffer 如何使用
核心方法:
● put() 写数据。
● get() 读数据。
● flip() 翻转。如当 put 完数据之后,调用flip s 是为了告知下次 get 数据需要读取数据区间。反过来也是一样的道理。
    public final Buffer flip() {
        limit = position;
        position = 0;
        mark = -1;
        return this;
    }
● clear() 清空。不会清除数据,但会各个属性回归初始值。
    public final Buffer clear() {
        position = 0;
        limit = capacity;
        mark = -1;
        return this;
    }
● rewind 倒带。当需要重读、重写的时候可以使用。
    public final Buffer rewind() {
        position = 0;
        mark = -1;
        return this;
    }
● remaning() 返回剩余未被处理的数量。
    public final int remaining() {
        return limit - position;
    }
假设我们声明了一个 capacity 为 5 的字节缓冲区:
ByteBuffer buf = ByteBuffer.allocate(4);
那么,缓冲区的初始状态就是如下图所示:
3:Buffer 用来干什么
Buffer(缓冲区)>Buffer(缓冲区) 常常用来于NIO的Channel进行交互。数据从缓冲区进行存放和读取。
3.1:Buffer 读文件
这里对比了两种读文件的方式。
BIO读文件(不用Buffer):
    public void ioRead() {
        FileInputStream fileInputStream = null;
        try {
            fileInputStream = new FileInputStream(new File("src/test/java/com/loper/mine/SQLParserTest.java"));
            byte[] receive = new byte[8];
            // IO 流读文件的时候不会管 byte 中的数据是否已被处理过,下一次读取直接覆盖
            while (fileInputStream.read(receive) > 0) {
                System.out.println(new String(receive));
            }
        } catch (Exception e) {
            e.printStackTrace();
        } finally {
            try {
                if (fileInputStream != null)
                    fileInputStream.close();
            } catch (IOException e) {
                e.printStackTrace();
            }
        }
    }
BufferReader读文件(用Buffer):
    public void bufferRead() {
        int capacity = 8;
        FileInputStream fileInputStream = null;
        InputStreamReader inputStreamReader = null;
        BufferedReader bufferedReader = null;
        try {
            fileInputStream = new FileInputStream(new File("src/test/java/com/loper/mine/SQLParserTest.java"));
            inputStreamReader = new InputStreamReader(fileInputStream);
            bufferedReader = new BufferedReader(inputStreamReader, capacity);

            CharBuffer receive = CharBuffer.allocate(capacity);
            char[] data = new char[capacity];
            // buffer reader 在读取数据的时候会判断buffer 中的数据是否已被清理
            while (bufferedReader.read(receive) > 0) {
                receive.flip();
                receive.get(data);
                receive.flip();
                System.out.println(new String(data));
            }
        } catch (Exception e) {
            e.printStackTrace();
        } finally {
            try {
                if (bufferedReader != null)
                    bufferedReader.close();
                if (inputStreamReader != null)
                    inputStreamReader.close();
                if (fileInputStream != null)
                    fileInputStream.close();
            } catch (IOException e) {
                e.printStackTrace();
            }
        }
    }
可以看到,当我们使用BIO时,从文件流中读取的数据使用 byte数组接收就可以了。
而使用 BufferReader之后,读取文件返回的是一个 ByteBuffer,那为什么要这么做呢?
1:使用byte[] 接收数据,我们读取之后下次再进行写入的时候是不知道是否已经读取完毕了的。下次的写入会将原本的数据直接覆盖掉。
2:使用ByteBuffer 接收文件流中的数据,在下一次数据写入前不进行 flip 或 clear 操作,那么下次写入数据时并不会更新 ByteBuffer 中的数据。
试想多线程情况下,一个线程写数据,另一个线程读数据,若数据还在未确保读完的情况下就进行下一步写入了,那么势必会丢失数据。
而使用Buffer 则很好的避免了这种情况,无论是写还是读,都需要告诉下一次读或写数据时的操作区间。byte[] 本身则是不支持这种情况的。
3.2:Buffer 与多线程
多线程下模拟数据分段读、写:
    public static void main(String[] args) {
        ThreadPoolExecutor executor = new ThreadPoolExecutor(2, 2, 1L, TimeUnit.SECONDS, new ArrayBlockingQueue<>(10));

        String bufferData = "hello world";
        int capacity = 4;
        // 默认使用分配堆内存分配缓冲区空间(非直接缓冲区)
        //ByteBuffer buffer = ByteBuffer.allocate(capacity);
        // 使用直接内存分配缓冲区空间(直接缓冲区)
        ByteBuffer buffer = ByteBuffer.allocateDirect(capacity);

        Semaphore semaphore1 = new Semaphore(0);
        Semaphore semaphore2 = new Semaphore(0);
        // 写操作
        executor.execute(() -> {
            int index = 0, len = bufferData.length();
            while (index < len) {
                try {
                    System.out.println("put数据开始----------------");
                    print(buffer);
                    int endIndex = index + capacity;
                    if (endIndex > len)
                        endIndex = len;

                    // 存之前先清空buffer
                    buffer.clear();
                    buffer.put(bufferData.substring(index, endIndex).getBytes());

                    System.out.println("put数据结束----------------");
                    print(buffer);
                    System.out.println("\n");
                    // 存完告诉读线程可读区域大小
                    buffer.flip();

                    index += capacity;
                } catch (Exception e) {
                    e.printStackTrace();
                    break;
                } finally {
                    semaphore2.release();
                    try {
                        semaphore1.tryAcquire(3, TimeUnit.SECONDS);
                    } catch (InterruptedException e) {
                        e.printStackTrace();
                    }
                }
            }
        });

        // 读操作
        executor.execute(() -> {
            StringBuilder value = new StringBuilder();
            int i = 0;
            while (i < bufferData.length()) {
                try {
                    semaphore2.tryAcquire(3, TimeUnit.SECONDS);
                    System.out.println("get数据开始----------------");
                    print(buffer);

                    byte[] bytes = new byte[buffer.limit()];
                    buffer.get(bytes);
                    value.append(new String(bytes));

                    System.out.println("get数据结束----------------");
                    print(buffer);
                    System.out.println("\n");

                    i += bytes.length;
                } catch (Exception e) {
                    e.printStackTrace();
                    break;
                } finally {
                    semaphore1.release();
                }
            }

            // 完整读取到的buffer数据
            System.out.println("完整读取到的buffer数据:" + value.toString());
            buffer.clear();
            print(buffer);
        });

        executor.shutdown();
    }

    private static void print(Buffer buffer) {
        System.out.println("position=" + buffer.position());
        System.out.println("limit   =" + buffer.limit());
        System.out.println("capacity=" + buffer.capacity());
        System.out.println("mark    :" + buffer.mark());
    }
日志太长,就不全截图了,如下为最终输出:
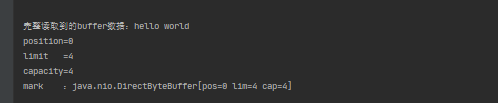
以上代码模拟了写线程需要往 buffer 中分段写入 ‘hello word’,而读线程则需要从 buffer 中分段读取,并输出最终的数据。
个人思考:
从这也联想到了ftp传输数据时也是分段、按序进行传输的,也不是一次性将数据一股脑全部丢过去的,这应该就是 Buffer(缓冲区)的作用吧。
4:Buffer 缓冲区类型
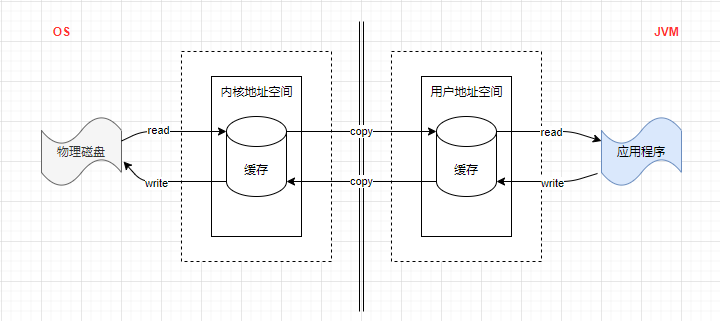
4.1:非直接缓冲区
缓冲区空间由JVM内存进行分配。
非直接缓冲区属于常规操作,传统的 IO 流和 allocate() 方法分配的缓冲区都是非直接缓冲区,建立在 JVM 内存中。
    public static ByteBuffer allocate(int capacity) {
        if (capacity < 0)
            throw new IllegalArgumentException();
        return new HeapByteBuffer(capacity, capacity);
    }
这种常规的非直接缓冲区会将内核地址空间中的内容拷贝到用户地址空间(中间缓冲区)后再由程序进行读或写操作,换句话说,磁盘上的文件在与应用程序交互的过程中会在两个缓存中来回进行复制拷贝。
如图:
4.2:直接缓冲区
缓冲区空间由物理内存直接分配。
直接缓冲区绝大多数情况用于显著提升性能,缓冲区直接建立在物理内存(相对于JVM 的内存空间)中,省去了在两个存储空间中来回复制的操作,可以通过调用 ByteBuffer 的 allocateDirect() 工厂方法来创建。
    public static ByteBuffer allocateDirect(int capacity) {
        return new DirectByteBuffer(capacity);
    }
直接缓冲区中的内容可以驻留在常规的垃圾回收堆之外,因此它们对应用程序的内存需求量造成的影响可能并不明显。
另外,直接缓冲区还可以通过 FileChannel 的 map() 方法将文件直接映射到内存中来创建,
该方法将返回 MappedByteBuffer(DirectByteBuffer extends MappedByteBuffer)。
直接或非直接缓冲区只针对字节缓冲区而言。字节缓冲区是那种类型可以通过 isDirect() 方法来判断。
如图:
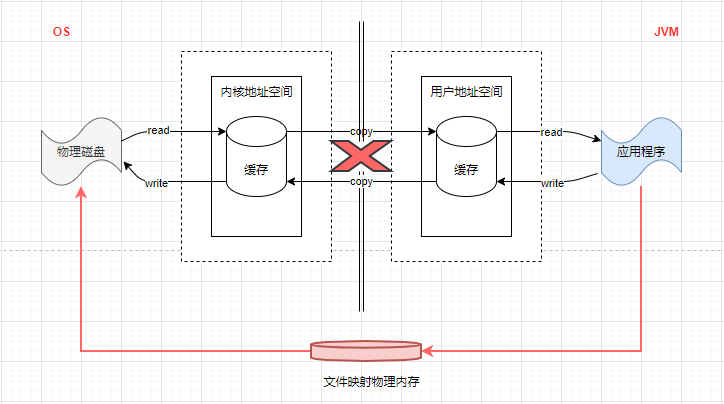
map 和 read 的区别:
1:map 不会进行数据拷贝,会在物理内存开辟一块文件映射区域,只占用物理内存。
ByteBuffer buffer = inChannel.map(FileChannel.MapMode.READ_ONLY, 0, file.length());
2:read 会进行数据拷贝,会占用用户内存空间。
            ByteBuffer buffer = ByteBuffer.allocate(8);
            // read 会进行数据拷贝,会占用用户内存空间。
            inChannel.read(buffer);
4.3:问答区域
1:DirectByteBuffer 比 HeapByteBuffer 更快吗?
不是。

本文参考文章:
1:面试官:Java NIO 的 Buffer 缓冲区,你了解多少?
2:Java NIO direct buffer的优势在哪儿?
3:基于NIO的Socket通信(使用Java NIO的综合示例讲解)

 浙公网安备 33010602011771号