SpringMVC第三天
SpringMVC第三天
一、文件上传
1)导入相应的jar包

2)jsp网页
表单必须是post提交,编码必须是multipart/form-data 文件上传文本框必须起名。

3)在springmvc中配置文件上传解析器。
   <!-- 配置文件上传解析器 -->
    <bean id="multipartResolver" class="org.springframework.web.multipart.commons.CommonsMultipartResolver">
        <!-- 设置文件上传的 大小 字节 -->
        <property name="maxUploadSize" value="209715200"></property>
    </bean>
4)在控制层处理代码
新建一个UploadController类
package com.zhiyou100.zfx.controller;

import java.io.File;
import java.io.IOException;

import javax.servlet.http.HttpServletRequest;

import org.apache.commons.io.FileUtils;
import org.springframework.stereotype.Controller;
import org.springframework.web.bind.annotation.RequestMapping;
import org.springframework.web.multipart.MultipartFile;

import com.zhiyou100.zfx.bean.Student;

@Controller
public class UploadController {

    @RequestMapping("upload")
    public String upload(MultipartFile myfile, HttpServletRequest request,Student stu) {

        // 1.获取文件上传真实保存的路径
        String path = request.getServletContext().getRealPath("/upload");
        System.out.println(path);

        // 2.创建一个文件对象
        File file = new File(path);
        if (!file.exists()) { // 该路径不存在
            file.mkdirs();
        }

        // 获取文件名
        String filename = System.currentTimeMillis() + myfile.getOriginalFilename();

        stu.setPhoto("upload/"+filename);

        File targetFile = new File(path + "/" + filename);

        try {
        // 把为文件写入到指定的目录下
            FileUtils.writeByteArrayToFile(targetFile, myfile.getBytes());
        } catch (IOException e) {
            e.printStackTrace();
        }

        request.setAttribute("stu", stu);

        return "list";
    }
}
5)前端页面显示图片
<img src="/Spring5/${stu.photo}"/>

<!--
        Spring5    工程名
        ${stu.photo}    request保存的路径

-->
二、拦截器
- 创建一个类 实现接口 HandlerInterceptor
- 重写接口的中方法
- 把创建的类配置到springmvc文件中。
package com.zhiyou100.zfx.interceptor;

import javax.servlet.http.HttpServletRequest;
import javax.servlet.http.HttpServletResponse;

import org.springframework.web.servlet.HandlerInterceptor;
import org.springframework.web.servlet.ModelAndView;

public class MyInterceptor implements HandlerInterceptor {

    @Override
    public void afterCompletion(HttpServletRequest arg0, HttpServletResponse arg1, Object arg2, Exception arg3)
            throws Exception {


    }

    @Override
    public void postHandle(HttpServletRequest arg0, HttpServletResponse arg1, Object arg2, ModelAndView arg3)
            throws Exception {


    }

    @Override
    public boolean preHandle(HttpServletRequest request, HttpServletResponse response, Object arg2) throws Exception {

        Object attribute = request.getSession().getAttribute("name");

        if (attribute != null) {
            return true;
        } else {
            response.sendRedirect("toLogin");
            return false;
        }

    }

}
  <!-- 配置拦截器 -->
    <mvc:interceptors>
        <mvc:interceptor>
         <!--拦截的方法-->
            <mvc:mapping path="/user/**"/>
         <!--user下不想被拦截的方法-->
            <mvc:exclude-mapping path="/user/toLogin"/>
            <mvc:exclude-mapping path="/user/toRegister"/>
            <bean id="myInterceptor" class="com.zhiyou100.zfx.interceptor.MyInterceptor"></bean>
        </mvc:interceptor>
    </mvc:interceptors>
三、数据校验(后台校验)
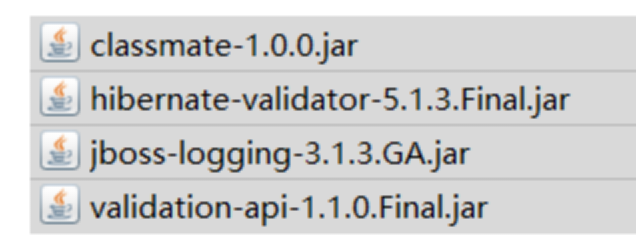
1)引入jar包
2)在相应的实体类中加入注解
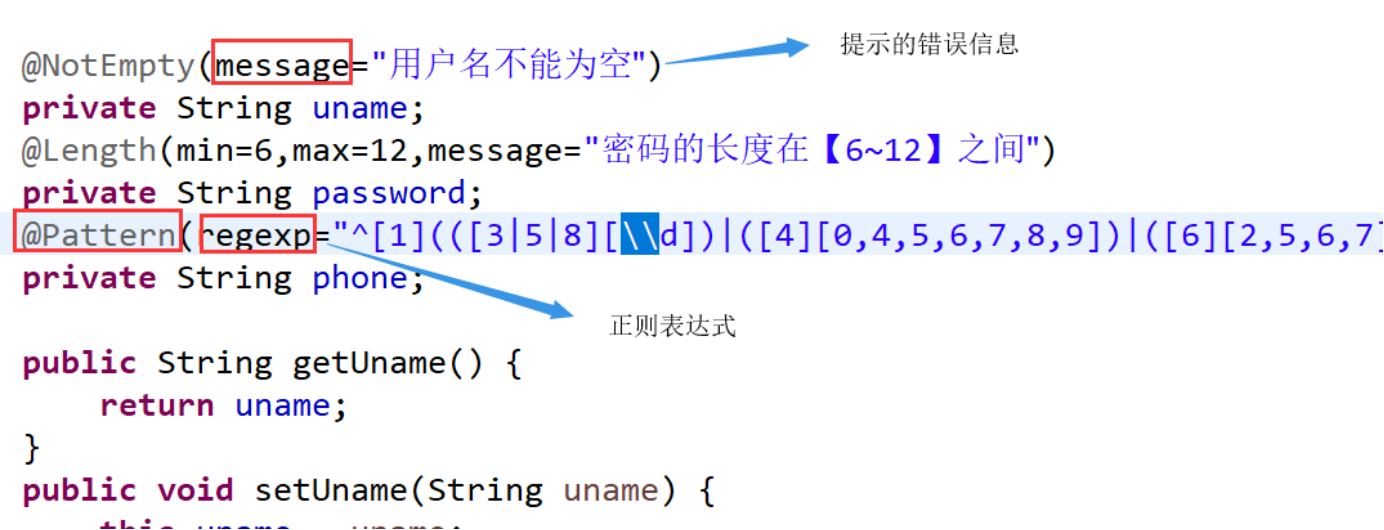
Bean Validation 中内置的 constraint :详情见https://blog.csdn.net/y550918116j/article/details/78258916
3)在控制层接收参数时
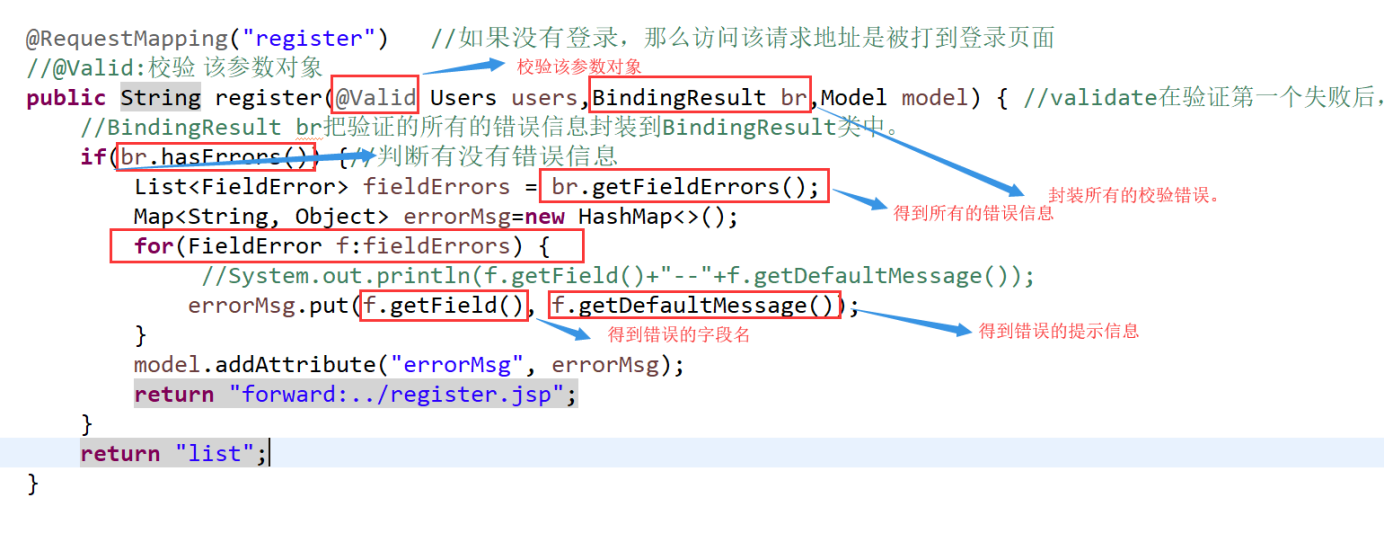
4)前端页面显示错误信息


 浙公网安备 33010602011771号