
Salesforce LWC学习(三十六) Quick Action 支持选择 LWC了
本篇参考:
https://developer.salesforce.com/docs/component-library/documentation/en/lwc/lwc.use_quick_actions
背景: 我们现在项目越来越多的使用 lwc 进行了前端开发,当然我们知道lwc并不能所有的场景都支持自己玩,比如组件之间的navigation、 quick action等都需要通过aura进行操作,aura套用lwc来实现。好消息是随着salesforce的release对lwc的不断发力,越来越多的功能可以通过lwc来使用。
一. lwc 适配 Quick Action的两个类型
首先我们先想一下我们通过Aura使用到Quick Action的场景,总结起来可以简单的归到2点:
1. 弹出一个popup modal,modal中展示一个UI,不管是一个可以用于修改的表单,还是展示只读内容然后有操作按钮等等,这些都无所谓了,重点是有UI的内容,展示modal;
2. 点击以后执行一个web service或者做一个跳转操作,用户不希望弹出来modal,只是希望进行即可。
当然,不同的甲方不同的需求会有不同的实现方案,但是Quick Action当我们选择 Aura的时候,通常这两个大的类型就可以搞定的。切回到 lwc,同样官方也提供了这两个类似的模式。
- ScreenAction: 用于声明一个有popup modal的UI的quick action;
- Action: 无UI的quick action。
这两种配置是配置到js-meta.xml里面。配置信息如下:
ScreenAction: 以下的配置是 ScreenAction的配置,主要有几个点:
- apiVersion建议选择52.0,如果有后续的release,当然也可以选择这个值即以上,目前来讲,选择52.0,尝试了一下,如果选择50、51也可以保存,但是为了考虑未知的风险,尽量还是按照规矩来;
- target设置成 lightning__RecordAction:这个是52 release新有的配置项,需要了解的一点是,如果使用 lwc的quick action,只支持 record 的quick action,global action是不支持的;
- targetConfig中配置的 actionType为 ScreenAction,当然,如果不配置 targetConfig,默认也是 ScreenAction,所以我们在配置时,默认可以不配置targetConfigs部分;
<?xml version="1.0" encoding="UTF-8" ?>
<LightningComponentBundle xmlns="http://soap.sforce.com/2006/04/metadata">
   <apiVersion>52.0</apiVersion>
   <isExposed>true</isExposed>
   <targets>
       <target>lightning__RecordAction</target>
   </targets>
    <targetConfigs>
   <targetConfig targets="lightning__RecordAction">
     <actionType>ScreenAction</actionType>
   </targetConfig>
 </targetConfigs>
</LightningComponentBundle>
Action:和上述的区别只是 actionType为 Action,如果想要选择 Action类型,则下述所有的内容都无法省略。
<?xml version="1.0" encoding="UTF-8" ?>
<LightningComponentBundle xmlns="http://soap.sforce.com/2006/04/metadata">
   <apiVersion>52.0</apiVersion>
   <isExposed>true</isExposed>
   <targets>
       <target>lightning__RecordAction</target>
   </targets>
    <targetConfigs>
   <targetConfig targets="lightning__RecordAction">
     <actionType>Action</actionType>
   </targetConfig>
 </targetConfigs>
</LightningComponentBundle>
二. ScreenAction的使用
配置篇已经搞定,接下来就搞一下UI,根据官方的demo,我们做一下contact的编辑的一个component quick action。
screenActionSample.js: 主要用于contact的获取数据以及编辑。这里面有两个关键点。
- CloseActionScreenEvent是salesforce lwc提供的关闭action的事件,类似于aura的e.force:closeQuickAction。同样,如果lwc想要关闭,只需要this.dispatchEvent(new CloseActionScreenEvent());即可,类似于aura的$A.get("e.force:closeQuickAction").fire();
- 我们无法捕捉到X这个关闭按钮,所以同样也没法在这个操作中监听事件(如果大神们可以监听到,麻烦告知,我这里在修改)。
import { LightningElement, api, wire,track } from 'lwc';
import { getRecord, getFieldValue } from 'lightning/uiRecordApi';
import { updateRecord } from 'lightning/uiRecordApi';
import { CloseActionScreenEvent } from 'lightning/actions';
import { ShowToastEvent } from 'lightning/platformShowToastEvent';
import FNAME_FIELD from '@salesforce/schema/Contact.FirstName';
import LNAME_FIELD from '@salesforce/schema/Contact.LastName';
import PHONE_FIELD from '@salesforce/schema/Contact.Phone';
import ID_FIELD from '@salesforce/schema/Contact.Id';

const FIELDS = [FNAME_FIELD, LNAME_FIELD, PHONE_FIELD];
export default class screenActionSample extends LightningElement {
    disabled = false;
    @api recordId;
    @api objectApiName;

    contact;

    @track firstName;

    @track lastName;

    @track phone;

    @wire(getRecord, { recordId: '$recordId', fields: FIELDS })
    wiredRecord({ error, data }) {
        if (error) {
            //TODO
        }  else if (data) {
            this.contact = data;
            this.firstName = this.contact.fields.FirstName.value;
            this.lastName = this.contact.fields.LastName.value;
            this.phone = this.contact.fields.Phone.value;
        }
    }

    handleCancel(event) {
       // Add your cancel button implementation here
       this.dispatchEvent(new CloseActionScreenEvent());
    }

    handleChange(event) {
       let source = event.target.name;
       if(source === 'firstName') {
               this.firstName = event.target.value;
       } else if(source === 'lastName') {
               this.lastName = event.target.value;
       } else if(source === 'phone') {
               this.phone = event.target.value;
       }
   }

    handleSubmit(e) {
        // Add your updateRecord implementation
        const fields = {};
        fields[ID_FIELD.fieldApiName] = this.recordId;
        fields[FNAME_FIELD.fieldApiName] = this.firstName;
        fields[LNAME_FIELD.fieldApiName] = this.lastName;
        fields[PHONE_FIELD.fieldApiName] = this.phone;
        const recordInput = { fields };
        console.log(JSON.stringify(recordInput));
        updateRecord(recordInput)
                .then(() => {
                    this.dispatchEvent(
                        new ShowToastEvent({
                            title: 'Success',
                            message: 'Contact updated',
                            variant: 'success'
                        })
                    );
                    this.dispatchEvent(new CloseActionScreenEvent());
                })
                .catch(error => {
                    this.dispatchEvent(
                        new ShowToastEvent({
                            title: 'Error creating record',
                            message: error.body.message,
                            variant: 'error'
                        })
                    );
                });
    }
}
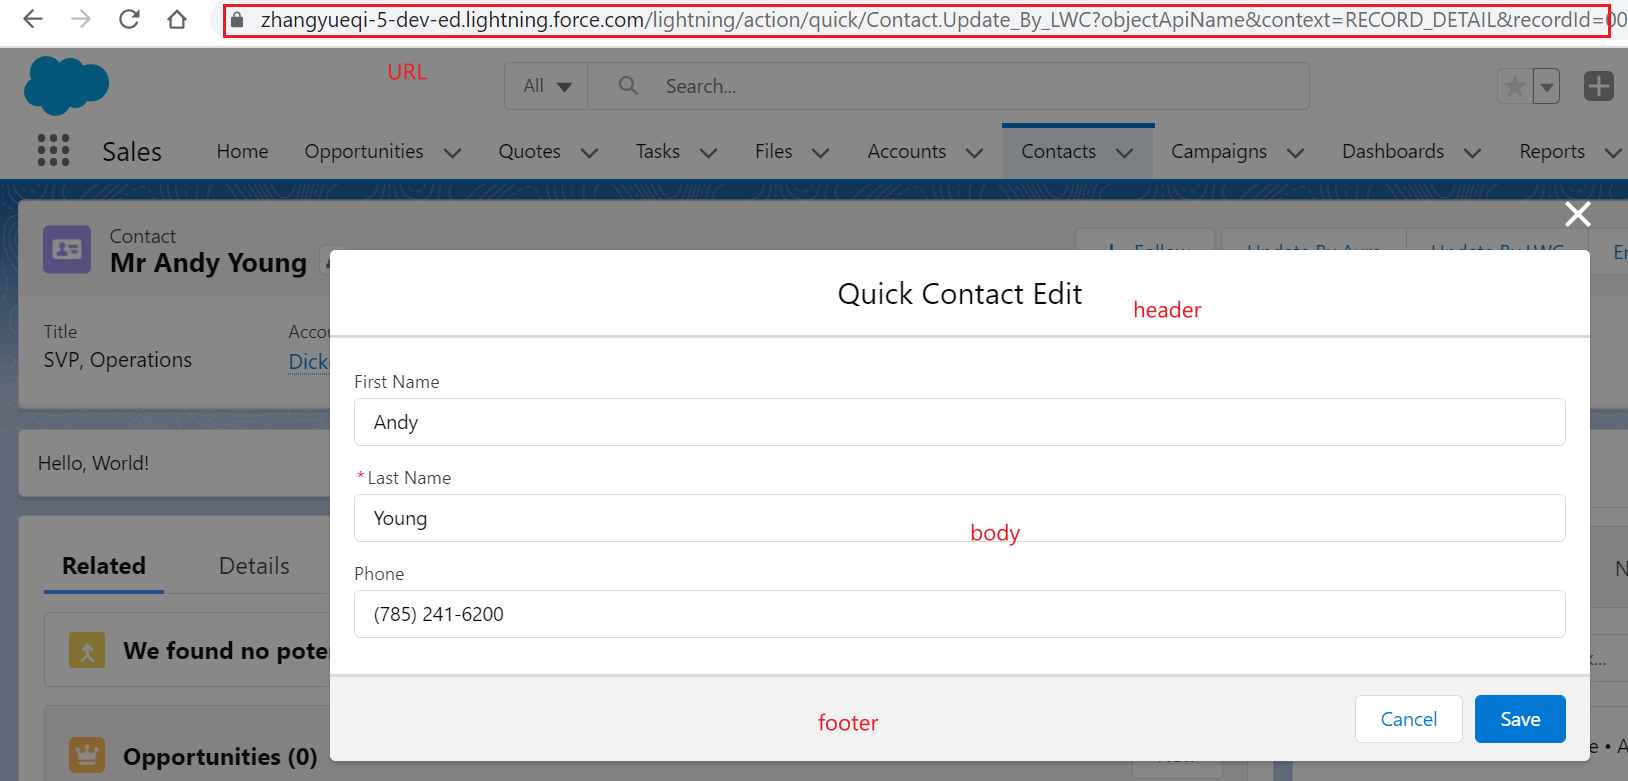
screenAction.html:这里我们看到一个新的组件的面孔: lightning-quick-action-panel。我们查阅官方文档以后,发现这个使用起来很简单,就是基于lightning design system中的modal来实现,属性中可以设置 header属性,代表action的头部,slot设置了footer的placeholder。
<template>
    <lightning-quick-action-panel header="Quick Contact Edit">

            <lightning-input label="First Name" name="firstName" value={firstName} class="slds-m-bottom_x-small" onchange={handleChange}></lightning-input>
            <lightning-input label="Last Name" name="lastName" value={lastName} onchange={handleChange} class="slds-m-bottom_x-small" required></lightning-input>
            <lightning-input label="Phone" type="tel" name="phone" value={phone} onchange={handleChange} class="slds-m-bottom_x-small"></lightning-input>

        <div slot="footer">
            <lightning-button variant="neutral" label="Cancel" onclick={handleCancel}></lightning-button>
            <lightning-button variant="brand" class="slds-m-left_x-small" label="Save" type="submit" onclick={handleSubmit} disabled={disabled}></lightning-button>
        </div>
</lightning-quick-action-panel>
</template>
整体展示的效果:
我们来看一下解析的html,这个模型和官方的modal模型是不是很像。

当然,官方除了可以使用 lightning-quick-action-panel组件以外,也支持自己使用html去适配。
三. headless的action效果
headless的action是通过调用 invoke方法来执行,invoke方法前面通过 @api 注解来声明。如果需要异步操作或者需要访问后台等在进行操作,可以将方法声明称异步,即:@api async invoke() {}
举一个官方的demo:用来点击quick action跳转到 contact list
import { LightningElement, track, wire,api } from 'lwc';
import { NavigationMixin } from 'lightning/navigation';
export default class headlessActionSAmple extends NavigationMixin(LightningElement) {
    @api invoke() {
        this[NavigationMixin.Navigate]({
            type: 'standard__objectPage',
            attributes: {
                objectApiName: 'Contact',
                actionName: 'home',
            },
        });
    }
}
四. 问题思考
优点: 对于优点来说,太显而易见了。 基于modal的设计,支持了lwc,还有什么比这个更好的优点吗
缺点:
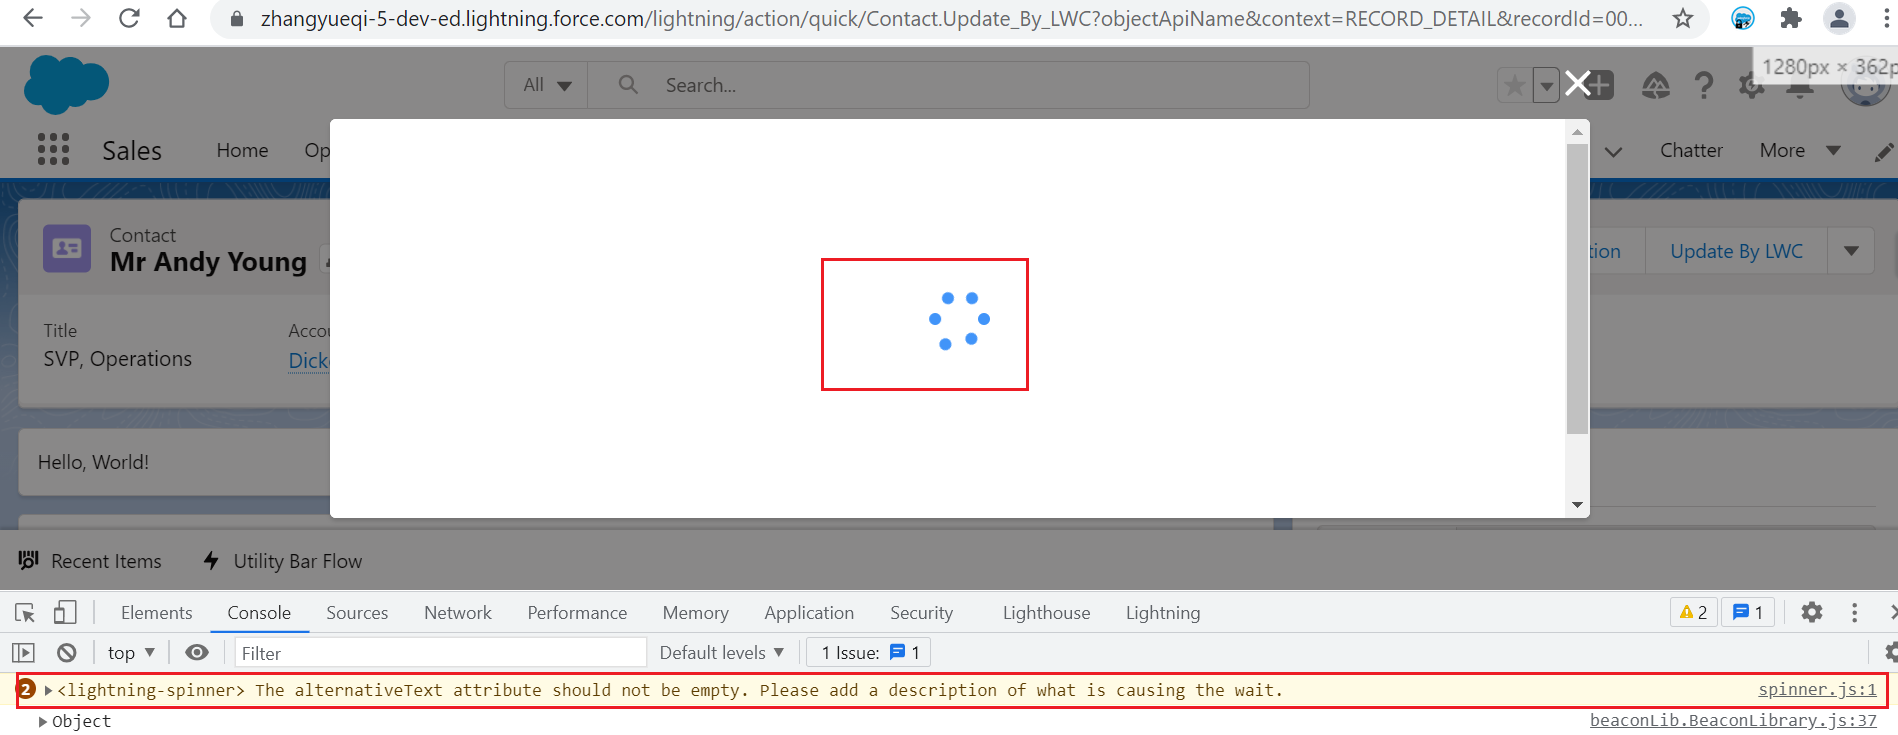
1. 和aura弹出modal不同,aura的URL不会改变,lwc会改变URL,两边不统一,针对弹出modal以后的刷新操作,lwc加载数据等可能会有潜在的问题,需要测试和适配。举个例子,上述的ScreenAction的demo,初始化弹出来是正常的,但是当你点击刷新按钮或者点击F5以后,页面将会进入假死状态,这种情况可能要考虑一下优化代码。
2. lwc弹出的modal的宽度是固定的,如果客户希望更改lwc弹出的modal的宽度,则无法实现,这种在aura可以通过 aura:tag注入可以搞定
3. 如果基于screen action的modal,目前 lightning-quick-action-panel 还是beta版,项目要求高的,客户不一定接受。
4. 目前 lwc quick action不支持 salesforce mobile app,有mobile相关的项目,使用前一定要考虑限制,别做完以后电脑端没有问题,手机端是用不了。
总结:篇中主要介绍lwc如何去适配quick action。篇中有错误地方欢迎指出,有不懂欢迎留言。
作者:zero
博客地址:http://www.cnblogs.com/zero-zyq/
本文欢迎转载,但未经作者同意必须保留此段声明,且在文章页面明显位置给出原文连接
如果文章的内容对你有帮助,欢迎点赞~
为方便手机端查看博客,现正在将博客迁移至微信公众号:Salesforce零基础学习,欢迎各位关注。

 浙公网安备 33010602011771号