

ES--在windows上快速安装
环境准备
java环境部署:
Java安装的时候,我使用的是默认安装,一路下一步即可;亦可自定义安装路径;
ES下载路径:
https://www.elastic.co/downloads/past-releases/elasticsearch-5-2-0
Kinaba下载路径
https://www.elastic.co/downloads/past-releases/kibana-5-2-0
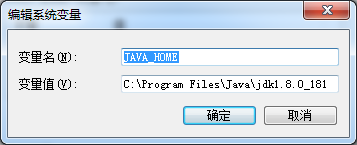
Java安装完成后,接下来设置Java环境变量
我这里使用的是默认安装路径:C:\Program Files\Java\jdk1.8.0_181
设置步骤:如下图所示(右键单击计算机,打开属性)
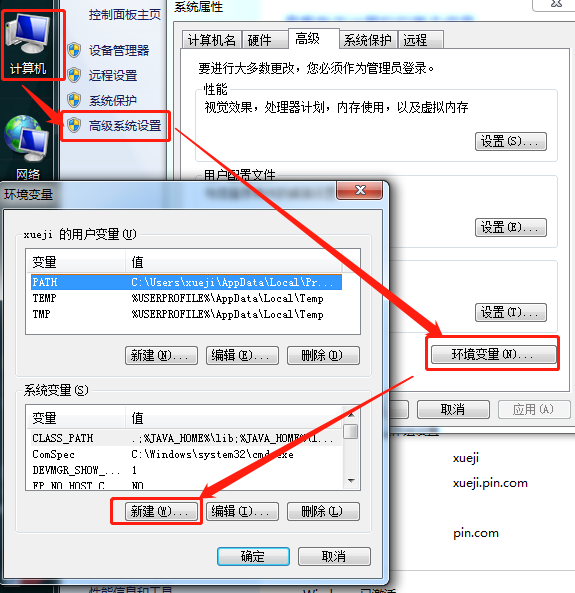
新建内容:
再次新建
变量名:CLASS_PATH
变量值:.;%JAVA_HOME%\lib;%JAVA_HOME%\lib\dt.jar;%JAVA_HOME%\lib\tools.jar;(一定要注意;前面的“.”)
设置PATH:
在PATH的值中,前面加上:%JAVA_HOME%\bin;%JAVA_HOME%\jre\bin;
设置完成后的path的变量内容如下图:

验证:

安装ES及kinaba
将下载下来的压缩包解压(我这里解压的是在D:\ES\elasticsearch-5.2.0),kinaba解压的目录是在(D:\ES\kibana-5.2.0-windows-x86)
在dos命令行下查看并启动ES及kinaba

启动成功的时候看下图:

启动kinaba

浏览器访问
Elsticsearch的网页状态

kinaba的网页状态
到此安装结束,接下来顺便说下ES及kinaba的一些操作和配置文件
首先在kinaba上可以查看ES集群的健康状态

ES的配置文件
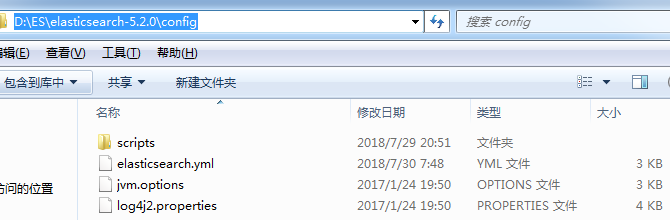
elasticsearch.yml的内容
# ======================== Elasticsearch Configuration =========================
#
# NOTE: Elasticsearch comes with reasonable defaults for most settings.
#       Before you set out to tweak and tune the configuration, make sure you
#       understand what are you trying to accomplish and the consequences.
#
# The primary way of configuring a node is via this file. This template lists
# the most important settings you may want to configure for a production cluster.
#
# Please consult the documentation for further information on configuration options:
# https://www.elastic.co/guide/en/elasticsearch/reference/index.html
#
# ---------------------------------- Cluster -----------------------------------
#
# Use a descriptive name for your cluster:
#
#cluster.name: my-application #这里可以修改集群的名字
cluster.name: ES-Test-application
#
# ------------------------------------ Node ------------------------------------
#
# Use a descriptive name for the node:
#
#node.name: node-1  #节点的名字
#
# Add custom attributes to the node:
#
#node.attr.rack: r1
#
# ----------------------------------- Paths ------------------------------------
#
# Path to directory where to store the data (separate multiple locations by comma):
#
#path.data: /path/to/data #数据存放路径
#
# Path to log files:
#
#path.logs: /path/to/logs #日志路径
#
# ----------------------------------- Memory -----------------------------------
#
# Lock the memory on startup:
#
#bootstrap.memory_lock: true
#
# Make sure that the heap size is set to about half the memory available
# on the system and that the owner of the process is allowed to use this
# limit.
#
# Elasticsearch performs poorly when the system is swapping the memory.
#
# ---------------------------------- Network -----------------------------------
#
# Set the bind address to a specific IP (IPv4 or IPv6):
#
#network.host: 192.168.0.1
#
# Set a custom port for HTTP:
#
#http.port: 9200   #端口号
#
# For more information, consult the network module documentation.
#
# --------------------------------- Discovery ----------------------------------
#
# Pass an initial list of hosts to perform discovery when new node is started:
# The default list of hosts is ["127.0.0.1", "[::1]"]
#
#discovery.zen.ping.unicast.hosts: ["host1", "host2"]
#
# Prevent the "split brain" by configuring the majority of nodes (total number of master-eligible nodes / 2 + 1):
#
#discovery.zen.minimum_master_nodes: 3
#
# For more information, consult the zen discovery module documentation.
#
# ---------------------------------- Gateway -----------------------------------
#
# Block initial recovery after a full cluster restart until N nodes are started:
#
#gateway.recover_after_nodes: 3
#
# For more information, consult the gateway module documentation.
#
# ---------------------------------- Various -----------------------------------
#
# Require explicit names when deleting indices:
#
#action.destructive_requires_name: true
其他配置及操作见下一篇!


 浙公网安备 33010602011771号