Maven学习小记
Maven的核心思想:约定由于配置
Maven的核心概念有 坐标、依赖、仓库、生命周期、插件等。

1 Maven坐标
1.1 本项目的坐标
- groupId: 必须。项目组名称,定义当前Maven项目所隶属的实际项目,通常与域名反向一一对应,与Java包名表示方式类似
- artifactId: 必须。项目名称
- version: 必须。版本
- packaging: (可选,没写则为jar)。打包方式,jar、war等
- classifier (不能直接定义)。帮助定义构建输出的附属构件
需要说明的是每个工程应该只有一个 POM 文件。
- 所有的 POM 文件需要 project 元素和三个必须的字段:groupId, artifactId,version。这三个坐标即所谓的GAV坐标。
- 在仓库中的工程标识为 groupId:artifactId:version
- POM.xml 的根元素是 project,它有三个主要的子节点:
| 节点 | 描述 |
|---|---|
| groupId | 这是工程组的标识。它在一个组织或者项目中通常是唯一的。例如,一个银行组织 com.company.bank 拥有所有的和银行相关的项目。 |
| artifactId | 这是工程的标识。它通常是工程的名称。例如,消费者银行。groupId 和 artifactId 一起定义了 artifact 在仓库中的位置。 |
| version | 这是工程的版本号。在 artifact 的仓库中,它用来区分不同的版本。例如: com.company.bank:consumer-banking:1.0 com.company.bank:consumer-banking:1.1. |
1.2 项目的依赖的坐标

- groupId: 必须。依赖的组名称
- artifactId: 必须。依赖的工程名称
- version: 必须。版本
- type: (可选,没写则为jar),该依赖的类型
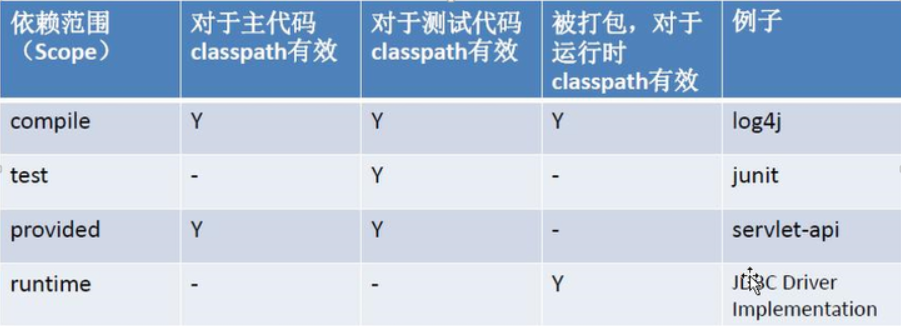
- scope (可选,没写则为compile),依赖的范围:compile、test、provided、runtime、system、import,用来控制在 编译classpath、测试classpath、运行classpath 三种classpath中依赖是否起作用。更多可参阅:maven dependency scope。
1.compile: 默认编译依赖范围。对于编译,测试,运行三种classpath都有效。
2.test:测试依赖范围。只对于测试classpath有效。
3.provided:已提供依赖范围。对于编译,测试的classpath都有效,但对于运行无效。因为容器已经提供,例如servlet-api,服务器如Tomcat会自带该api,所以程序不用将之打入包中。相当于compile,但是在打包阶段做了exclude的动作。
4.runtime:只对运行时有效。例如JDBC 驱动,项目代码只需要 jdk 提供的 jdbc 接口而不需要驱动,只有在执行测试和运行项目的时候才需要实现 jdbc 的功能。
5.system:从参与度来说,也provided相同,不过被依赖项不会从maven仓库抓,而是从本地文件系统拿,需要配合systemPath属性使用。
- optional (可选,没写则为必选)标记依赖是否可选,一般不用,因为按面向对象设计单一职责原则,一个类应只有一个职责而非糅合太多功能。
- exclusions (可选),用来排除依赖的传递性。只需要指定 groupId 和 artifactId
当Maven通过这些坐标无法从中心仓库获取该组件时,可以通过下面的方法处理:
- 用安装插件安装本地依赖,命令:
mvn install:install-file -Dfile=non-maven-proj.jar -DgroupId=some.group -DartifactId=non-maven-proj -Dversion=1 -Dpackaging=jar
- 创建你自己的仓库,并部署它
- 设置依赖scope到system,并定义一个systemPath,但这个不推荐
2 Maven依赖
2.1、添加不在repository中的依赖
法1:(不太可行)
先下载jar包并放在项目下,然后作为dependency通过system scope加入pom。缺点:本地可运行,但使用jar-with-dependencies打包时该包将不会被包含。


 1 <!--添加本地依赖-->
 2 <dependency>
 3             <groupId>org.apache.kafka</groupId>
 4             <artifactId>kafka_2.8.0</artifactId>
 5             <version>0.8.1.1</version>
 6             <scope>system</scope>
 7             <systemPath>${project.basedir}/lib/kafka_2.8.0-0.8.1.1.jar</systemPath>
 8         </dependency>
 9
10 <!--即使借助如下的resources将本地包打入目标jar,也只是作为资源加入而不是作为依赖,所以还是找不到-->
11     <!--
12     <build>
13         <resources>
14             <resource>
15                 <targetPath>lib/</targetPath>
16                 <directory>lib/</directory>
17                 <includes>
18                     <include>**/kafka_2.8.0-0.8.1.1.jar</include>
19                 </includes>
20             </resource>
21         </resources>
22     </build>
23     -->
法2:(推荐)
既然maven可以把repository中的依赖打到最后的jar包中,那么把这个外部的jar包放到repository中,也就可以让maven把这个外部的jar包打到最后的jar包中。
因此:先将库安装到本地repository: mvn install:install-file -Dfile=my-jar.jar -DgroupId=org.richard -DartifactId=my-jar -Dversion=1.0 -Dpackaging=jar ,再按通常添加dependency的方法添加该依赖。缺点:项目在其他机子开发时需要同时安装该包到目的机器repository。
也可以通过配置pom来将外部jar安装到本地repository:
 1             <plugin><!-- 将本地依赖包安装到本地仓库中,使得本地依赖包也可以打到本项目的包中,从而在其他机器上也能跑 -->
 2                 <groupId>org.apache.maven.plugins</groupId>
 3                 <artifactId>maven-install-plugin</artifactId>
 4                 <executions>
 5                     <execution>
 6                         <id>install-external</id>
 7                         <phase>clean</phase><!-- 执行clean时安装 -->
 8                         <configuration>
 9                             <file>D:/eclipse/workspace/mylib/PHTree-0.0.1-SNAPSHOT.jar</file>
10                             <repositoryLayout>default</repositoryLayout>
11                             <groupId>zsmlib.local</groupId>
12                             <artifactId>PHTree</artifactId>
13                             <version>0.0.1-SNAPSHOT</version>
14                             <packaging>jar</packaging>
15                             <generatePom>true</generatePom>
16                         </configuration>
17                         <goals>
18                             <goal>install-file</goal>
19                         </goals>
20                     </execution>
21                 </executions>
22             </plugin>
多个parent
Maven pom.xml中只允许有一个parent,当需要多个parent时,可以以添加依赖的方式添加多余的parent。示例:
<dependencyManagement>
     <dependencies>
        <dependency>
            <groupId>org.springframework.boot</groupId>
            <artifactId>spring-boot-dependencies</artifactId>
            <version>1.5.9.RELEASE</version>
            <type>pom</type>
            <scope>import</scope>
        </dependency>
    </dependencies>
</dependencyManagement>
dependencies和dependencyManagement的区别:
- dependencies即使在子项目中不写该依赖项,子项目仍然会从父项目中继承该依赖项(全部继承)
- dependencyManagement里只是声明依赖,并不实现引入,因此子项目需要显示的声明需要用的依赖。如果不在子项目中声明依赖,是不会从父项目中继承下来的;只有在子项目中写了该依赖项,并且没有指定具体版本,才会从父项目中继承该项,并且version和scope都读取自父pom;另外如果子项目中指定了版本号,那么会使用子项目中指定的jar版本。故dependencyManagement通常用于统一管理项目的版本号,以确保应用的各个项目的依赖和版本一致、保证测试的和发布的是相同的成果
2.2、排除依赖与设置依赖不可传递
假设当前项目为A,引用了依赖B,而B引用了C。默认情况下A引入B后C会也被引入到A中了,可以通过exclusion排除C,这样C就不会被引入到A中。A的依赖配置示例:
//pom.xml of A
<dependency><!-- B -->
    <groupId>org.springframework.boot</groupId>
    <artifactId>spring-boot-starter-web</artifactId>
    <exclusions>
        <exclusion><!-- C -->
            <groupId>org.springframework.boot</groupId>
            <artifactId>spring-boot-starter-tomcat</artifactId>
        </exclusion>
    </exclusions>
</dependency>
这是引用者主动排除被引用者的子模块的情形,另一种是被引用者主动设置使得子模块对引用者不可见的。可以通过optional设置子模块不传递依赖到父模块。B中的配置实例:
//pom.xml of B
<dependency><!-- C -->
    <groupId>org.springframework.boot</groupId>
    <artifactId>spring-boot-configuration-processor</artifactId>
    <optional>true</optional>
</dependency>
上面两种配置都可以C不被引入A。
2.3 依赖传递中生效的依赖版本的确定
假设项目A依赖项目B、项目B依赖项目C。现有组件D,有两种情况:
一种是传递路径上有不同的依赖版本:如B pom中指定依赖于1.0版本的D、C pom中指定依赖于1.1版本的D。
另一种是一个pom文件中有同一依赖的两个版本:如A pom中指定依赖于1.2版本的D,同时又有从B继承来的D。
针对上述情况,Maven采用 最短路径优先 原则:第一种情况下,A中的D的版本将会是与B一样(1.0);第二种情况下,A中的D的版本将会是自己指定的版本(1.2).
3 Maven仓库
在不用Maven的时候,比如说以前我们用Ant构建项目,在项目目录下,往往会看到一个名为/lib的子目录,那里存放着各类第三方依赖jar文 件,如log4j.jar,junit.jar等等。每建立一个项目,你都需要建立这样的一个/lib目录,然后复制一对jar文件,这是很明显的重复。 重复永远是噩梦的起点,多个项目不共用相同的jar文件,不仅会造成磁盘资源的浪费,也使得版本的一致性管理变得困难。此外,如果你使用版本管理工具,如 SVN(你没有使用版本管理工具?马上试试SVN吧,它能帮你解决很多头疼的问题),你需要将大量的jar文件提交到代码库里,可是版本管理工具在处理二 进制文件方面并不出色。
Maven仓库就是放置所有JAR文件(WAR,ZIP,POM等等)的地方,所有Maven项目可以从同一个Maven仓库中获取自己所需要的依 赖JAR,这节省了磁盘资源。此外,由于Maven仓库中所有的JAR都有其自己的坐标,该坐标告诉Maven它的组ID,构件ID,版本,打包方式等 等,因此Maven项目可以方便的进行依赖版本管理。你也不在需要提交JAR文件到SCM仓库中,你可以建立一个组织层次的Maven仓库,供所有成员使 用。
简言之,Maven仓库能帮助我们管理构件(主要是JAR)。
3.1 本地仓库 vs. 远程仓库
运行Maven的时候,Maven所需要的任何构件都是直接从本地仓库获取的。如果本地仓库没有,它会首先尝试从远程仓库下载构件至本地仓库,然后再使用本地仓库的构件。
比如说,你的项目配置了junit-3.8的依赖,在你运行mvn test 的时候,Maven需要使用junit-3.8的jar文件,它首先根据坐标查找本地仓库,如果找到,就直接使用。如果没有,Maven会检查可用的远程 仓库配置,然后逐个尝试这些远程仓库去下载junit-3.8的jar文件,如果远程仓库存在该文件,Maven会将其下载到本地仓库中,继而使用。如果 尝试过所有远程仓库之后,Maven还是没能够下载到该文件,它就会报错。
Maven缺省的本地仓库地址为${user.home}/.m2/repository 。也就是说,一个用户会对应的拥有一个本地仓库。
你也可以自定义本地仓库的位置,修改${user.home}/.m2/settings.xml (如果在eclipse的windows->preference->maven->user settings中指定了使用的settings文件,则在该文件中配置):
- <settings>
- ...
- <localRepository>D:\java\repository</localRepository>
- ...
- </settings>
你还可以在运行时指定本地仓库位置:
mvn clean install -Dmaven.repo.local=/home/juven/myrepo/
还有一点需要理解的是,当我们运行install的时候,Maven实际上是将项目生成的构件安装到了本地仓库,也就是说,只有install了之后,其它项目才能使用此项目生成的构件。
了解了本地仓库,接着了解一下Maven缺省的远程仓库,即Maven中央仓库。
安装好Maven之后,我们可以建立一个简单的项目,配置一些简单的依赖,然后运行mvn clean install,项目就构建好了。我们没有手工的去下载任何jar文件,这一切都是因为Maven中央仓库的存在,当Maven在本地仓库找不到需要的 jar文件时,它会查找远程仓库,而一个原始的Maven安装就自带了一个远程仓库——Maven中央仓库。
这个Maven中央仓库是在哪里定义的呢?在我的机器上,我安装了maven-2.0.10,我可以找到这个文件:${M2_HOME}/lib/maven-2.0.10-uber.jar ,打开该文件,能找到超级POM:\org\apache\maven\project\pom-4.0.0.xml ,它是所有Maven POM的父POM,所有Maven项目继承该配置,你可以在这个POM中发现如下配置:
- <repositories>
- <repository>
- <id>central</id>
- <name>Maven Repository Switchboard</name>
- <layout>default</layout>
- <url>http://repo1.maven.org/maven2</url>
- <snapshots>
- <enabled>false</enabled>
- </snapshots>
- </repository>
- </repositories>
关于远程仓库的配置,下面的小节我会详细解释,这里我们只要知道,中央仓库的id为central,远程url地址为http://repo1.maven.org/maven2,它关闭了snapshot版本构件下载的支持。
3.2 远程仓库:在POM中配置(局部)
这种配置方法只对当前项目有效。前面我们看到超级POM配置了ID为central的远程仓库,我们可以在POM中配置其它的远程仓库。这样做的原因有很多,比如你有一个局域网的 远程仓库,使用该仓库能大大提高下载速度,继而提高构建速度,也有可能你依赖的一个jar在central中找不到,它只存在于某个特定的公共仓库,这样 你也不得不添加那个远程仓库的配置。
这里我配置一个远程仓库指向中央仓库的中国镜像:
- <project>
- ...
- <repositories>
- <repository>
- <id>maven-net-cn</id>
- <name>Maven China Mirror</name>
- <url>http://maven.net.cn/content/groups/public/</url>
- <releases>
- <enabled>true</enabled>
- </releases>
- <snapshots>
- <enabled>false</enabled>
- </snapshots>
- </repository>
- </repositories>
- <pluginRepositories>
- <pluginRepository>
- <id>maven-net-cn</id>
- <name>Maven China Mirror</name>
- <url>http://maven.net.cn/content/groups/public/</url>
- <releases>
- <enabled>true</enabled>
- </releases>
- <snapshots>
- <enabled>false</enabled>
- </snapshots>
- </pluginRepository>
- </pluginRepositories>
- ...
- </project>
我们先看一下<repositories>的配置,你可以在它下面添加多个<repository> ,每个<repository>都有它唯一的ID,一个描述性的name,以及最重要的,远程仓库的url。此 外,<releases><enabled>true</enabled></releases>告诉 Maven可以从这个仓库下载releases版本的构件, 而<snapshots><enabled>false</enabled></snapshots> 告诉Maven不要从这个仓库下载snapshot版本的构件。禁止从公共仓库下载snapshot构件是推荐的做法,因为这些构件不稳定,且不受你控 制,你应该避免使用。当然,如果你想使用局域网内组织内部的仓库,你可以激活snapshot的支持。
关于<repositories>的更详细的配置及相关解释,请参考:http://www.sonatype.com/books/maven-book/reference_zh/apas02s08.html。
至于<pluginRepositories>,这是配置Maven从什么地方下载插件构件(Maven的所有实际行为都由其插件完成)。该元素的内部配置和<repository>完全一样,不再解释。
3.3 远程仓库:在settings.xml中配置(全局)
这种配置方法全局有效。我们知道了如何在POM中配置远程仓库,但考虑这样的情况:在一个公司内部,同时进行这3个项目,而且以后随着这几个项目的结束,越来越多的项目会 开始;同时,公司内部建立一个Maven仓库。我们统一为所有这些项目配置该仓库,于是不得不为每个项目提供同样的配置。问题出现了,这是重复 !
其实我们可以做到只配置一次,在哪里配置呢?就是settings.xml。
不过事情没有那么简单,不是简单的将POM中的<repositories>及<pluginRepositories>元素复制到settings.xml中就可以,setting.xml不直接支持 这两个元素。但我们还是有一个并不复杂的解决方案,就是利用profile,如下:
- <settings>
- ...
- <profiles>
- <profile>
- <id>dev</id>
- <!-- repositories and pluginRepositories here-->
- </profile>
- </profiles>
- <activeProfiles>
- <activeProfile>dev</activeProfile>
- </activeProfiles>
- ...
- </settings>
这里我们定义一个id为dev的profile,将所有repositories以及pluginRepositories元素放到这个 profile中,然后,使用<activeProfiles>元素自动激活该profile。这样,你就不用再为每个POM重复配置仓库。
使用profile为settings.xml添加仓库提供了一种用户全局范围的仓库配置。
3.4 镜像
如果你的地理位置附近有一个速度更快的central镜像,或者你想覆盖central仓库配置,或者你想为所有POM使用唯一的一个远程仓库(这个远程仓库代理的所有必要的其它仓库),你可以使用settings.xml中的mirror配置。
以下的mirror配置用maven.net.cn覆盖了Maven自带的central:
- <settings>
- ...
- <mirrors>
- <mirror>
- <id>maven-net-cn</id>
- <name>Maven China Mirror</name>
- <url>http://maven.net.cn/content/groups/public/</url>
- <mirrorOf>central</mirrorOf>
- </mirror>
- </mirrors>
- ...
- </settings>
这里唯一需要解释的是<mirrorOf>,这里我们配置central的镜像,我们也可以配置一个所有仓库的镜像,以保证该镜像是Maven唯一使用的仓库:
- <settings>
- ...
- <mirrors>
- <mirror>
- <id>my-org-repo</id>
- <name>Repository in My Orgnization</name>
- <url>http://192.168.1.100/maven2</url>
- <mirrorOf>*</mirrorOf>
- </mirror>
- </mirrors>
- ...
- </settings>
关于更加高级的镜像配置,可以参考:http://maven.apache.org/guides/mini/guide-mirror-settings.html。
3.5 分发构件至远程仓库
mvn install 会将项目生成的构件安装到本地Maven仓库,mvn deploy 用来将项目生成的构件安装到本地并推送到远程Maven仓库。本地Maven仓库的构件只能供当前用户使用,在分发到远程Maven仓库之后,所有能访问该仓库的用户都能使用你的构件。
我们需要配置POM的distributionManagement来指定Maven分发构件的位置,如下:
- <project>
- ...
- <distributionManagement>
- <repository>
- <id>nexus-releases</id>
- <name>Nexus Release Repository</name>
- <url>http://127.0.0.1:8080/nexus/content/repositories/releases/</url>
- </repository>
- <snapshotRepository>
- <id>nexus-snapshots</id>
- <name>Nexus Snapshot Repository</name>
- <url>http://127.0.0.1:8080/nexus/content/repositories/snapshots/</url>
- </snapshotRepository>
- </distributionManagement>
- ...
- </project>
Maven区别对待release版本的构件和snapshot版本的构件,snapshot为开发过程中的版本,实时,但不稳定,release版本则比较稳定。Maven会根据你项目的版本来判断将构件分发到哪个仓库。
一般来说,分发构件到远程仓库需要认证,如果你没有配置任何认证信息,你往往会得到401错误。这个时候,如下在settings.xml中配置认证信息:
- <settings>
- ...
- <servers>
- <server>
- <id>nexus-releases</id>
- <username>admin</username>
- <password>admin123</password>
- </server>
- <server>
- <id>nexus-snapshots</id>
- <username>admin</username>
- <password>admin123</password>
- </server>
- </servers>
- ...
- </settings>
需要注意的是,settings.xml中server元素下id的值必须与POM中repository或snapshotRepository 下id的值完全一致。将认证信息放到settings下而非POM中,是因为POM往往是它人可见的,而settings.xml是本地的。
3.6 jar包安装到远程仓库
前面说的deploy是将项目构建并推送到远程仓库,其前提是被deploy的项目有pom文件。但有时我们只有一个jar文件,除此外没有其他任何信息,如何将这个jar包推送到远程仓库以能够在内部各项目中通过maven引用该jar包呢?如阿里云vod upload包尚未公开,此时在我们maven项目中如何引用?
方法1:像传统非maven项目那样,将依赖包添加到build path。缺点是每导入一次项目都得添加一遍,且jenkins自动构建时不会识别该依赖包,故不可取。
方法2:借助deploy-file
mvn deploy:deploy-file -Dmaven.test.skip=true -Dfile=/Users/aliyun-java-vod-upload-1.4.12.jar -DgroupId=com.aliyun -DartifactId=aliyun-java-vod-upload -Dversion=1.4.12-SNAPSHOT -Dpackaging=jar -DrepositoryId=nexus-snapshots -Durl=http://nexus.xxx.com/repository/maven-snapshots 。这里repositoryId、url是maven仓库的repository id和url,不同内网nexus环境可能不一样。
参考资料
http://wiki.jikexueyuan.com/project/maven/environment-setup.html
http://www.cnblogs.com/happyday56/p/4661209.html
4 Maven生命周期及插件
Maven的所有实际行为都由其插件完成。插件通过与生命周期绑定发挥作用,插件与生命周期的绑定实际是 插件的目标 与 生命周期的阶段 的绑定。
4.1 生命周期
生命周期和插件关联密切,生命周期只是进行行为上的抽象定义,其实际执行由相应的插件来完成。生命周期与插件的绑定实际上是生命周期阶段与插件目标的绑定。
- 生命周期有三种:clean、default、site,三者间相互独立,每个周期包含若干个阶段,阶段前后有依赖关系。如clean周期的pre-clean、-clean、post-clean三个阶段。
- default周期各阶段:validate, initialize, generate-sources, process-sources, generate-resources, process-resources, compile, process-classes, generate-test-sources, process-test-sources, generate-test-resources, process-test-resources, test-compile, process-test-classes, test, prepare-package, package, pre-integration-test, integration-test, post-integration-test, verify, install, deploy
-
clean周期各阶段:pre-clean, clean, post-clean
-
site周期各阶段:pre-site, site, post-site, site-deploy
- 每个插件都集成有若干同类的功能,一个功能就是该插件的一种目标 。如dependency的目标有analyze、tree等
三个生命周期主要阶段及其插件目标的默认绑定关系如下(default生命周期的绑定关系与打包类型有关,这里以jar为例):


插件及其目标介绍详见:https://maven.apache.org/plugins/
4.2 插件
相关构建相关插件
- mvn archetype:generate 创建maven项目,只运行该命令会以交互模式运行,让写groupId、artifactId、version等。可以非交互模式运行:
- 创建普通工程:
mvn archetype:generate -DgroupId=com.trinea.maven.test -DartifactId=maven-quickstart -DarchetypeArtifactId=maven-archetype-quickstart -DinteractiveMode=false - 创建Web工程:
mvn archetype:generate -DgroupId=com.trinea.maven.web.test -DartifactId=maven-web -DarchetypeArtifactId=maven-archetype-webapp -DinteractiveMode=false
- 创建普通工程:
- mvn clean 删除target文件夹(清除编译出的类)
- mvn compile 编译类到target文件夹下
- mvn test 运行单元测试
- mvn package 打包(生成的包在本工程内)
- mvn install 安装(将包安装到本地maven仓库中,供其他项目使用)
执行test 会自动先调用compile
执行package 会自动先调用test
执行install 会自动先调用package
- mvn dependency:list 列出已解析依赖(Resolved Dependency)
- mvn dependency:tree 列出依赖树
- mvn dependency:analyze 依赖分析(分析编译主代码和测试代码需要的依赖,不会分析执行测试和运行时所需的依赖),会列出 未声明但使用了的依赖(Unused declared dependencies)、已声明但未使用的依赖(Used undeclared dependencies)
产生源码
 1     <build>
 2         <plugins>
 3             <plugin>
 4                 <groupId>org.apache.maven.plugins</groupId>
 5                 <artifactId>maven-source-plugin</artifactId>
 6                 <version>2.1.2</version>
 7                 <executions>
 8                     <execution>
 9                         <id>attach-sources</id>
10                         <goals>
11                             <goal>jar</goal>
12                         </goals>
13                     </execution>
14                 </executions>
15             </plugin>
16         </plugins>
17     </build>
产生文档
 1             <plugin>
 2                 <groupId>org.apache.maven.plugins</groupId>
 3                 <artifactId>maven-javadoc-plugin</artifactId>
 4                 <version>2.8</version>
 5                 <executions>
 6                     <execution>
 7                         <id>attach-javadocs</id>
 8                         <goals>
 9                             <goal>jar</goal>
10                         </goals>
11                     </execution>
12                 </executions>
13             </plugin>
产生可执行jar
详见:http://www.cnblogs.com/z-sm/p/5515199.html
方法:使用assembly插件,生成的jar包名为xxx-jar-with-dependencies
- 指定mainClass会把主类写到MANIFEST.MF文件里
- 指定jar-with-dependencies会把依赖考到jar包里
代码如下:
 1 <plugin>
 2         <groupId>org.apache.maven.plugins</groupId>
 3         <artifactId>maven-assembly-plugin</artifactId>
 4         <version>2.2.2</version>
 5         <configuration>
 6         <appendAssemblyId>false</appendAssemblyId><!--为false时把依赖包打到原始包中,为true时打到名为xxx-with-dependencies.jar包,默认为true-->
 7           <archive>
 8             <manifest>
 9               <addClasspath>true</addClasspath>
10               <mainClass>net.sf.jsi.examples.NearestN</mainClass>
11             </manifest>
12           </archive>
13           <descriptorRefs>
14             <descriptorRef>jar-with-dependencies</descriptorRef>
15           </descriptorRefs>
16         </configuration>
17         <executions>
18           <execution>
19             <id>make-assembly</id>
20             <phase>package</phase>
21             <goals>
22               <goal>single</goal>
23             </goals>
24           </execution>
25         </executions>
26       </plugin>
编译时把依赖包整理到指定目录下
 1             <plugin>
 2                 <groupId>org.apache.maven.plugins</groupId>
 3                 <artifactId>maven-dependency-plugin</artifactId>
 4                 <version>2.4</version>
 5                 <executions>
 6                     <execution>
 7                         <id>copy-dependencies</id>
 8                         <phase>package</phase>
 9                         <goals>
10                             <goal>copy-dependencies</goal>
11                         </goals>
12                         <configuration>
13                             <outputDirectory>${project.build.directory}/dependencies</outputDirectory>
14                             <includeScope>compile</includeScope>
15                         </configuration>
16                     </execution>
17
18                     <execution>
19                         <id>copy-test-dependencies</id>
20                         <phase>package</phase>
21                         <goals>
22                             <goal>copy-dependencies</goal>
23                         </goals>
24                         <configuration>
25                             <outputDirectory>${project.build.directory}/test-dependencies</outputDirectory>
26                             <excludeScope>compile</excludeScope>
27                         </configuration>
28                     </execution>
29                 </executions>
30             </plugin>
检查定义的约定
 1             <!-- Allow versions that are greater or equal to 3.0.0, and less than
 2                 4.0.0 -->
 3             <plugin>
 4                 <groupId>org.apache.maven.plugins</groupId>
 5                 <artifactId>maven-enforcer-plugin</artifactId>
 6                 <version>1.1.1</version>
 7                 <executions>
 8                     <execution>
 9                         <id>enforce-versions</id>
10                         <goals>
11                             <goal>enforce</goal>
12                         </goals>
13                         <configuration>
14                             <rules>
15                                 <requireMavenVersion>
16                                     <version>[3.0.0,4.0.0)</version>
17                                 </requireMavenVersion>
18                             </rules>
19                         </configuration>
20                     </execution>
21                 </executions>
22             </plugin>
设置所用JDK
Maven项目默认用1.5版本JDK,编译亦是,在Eclipse里手动改成其他版本会生效,但是maven-update project或者导到其他机器上后又会变成默认的1.5。可采用如下方法设置:
全局设置(使得默认为指定版本):在所用到的的setting.xml(不一定是maven/conf/下的setting.xml,有可能自己指定了settings.xml)的profiles元素下添加如下profile元素
 1 <profile>
 2     <id>jdk17</id>
 3     <activation>
 4         <activeByDefault>true</activeByDefault>
 5         <jdk>1.7</jdk>
 6     </activation>
 7     <properties>
 8         <maven.compiler.source>1.7</maven.compiler.source>
 9         <maven.compiler.target>1.7</maven.compiler.target>
10         <maven.compiler.compilerVersion>1.7</maven.compiler.compilerVersion>
11     </properties>
12 </profile>
局部设置(针对当前项目设置):在项目的pom,xml文件中添加如下build元素
 1 <build>
 2         <plugins>
 3             <plugin>
 4                 <groupId>org.apache.maven.plugins</groupId>
 5                 <artifactId>maven-compiler-plugin</artifactId>
 6                 <version>2.3.2</version>
 7                 <configuration>
 8                     <source>1.7</source>
 9                     <target>1.7</target>
10                     <encoding>UTF-8</encoding>
11                 </configuration>
12             </plugin>
13         </plugins>
14     </build>
添加资源文件pom和文件中的变量互相引用
 1         <resources>
 2             <resource>
 3                 <directory>src/main/resources</directory>
 4                 <filtering>true</filtering> <!--set true to enable to use pom's variables in the file or use the file's
 5                     k-v in this pom -->
 6                 <includes><!--only included files will be copied to target/classes/ ,all
 7                         will be copied if it is empty -->
 8                     <!-- <include>**/*.properties</include> <include>default_devicesn.txt</include> -->
 9                 </includes>
10             </resource>
11         </resources>
打包与部署
package、install、deploy区别:
package命令完成了项目编译、单元测试、打包功能,但没有把打好的可执行jar包(war包或其它形式的包)布署到本地maven仓库和远程maven私服仓库
install命令完成了项目编译、单元测试、打包功能,同时把打好的可执行jar包(war包或其它形式的包)布署到本地maven仓库,但没有布署到远程maven私服仓库
deploy命令完成了项目编译、单元测试、打包功能,同时把打好的可执行jar包(war包或其它形式的包)布署到本地maven仓库和远程maven私服仓库
5 聚合与继承
聚合主要为了快速构建项目,继承主要为了消除重复。
聚合就是在父项目的pom中指定modules,继承就是在子项目pom中指定parent
聚合时列出的模块不需要考虑顺序,Maven将自己根据依赖关系排序。
注:
Maven中多模块的项目结构通常是在父pom中指定modules,并在子pom中指定parent。但实际上只指定后者不指定前者也可。
指定parent时,将会从指定的relativePath路径中查找parent pom。若未指定relativePath标签则其值默认为 ../pom.xml(即从父目录找);若其值为空(例如 <relativePath/> )则表示始终从远程仓库找而不从本地仓库找。示例:
<parent>
    <groupId>com.baeldung.maven-parent-pom-resolution</groupId>
    <artifactId>module1</artifactId>
    <version>1.0.0-SNAPSHOT</version>
    <relativePath>../module1/pom.xml</relativePath>
     <!-- <relativePath/> -->
</parent>
5.1 super pom
所有pom默认都继承自一个super pom,对apache-maven-3.2.5而言,该文件在 yourmaven/lib/maven-model-builder-3.2.5.jar里的pom.xml,内容如下:
  1 <?xml version="1.0" encoding="UTF-8"?>
  2
  3 <!--
  4 Licensed to the Apache Software Foundation (ASF) under one
  5 or more contributor license agreements.  See the NOTICE file
  6 distributed with this work for additional information
  7 regarding copyright ownership.  The ASF licenses this file
  8 to you under the Apache License, Version 2.0 (the
  9 "License"); you may not use this file except in compliance
 10 with the License.  You may obtain a copy of the License at
 11
 12     http://www.apache.org/licenses/LICENSE-2.0
 13
 14 Unless required by applicable law or agreed to in writing,
 15 software distributed under the License is distributed on an
 16 "AS IS" BASIS, WITHOUT WARRANTIES OR CONDITIONS OF ANY
 17 KIND, either express or implied.  See the License for the
 18 specific language governing permissions and limitations
 19 under the License.
 20 -->
 21
 22 <!-- START SNIPPET: superpom -->
 23 <project>
 24   <modelVersion>4.0.0</modelVersion>
 25
 26   <repositories>
 27     <repository>
 28       <id>central</id>
 29       <name>Central Repository</name>
 30       <url>https://repo.maven.apache.org/maven2</url>
 31       <layout>default</layout>
 32       <snapshots>
 33         <enabled>false</enabled>
 34       </snapshots>
 35     </repository>
 36   </repositories>
 37
 38   <pluginRepositories>
 39     <pluginRepository>
 40       <id>central</id>
 41       <name>Central Repository</name>
 42       <url>https://repo.maven.apache.org/maven2</url>
 43       <layout>default</layout>
 44       <snapshots>
 45         <enabled>false</enabled>
 46       </snapshots>
 47       <releases>
 48         <updatePolicy>never</updatePolicy>
 49       </releases>
 50     </pluginRepository>
 51   </pluginRepositories>
 52
 53   <build>
 54     <directory>${project.basedir}/target</directory>
 55     <outputDirectory>${project.build.directory}/classes</outputDirectory>
 56     <finalName>${project.artifactId}-${project.version}</finalName>
 57     <testOutputDirectory>${project.build.directory}/test-classes</testOutputDirectory>
 58     <sourceDirectory>${project.basedir}/src/main/java</sourceDirectory>
 59     <scriptSourceDirectory>${project.basedir}/src/main/scripts</scriptSourceDirectory>
 60     <testSourceDirectory>${project.basedir}/src/test/java</testSourceDirectory>
 61     <resources>
 62       <resource>
 63         <directory>${project.basedir}/src/main/resources</directory>
 64       </resource>
 65     </resources>
 66     <testResources>
 67       <testResource>
 68         <directory>${project.basedir}/src/test/resources</directory>
 69       </testResource>
 70     </testResources>
 71     <pluginManagement>
 72       <!-- NOTE: These plugins will be removed from future versions of the super POM -->
 73       <!-- They are kept for the moment as they are very unlikely to conflict with lifecycle mappings (MNG-4453) -->
 74       <plugins>
 75         <plugin>
 76           <artifactId>maven-antrun-plugin</artifactId>
 77           <version>1.3</version>
 78         </plugin>
 79         <plugin>
 80           <artifactId>maven-assembly-plugin</artifactId>
 81           <version>2.2-beta-5</version>
 82         </plugin>
 83         <plugin>
 84           <artifactId>maven-dependency-plugin</artifactId>
 85           <version>2.8</version>
 86         </plugin>
 87         <plugin>
 88           <artifactId>maven-release-plugin</artifactId>
 89           <version>2.3.2</version>
 90         </plugin>
 91       </plugins>
 92     </pluginManagement>
 93   </build>
 94
 95   <reporting>
 96     <outputDirectory>${project.build.directory}/site</outputDirectory>
 97   </reporting>
 98
 99   <profiles>
100     <!-- NOTE: The release profile will be removed from future versions of the super POM -->
101     <profile>
102       <id>release-profile</id>
103
104       <activation>
105         <property>
106           <name>performRelease</name>
107           <value>true</value>
108         </property>
109       </activation>
110
111       <build>
112         <plugins>
113           <plugin>
114             <inherited>true</inherited>
115             <artifactId>maven-source-plugin</artifactId>
116             <executions>
117               <execution>
118                 <id>attach-sources</id>
119                 <goals>
120                   <goal>jar</goal>
121                 </goals>
122               </execution>
123             </executions>
124           </plugin>
125           <plugin>
126             <inherited>true</inherited>
127             <artifactId>maven-javadoc-plugin</artifactId>
128             <executions>
129               <execution>
130                 <id>attach-javadocs</id>
131                 <goals>
132                   <goal>jar</goal>
133                 </goals>
134               </execution>
135             </executions>
136           </plugin>
137           <plugin>
138             <inherited>true</inherited>
139             <artifactId>maven-deploy-plugin</artifactId>
140             <configuration>
141               <updateReleaseInfo>true</updateReleaseInfo>
142             </configuration>
143           </plugin>
144         </plugins>
145       </build>
146     </profile>
147   </profiles>
148
149 </project>
150 <!-- END SNIPPET: superpom -->
6 Maven pom.xml结构
 1 <project xmlns="http://maven.apache.org/POM/4.0.0"
 2         xmlns:xsi="http://www.w3.org/2001/XMLSchema-instance"
 3         xsi:schemaLocation="http://maven.apache.org/POM/4.0.0
 4                             http://maven.apache.org/xsd/maven-4.0.0.xsd">
 5     <modelVersion>4.0.0</modelVersion>
 6
 7     <!-- The Basics -->
 8     <groupId>...</groupId>
 9     <artifactId>...</artifactId>
10     <version>...</version>
11     <packaging>...</packaging>
12     <dependencies>...</dependencies>
13     <parent>...</parent>
14     <dependencyManagement>...</dependencyManagement>
15     <modules>...</modules>
16     <properties>...</properties>
17
18     <!-- Build Settings -->
19     <build>...</build>
20     <reporting>...</reporting>
21
22     <!-- More Project Information -->
23     <name>...</name>
24     <description>...</description>
25     <url>...</url>
26     <inceptionYear>...</inceptionYear>
27     <licenses>...</licenses>
28     <organization>...</organization>
29     <developers>...</developers>
30     <contributors>...</contributors>
31
32     <!-- Environment Settings -->
33     <issueManagement>...</issueManagement>
34     <ciManagement>...</ciManagement>
35     <mailingLists>...</mailingLists>
36     <scm>...</scm>
37     <prerequisites>...</prerequisites>
38     <repositories>...</repositories>
39     <pluginRepositories>...</pluginRepositories>
40     <distributionManagement>...</distributionManagement>
41     <profiles>...</profiles>
42 </project>
参考资料:http://blog.csdn.net/tomato__/article/details/13168191
- The Basics:http://blog.csdn.net/tomato__/article/details/13169437
- Build Settings:http://blog.csdn.net/tomato__/article/details/13625497
- More Project Information:http://blog.csdn.net/tomato__/article/details/13625811
- Environment Settings:http://blog.csdn.net/tomato__/article/details/13770733
7 其他
maven内置属性与pom属性
1、内置属性(Maven预定义,用户可以直接使用)
${basedir}表示项目根目录,即包含pom.xml文件的目录;
${version}表示项目版本;
${project.basedir}同${basedir};
${project.baseUri}表示项目文件地址;
${maven.build.timestamp}表示项目构件开始时间;
${maven.build.timestamp.format}表示属性${maven.build.timestamp}的展示格式,默认值为yyyyMMdd-HHmm,可自定义其格式,其类型可参考java.text.SimpleDateFormat。

用法:
<properties>
  <maven.build.timestamp.format>yyyy-MM-dd HH:mm:ss</maven.build.timestamp.format>
</properties>

2、POM属性(使用pom属性可以引用到pom.xml文件对应元素的值)
${project.build.directory}  项目构建输出目录,默认为target/
${project.build.outputDirectory} 项目主代码编译输出目录,默认为target/classes/
${project.build.testOutputDirectory}:项目测试代码编译输出目录,默认为target/testclasses/
${project.build.sourceEncoding}  表示主源码的编码格式;
${project.build.sourceDirectory}  项目的主源码目录,默认为src/main/java/
${project.build.testSourceDirectory} 项目的测试源码目录,默认为/src/test/java/
${project.build.finalName}  表示输出文件名称;
${project.version}  表示项目版本,与${version}相同;
${project.groupId}:项目的groupId
${project.artifactId} 项目的artifactId

用法:
<properties>
  <project.build.sourceEncoding>UTF-8</project.build.sourceEncoding>
</properties>
版本要求
maven跳过测试进行编译示例:mvn -DskipTests=true install assembly:single
高版本的maven要求jdk为1.7或later,对低版本的jdk会报错。
版本要求:
maven 3.3要去至少 jdk 1.7
maven 3.2要去至少jdk 1.6
maven 3.1要求至少jdk 1.5
maven 3.0要求至少jdk 1.5
参考资料
1、《Maven实战》

 浙公网安备 33010602011771号