
pytest测试框架(二)
十一、conftest.py和@pytest.fixture结合使用实现全局的前置应用
例如:项目的全局登录、模块的全局处理
1.conftest.py是一个单独存放的一个夹具配置文件,名称是固定的不能够更改
2.作用:可以在不同的py文件使用同一个fixture函数
3.conftest.py文件需要与运行的测试用例在同一层路径下,并且不需要做任何的import导入操作
 1 import pytest
 2
 3 data = ['成都', '大理', '西安']
 4
 5
 6 @pytest.fixture(scope="function", params=data, name="fixtest")
 7 def fixture_test(request):
 8     # 注意:这里返回的param不用s,否则会报错,request也是固定写法
 9     print('测试前置')
10     yield request.param
11     print('测试后置')
总结一下:
1.setup/teardown/setup_class/teardown_class 它是作用于所有测试用例和所有类
2.@pytest.fixture() 它的作用既可以部分也可以全部前后置
3.conftest.py和@pytest.fixture()结合使用,作用于全局的前后置

十二、断言
pytest的断言用assert即可,它不像unittest一样有很多的断言方式
assert 'h' in 'hello'
十三、pytest之生成测试报告---> allure-pytest插件
1.安装allure-pytest:
pip install allure-pytest
2.安装allure(需依赖Java1.8以上环境)
1)下载地址:https://github.com/allure-framework/allure2/releases
2)放置路径:下载后解压,放到--》F:\Python37\Lib\site-packages
3)配置path环境变量:F:\Python37\Lib\site-packages\allure-2.13.10\bin
4)验证:dos窗口>allure --version
5)问题:出现dos验证成功,pycharm验证失败,解决办法:重启pycharm
3.生成allure报告
1)生成json格式的临时报告
在pytest.ini配置文件addopts中加入----->--alluredir ./temp
2)生成allure报告
1 import pytest
2 import os
3
4 if __name__ == '__main__':
5     pytest.main()
6     # 先找到目录中的temp临时报告,在去report目录生成并清空之前的报告,-o表示output输出
7     os.system('allure generate ./temp -o ./report --clean')
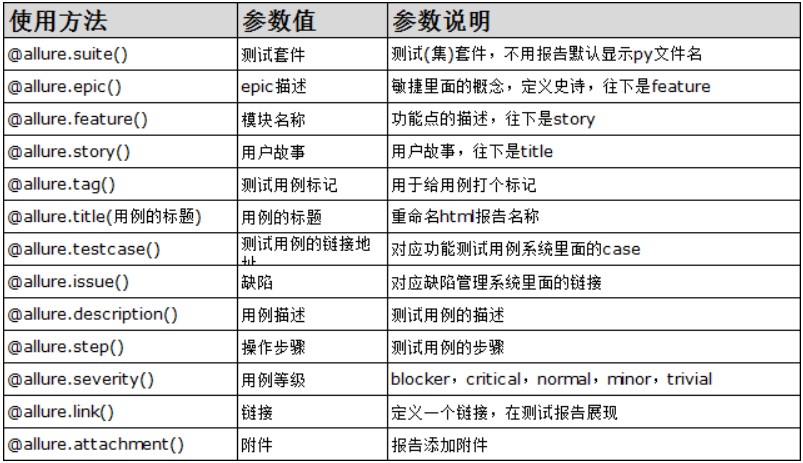
3)Allure装饰器描述
4)修改allure报告logo
1.首先在该路径(E:\python3.8.2\Lib\site-packages\allure-2.13.8\config)allure.yml文件增加一条custom-logo-plugin
plugins:
  - junit-xml-plugin
  - xunit-xml-plugin
  - trx-plugin
  - behaviors-plugin
  - packages-plugin
  - screen-diff-plugin
  - xctest-plugin
  - jira-plugin
  - xray-plugin
  - custom-logo-plugin
2.在该路径(E:\python3.8.2\Lib\site-packages\allure-2.13.8\plugins\custom-logo-plugin\static),放入显示的logo
3.修改styles.css文件
.side-nav__brand {
  background: url('sinoiov.png') no-repeat left center !important;      #url括号内写的就是自己图片的名字,我这里的是logo.png
  margin-left: 10px;
  height: 40px;
  background-size: contain !important;
}
.side-nav__brand span{
    display: none;
}
.side-nav__brand:after{
    content: "Test Report";    #这是的内容对应的是我logo后面的内容,在接下来的截图中可以看到,如果不写这个样式,默认的就是allure
    margin-left: 20px;

}
十四、参数化-->@pytest.mark.parametrize()
参数化基本用法:
1.@pytest.mark.parametrize(args_name, args_value),一般带有两个常用参数,第一个为参数名,第二个为参数的值
1)args_name:参数名,必须是字符串
2)args_value:参数值(list、tuple、字典列表、字典元组),有多少个值就会执行多少次用例
2.代码实践范例
1)单个参数传递:
1 import pytest
2
3 class TestDemo(object):
4
5     @pytest.mark.parametrize('args', ['成都', '北京', '深圳'])
6     def test_add(self, args):
7         print('this is add')
8         print('获取到的参数:%s' % args)
2)多个参数传递:
 1 import pytest
 2
 3 class TestDemo(object):
 4
 5     parmae = [['成都', '锦里'], ['北京', '故宫'], ['深圳', '世界之窗']]
 6
 7     @pytest.mark.parametrize('city, attrac', parmae)
 8     def test_add(self, city, attrac):
 9         print('this is add')
10         print('城市:%s  景点:%s' % (city, attrac))
十五、YAML文件实现接口自动化
1.用于全局的配置文件:ini、yaml
2.用于编写接口测试用例

 浙公网安备 33010602011771号