
SpringMVC(十七):Web.xml初始化流程源码分析
上一篇讲解了web.xml如何使用编码的方式替换掉,但是一直没有写web.xml是如何被加载的相关细节,觉得十分有必要写一篇文章来梳理下。
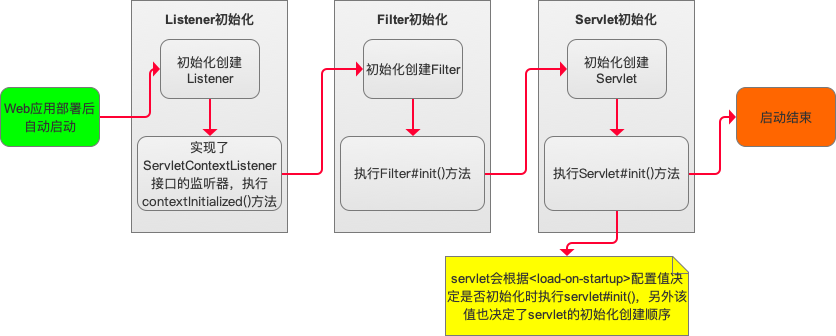
Web应用部署初始化
当一个web应用被部署到容器(tomcat等),tomcat系统启动过程中会执行以下处理:
1)部署描述文件(tomcat对应web.xml)中定义的(由<listener>元素标记的)事件监听器会被创建和初始化;
2)对于所有事件监听器,如果实现了ServletContextListener接口,将会执行#contextInitialized()方法;
3)部署描述文件中定义的(由<filter>元素标记的)过滤器会被创建和初始化,并调用#init()方法;
4)部署描述文件中定义的(由<servlet>元素标记的)servlet会根据<load-on-startup>的权重按顺序创建和初始化,并调用#init()方法。
备注:
1)<load-on-startup>权值如果设置为负整数,则不会在启动服务器时执行;包含>=0时,会在启动服务器时执行。
2)具体参考:《Java Servlet(十二):Servlet、Listener、Filter之间的执行流程分析》测试程序部署启动日志。
Web的初始化流程如下:
Tomcat初始化与处理Http请求
Tomcat初始化
Tomcat初始化解析Web.xml文件
要理清web.xml如何被加载、解析,需要从tomcat源码入手:
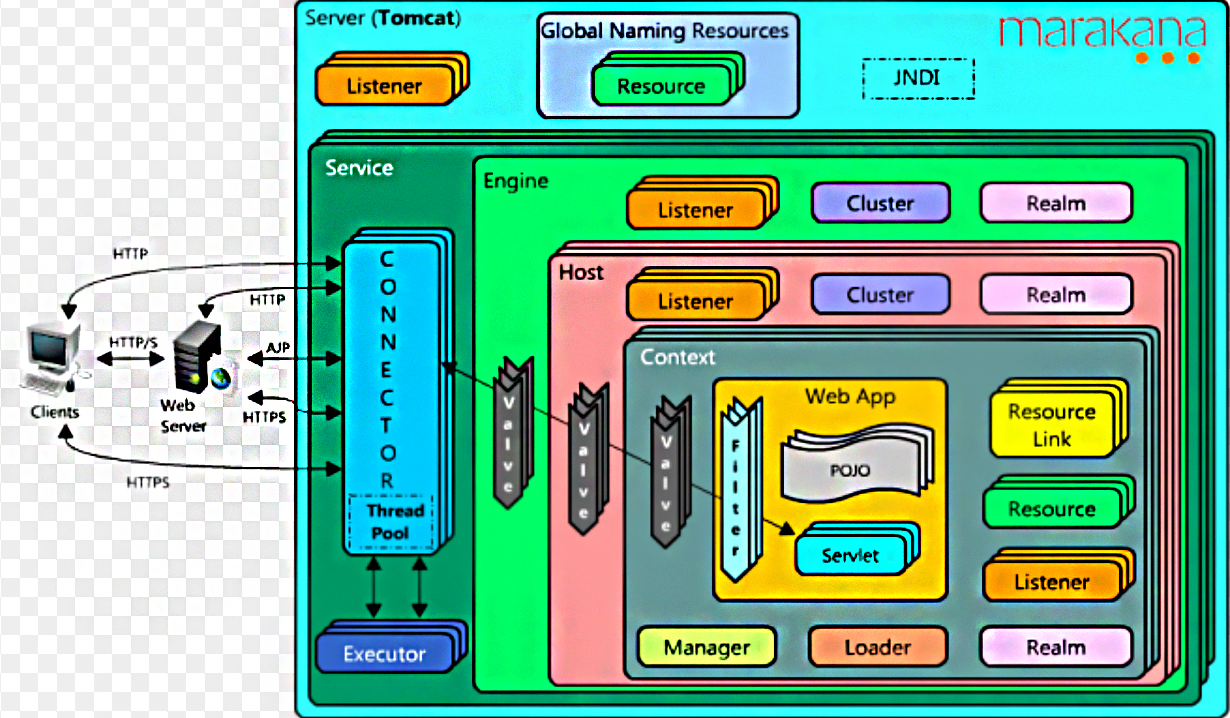
一个Tomcat中只有一个Server,一个Server可以包含多个Service,一个Service只有一个Container,但是可以有多个Connectors,这是因为一个服务可以有多个连接,如同时提供Http和Https链接,也可以提供向相同协议不同端口的连接。
在Container用于封装和管理Servlet,以及具体的处理Request请求,在Conatiner内部包含4个子容器:
1)Engine:引擎,用来管理多个站点,一个Servcie最多只能有一个Engine;
2)Host:代表一个站点,也可以叫虚拟主机,通过配置host就可以添加站点;
3)Context:代表一个应用程序,对应着平时开发的一套程序,或者一个WEB-INF目录以及下面的web.xml文件;
4)Wrapper:每一个Wrapper封装这一个Servlet。
Tomca的心脏是两个组件:Connector和Container(Engine,Host,Context,Wrapper)。一个Container可以选择多个Connecter,多个Connector和一个Container就形成了一个Service。Service可以对外提供服务,而Server服务器控制整个Tomcat的生命周期。
从上边分析可以知道Context是代表一个应程序,或者一个WEB-INF目录以及下边的web.xml文件,可以从它的作用上可以明白Context对web.xml的加载解析启动了特别重要的作用。Tomcat的启动流程:
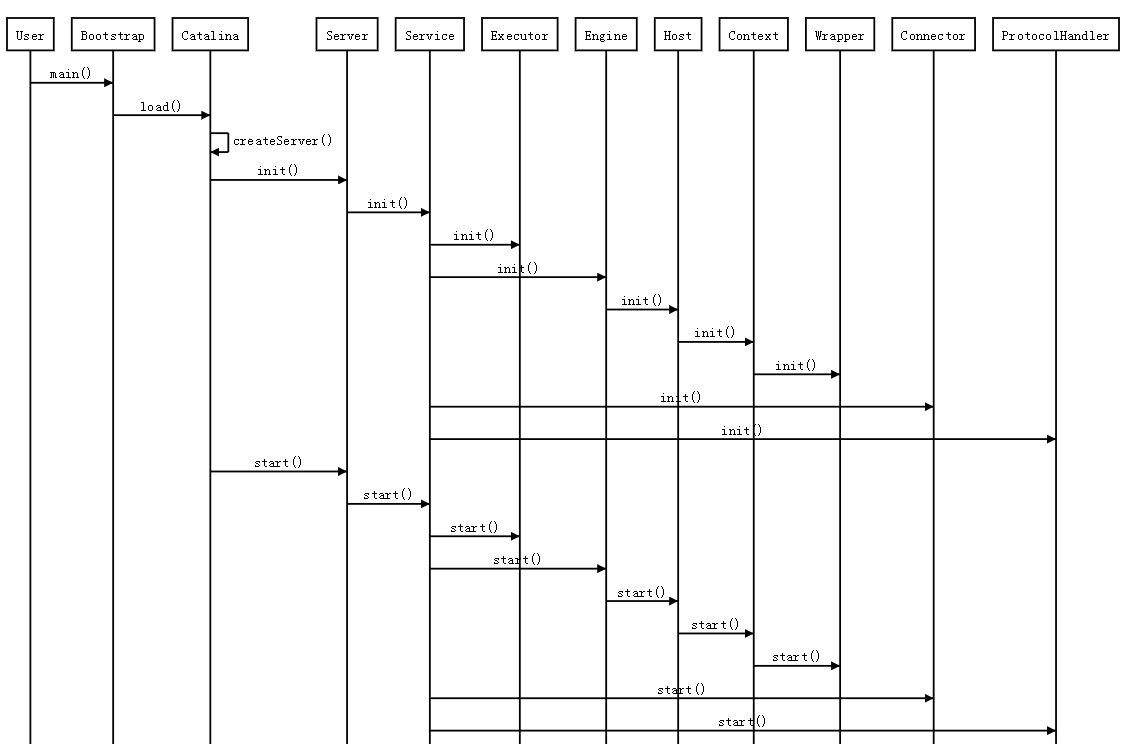
从上图可以知道Tomcat中启动过程中会调用Context的唯一实现类StandardContext的#init()和#start(),在这里Tomcat采用了模板设计模式,StandardContext中实际实现方法对应的是initInternal()和startInternal()。
StandardContext#startInternal()
    @Override
    protected synchronized void startInternal() throws LifecycleException {
        // 此处省略代码...

        try {
            if (ok) {
                // 此处省略代码...

                // 1)加载web.xml
                // Notify our interested LifecycleListeners
                fireLifecycleEvent(Lifecycle.CONFIGURE_START_EVENT, null);

                // 此处省略代码...
            }
            // 此处省略代码...

            // 2)合并参数
            // Set up the context init params
            mergeParameters();
            // 此处省略代码...

            // 3)listener启动
            // Configure and call application event listeners
            if (ok) {
                if (!listenerStart()) {
                    log.error(sm.getString("standardContext.listenerFail"));
                    ok = false;
                }
            }
            // 此处省略代码...

            // 4)filter启动
            // Configure and call application filters
            if (ok) {
                if (!filterStart()) {
                    log.error(sm.getString("standardContext.filterFail"));
                    ok = false;
                }
            }
            // 此处省略代码...

            // 5)加载初始化servlet
            // Load and initialize all "load on startup" servlets
            if (ok) {
                if (!loadOnStartup(findChildren())){
                    log.error(sm.getString("standardContext.servletFail"));
                    ok = false;
                }
            }
            // 此处省略代码...
        } finally {
            // Unbinding thread
            unbindThread(oldCCL);
        }
        // 此处省略代码...
    }
1)调用fireLifecycleEvent()
发布一个"configure_start"
事件,在众多监听器中有一个ContextConfig监听器,在ContextConfig监听到"configure_start" 事件后,
会执行configureStart()方法;在configureStart()方法中执行webConfig()开始web.xml解析;值得一提的是webConfig中调用的两个方法:
ContextConfig#parseWebXml(contextWebXml, webXml, false)方法:
这个方法中有一个Digester工具,在Tomcat加载server.xml配置文件的时候就是使用了此工具,解析原理异曲同工。 此处使用WebRuleSet规则,将web.xml文件中的配置读取出来设置到webXml对象中去。
ContextConfig#configureContext(StandardContext context)方法:
将web.xml文件解析出来的各个组件设置到标准servlet上下文StandardContext中去。 其中就包括我们的filter ,servlet,listener。
2)mergeParameters
步骤1)中会将web.xml中的context-param元素设置到context的parameters里,此处则是把parameters设置到servletContext里。
3)启动listener
步骤1)中会将web.xml中的listener元素设置到context的applicationListeners里,此处则取出listener类名,创建实例,并将listener分为两类
eventlistener:ServletRequestAttributeListener、ServletRequestListener、HttpSessionIdListener、HttpSessionAttributeListener
lifecyclelistener:ServletContextListener、HttpSessionListener
对于ServletContextListener,会调用listener.contextInitialized(event),并触发实现了ServletContextListener接口实现类的beforeContextInitialized,afterContextInitialized方法。
4)启动filter
步骤1)中会将web.xml中的filter元素设置到filter的filterdef里,此处则会实例化filter设置到filterConfigs里。
5)启动servlet
步骤1)中会将web.xml中的servlet元素封装成wrapper并调用addChild方法设置到Context里,此处则会检查是否需要loadonstartup,如果需要则load。
更详细介绍请参考:《Tomcat(一):Tomcat启动时加载web.xml》
Tomcat处理Http请求
Tomcat处理Http请求过程流程图:
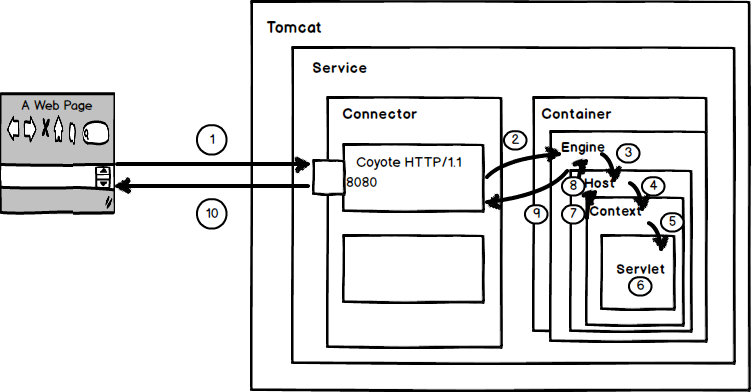
假设来自客户的请求为:http://localhost:8080/test/index.jsp 请求被发送到本机端口8080
1、用户点击网页内容,请求被发送到本机端口8080,被在那里监听的Coyote HTTP/1.1 Connector获得。
2、Connector把该请求交给它所在的Service的Engine来处理,并等待Engine的回应。
3、Engine获得请求localhost/test/index.jsp,匹配所有的虚拟主机Host。
4、Engine匹配到名为localhost的Host(即使匹配不到也把请求交给该Host处理,因为该Host被定义为该Engine的默认主机),名为localhost的Host获得请求/test/index.jsp,匹配它所拥有的所有的Context。Host匹配到路径为/test的Context(如果匹配不到就把该请求交给路径名为“
”的Context去处理)。
5、path=“/test”的Context获得请求/index.jsp,在它的mapping table中寻找出对应的Servlet。Context匹配到URL PATTERN为*.jsp的Servlet,对应于JspServlet类。
6、构造HttpServletRequest对象和HttpServletResponse对象,作为参数调用JspServlet的doGet()或doPost().执行业务逻辑、数据存储等程序。
7、Context把执行完之后的HttpServletResponse对象返回给Host。
8、Host把HttpServletResponse对象返回给Engine。
9、Engine把HttpServletResponse对象返回Connector。
10、Connector把HttpServletResponse对象返回给客户Browser。
Tomcat哪些组件参与了Http请求处理
Connector相关组件
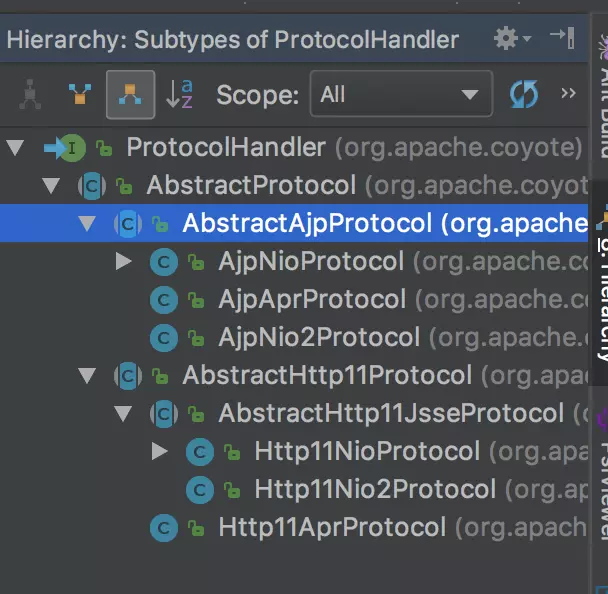
注意:不同的协议、不同的通信方式,ProtocolHandler会有不同的实现。在Tomcat8.5中,ProtocolHandler类的集成层级如下图所示:
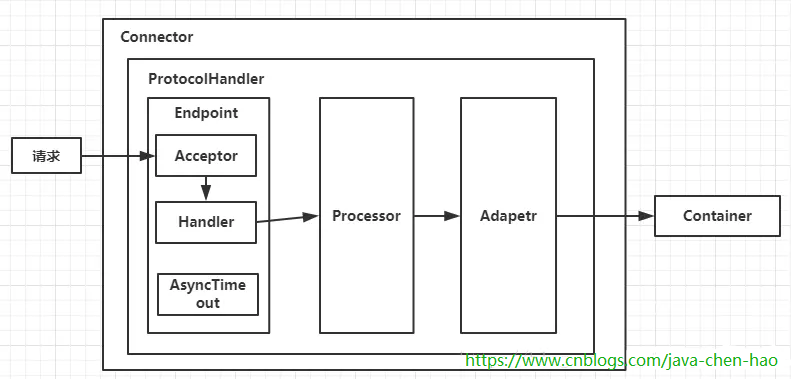
ProtocolHandler包含三个部件:Endpoint、Processor、Adapter。
1)Endpoint:用来处理底层Socket网络连接,因此Endpoint是用来实现TCP/IP协议的;Endpoint的抽象实现类AbstractEndpoint里面定义了Acceptor和AsyncTimeout两个内部类和一个Handler接口。
1.1)Acceptor:用于监听请求;
1.2)AsyncTimeout:用于检查异步Request的超时;
1.3)Handler:用于处理接收到的Socket,在内部调用Processor进行处理。

2)Processor:用来将Endpoint接收到Socket封装成Request,Precessor用来实现Http协议的;
3)Adapter:用来将Request交给Container进行具体处理,Adapter想请求适配到Servlet容器进行具体的处理。

CoyoteAdapter#service()
Adapter用于连接Connector和Container,起到承上启下的作用。Processor会调用Adapter.service()方法。
    @Override
    public void service(org.apache.coyote.Request req, org.apache.coyote.Response res) throws Exception {
        Request request = (Request) req.getNote(ADAPTER_NOTES);
        Response response = (Response) res.getNote(ADAPTER_NOTES);

        // 此处忽略代码

        try {
            // Parse and set Catalina and configuration specific request parameters
            postParseSuccess = postParseRequest(req, request, res, response);
            if (postParseSuccess) {
                //check valves if we support async
                request.setAsyncSupported(
                        connector.getService().getContainer().getPipeline().isAsyncSupported());
                // Calling the container
                connector.getService().getContainer().getPipeline().getFirst().invoke(
                        request, response);
            }
            // 此处忽略代码
        } catch (IOException e) {
            // Ignore
        } finally {
            // 此处忽略代码
        }
    }
如果请求可以被传给容器的Pipeline即当postParseRequest方法返回true时,则由容器继续处理,在service方法中有connector.getService().getContainer().getPipeline().getFirst().invoke(request, response)这一行:
- Connector调用getService返回StandardService;
- StandardService调用getContainer返回StandardEngine;
- StandardEngine调用getPipeline返回与其关联的StandardPipeline;
接下来将会调用EnginePipeline#StandardEngineValve->HostPipeline#StandardHostValve->ContextPipeline#StandardContextValve->WrapperPipeline#StandardWrapperValve。
StandardWrapperValve#invoker(...)
    /**
     * Invoke the servlet we are managing, respecting the rules regarding
     * servlet lifecycle and SingleThreadModel support.
     *
     * @param request Request to be processed
     * @param response Response to be produced
     *
     * @exception IOException if an input/output error occurred
     * @exception ServletException if a servlet error occurred
     */
    @Override
    public final void invoke(Request request, Response response)
        throws IOException, ServletException {
        // 此处省略代码
        StandardWrapper wrapper = (StandardWrapper) getContainer();
        Servlet servlet = null;
        Context context = (Context) wrapper.getParent();

        // 此处省略代码
        // 分配一个servlet实例用来处理请求
        // Allocate a servlet instance to process this request
        try {
            if (!unavailable) {
                // 调用StandardWrapper#allocate()方法,获取到servlet实例
                servlet = wrapper.allocate();
            }
        } catch (UnavailableException e) {
            // 此处省略代码
        } catch (ServletException e) {
            // 此处省略代码
        } catch (Throwable e) {
            // 此处省略代码
        }

        // 此处省略代码
        // 为当前请求创建一个过滤器链
        // Create the filter chain for this request
        ApplicationFilterChain filterChain =
                ApplicationFilterFactory.createFilterChain(request, wrapper, servlet);

        // 为当前请求调用过滤器链,注意:这也会调用servlet实例的service()方法
        // Call the filter chain for this request
        // NOTE: This also calls the servlet's service() method
        try {
            if ((servlet != null) && (filterChain != null)) {
                // Swallow output if needed
                if (context.getSwallowOutput()) {
                    try {
                        SystemLogHandler.startCapture();
                        if (request.isAsyncDispatching()) {
                            request.getAsyncContextInternal().doInternalDispatch();
                        } else {
                            filterChain.doFilter(request.getRequest(),
                                    response.getResponse());
                        }
                    } finally {
                        String log = SystemLogHandler.stopCapture();
                        if (log != null && log.length() > 0) {
                            context.getLogger().info(log);
                        }
                    }
                } else {
                    if (request.isAsyncDispatching()) {
                        request.getAsyncContextInternal().doInternalDispatch();
                    } else {
                        filterChain.doFilter
                            (request.getRequest(), response.getResponse());
                    }
                }
            }
        } catch (ClientAbortException | CloseNowException e) {
            // 此处省略代码
        } catch (IOException e) {
            // 此处省略代码
        } catch (UnavailableException e) {
            // 此处省略代码
        } catch (ServletException e) {
            // 此处省略代码
        } catch (Throwable e) {
            // 此处省略代码
        } finally {
            // 释放资源
            // Release the filter chain (if any) for this request
            if (filterChain != null) {
                filterChain.release();
            }

            // Deallocate the allocated servlet instance
            try {
                if (servlet != null) {
                    wrapper.deallocate(servlet);
                }
            } catch (Throwable e) {
                // 此处省略代码
            }

            // If this servlet has been marked permanently unavailable,
            // unload it and release this instance
            try {
                if ((servlet != null) &&
                    (wrapper.getAvailable() == Long.MAX_VALUE)) {
                    wrapper.unload();
                }
            } catch (Throwable e) {
                // 此处省略代码
            }
            // 此处省略代码
        }
    }
该StandardWrapperValve正是将Tomcat在处理Http请求过程中,真正调用filterChain(内部执行filter.doFilter())、调用servlet.service(...)代码的地方。
ApplicationFilterChain#doFilter(...)
    /**
     * Invoke the next filter in this chain, passing the specified request
     * and response.  If there are no more filters in this chain, invoke
     * the <code>service()</code> method of the servlet itself.
     *
     * @param request The servlet request we are processing
     * @param response The servlet response we are creating
     *
     * @exception IOException if an input/output error occurs
     * @exception ServletException if a servlet exception occurs
     */
    @Override
    public void doFilter(ServletRequest request, ServletResponse response)
        throws IOException, ServletException {
        if( Globals.IS_SECURITY_ENABLED ) {
            final ServletRequest req = request;
            final ServletResponse res = response;
            try {
                java.security.AccessController.doPrivileged(
                    new java.security.PrivilegedExceptionAction<Void>() {
                        @Override
                        public Void run()
                            throws ServletException, IOException {
                            internalDoFilter(req,res);
                            return null;
                        }
                    }
                );
            } catch( PrivilegedActionException pe) {
                // 此处省略代码;
            }
        } else {
            internalDoFilter(request,response);
        }
    }

    /**
     * 职责链模式调用filter#doFilter,并在调用最底层调用servlet.service(request,response)。
     */
    private void internalDoFilter(ServletRequest request,
                                  ServletResponse response)
        throws IOException, ServletException {

        // Call the next filter if there is one
        if (pos < n) {
            ApplicationFilterConfig filterConfig = filters[pos++];
            try {
                Filter filter = filterConfig.getFilter();

                if (request.isAsyncSupported() && "false".equalsIgnoreCase(
                        filterConfig.getFilterDef().getAsyncSupported())) {
                    request.setAttribute(Globals.ASYNC_SUPPORTED_ATTR, Boolean.FALSE);
                }
                if( Globals.IS_SECURITY_ENABLED ) {
                    final ServletRequest req = request;
                    final ServletResponse res = response;
                    Principal principal =
                        ((HttpServletRequest) req).getUserPrincipal();

                    Object[] args = new Object[]{req, res, this};
                    SecurityUtil.doAsPrivilege ("doFilter", filter, classType, args, principal);
                } else {
                    filter.doFilter(request, response, this);
                }
            } catch (IOException | ServletException | RuntimeException e) {
                throw e;
            } catch (Throwable e) {
                // 此处省略代码
            }
            return;
        }

        // We fell off the end of the chain -- call the servlet instance
        try {
            // 此处省略代码
            // Use potentially wrapped request from this point
            if ((request instanceof HttpServletRequest) &&
                    (response instanceof HttpServletResponse) &&
                    Globals.IS_SECURITY_ENABLED ) {
                final ServletRequest req = request;
                final ServletResponse res = response;
                Principal principal =
                    ((HttpServletRequest) req).getUserPrincipal();
                Object[] args = new Object[]{req, res};
                SecurityUtil.doAsPrivilege("service",
                                           servlet,
                                           classTypeUsedInService,
                                           args,
                                           principal);
            } else {
                servlet.service(request, response);
            }
        } catch (IOException | ServletException | RuntimeException e) {
            throw e;
        } catch (Throwable e) {
            // 此处省略代码
        } finally {
            // 此处省略代码
        }
    }
采用职责链设计模式,在filter最深层调用servlet.service(request,response)。
在Spring+SpringMvc项目中,Tomcat处理Http请求时的流程图如下:
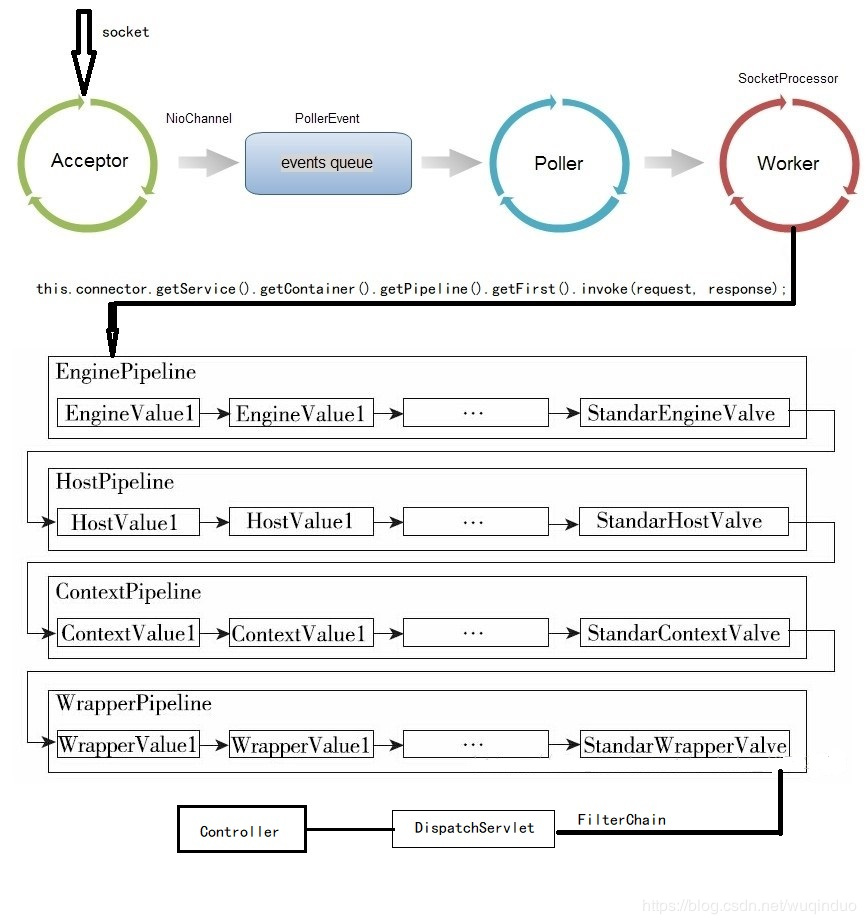
图片来自《Tomcat原理系列之二:由点到线,请求主干》
SpringMVC初始化流程
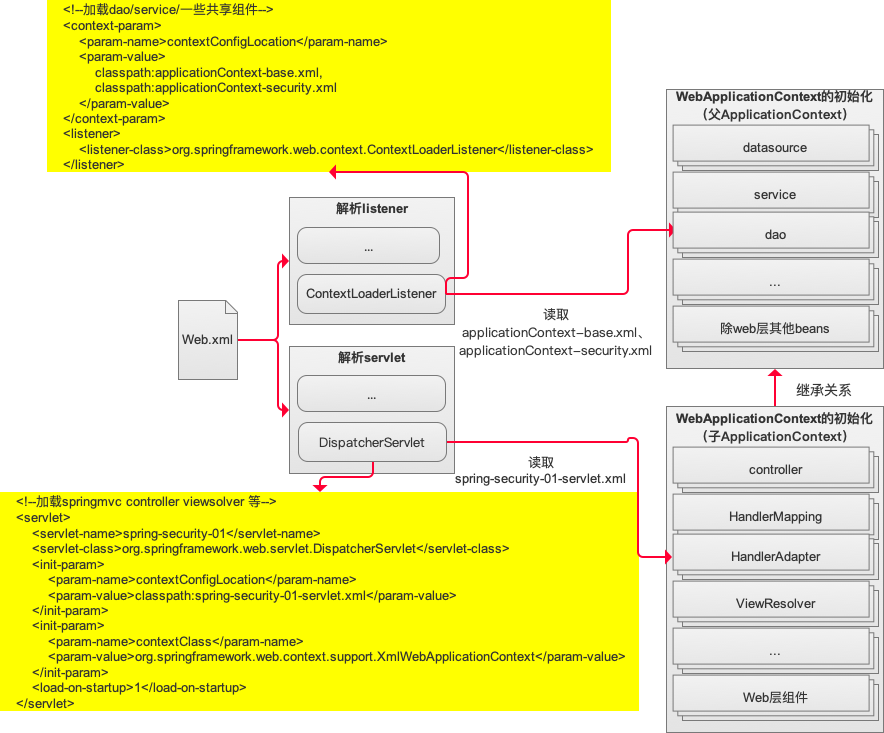
启动时需要加载部署描述文件(web.xml),我们本章的给出一个比较常见的web.xml为例,用它来分析SpringMVC的启动流程。
<!DOCTYPE web-app PUBLIC
        "-//Sun Microsystems, Inc.//DTD Web Application 2.3//EN"
        "http://java.sun.com/dtd/web-app_2_3.dtd" >
<web-app>
    <display-name>Archetype Created Web Application</display-name>

    <welcome-file-list>
        <welcome-file>/index</welcome-file>
    </welcome-file-list>

    <!--加载dao/service/一些共享组件-->
    <context-param>
        <param-name>contextConfigLocation</param-name>
        <param-value>
            classpath:applicationContext-base.xml,
            classpath:applicationContext-security.xml
        </param-value>
    </context-param>
    <listener>
        <listener-class>org.springframework.web.context.ContextLoaderListener</listener-class>
    </listener>
    <listener>
        <listener-class>org.springframework.security.web.session.HttpSessionEventPublisher</listener-class>
    </listener>

    <filter>
        <filter-name>springSecurityFilterChain</filter-name>
        <filter-class>org.springframework.web.filter.DelegatingFilterProxy</filter-class>
        <init-param>
            <param-name>targetFilterLifecycle</param-name>
            <!-- 默认是false -->
            <param-value>false</param-value>
        </init-param>
    </filter>
    <filter-mapping>
        <filter-name>springSecurityFilterChain</filter-name>
        <url-pattern>/*</url-pattern>
    </filter-mapping>

    <filter>
        <filter-name>multipartFilter</filter-name>
        <filter-class>org.springframework.web.multipart.support.MultipartFilter</filter-class>
        <init-param>
            <param-name>multipartResolverBeanName</param-name>
            <param-value>multipartResolver</param-value>
        </init-param>
    </filter>
    <filter-mapping>
        <filter-name>multipartFilter</filter-name>
        <url-pattern>/*</url-pattern>
    </filter-mapping>

    <filter>
        <filter-name>hiddenHttpMethodFilter</filter-name>
        <filter-class>org.springframework.web.filter.HiddenHttpMethodFilter</filter-class>
        <init-param>
            <param-name>methodParam</param-name>
            <param-value>_method</param-value>
        </init-param>
    </filter>
    <filter-mapping>
        <filter-name>hiddenHttpMethodFilter</filter-name>
        <url-pattern>/*</url-pattern>
    </filter-mapping>

    <filter>
        <filter-name>characterEncodingFilter</filter-name>
        <filter-class>org.springframework.web.filter.CharacterEncodingFilter</filter-class>
        <init-param>
            <param-name>encoding</param-name>
            <param-value>UTF-8</param-value>
        </init-param>
        <init-param>
            <param-name>forceEncoding</param-name>
            <param-value>true</param-value>
        </init-param>
    </filter>
    <filter-mapping>
        <filter-name>characterEncodingFilter</filter-name>
        <url-pattern>/*</url-pattern>
    </filter-mapping>

    <!--加载springmvc controller viewsolver 等-->
    <servlet>
        <servlet-name>spring-security-01</servlet-name>
        <servlet-class>org.springframework.web.servlet.DispatcherServlet</servlet-class>
        <init-param>
            <param-name>contextConfigLocation</param-name>
            <param-value>classpath:spring-security-01-servlet.xml</param-value>
        </init-param>
        <init-param>
            <param-name>contextClass</param-name>
            <param-value>org.springframework.web.context.support.XmlWebApplicationContext</param-value>
        </init-param>
        <load-on-startup>1</load-on-startup>
    </servlet>
    <servlet-mapping>
        <servlet-name>spring-security-01</servlet-name>
        <url-pattern>/</url-pattern>
    </servlet-mapping>

</web-app>
在Spring+SpringMVC项目被部署到tomcat容器,启动项目时会去加载web.xml配置文件,会根据web.xml配置内容去进行初始化。
Listener初始化
ContextLoaderListener实现了ServletContextListener,它本身就是一个listener,在Tomcat启动过程中web.xml加载后,StandardContext#startInternal()方法中调用的StandardContext#listenerStart()中执行的。
    public boolean listenerStart() {
             ...
            for (int i = 0; i < instances.length; i++) {
            if (!(instances[i] instanceof ServletContextListener))
                continue;
            ServletContextListener listener =
                (ServletContextListener) instances[i];
            try {
                fireContainerEvent("beforeContextInitialized", listener);
                if (noPluggabilityListeners.contains(listener)) {
                    listener.contextInitialized(tldEvent);
                } else {
                    //执行listener的初始。传递ServletContextEvent参数
                    listener.contextInitialized(event);//
                }
                fireContainerEvent("afterContextInitialized", listener);
            } catch (Throwable t) {
                ExceptionUtils.handleThrowable(t);
                fireContainerEvent("afterContextInitialized", listener);
                getLogger().error
                    (sm.getString("standardContext.listenerStart",
                                  instances[i].getClass().getName()), t);
                ok = false;
            }
            }
             ...
     }
因为ContextLoaderListener实现ServletContextListener接口,因此上边调用ServletContextListener#contextInitialized(...)实现代码就是ContextLoaderListener#contextInitialized(ServletContextEvent event)方法:
    /**
     * Initialize the root web application context. 初始化web
     */
    @Override
    public void contextInitialized(ServletContextEvent event) {
        initWebApplicationContext(event.getServletContext());
    }
initWebApplicationContext(...)是ContextLoader的方法(ContextLoaderListener不但实现了ServletContextListener接口,还继承了ContextLoader类),接下来查看ContextLoader#initWebApplicationContext(...)源码:
    public WebApplicationContext initWebApplicationContext(ServletContext servletContext) {
        if (servletContext.getAttribute(WebApplicationContext.ROOT_WEB_APPLICATION_CONTEXT_ATTRIBUTE) != null) {
            throw new IllegalStateException(
                    "Cannot initialize context because there is already a root application context present - " +
                    "check whether you have multiple ContextLoader* definitions in your web.xml!");
        }

        servletContext.log("Initializing Spring root WebApplicationContext");
        Log logger = LogFactory.getLog(ContextLoader.class);
        if (logger.isInfoEnabled()) {
            logger.info("Root WebApplicationContext: initialization started");
        }
        long startTime = System.currentTimeMillis();

        try {
            // Store context in local instance variable, to guarantee that
            // it is available on ServletContext shutdown.
            if (this.context == null) {
                this.context = createWebApplicationContext(servletContext);
            }
            if (this.context instanceof ConfigurableWebApplicationContext) {
                ConfigurableWebApplicationContext cwac = (ConfigurableWebApplicationContext) this.context;
                if (!cwac.isActive()) {
                    // The context has not yet been refreshed -> provide services such as
                    // setting the parent context, setting the application context id, etc
                    if (cwac.getParent() == null) {
                        // The context instance was injected without an explicit parent ->
                        // determine parent for root web application context, if any.
                        ApplicationContext parent = loadParentContext(servletContext);
                        cwac.setParent(parent);
                    }
                    configureAndRefreshWebApplicationContext(cwac, servletContext);
                }
            }
            servletContext.setAttribute(WebApplicationContext.ROOT_WEB_APPLICATION_CONTEXT_ATTRIBUTE, this.context);

            ClassLoader ccl = Thread.currentThread().getContextClassLoader();
            if (ccl == ContextLoader.class.getClassLoader()) {
                currentContext = this.context;
            }
            else if (ccl != null) {
                currentContextPerThread.put(ccl, this.context);
            }

            if (logger.isInfoEnabled()) {
                long elapsedTime = System.currentTimeMillis() - startTime;
                logger.info("Root WebApplicationContext initialized in " + elapsedTime + " ms");
            }

            return this.context;
        }
        catch (RuntimeException | Error ex) {
            logger.error("Context initialization failed", ex);
            servletContext.setAttribute(WebApplicationContext.ROOT_WEB_APPLICATION_CONTEXT_ATTRIBUTE, ex);
            throw ex;
        }
    }
上边代码核心方法包含两个:
1)ContextLoader#createWebApplicationContext(ServletContext sc):
createWebApplicationContext(ServletContext sc)方法用来创建WebApplicationContext实例:
    /**
     * 返回WebApplicationContext的实现类,否则返回默认XmlWebApplicationContext或者通过开发者自定义.
     * 此实现要求自定义上下文实现ConfigurableWebApplicationContext接口。可以在子类中重写。
     * 此外,{#customizeContext}在刷新上下文之前被调用,从而允许子类对上下文执行自定义修改。
     * @param sc 当前servlet上下文
     * @return 根WebApplicationContext
     */
    protected WebApplicationContext createWebApplicationContext(ServletContext sc) {
        Class<?> contextClass = determineContextClass(sc);
        if (!ConfigurableWebApplicationContext.class.isAssignableFrom(contextClass)) {
            throw new ApplicationContextException("Custom context class [" + contextClass.getName() +
                    "] is not of type [" + ConfigurableWebApplicationContext.class.getName() + "]");
        }
        return (ConfigurableWebApplicationContext) BeanUtils.instantiateClass(contextClass);
    }
ContextLoader#determineContextClass()方法:
    /**
     * 返回WebApplicationContext的实现类,否则返回默认XmlWebApplicationContext或者通过开发者自定义.
     * @param servletContext 当前servlet上下文
     * @return  WebApplicationContext的实现类
     */
    protected Class<?> determineContextClass(ServletContext servletContext) {
        String contextClassName = servletContext.getInitParameter(CONTEXT_CLASS_PARAM);//"contextClass"
        if (contextClassName != null) {
            try {
                return ClassUtils.forName(contextClassName, ClassUtils.getDefaultClassLoader());
            }
            catch (ClassNotFoundException ex) {
                throw new ApplicationContextException(
                        "Failed to load custom context class [" + contextClassName + "]", ex);
            }
        }
        else { // 否则,读取ContextLoader.properties中配置的key=WebApplicationContetxt.class.getName()的value,这里返回XmlWebApplicationContext.class.getName()
            contextClassName = defaultStrategies.getProperty(WebApplicationContext.class.getName());
            try {
                return ClassUtils.forName(contextClassName, ContextLoader.class.getClassLoader());
            }
            catch (ClassNotFoundException ex) {
                throw new ApplicationContextException(
                        "Failed to load default context class [" + contextClassName + "]", ex);
            }
        }
    }
ContextLoader#defaultStrategies属性:
    /**
     * Name of the class path resource (relative to the ContextLoader class)
     * that defines ContextLoader's default strategy names.
     */
    private static final String DEFAULT_STRATEGIES_PATH = "ContextLoader.properties";

    private static final Properties defaultStrategies;

    static {
        // Load default strategy implementations from properties file.
        // This is currently strictly internal and not meant to be customized
        // by application developers.
        try {
            ClassPathResource resource = new ClassPathResource(DEFAULT_STRATEGIES_PATH, ContextLoader.class);
            defaultStrategies = PropertiesLoaderUtils.loadProperties(resource);
        }
        catch (IOException ex) {
            throw new IllegalStateException("Could not load 'ContextLoader.properties': " + ex.getMessage());
        }
    }
ContextLoader.properties是spring-web-5.2.0.RELEASE.jar中内的配置文件/org/springframework/web/context/ContextLoader.properties
# Default WebApplicationContext implementation class for ContextLoader.
# Used as fallback when no explicit context implementation has been specified as context-param.
# Not meant to be customized by application developers.
org.springframework.web.context.WebApplicationContext=org.springframework.web.context.support.XmlWebApplicationContext
结合ContextLoader.properties中配置,可以得知ContextLoader#defaultStrategies属性值配置的值就是:{key=WebApplicationContext.class,value=XmlWebApplicationContext.class}。
2)ContextLoader#configureAndRefreshWebApplicationContext(cwac, servletContext):
configureAndRefreshWebApplicationContext(cwac, servletContext)方法作用是‘配置’和‘刷新’WebApplicationContext:
protected void configureAndRefreshWebApplicationContext(ConfigurableWebApplicationContext wac, ServletContext sc) {
   if (ObjectUtils.identityToString(wac).equals(wac.getId())) {
      // The application context id is still set to its original default value
      // -> assign a more useful id based on available information
      String idParam = sc.getInitParameter(CONTEXT_ID_PARAM);
      if (idParam != null) {
         wac.setId(idParam);
      }
      else {
         // Generate default id...
         wac.setId(ConfigurableWebApplicationContext.APPLICATION_CONTEXT_ID_PREFIX +
               ObjectUtils.getDisplayString(sc.getContextPath()));
      }
   }

   wac.setServletContext(sc);
   String configLocationParam = sc.getInitParameter(CONFIG_LOCATION_PARAM);
   if (configLocationParam != null) {
      wac.setConfigLocation(configLocationParam);
   }

   // The wac environment's #initPropertySources will be called in any case when the context
   // is refreshed; do it eagerly here to ensure servlet property sources are in place for
   // use in any post-processing or initialization that occurs below prior to #refresh
   ConfigurableEnvironment env = wac.getEnvironment();
   if (env instanceof ConfigurableWebEnvironment) {
      ((ConfigurableWebEnvironment) env).initPropertySources(sc, null);
   }

   customizeContext(sc, wac);
   wac.refresh();
}
wac.setConfigLocation(configLocationParam): CONFIG_LOCATION_PARAM = "contextConfigLocation" 获取web.xml中<context-param>标签配置的全局变量,其中key为CONFIG_LOCATION_PARAM,也就是我们配置的相应Bean的xml文件名,并将其放入到WebApplicationContext中
wac是一个接口类:我们知道ac的真正实现类是XmlWebApplicaitonContext,因此wac.refresh()调用就是XmlWebApplicationContext#refresh(),注意XmlWebApplcationContext的refresh()是定义在它的抽象父类接口类AbstractApplicationContext.java中。
下边看下AbstractApplicationContext#refresh()源码:
@Override
    public void refresh() throws BeansException, IllegalStateException {
        synchronized (this.startupShutdownMonitor) {
            // Prepare this context for refreshing.
            prepareRefresh();

            // Tell the subclass to refresh the internal bean factory.
            ConfigurableListableBeanFactory beanFactory = obtainFreshBeanFactory();

            // Prepare the bean factory for use in this context.
            prepareBeanFactory(beanFactory);

            try {
                // Allows post-processing of the bean factory in context subclasses.
                postProcessBeanFactory(beanFactory);

                // Invoke factory processors registered as beans in the context.
                invokeBeanFactoryPostProcessors(beanFactory);

                // Register bean processors that intercept bean creation.
                registerBeanPostProcessors(beanFactory);

                // Initialize message source for this context.
                initMessageSource();

                // Initialize event multicaster for this context.
                initApplicationEventMulticaster();

                // Initialize other special beans in specific context subclasses.
                onRefresh();

                // Check for listener beans and register them.
                registerListeners();

                // Instantiate all remaining (non-lazy-init) singletons.
                finishBeanFactoryInitialization(beanFactory);

                // Last step: publish corresponding event.
                finishRefresh();
            }
            catch (BeansException ex) {
                if (logger.isWarnEnabled()) {
                    logger.warn("Exception encountered during context initialization - " +
                            "cancelling refresh attempt: " + ex);
                }

                // Destroy already created singletons to avoid dangling resources.
                destroyBeans();

                // Reset 'active' flag.
                cancelRefresh(ex);

                // Propagate exception to caller.
                throw ex;
            }
            finally {
                // Reset common introspection caches in Spring's core, since we
                // might not ever need metadata for singleton beans anymore...
                resetCommonCaches();
            }
        }
    }
上边refresh()方法初始化bean,就是spring的著名的初始化方法refresh()。在Tomcat启动时,加载Spring+SpringMVC项目中web.xml定义的ContextLoaderListener,ContextLoaderListener实现ServletContextListener接口,继承ContextLoader加载器,进而把Tomcat与Spring连接到了一起。
Filter初始化
在监听器listener初始化完成后,按照文章开始的讲解,接下来会进行filter的初始化操作,filter的创建和初始化中没有涉及IoC容器的相关操作,因此不是本文讲解的重点,本文举例的filter是一个用于编码用户请求和响应的过滤器,采用utf-8编码用于适配中文。
关于Filter的在请求过程中与Servlet调用原理,请参考上边Tomcat处理Http请求过程。
Servlet(DispatcherServlet)初始化
上边在介绍Tomcat启动过程中解析web.xml时,讲到Servlet的初始化与调用核心代码,这里将主要针对启动这部分进一步介绍,关于调用部分不再阐述。
在Spring+SpringMVC项目中web.xml中servlet配置了DispatcherServlet,Tomcat在启动过程中DispatcherServlet就是一个普通的Servlet(DispatcherServlet extends FrameworkServlet,FrameworkServlet extends HttpServletBean,HttpServletBean extends HttpServlet,HttpServlet extends GenericServlet,GenericServlet extends Servlet),从上边结合Tomcat加载启动web.xml过程可以知道StandardContext#startInternal()调用时,加载并初始化Servlet,调用的方法是StandardContext#loadOnStartup(...)。
    /**
     * Load and initialize all servlets marked "load on startup" in the
     * web application deployment descriptor.
     *
     * @param children Array of wrappers for all currently defined
     *  servlets (including those not declared load on startup)
     * @return <code>true</code> if load on startup was considered successful
     */
    public boolean loadOnStartup(Container children[]) {
        // 1)收集到配置<load-on-startup>值大于等于0的servlet,后边回去初始化它们。
        // Collect "load on startup" servlets that need to be initialized
        TreeMap<Integer, ArrayList<Wrapper>> map = new TreeMap<>();
        for (int i = 0; i < children.length; i++) {
            Wrapper wrapper = (Wrapper) children[i];
            int loadOnStartup = wrapper.getLoadOnStartup();
            if (loadOnStartup < 0)
                continue;
            Integer key = Integer.valueOf(loadOnStartup);
            ArrayList<Wrapper> list = map.get(key);
            if (list == null) {
                list = new ArrayList<>();
                map.put(key, list);
            }
            list.add(wrapper);
        }

        // 2)初始化<load-on-startup>值大于等于0的servlet,通过调用servlet.load()方法。
        // Load the collected "load on startup" servlets
        for (ArrayList<Wrapper> list : map.values()) {
            for (Wrapper wrapper : list) {
                try {
                    wrapper.load();
                } catch (ServletException e) {
                    getLogger().error(sm.getString("standardContext.loadOnStartup.loadException",
                          getName(), wrapper.getName()), StandardWrapper.getRootCause(e));
                    // NOTE: load errors (including a servlet that throws
                    // UnavailableException from the init() method) are NOT
                    // fatal to application startup
                    // unless failCtxIfServletStartFails="true" is specified
                    if(getComputedFailCtxIfServletStartFails()) {
                        return false;
                    }
                }
            }
        }
        return true;
    }
Wrapper的实现类结构:

其中上边StandardContext#loadOnStartup(...)中调用的wrapper.load(),load()方法的实现就是StandardWrapper#load()。
    @Override
    public synchronized void load() throws ServletException {
        instance = loadServlet();

        if (!instanceInitialized) {
            initServlet(instance);
        }

        if (isJspServlet) {
            StringBuilder oname = new StringBuilder(getDomain());

            oname.append(":type=JspMonitor");

            oname.append(getWebModuleKeyProperties());

            oname.append(",name=");
            oname.append(getName());

            oname.append(getJ2EEKeyProperties());

            try {
                jspMonitorON = new ObjectName(oname.toString());
                Registry.getRegistry(null, null).registerComponent(instance, jspMonitorON, null);
            } catch (Exception ex) {
                log.warn("Error registering JSP monitoring with jmx " + instance);
            }
        }
    }
主要代码:
1)loadServlet():加载Servlet类,并返回其实例对象;
2)initServlet():如果Servlet实例未初始化,则调用Servlet#init()方法初始化servlet。
    public synchronized Servlet loadServlet() throws ServletException {
        // Nothing to do if we already have an instance or an instance pool
        if (!singleThreadModel && (instance != null))
            return instance;

        PrintStream out = System.out;
        if (swallowOutput) {
            SystemLogHandler.startCapture();
        }

        Servlet servlet;
        try {
            long t1=System.currentTimeMillis();
            // Complain if no servlet class has been specified
            if (servletClass == null) {
                unavailable(null);
                throw new ServletException
                    (sm.getString("standardWrapper.notClass", getName()));
            }

            InstanceManager instanceManager = ((StandardContext)getParent()).getInstanceManager();
            try {
                servlet = (Servlet) instanceManager.newInstance(servletClass);
            } catch (ClassCastException e) {
                // 此处省略代码
            } catch (Throwable e) {
                // 此处省略代码
            }

            if (multipartConfigElement == null) {
                MultipartConfig annotation =
                        servlet.getClass().getAnnotation(MultipartConfig.class);
                if (annotation != null) {
                    multipartConfigElement =
                            new MultipartConfigElement(annotation);
                }
            }

            // Special handling for ContainerServlet instances
            // Note: The InstanceManager checks if the application is permitted
            //       to load ContainerServlets
            if (servlet instanceof ContainerServlet) {
                ((ContainerServlet) servlet).setWrapper(this);
            }

            classLoadTime=(int) (System.currentTimeMillis() -t1);

            if (servlet instanceof SingleThreadModel) {
                if (instancePool == null) {
                    instancePool = new Stack<>();
                }
                singleThreadModel = true;
            }

            initServlet(servlet);

            fireContainerEvent("load", this);

            loadTime=System.currentTimeMillis() -t1;
        } finally {
            // 此处省略代码
        }
        return servlet;
    }
创建Servlet实例的方法是从Wrapper.loadServlet开始:
1)loadServlet方法要完成的就是获取servletClass,然后把它交给InstanceManager去创建一个基于servletClass.class的对象。如果这个Servlet配置了jsp-file,那么这个servletClass就是conf/web.xml中定义的JspServlet了。
2)调用initServlet(servlet),在initServlet(...)方法内部调用Servlet#init(),对servlet进行初始化。
3)触发Container load事件。
    private synchronized void initServlet(Servlet servlet)
            throws ServletException {
        if (instanceInitialized && !singleThreadModel) return;

        // Call the initialization method of this servlet
        try {
            if( Globals.IS_SECURITY_ENABLED) {
                boolean success = false;
                try {
                    Object[] args = new Object[] { facade };
                    SecurityUtil.doAsPrivilege("init",
                                               servlet,
                                               classType,
                                               args);
                    success = true;
                } finally {
                    if (!success) {
                        // destroy() will not be called, thus clear the reference now
                        SecurityUtil.remove(servlet);
                    }
                }
            } else {
                servlet.init(facade);
            }

            instanceInitialized = true;
        } catch (UnavailableException f) {
            // 此处省略代码
        } catch (ServletException f) {
            // 此处省略代码
        } catch (Throwable f) {
            // 此处省略代码
        }
    }
初始化Servlet在StandardWrapper的initServlet方法中,调用Servlet的init()方法,同时把包装了StandardWrapper对象的StandardWrapperFacade作为ServletConfig传给Servlet。
Servlet的初始化过程可以通过一张图来总结,如下所示:
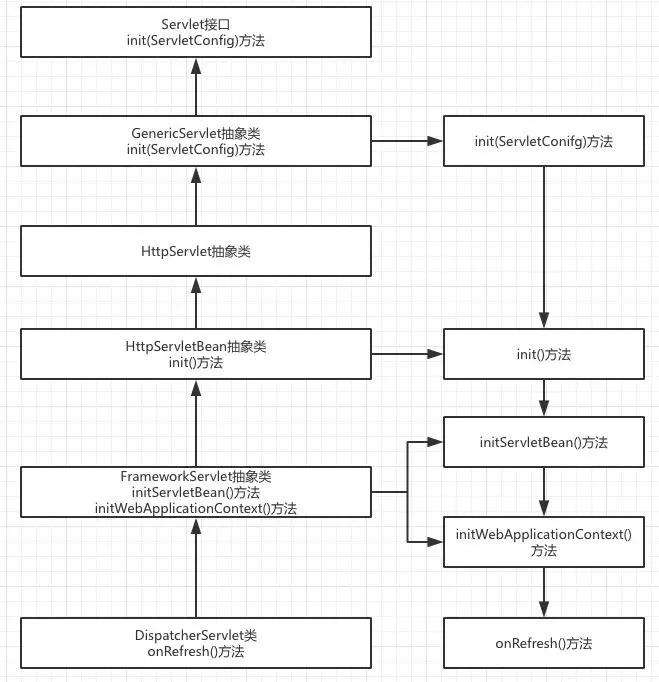
因此DispatcherServlet调用init时,实际上执行的是GenericServlet#init(ServletConfig config)
package javax.servlet;
...
public abstract class GenericServlet
    implements Servlet, ServletConfig, java.io.Serializable
{
    /**
     * Called by the servlet container to indicate to a servlet that the servlet is being placed into service.  See {@link Servlet#init}.
     * <p>This implementation stores the {@link ServletConfig} object it receives from the servlet container for later use.
     * When overriding this form of the method, call <code>super.init(config)</code>.
     * @param config             the <code>ServletConfig</code> object that contains configutation information for this servlet
     * @exception ServletException     if an exception occurs that interrupts the servlet's normal operation
     * @see                 UnavailableException
     */
    public void init(ServletConfig config) throws ServletException {
    this.config = config;
    this.init();
    }

    public void init() throws ServletException {

    }
}
从GenericServlet#init(...)方法的实现上来看,它并未真正执行任何操作,因此我们继续查看GenericServlet的子类是如何实现servlet初始化操作。
package org.springframework.web.servlet;
...
@SuppressWarnings("serial")
public abstract class HttpServletBean extends HttpServlet implements EnvironmentCapable, EnvironmentAware {
    /**
     * Map config parameters onto bean properties of this servlet, and invoke subclass initialization.
     * @throws ServletException if bean properties are invalid (or required properties are missing), or if subclass initialization fails.
     */
    @Override
    public final void init() throws ServletException {
        // Set bean properties from init parameters.
        PropertyValues pvs = new ServletConfigPropertyValues(getServletConfig(), this.requiredProperties);
        if (!pvs.isEmpty()) {
            try {
                BeanWrapper bw = PropertyAccessorFactory.forBeanPropertyAccess(this);
                ResourceLoader resourceLoader = new ServletContextResourceLoader(getServletContext());
                bw.registerCustomEditor(Resource.class, new ResourceEditor(resourceLoader, getEnvironment()));
                initBeanWrapper(bw);
                bw.setPropertyValues(pvs, true);
            }
            catch (BeansException ex) {
                if (logger.isErrorEnabled()) {
                    logger.error("Failed to set bean properties on servlet '" + getServletName() + "'", ex);
                }
                throw ex;
            }
        }

        // Let subclasses do whatever initialization they like.
        initServletBean();
    }

    /**
     * Initialize the BeanWrapper for this HttpServletBean, possibly with custom editors.
     * <p>This default implementation is empty.
     * @param bw the BeanWrapper to initialize
     * @throws BeansException if thrown by BeanWrapper methods
     * @see org.springframework.beans.BeanWrapper#registerCustomEditor
     */
    protected void initBeanWrapper(BeanWrapper bw) throws BeansException {
    }

    /**
     * Subclasses may override this to perform custom initialization.
     * All bean properties of this servlet will have been set before this method is invoked.
     * <p>This default implementation is empty.
     * @throws ServletException if subclass initialization fails
     */
    protected void initServletBean() throws ServletException {
    }
}
1)它将init-param等配置参数封装到BeanWrapper参数内,并调用HttpServletBase#initBeanWrapper(BeanWrapper bw)来进行实现Bean的包装初始化;
2)调用HttpServletBase#initServletBean()方法进进一步初始化Servlet bean。
但从initBeanWrapper(...)和initServletBean()方法定义不难发现,这里采用了模板方法设计模式,把真正的实现交给了子类去实现,那么我们不得不区分析它的子类如何去试下了。
在子类FrameworkServlet中对initServletBean()方法进行了重写,接下来我们来查看FrameworkServlet中如何重写initServletBean()方法。
package org.springframework.web.servlet;
...
@SuppressWarnings("serial")
public abstract class FrameworkServlet extends HttpServletBean implements ApplicationContextAware {
    /**
     * Overridden method of {@link HttpServletBean}, invoked after any bean properties have been set. Creates this servlet's WebApplicationContext.
     */
    @Override
    protected final void initServletBean() throws ServletException {
        getServletContext().log("Initializing Spring " + getClass().getSimpleName() + " '" + getServletName() + "'");
        if (logger.isInfoEnabled()) {
            logger.info("Initializing Servlet '" + getServletName() + "'");
        }
        long startTime = System.currentTimeMillis();

        try {
      // 这里是重点,用于初始化子ApplicationContext对象,主要是用来加载<servlet/>对应的servletName-servlet.xml文件如:classpath:spring-security-01-servlet.xml
            this.webApplicationContext = initWebApplicationContext();
            initFrameworkServlet();
        }
        catch (ServletException | RuntimeException ex) {
            logger.error("Context initialization failed", ex);
            throw ex;
        }

        if (logger.isDebugEnabled()) {
            String value = this.enableLoggingRequestDetails ?
                    "shown which may lead to unsafe logging of potentially sensitive data" :
                    "masked to prevent unsafe logging of potentially sensitive data";
            logger.debug("enableLoggingRequestDetails='" + this.enableLoggingRequestDetails +
                    "': request parameters and headers will be " + value);
        }

        if (logger.isInfoEnabled()) {
            logger.info("Completed initialization in " + (System.currentTimeMillis() - startTime) + " ms");
        }
    }

  /**
     * This method will be invoked after any bean properties have been set and
     * the WebApplicationContext has been loaded. The default implementation is empty;
     * subclasses may override this method to perform any initialization they require.
     * @throws ServletException in case of an initialization exception
     */
    protected void initFrameworkServlet() throws ServletException {
    }
}
从上边代码可以发现初始化工作核心方法是 initWebApplicationContext()和initFrameworkServlet(),但是initFrameworkServlet()方法是一个空方法,因此猜测核心代码应该都在initWebApplicationContext()中实现,那么接着查看initWebApplicationContext()方法。
    /**
     * Initialize and publish the WebApplicationContext for this servlet.
     * <p>Delegates to {@link #createWebApplicationContext} for actual creation of the context. Can be overridden in subclasses.
     * @return the WebApplicationContext instance
     * @see #FrameworkServlet(WebApplicationContext)
     * @see #setContextClass
     * @see #setContextConfigLocation
     */
    protected WebApplicationContext initWebApplicationContext() {
    // 1)获取由ContextLoaderListener创建的根IoC容器
    // 2)获取根IoC容器有两种方法,还可通过key直接获取
        WebApplicationContext rootContext =
                WebApplicationContextUtils.getWebApplicationContext(getServletContext());
        WebApplicationContext wac = null;

        if (this.webApplicationContext != null) {
            // A context instance was injected at construction time -> use it
            wac = this.webApplicationContext;
            if (wac instanceof ConfigurableWebApplicationContext) {
                ConfigurableWebApplicationContext cwac = (ConfigurableWebApplicationContext) wac;
                if (!cwac.isActive()) {
                    // The context has not yet been refreshed -> provide services such as
                    // setting the parent context, setting the application context id, etc
                    if (cwac.getParent() == null) {
            // 如果当前Servelt存在一个WebApplicationContext即子IoC容器,
            // 并且上文获取的根IoC容器存在,则将根IoC容器作为子IoC容器的父容器
                        // The context instance was injected without an explicit parent -> set
                        // the root application context (if any; may be null) as the parent
                        cwac.setParent(rootContext);
                    }
                    configureAndRefreshWebApplicationContext(cwac);
                }
            }
        }
        if (wac == null) {
      // 如果当前Servlet不存在一个子IoC容器则去查找一下
            // No context instance was injected at construction time -> see if one
            // has been registered in the servlet context. If one exists, it is assumed
            // that the parent context (if any) has already been set and that the
            // user has performed any initialization such as setting the context id
            wac = findWebApplicationContext();
        }
        if (wac == null) {
      // 如果仍旧没有查找到子IoC容器则创建一个子IoC容器
            // No context instance is defined for this servlet -> create a local one
            wac = createWebApplicationContext(rootContext);
        }

        if (!this.refreshEventReceived) {
      // 调用子类DispatcherServlet覆盖的onRefresh方法完成“可变”的初始化过程
            // Either the context is not a ConfigurableApplicationContext with refresh
            // support or the context injected at construction time had already been
            // refreshed -> trigger initial onRefresh manually here.
            synchronized (this.onRefreshMonitor) {
                onRefresh(wac);
            }
        }

        if (this.publishContext) {
            // Publish the context as a servlet context attribute.
            String attrName = getServletContextAttributeName();
            getServletContext().setAttribute(attrName, wac);
        }

        return wac;
    }

    /**
     * Template method which can be overridden to add servlet-specific refresh work.
     * Called after successful context refresh.
     * <p>This implementation is empty.
     * @param context the current WebApplicationContext
     * @see #refresh()
     */
    protected void onRefresh(ApplicationContext context) {
        // For subclasses: do nothing by default.
    }
通过函数名不难发现,该方法的主要作用同样是创建一个WebApplicationContext对象,即Ioc容器每个Web应用最多只能存在一个根IoC容器,这里创建的则是特定Servlet拥有的子IoC容器。
如果当前Servlet存在一个IoC容器则为其设置根IoC容器作为其父类,并配置刷新该容器,用于构造其定义的Bean,这里的方法与前文讲述的根IoC容器类似,同样会读取用户在web.xml中配置的<servlet>中的<init-param>值,用于查找相关的xml配置文件用于构造定义的Bean,这里不再赘述了。如果当前Servlet不存在一个子IoC容器就去查找一个,如果仍然没有查找到则调用 createWebApplicationContext()方法去创建一个,查看该方法的源码如下图所示:
    protected WebApplicationContext createWebApplicationContext(@Nullable ApplicationContext parent) {
        Class<?> contextClass = getContextClass();
        if (!ConfigurableWebApplicationContext.class.isAssignableFrom(contextClass)) {
            throw new ApplicationContextException(
                    "Fatal initialization error in servlet with name '" + getServletName() +
                    "': custom WebApplicationContext class [" + contextClass.getName() +
                    "] is not of type ConfigurableWebApplicationContext");
        }
        ConfigurableWebApplicationContext wac =
                (ConfigurableWebApplicationContext) BeanUtils.instantiateClass(contextClass);

        wac.setEnvironment(getEnvironment());
        wac.setParent(parent);
        String configLocation = getContextConfigLocation();
        if (configLocation != null) {
            wac.setConfigLocation(configLocation);
        }
        configureAndRefreshWebApplicationContext(wac);

        return wac;
    }
该方法用于创建一个子IoC容器并将根IoC容器做为其父容器,接着进行配置和刷新操作用于构造相关的Bean。至此,根IoC容器以及相关Servlet的子IoC容器已经配置完成,子容器中管理的Bean一般只被该Servlet使用,因此,其中管理的Bean一般是“局部”的,如SpringMVC中需要的各种重要组件,包括Controller、Interceptor、Converter、ExceptionResolver等。相关关系如下图所示:
package org.springframework.web.servlet;
...
@SuppressWarnings("serial")
public class DispatcherServlet extends FrameworkServlet {
  ...
    /**
     * This implementation calls {@link #initStrategies}.
     */
    @Override
    protected void onRefresh(ApplicationContext context) {
        initStrategies(context);
    }

    /**
     * Initialize the strategy objects that this servlet uses.
     * <p>May be overridden in subclasses in order to initialize further strategy objects.
     */
    protected void initStrategies(ApplicationContext context) {
        initMultipartResolver(context);
        initLocaleResolver(context);
        initThemeResolver(context);
        initHandlerMappings(context);
        initHandlerAdapters(context);
        initHandlerExceptionResolvers(context);
        initRequestToViewNameTranslator(context);
        initViewResolvers(context);
        initFlashMapManager(context);
    }
    ...
}
onRefresh()方法直接调用了initStrategies()方法,源码如上,通过函数名可以判断,该方法用于初始化创建multipartResovle来支持图片等文件的上传、本地化解析器、主题解析器、HandlerMapping处理器映射器、HandlerAdapter处理器适配器、异常解析器、视图解析器、flashMap管理器等,这些组件都是SpringMVC开发中的重要组件,相关组件的初始化创建过程均在此完成。
父子容器
在学习Spring时,我们都是从读取xml配置文件来构造IoC容器,常用的类有ClassPathXmlApplicationContext类,该类存在一个初始化方法用于传入xml文件路径以及一个父容器,我们可以创建两个不同的xml配置文件并实现如下代码:
//applicationContext1.xml文件中配置一个id为baseBean的Bean
//applicationContext2.xml文件中配置一个id未subBean的Bean
public void testParentChhildrenIOC(){
  ApplicationContext baseContext = new ClassPathXmlApplicationContext("applicationContext1.xml");

  Object obj1 = baseContext.getBean("baseBean");
  System.out.println("baseContext Get Bean " + obj1);

  ApplicationContext subContext = new ClassPathXmlApplicationContext(new String[]{"applicationContext2.xml"}, baseContext);

  Object obj2 = subContext.getBean("baseBean");
  System.out.println("subContext get baseContext Bean " + obj2);

  Object obj3 = subContext.getBean("subBean");
  System.out.println("subContext get subContext Bean " + obj3);

  //抛出NoSuchBeanDefinitionException异常
  Object obj4 = baseContext.getBean("subBean");
  System.out.println("baseContext get subContext Bean " + obj4);
}
1)首先创建baseContext没有为其设置父容器,接着可以成功获取id为baseBean的Bean;
2)接着创建subContext并将baseContext设置为其父容器,subContext可以成功获取baseBean以及subBean
3)最后试图使用baseContext去获取subContext中定义的subBean,此时会抛出异常NoSuchBeanDefinitionException。
由此可见,父子容器类似于类的继承关系,子类可以访问父类中的成员变量,而父类不可访问子类的成员变量,同样的,子容器可以访问父容器中定义的Bean,但父容器无法访问子容器定义的Bean。
参考
《第三章 DispatcherServlet详解 ——跟开涛学SpringMVC》
《SpringMvc之DispatcherServlet详解》
《Spring MVC入口Servlet详解(HttpServletBean,FrameworkServlet,DispatcherServlet )》
《Spring容器 SpringMVC容器 web容器的关系》
《Tomcat源码分析 (九)----- HTTP请求处理过程(二)》
基础才是编程人员应该深入研究的问题,比如:
1)List/Set/Map内部组成原理|区别
2)mysql索引存储结构&如何调优/b-tree特点、计算复杂度及影响复杂度的因素。。。
3)JVM运行组成与原理及调优
4)Java类加载器运行原理
5)Java中GC过程原理|使用的回收算法原理
6)Redis中hash一致性实现及与hash其他区别
7)Java多线程、线程池开发、管理Lock与Synchroined区别
8)Spring IOC/AOP 原理;加载过程的。。。
【+加关注】。

 浙公网安备 33010602011771号