

day_03 UI_01
- TextView:就是界面上显示的文本
text是设置要显示的文本,textColor是字体的颜色,textSize是字体的大小,还可以在TextView里面填写位置,表示水平居中。
 1 <LinearLayout xmlns:android="http://schemas.android.com/apk/res/android"
 2               android:orientation="vertical"
 3               android:layout_width="match_parent"
 4               android:layout_height="match_parent">
 5     <TextView
 6         android:layout_width="wrap_content"
 7         android:layout_height="wrap_content"
 8         android:text="这是文本"
 9         android:textColor="#ff0d00"
10         android:textSize="10dp"
11         android:layout_gravity="center_horizontal"/>
  </LinearLayout>
- EditText:文本框,可以在里面输入信息
hint是设置上的提示信息,如果点击文本框,这个提示字就会消失。maxLines是设置的在这个文本框里最多可以写几行。
1  <EditText
2        android:layout_width="match_parent"
3        android:layout_height="wrap_content"
4        android:hint="请输入信息"
5        android:maxLines="2"/>
- ImageView:这个是显示出一张图片,一般先把图片放在drawable里,用的时候引用。
src表示从哪里引入图片,这里我们是从drawable类引入的名字叫book的图片,它的位置也是可以调节的,调节的方式这得看在什么布局里。
1 <ImageView
2        android:layout_width="wrap_content"
3        android:layout_height="wrap_content"
4        android:src="@drawable/book"/>
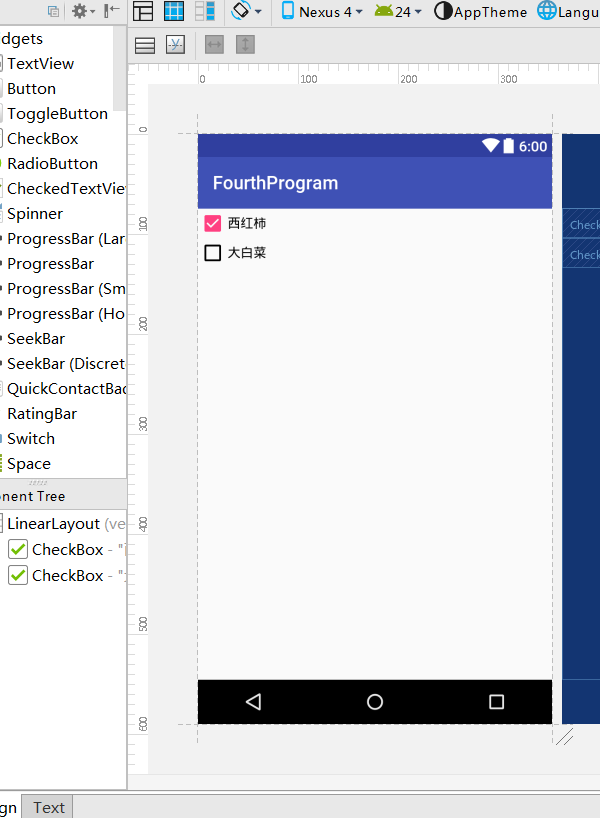
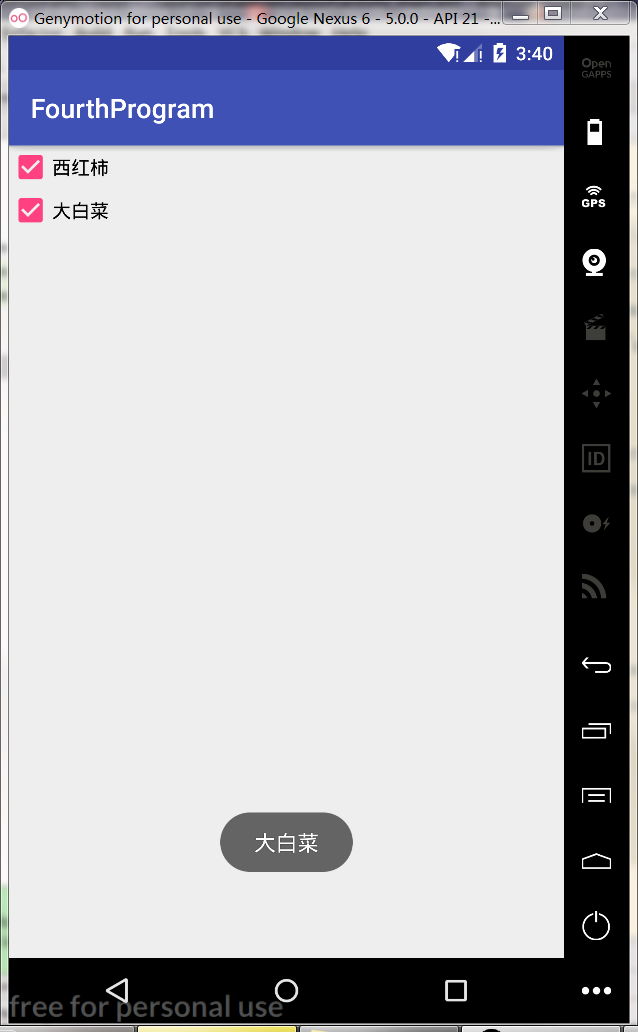
- CheckBox:复选框。比如给你几个选项,让你选出你喜欢吃的东西,你可以选一个也可以选多个,这个就是复选框。
checked代表一开始是否默认选中,如果不添加代表不选中,但也可以写上false,这里第一个默认选中,第二个默认不选中。运行的时候还可以修改。
1 <CheckBox
2        android:layout_width="wrap_content"
3        android:layout_height="wrap_content"
4        android:text="西红柿"
5        android:checked="true"/>
6     <CheckBox
7         android:layout_width="wrap_content"
8         android:layout_height="wrap_content"
9         android:text="大白菜"/>
不运行了,直接点击Design查看就可以了
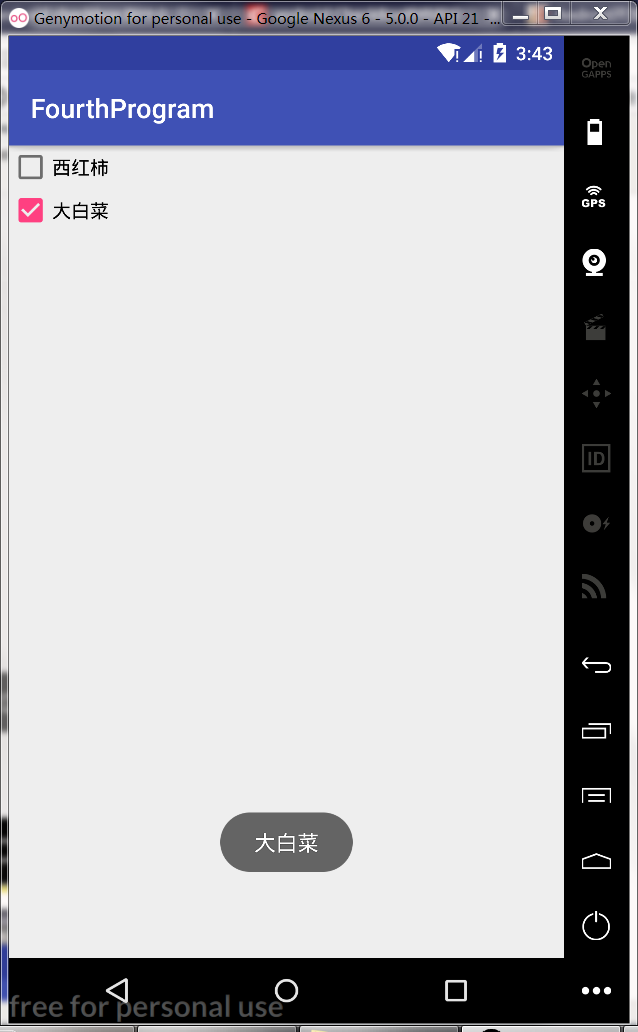
再说一下点击监听事件
先在布局那里,给它俩添加id,再改动MainActivity里的监听事件。这里用setOnCheckedChangeListener; isChecked的意思是是否被选中。
 1 <LinearLayout xmlns:android="http://schemas.android.com/apk/res/android"
 2               android:orientation="vertical"
 3               android:layout_width="match_parent"
 4               android:layout_height="match_parent">
 5    <CheckBox
 6        android:id="@+id/cb_xhs"
 7        android:layout_width="wrap_content"
 8        android:layout_height="wrap_content"
 9        android:text="西红柿"
10        android:checked="true"/>
11     <CheckBox
12         android:id="@+id/cb_dbc"
13         android:layout_width="wrap_content"
14         android:layout_height="wrap_content"
15         android:text="大白菜"/>
16
17
18 </LinearLayout>
 1 public class MainActivity extends AppCompatActivity {
 2
 3     @Override
 4     protected void onCreate(Bundle savedInstanceState) {
 5         super.onCreate(savedInstanceState);
 6         setContentView(R.layout.activity_main);
 7         final CheckBox cb_xhs = (CheckBox)findViewById(R.id.cb_xhs);
 8         final CheckBox cb_dbc = (CheckBox)findViewById(R.id.cb_dbc);
 9
10         cb_xhs.setOnCheckedChangeListener(new CompoundButton.OnCheckedChangeListener() {
11             @Override
12             public void onCheckedChanged(CompoundButton buttonView, boolean isChecked) {
13                 if(isChecked){
14                     String text = cb_xhs.getText().toString();
15                     Toast.makeText(MainActivity.this,text,Toast.LENGTH_LONG).show();
16                 }
17             }
18         });
19         cb_dbc.setOnCheckedChangeListener(new CompoundButton.OnCheckedChangeListener() {
20             @Override
21             public void onCheckedChanged(CompoundButton buttonView, boolean isChecked) {
22                 if(isChecked){
23                     String text = cb_dbc.getText().toString();
24                     Toast.makeText(MainActivity.this,text,Toast.LENGTH_LONG).show();
25                 }
26             }
27         });
28     }
29 }
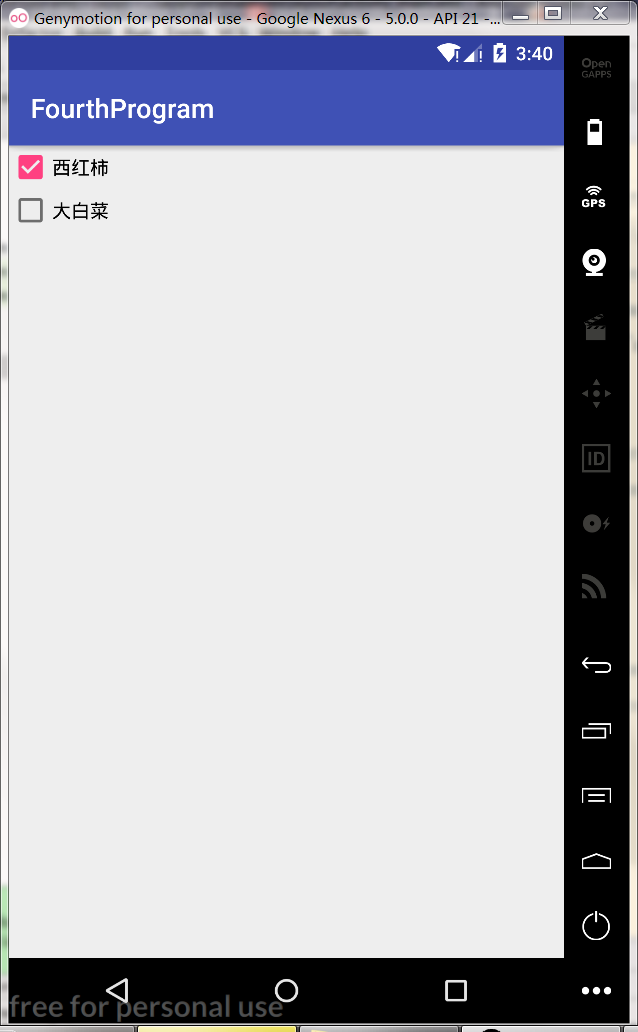
运行起来:确实跟我们想象的一个样
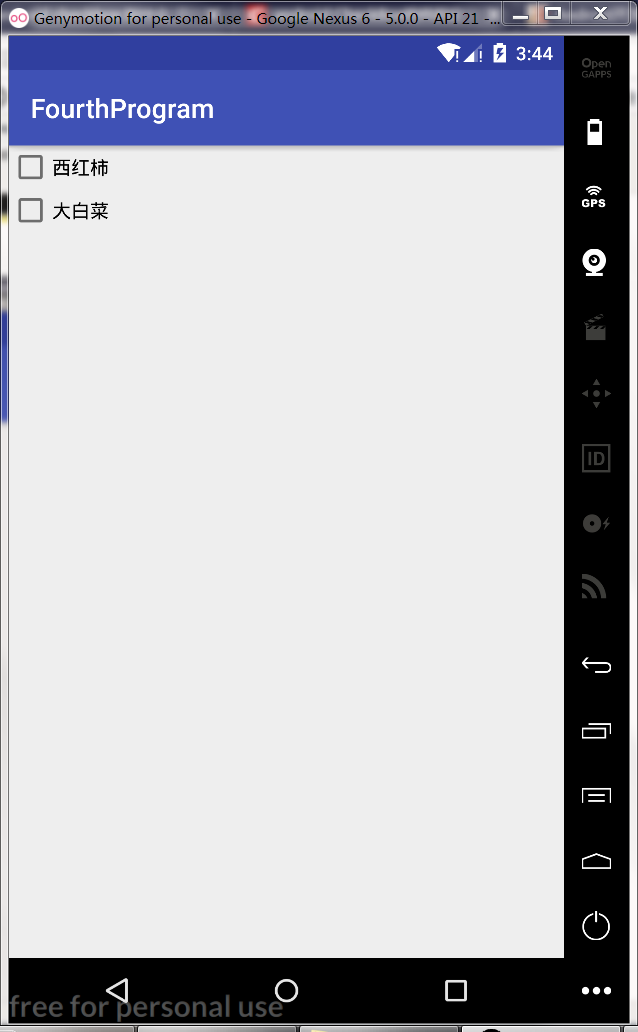
这里西红柿可以被取消选择:
然后试一下监听效果:
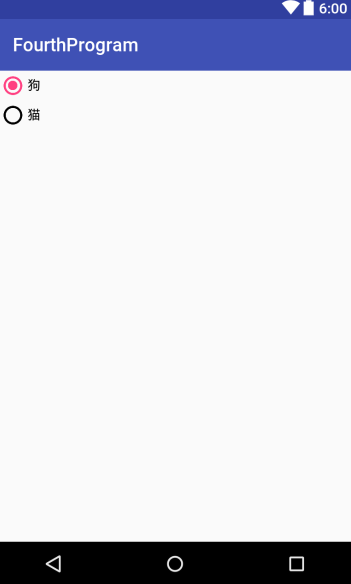
- RadioButton:跟CheckBox差不多效果。
 1 <LinearLayout xmlns:android="http://schemas.android.com/apk/res/android"
 2               android:orientation="vertical"
 3               android:layout_width="match_parent"
 4               android:layout_height="match_parent">
 5    <RadioButton
 6        android:id="@+id/rb_dog"
 7        android:layout_width="wrap_content"
 8        android:layout_height="wrap_content"
 9        android:text="狗"
10        android:checked="true"/>
11     <RadioButton
12         android:id="@+id/rb_cat"
13         android:layout_width="wrap_content"
14         android:layout_height="wrap_content"
15         android:text="猫"/>
16
17
18 </LinearLayout>
效果图:
- ProgressBar:平常最烦的东西,一直不断地转啊转,打个游戏网络不佳的时候,他就会冒出来。
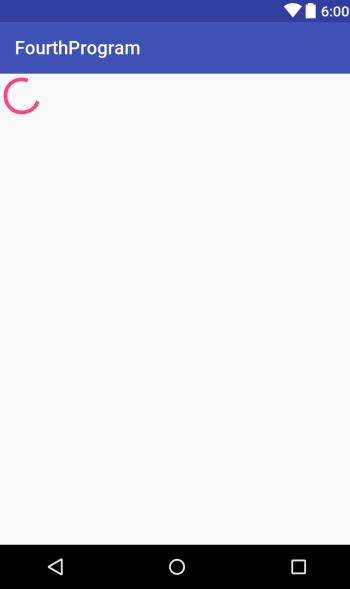
1 <ProgressBar
2        android:layout_width="wrap_content"
3        android:layout_height="wrap_content"
4        />
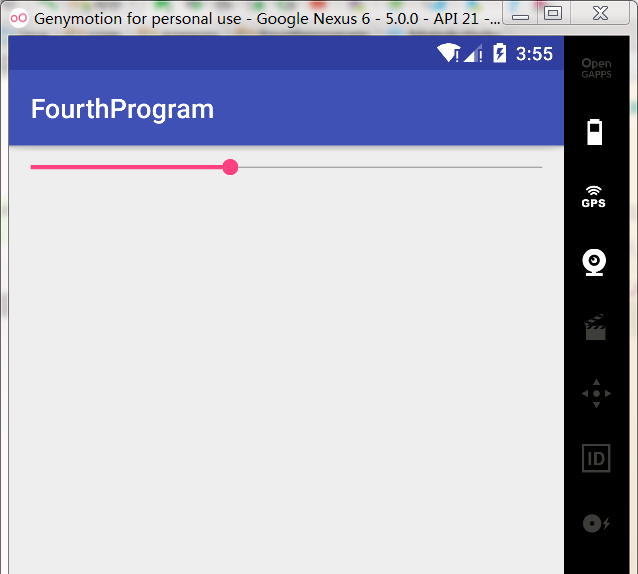
- SeekBar:随意拉动的进度条
1 <SeekBar
2         android:layout_width="match_parent"
3         android:layout_height="wrap_content"
4         android:id="@+id/seekBar"
5         />
- Spinner:列表选择框,供用户选择。
方式一:
在layout里添加Spinner控件,entries表示引入的元素。
1 <Spinner
2        android:layout_width="match_parent"
3        android:layout_height="wrap_content"
4        android:entries="@array/animal">
5
6    </Spinner>
需要自己在values里面新建一个array.xml;
在字符串数组string-array里面添加item元素,并且给这个数组起名字为animal。
 1 <resources>
 2     <string-array name="animal">
 3         <item>狗</item>
 4         <item>猫</item>
 5         <item>蛇</item>
 6         <item>老虎</item>
 7         <item>羊</item>
 8         <item>乌龟</item>
 9         <item>狮子</item>
10     </string-array>
11 </resources>
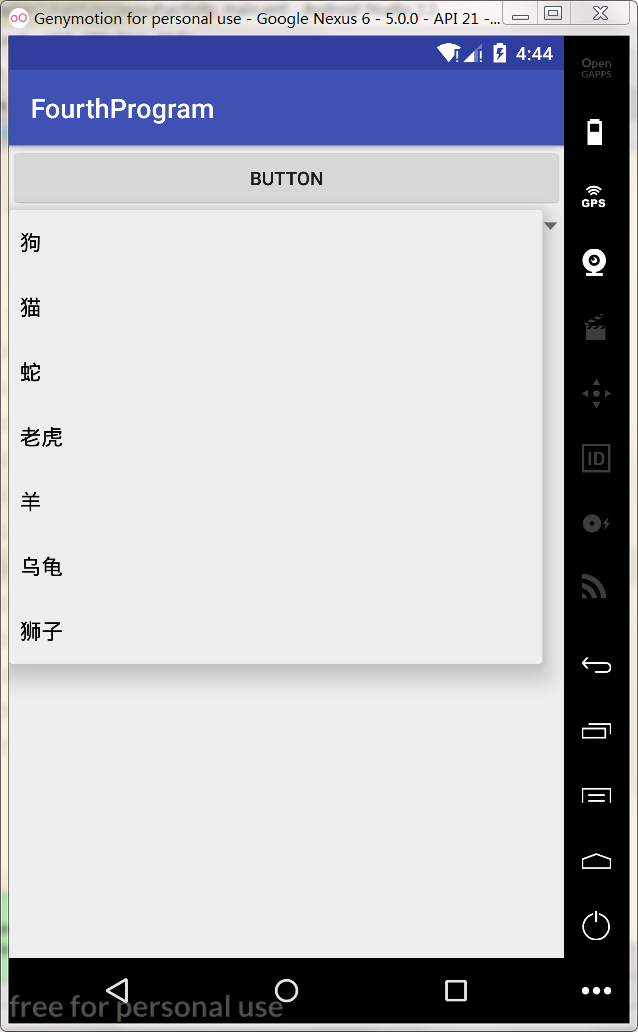
运行:

点击一下:
从众多选项中随机选择一个:

方式二:
这次删除掉entries,设置上id。
<Spinner
      android:id="@+id/llt_spinner"
       android:layout_width="match_parent"
       android:layout_height="wrap_content"
       >
在MainActivity里获取Spinner,
这里有个新名词Adapter,适配器,包括:arrayAdapter ,simpleCursorAdapter, cursorAdapter resourceCursorAdapter 如果需要自定义适配器 可以扩展抽象类BaseAdapter;通俗点说就是,里面装着主视图看不见的东西,需要展开才会显示出来,我自己理解成抽屉。
new ArrayAdapter<String>(),里面的参数有四个,第一个是上下文,这里填写this;第二个是布局id,这里引用的android自带的布局;第三个是布局里的TextView的id,既然用的android的layout,那就要用android.R.layout.simple_spinner_dropdown_item里的TextView,Windows系统按住Ctrl键点击左键查看里面的TextView的id;第四个是要填写你想在里面展现的数据,这里用字符串数组。
当然,我们可以不用系统的布局,大不了就是看起来不好看点罢了。一会儿试试自己定义的布局啥样。
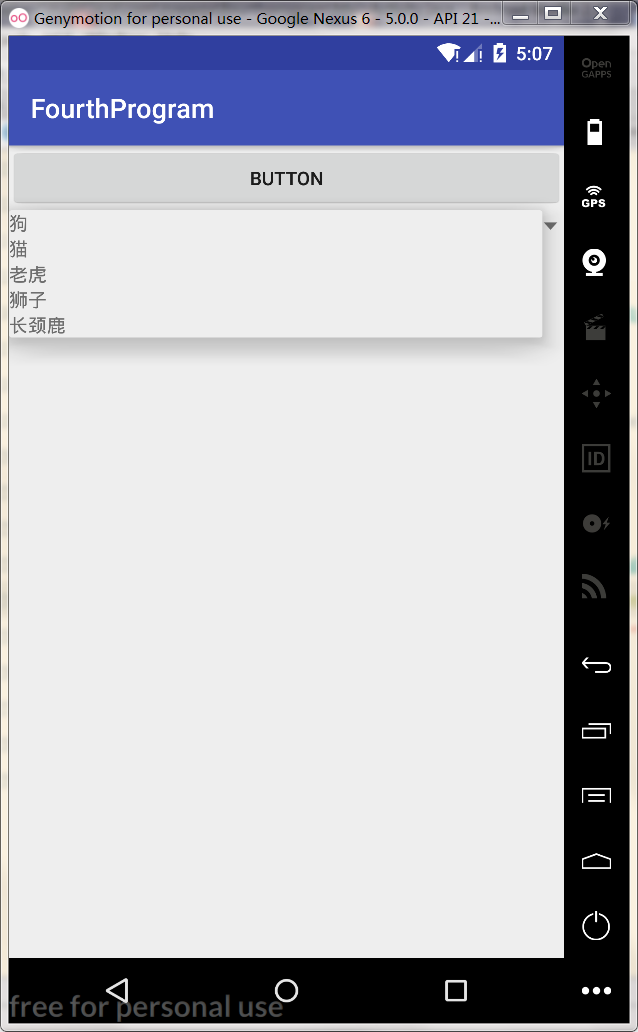
 1 public class MainActivity extends AppCompatActivity {
 2
 3     @Override
 4     protected void onCreate(Bundle savedInstanceState) {
 5         super.onCreate(savedInstanceState);
 6         setContentView(R.layout.activity_main);
 7
 8         Spinner spinner = (Spinner) findViewById(R.id.llt_spinner);
 9         ArrayAdapter<String> adapter = new ArrayAdapter<String>(this,android.R.layout.simple_spinner_dropdown_item,
10                 android.R.id.text1,new String[]{"狗","猫","老虎","狮子","长颈鹿"});
11         spinner.setAdapter(adapter);
12     }
13 }
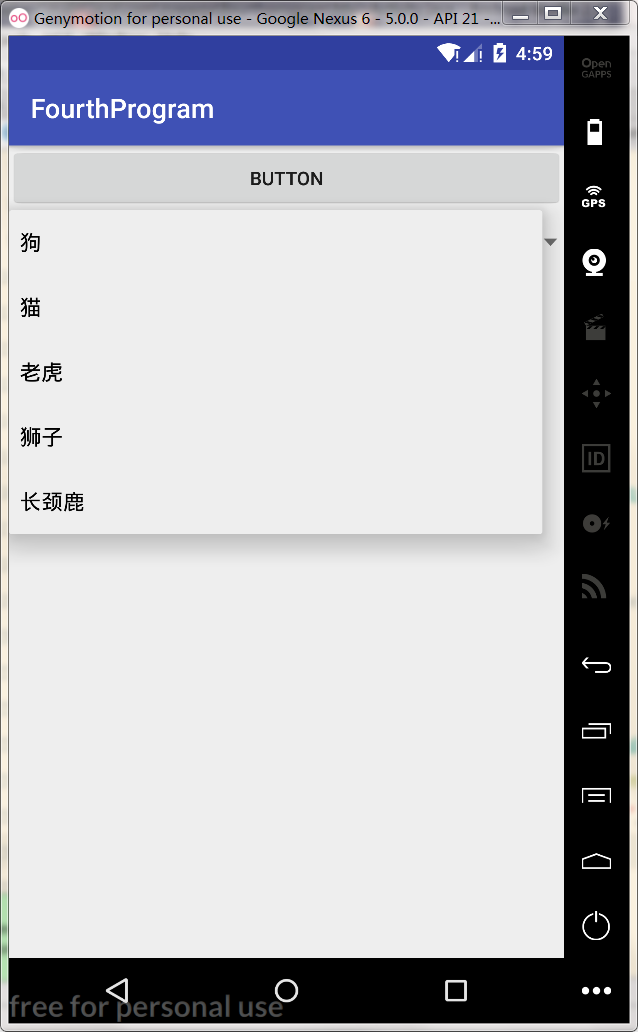
运行:
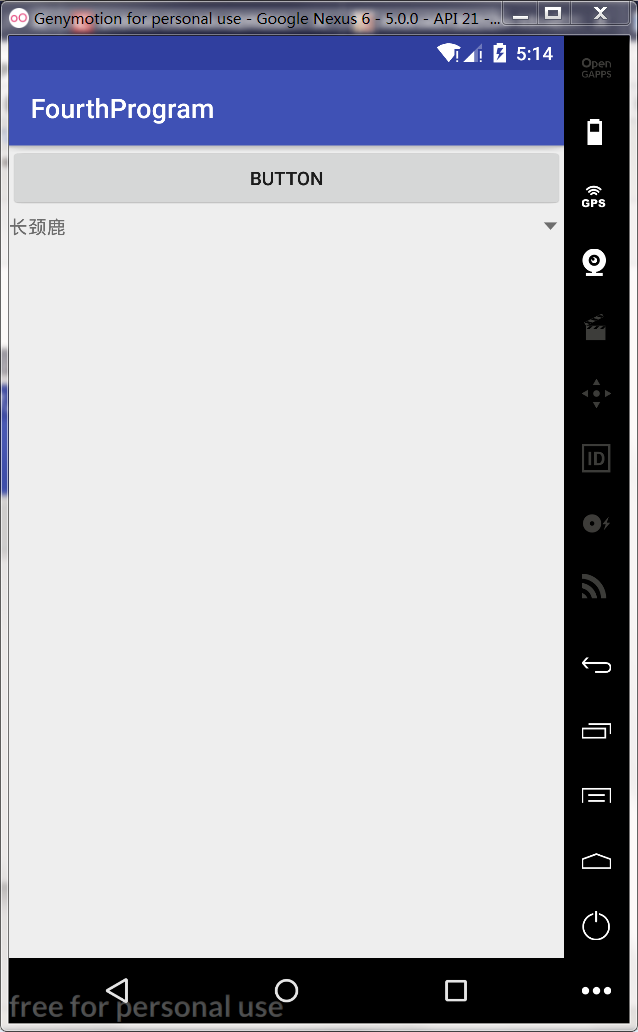
点开:
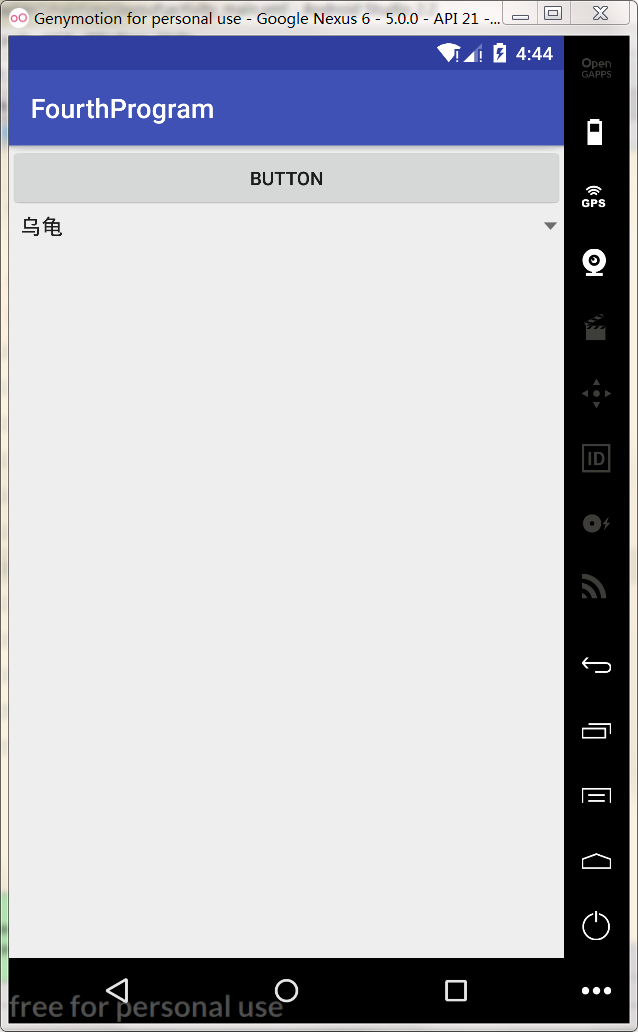
选择乌龟:
跟第一个方法效果一样;
引入自己定义的布局:
新建布局:
 1 <LinearLayout xmlns:android="http://schemas.android.com/apk/res/android"
 2               android:orientation="vertical"
 3               android:layout_width="match_parent"
 4               android:layout_height="match_parent">
 5     <TextView
 6         android:id="@+id/text_my"
 7         android:layout_width="wrap_content"
 8         android:layout_height="wrap_content"
 9         />
10
11 </LinearLayout>
改动代码:
 1 public class MainActivity extends AppCompatActivity {
 2
 3     @Override
 4     protected void onCreate(Bundle savedInstanceState) {
 5         super.onCreate(savedInstanceState);
 6         setContentView(R.layout.activity_main);
 7
 8         Spinner spinner = (Spinner) findViewById(R.id.llt_spinner);
 9         ArrayAdapter<String> adapter = new ArrayAdapter<String>(this,R.layout.layout_my,
10                 R.id.text_my,new String[]{"狗","猫","老虎","狮子","长颈鹿"});
11         spinner.setAdapter(adapter);
12     }
查看效果区别:
是丑了点,但是可以用!
- AlertDialog:在当前界面弹出的对话框
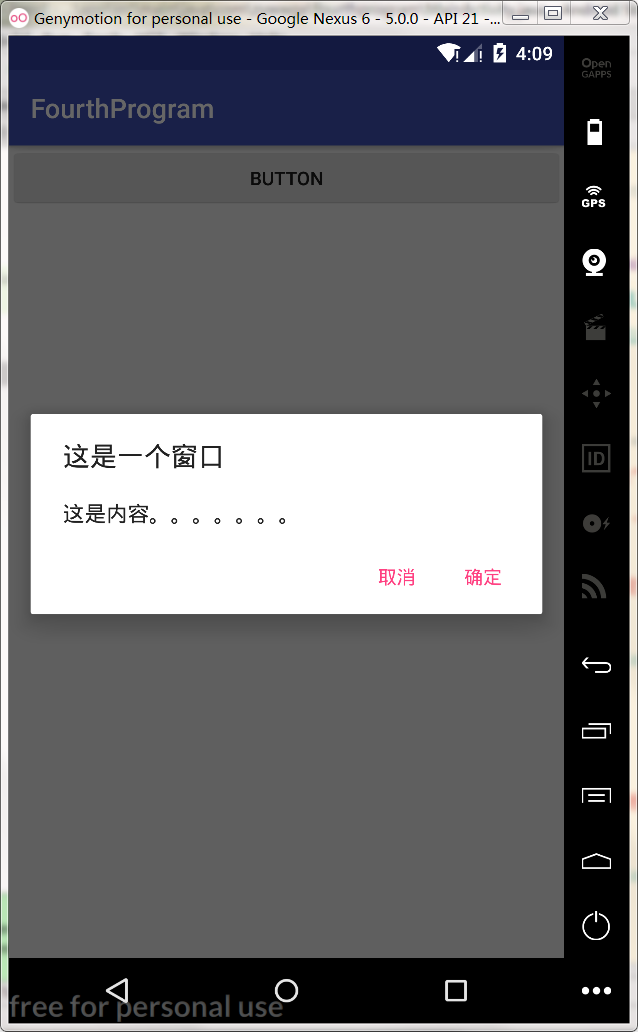
 1 public class MainActivity extends AppCompatActivity {
 2
 3     @Override
 4     protected void onCreate(Bundle savedInstanceState) {
 5         super.onCreate(savedInstanceState);
 6         setContentView(R.layout.activity_main);
 7         Button btn = (Button) findViewById(R.id.btn_button);
 8         btn.setOnClickListener(new View.OnClickListener() {
 9             @Override
10             public void onClick(View v) {
11                 AlertDialog.Builder dialog = new AlertDialog.Builder(MainActivity.this);
12                 dialog.setTitle("这是一个窗口");//标题
13                 dialog.setMessage("这是内容。。。。。。。");//内容
14                 dialog.setCancelable(false);//是否可以直接取消这个对话框
15                 dialog.setPositiveButton("确定", new DialogInterface.OnClickListener() {//确定按钮 的 监听事件
16                     @Override
17                     public void onClick(DialogInterface dialog, int which) {
18
19                     }
20                 });
21                 dialog.setNegativeButton("取消", new DialogInterface.OnClickListener() { //取消按钮的监听事件
22                     @Override
23                     public void onClick(DialogInterface dialog, int which) {
24
25                     }
26                 });
27                 dialog.show();
28
29
30             }
31         });
32     }
33 }
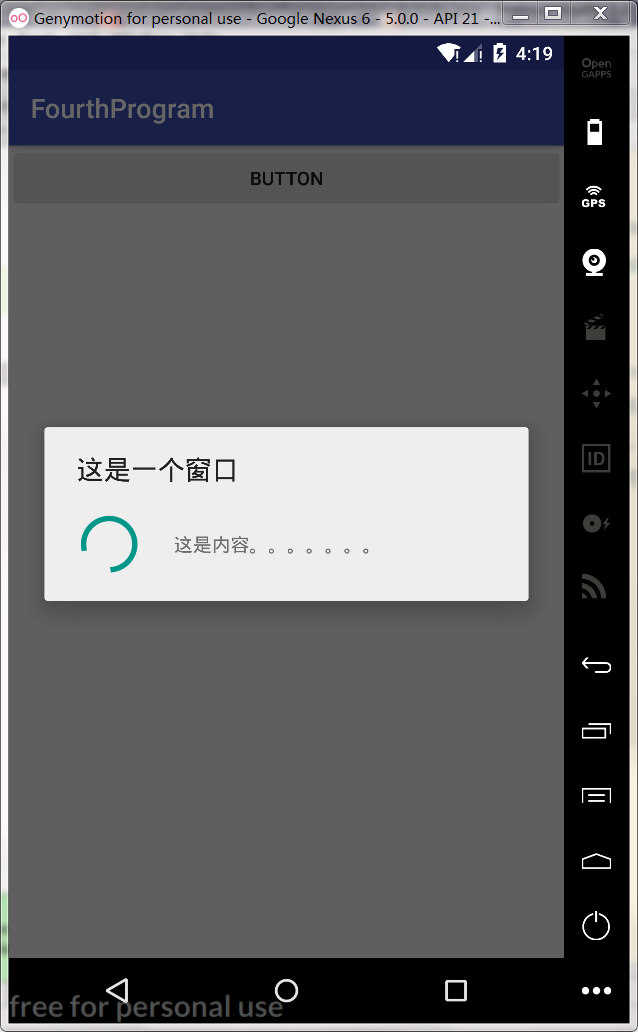
- ProgressDialog:表示让用户等待的对话框
setCancelable(false)这个地方一定得弄好,比如加载完程序就把这个关掉,否则你是无法关掉这个对话框的
 1 public class MainActivity extends AppCompatActivity {
 2
 3     @Override
 4     protected void onCreate(Bundle savedInstanceState) {
 5         super.onCreate(savedInstanceState);
 6         setContentView(R.layout.activity_main);
 7         Button btn = (Button) findViewById(R.id.btn_button);
 8         btn.setOnClickListener(new View.OnClickListener() {
 9             @Override
10             public void onClick(View v) {
11                 ProgressDialog dialog = new ProgressDialog(MainActivity.this);
12                 dialog.setTitle("这是一个窗口");//标题
13                 dialog.setMessage("这是内容。。。。。。。");//内容
14                 dialog.setCancelable(false);//是否可以直接取消这个对话框
15                 dialog.show();
16
17
18             }
19         });
20     }

 浙公网安备 33010602011771号