Nginx+uWSGI+Django部署方案的详细实现过程
前情提要:
本项目在开发时设置使用数据库存放session数据。用户需要上传图片等静态文件,而静态文件均存放在Master的静态文件目录下,故采用NFS服务,使得各Worker服务器能够远程共享Master服务器下的静态文件。
使用版本说明:
该项目使用CentOS6.4部署集群,实测Python3.7版本在该系统下pip3无法正常使用!!!
系统:CentOS6.4
Python:Python-3.5.6
Nginx:nginx-1.18.0
1、Nginx+uWSGI+Django项目的部署设计:
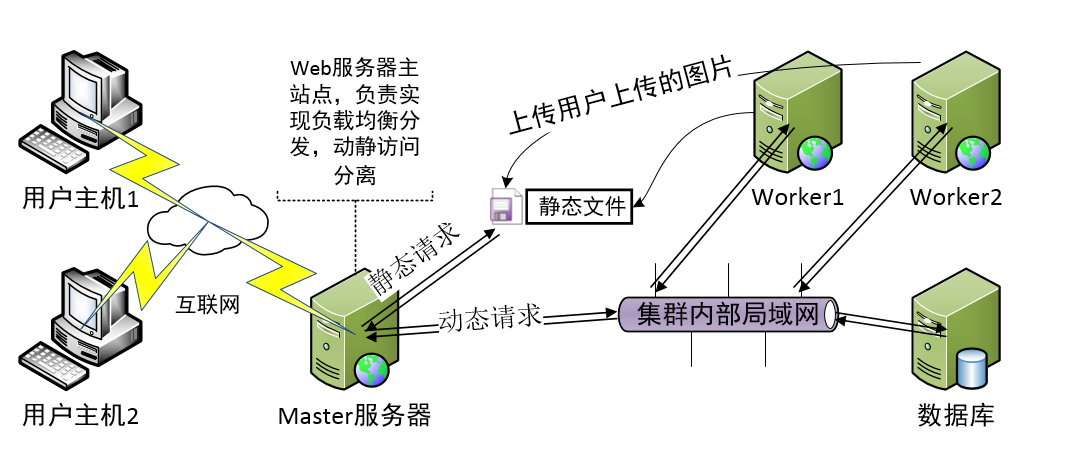
对于Nginx+uWSGI+Django的部署模式,一般通过Nginx实现负载均衡和动静分离功能。
部署要求:四台虚拟机,
一台虚拟机作为Master服务器搭建Nginx服务;
两台虚拟机Worker服务器搭建uWSGI服务;
一台虚拟机作为数据库服务器;
部署大体图如下:
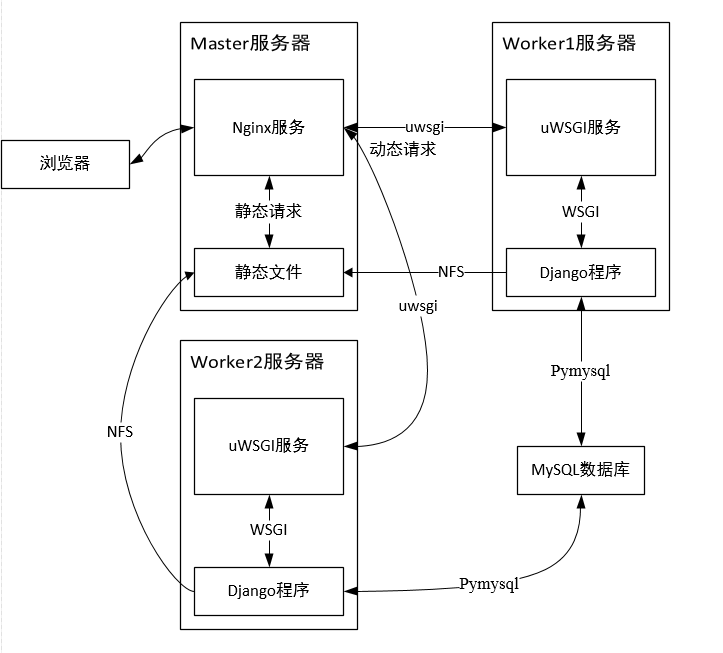
2、工作原理图:
具体实现接口以及各服务部署如下图所示:
#注意在安装各服务前需要安装好各支持模块
yum install gcc zlib2-devel pcre-devel openssl-devel
3、Nginx服务:
(1) Nginx安装:


wget http://nginx.org/download/nginx-1.16.1.tar.gz
tar xf nginx-1.16.1.tar.gz
cd nginx-1.16.1
./configure --prefix=/opt/nginx --with-http_ssl_module --with-http_stub_status_module
make && make install
(2)Nginx的目录结构:
----conf 配置文件
----html 存放静态文件,index.html是默认的欢迎页面
----logs 日志文件
----sbin 二进制文件
(3)Nginx的配置文件解读:
可查看其它详细资料,此处不展开
(4)Nginx配置:
配置文件路径为:(安装路径)/nginx/conf/nginx.conf
在对应http{ }中配置如下:

(5)Nginx服务的开启与重启:
./sbin/nginx #开启服务
./sbin/nginx -s reload #修改配置文件后重新加载配置
4、uWSGI服务配置:
(1) uWSGI安装:
pip3 install uwsgi -i https://pypi.douban.com/simple
(2)uWSGI文件启动方式配置:
使用ini配置文件启动uwsgi服务,首先需要创建启动文件:vim /etc/uwsgi.ini
#创建文件 vim /etc/uwsgi.ini
[uwsgi]
http = :8080
chdir=/data/mysite #项目路径
wsgi-file= mysite/wsgi.py #wsgi接口模块
processess = 4 #进程个数
threads = 2 #线程个数
daemonize = /data/mysite/django.log #守护进程 后台启动,指定日志输出文件
vacuum = true #清除临时文件
py-autoreload=1 #项目文件发生改变自动重启
(3)uWSGI启动:
#uwsgi --ini /etc/uwsgi.ini
5、NFS服务配置:
(1) 服务端:
a.安装和启动服务
#yum install nfs-utils rpcbind -y #安装服务模块
#/etc/init.d/rpcbind start #先启动rpcbind服务
#/etc/init.d/nfs start #然后启动nfs服务
b.将服务设置为开机自启动:
#/etc/rc/local为开机启动设置脚本文件
echo "/etc/init.d/rpcbind start" >>/etc/rc.local
echo "/etc/init.d/nfs start" >>/etc/rc.local
c.配置NFS服务的配置文件/etc/exports
#配置详细解说请查阅其他详细资料 ----> 详解链接
/data/nfs 192.168.118.0/24(rw,sync) ---->表示设置/data/nfs文件允许IP网段的主机进行读写
注意:要想客户端可以写文件,同时也需要将文件的权限设置为其他人可以写
(2) 客户端:
a.安装和启动服务
#yum install nfs-utils rpcbind -y #安装服务模块
#/etc/init.d/rpcbind start #先启动rpcbind服务
#/etc/init.d/nfs start #然后启动nfs服务
b.查看可联机的服务器
#showmount -e localhost
c.客户端挂载服务器端共享目录
#mount -t nfs 192.168.118.10:/data/nfs /data/DjangoWeb1/static/
挂载成功后Worker服务器中的/data/DjangoWeb1/static/目录下的内容会被隐藏,此时操作的为NFS服务器下的共享目录。所以系统用户上传图片等静态文件到服务器时,将图片文件保存至此挂载目录下,实际保存的地址为NFS服务器(即Master服务器)下的共享目录。
6、数据库服务器配置:
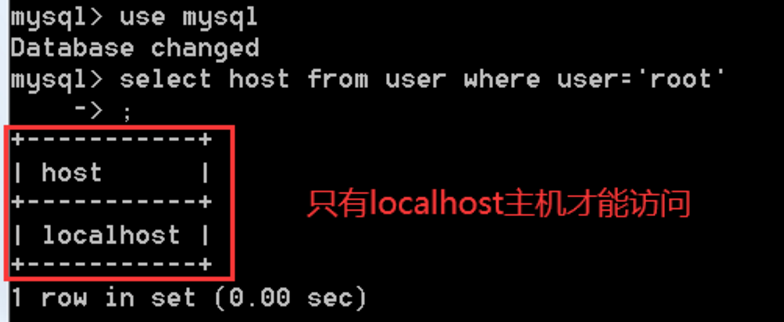
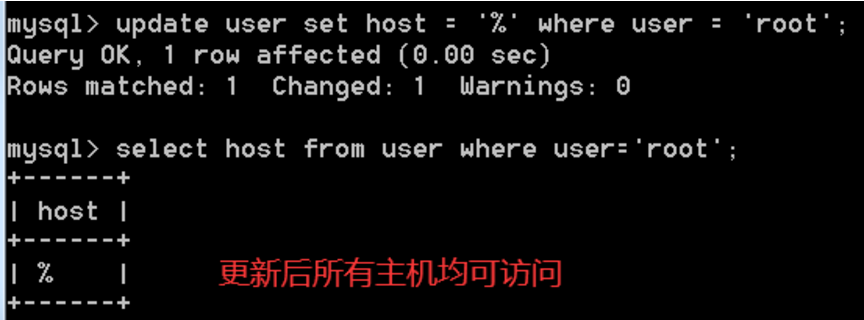
数据库服务器设计:MySQL数据库默认只能本地访问,需要开启远程访问权限;
#MySQL默认带有的mysq数据库l用来配置访问权限
use mysql;
#查看可以以root用户身份访问的主机
select host from user where user='root';
#设置root用户所有主机都可以访问
update user set host='%' where user='root'

 浙公网安备 33010602011771号