
慕课网--》从零做一个前端开源项目笔记
工作中时常用到github,但是一直对github项目不甚理解,无意间在慕课网上看到双越老师的“从零做一个前端开源项目”后,在第一遍快速学习老师的课程后,手把手实际操作了一把,感觉受益匪浅。
总结一下平时的收获,达到温故而知新的效果。
1:老师的教学文档:https://www.imooc.com/article/28240
2:学习目的:
因为我对前端接触的不多,这里主要时想了解github项目库的相关用法。
根据文档以及自己的实践,记录相应的知识点。
3:相关概念:
github:一个面向开源及私有软件项目的托管平台,可以把项目托管在github上,一般源码公布。
npm:是 JavaScript 世界的包管理工具,可以通过npm -i 包名称下载到相关的库直接使用,例如本文使用的npm -i gitbook -g (g是全局安装生效的意思)
自己总结的本文的目的:在npm中管理一个前端开源库。
练习总结:
第一次接触这么多的东西,很多内容对我来说都是新的,总结下该练习流程:
1:开发项目:以项目名称注册github账号,设置基础目录,并在本地修改帮助文档以及相关代码,做提交。(省去web项目用到的工具流程)。
.gitignore文件可以屏蔽相关的git提交(web相应的框架工具及npm 的使用省去)
2:md文档转html文档可以用到npm下的gitbook工具,有效的生成说明文档。(每一次修改后都要重新生成)
3:提交代码后,可以用git tag命令实现发布版本,在项目代码中的release栏可以看到版本包等信息。
4:前端js项目: 用npm init自动生成package.json。在nmp中配置与github项目账号一样名称的用户,可以用npm去管理发布的js包,供大家使用。
同时npm提供了一个CDN的路径可以自动更新版本。
5:官网,github提供了一种免费的官网机制,用github账号+github.io新建一个git库,在里面配置上原库中gitbook生成的html文档可当做一个官网对项目进行认识。
直接访问github账号+github.io,在网页中即可显示该库下对应根目录index.html对应的内容。
4:操作流程:
4.1:注册github账号,创建github项目:(一般个人项目,组织可以理解为软件集):
注意:github账号注册要慎重,与项目强相关,不宜修改。
提示:这里因为我已经有过github账号,自己并没有好的和可做的开源项目,所以,拿来以前随意注册的账号做练习测试。
4.1.1:打开自己的github个人主页,新建项目:
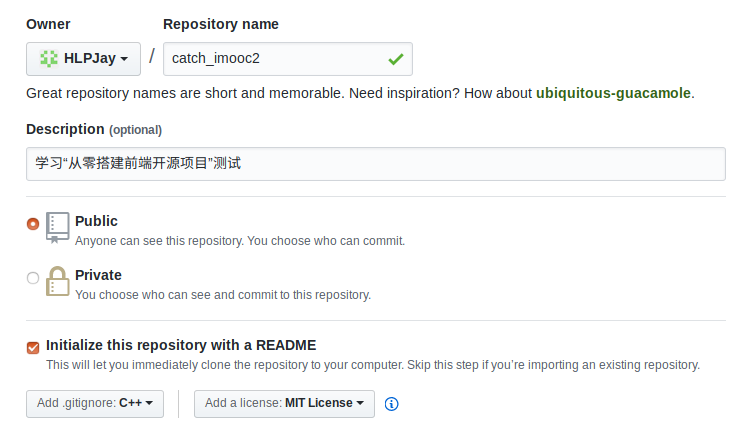
提示:
1:决定好的项目名称要慎重;
2:选择public类型;
3:初始化的时候创建README.md文件;
4:选择创建一个.gitignore文件(git忽略提交内容配置文件)。
5:选择MIT许可证(最广泛的)
4.1.2:效果展示:

4.2:本地配置git并且克隆代码到本地+第一次提交测试:
4.2.1:配置本地环境(通过ssh秘钥使本地有提交代码的权限):
执行ssh-keygen命令生成对应的秘钥,一直回车点击默认即可。
按照提示的默认路径,取/.ssh/id_rsa.pub 中的内容,拷贝出来。
打开个人github项目主页:https://github.com/settings/keys 选择“SSH and GPG keys”,添加本地秘钥到github:

/.ssh/id_rsa.pub 作者:
链接:https://www.imooc.com/article/28240
来源:慕课网
本文原创发布于慕课网 ,转载请注明出处,
ssh-keygen作者:
链接:https://www.imooc.com/article/28240
来源:慕课网
本文原创发布于慕课网 ,转载请注明出处,
ssh-keygen作者:
链接:https://www.imooc.com/article/28240
来源:慕课网
本文原创发布于慕课网 ,转载请注明出处,谢谢合作
4.2.2:克隆github库代码:
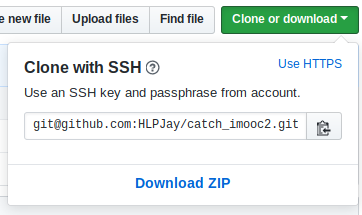
1:复制github上创建的项目库路径(注意这里有https和ssh两种方式):
选择ssh方式获取git路径,https的方式获取git库路径在git push时每次都要重新输入用户名和密码):
ssh的方式项目路径以Git开头。
2:执行git clone命令克隆github远端库:
➜  github_code git clone git@github.com:HLPJay/catch_imooc2.git
Cloning into 'catch_imooc2'...
remote: Counting objects: 5, done.
remote: Compressing objects: 100% (5/5), done.
remote: Total 5 (delta 0), reused 0 (delta 0), pack-reused 0
Receiving objects: 100% (5/5), done.
➜  github_code cd catch_imooc2
➜  catch_imooc2 git:(master) la
total 16K
drwxr-xr-x 8 hlp hlp 4.0K 7月  22 15:17 .git
-rw-r--r-- 1 hlp hlp  270 7月  22 15:15 .gitignore
-rw-r--r-- 1 hlp hlp 1.1K 7月  22 15:15 LICENSE
-rw-r--r-- 1 hlp hlp   64 7月  22 15:15 README.md
4.2.3:配置账号和密码并做第一个提交测试:
➜  catch_imooc2 git:(master) git config user.name "XXXXXX"
➜  catch_imooc2 git:(master) git config user.email "XXXXXXXXX@163.com"
➜  catch_imooc2 git:(master) vim README.md
➜  catch_imooc2 git:(master) ✗ git status
On branch master
Your branch is up to date with 'origin/master'.

Changes not staged for commit:
  (use "git add <file>..." to update what will be committed)
  (use "git checkout -- <file>..." to discard changes in working directory)

    modified:   README.md

no changes added to commit (use "git add" and/or "git commit -a")
➜  catch_imooc2 git:(master) ✗ git add .
➜  catch_imooc2 git:(master) ✗ git commit -m "first update"
[master 99f4ee3] first update
 1 file changed, 3 insertions(+)

➜  catch_imooc2 git:(master) git push origin master
Counting objects: 3, done.
Delta compression using up to 4 threads.
Compressing objects: 100% (3/3), done.
Writing objects: 100% (3/3), 361 bytes | 361.00 KiB/s, done.
Total 3 (delta 1), reused 0 (delta 0)
remote: Resolving deltas: 100% (1/1), completed with 1 local object.
To github.com:HLPJay/catch_imooc2.git
   843684a..99f4ee3  master -> master
4.3:通过npm去使代码框架生效(感觉npm这里特别神奇,这是我想整理的重点):
1:安装npm和node
2:执行npm init 按照提示填写相关信息。
➜  catch_imooc2 git:(master) npm init
This utility will walk you through creating a package.json file.
It only covers the most common items, and tries to guess sensible defaults.

See `npm help json` for definitive documentation on these fields
and exactly what they do.

Use `npm install <pkg> --save` afterwards to install a package and
save it as a dependency in the package.json file.

Press ^C at any time to quit.
name: (catch_imooc2)
version: (1.0.0) 0.0.1
description: 项目描述
entry point: (index.js) src/index.js
test command:
git repository: (https://github.com/HLPJay/catch_imooc2.git)
keywords: catch_imooc2
author: https://github.com/HLPJay
license: (ISC) MIT
3:执行完npm Init 后,在项目根目录下生成的package.json(请仔细了解生成的代码,以及代码架构)
(版本号,一级:重构版本;二级:重大功能改进;三级:小升级或者bug修复)
4:创建目录:
根目录文件夹一般:
src/ 源代码;
release/ 发布结果
test/ 单元测试;
doc/ 文档
example/ 实例
➜  catch_imooc2 git:(master) ✗ mkdir doc src release example test
➜  catch_imooc2 git:(master) ✗ ls
doc  example  LICENSE  package.json  README.md  release  src  test
5:根据package中的配置,还需要在src目录下新建index.js(只加入一行简单测试)
➜  catch_imooc2 git:(master) ✗ cat src/index.js
alert('catch_imooc2');
6:通过构建工具去自动生成框架代码,最常用的是webpack。
(--registry=https://registry.npm.taobao.org 是登录https://npm.taobao.org/中获取到的地址)
➜ catch_imooc2 git:(master) ✗ npm i babel-core babel-loader babel-polyfill babel-preset-es2015 babel-preset-latest webpack webpack-cli --save-dev --registry=https://registry.npm.taobao.org
7:新建配置文件:
➜  catch_imooc2 git:(master) ✗ cat .babelrc
{
    "presets": ["es2015", "latest"],
    "plugins": []
}%
➜  catch_imooc2 git:(master) ✗ cat webpack.config.js       ----》配置通过src下的代码生成release的代码
module.exports = {
    entry: './src/index.js',
    output: {
              path: __dirname,
              filename: './release/bundle.js'
        },
    module: {
              rules: [{
                    test: /\.js?$/,
                    exclude: /(node_modules)/,
                    loader: 'babel-loader'
            }]
        }
}
8: 修改package.json文件,在script标签中加上:"release":"webpack"
执行npm run release 生成目标代码。
➜  catch_imooc2 git:(master) ✗ npm run release

> catch_imooc2@0.0.1 release /home/hlp/code/github_code/catch_imooc2
> webpack

Hash: c94073cbf2daa162c3ca
Version: webpack 4.16.1
Time: 3344ms
Built at: 07/22/2018 4:21:35 PM
              Asset       Size  Chunks             Chunk Names
./release/bundle.js  966 bytes       0  [emitted]  main
Entrypoint main = ./release/bundle.js
[0] ./src/index.js 37 bytes {0} [built]

WARNING in configuration
The 'mode' option has not been set, webpack will fallback to 'production' for this value. Set 'mode' option to 'development' or 'production' to enable defaults for each environment.
You can also set it to 'none' to disable any default behavior. Learn more: https://webpack.js.org/concepts/mode/
➜  catch_imooc2 git:(master) ✗ ls release     ------》生成目标文件,源代码输出成编译后的代码。
bundle.js
9:在example目录下新增一个html页面做测试,加载release/bundle.js(实际上是src/index.js生成的二进制文件)查看效果。
➜  catch_imooc2 git:(master) ✗ cat example/index.html
<!DOCTYPE html>
<html>
<head>
    <meta charset="UTF-8">
    <title>example</title>
</head>
<body>
    <p>example _test_imooc2</p>
    <script src="../release/bundle.js"></script>
</body>
</html>%
10:安装一个http-server的小工具,发布网页(静态网页)。
➜ catch_imooc2 git:(master) ✗ npm install http-server -g
11:修改package.json文件,在script标签中加上:"example":"http-server -p 8880"
执行npm run example发布该静态网页。
➜  catch_imooc2 git:(master) ✗ npm run example

> catch_imooc2@0.0.1 example /home/hlp/code/github_code/catch_imooc2
> http-server -p 8880

Starting up http-server, serving ./
Available on:
  http://127.0.0.1:8880
  http://192.168.1.103:8880
Hit CTRL-C to stop the server
12:在网页输入http://localhost:8880/example/index.html,查看验证效果,是否正常加载src目录下实现的js功能。
4.4:修改README.md规范项目说明+ 屏蔽(.gitignore文件中)不需要的提交的代码并提交。
README.md修改可以参考如下:(注意#后有一个空格 实现目录大字体)
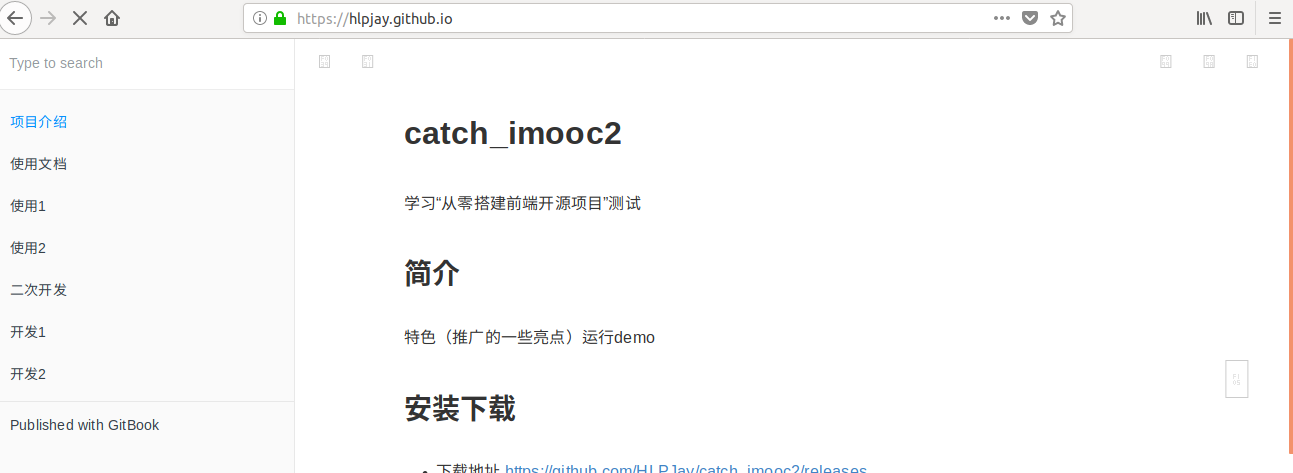
➜  catch_imooc2 git:(master) cat README.md
# catch_imooc2
学习“从零搭建前端开源项目”测试

# 简介

特色(推广的一些亮点)
运行demo

# 安装下载


# 快速使用

简单接入的文档

 - 使用文档
 - 二次开发文档

# 交流&提问(可以用issues)

# 关于作者

-个人主页
-收款二维码%
屏蔽不需要提交的代码并提交github远程分支:
➜  catch_imooc2 git:(master) cat .gitignore
#忽略
**/node_modules/*
node_modules/*
➜  catch_imooc2 git:(master) ✗ git status   ---》注意不要提交多余的代码
➜  catch_imooc2 git:(master) ✗ git add .
➜  catch_imooc2 git:(master) ✗ git commit -m "init project"
➜  catch_imooc2 git:(master) git push origin master
4.5:编码规范:
要注意编码规范,用相应的静态检查工具检查一下。
4.6:文档和测试用例(这里是我可以用到的):
测试用例和文档都可以用相应的工具去实现,这里只介绍了自动生成文档的工具:
用在项目目录下用命令:“npm i gitbook-cli -g”安装gitbook(通过md格式生成html文档),并创建SUMMARY.md的文档
安装gitbook:
➜  catch_imooc2 git:(master) npm i gitbook-cli -g
新建SUMMARY.md文件:
➜  catch_imooc2 git:(master) ✗ cat SUMMARY.md
# Summary

* [项目介绍](README.md)
* [使用文档](doc/use/README.md)
* [使用1](doc/use/use1.md)
* [使用2](doc/use/use2.md)
* [二次开发](doc/dev/README.md)
* [开发1](doc/dev/dev1.md)
* [开发2](doc/dev/dev2.md)

执行gitbook init生成对应的文档:
➜  catch_imooc2 git:(master) ✗ gitbook init
info: create doc/use/README.md
info: create doc/use/use1.md
info: create doc/use/use2.md
info: create doc/dev/README.md
info: create doc/dev/dev1.md
info: create doc/dev/dev2.md
info: create SUMMARY.md
info: initialization is finished

此时在doc目录下已经自动生成相关的md文件,填写自己的内容:
➜  catch_imooc2 git:(master) ✗ cat doc/dev/README.md
# 二次开发

- 下载:git clone git@github.com:HLPJay/catch_imooc2.git
- 编辑:src 目录下编辑js文件
- 执行:npm run release 编译
- 执行:npm run example 执行%

执行gitbook build生成对应的html文件:
➜  catch_imooc2 git:(master) ✗ gitbook build
info: 7 plugins are installed
info: 6 explicitly listed
info: loading plugin "highlight"... OK
info: loading plugin "search"... OK
info: loading plugin "lunr"... OK
info: loading plugin "sharing"... OK
info: loading plugin "fontsettings"... OK
info: loading plugin "theme-default"... OK
info: found 7 pages
info: found 8 asset files
info: >> generation finished with success in 4.3s !

运行服务器并验证:
➜  catch_imooc2 git:(master) ✗ npm run example     -----》实际上是启动服务"example":"http-server -p 8880"
登录http://192.168.1.103:8880/_book/index.html查看生成的html文档
4.7:制作版本代码并提交:
如果这里的第一个版本代码已经ok,则应该准备提交第一个版本了:
1:注释掉自动生成的_book目录的提交(参考上文node_modules的注释)。
2:提交所有的代码参考上文中的代码提交(当前master分支代码最新);
3:提交第一个版本,就可以获取到版本下载路径releases,可以把该路径加在介绍中,即为项目稳定版本。
➜  catch_imooc2 git:(master) git tag -a "v0.0.1" -m "first project"
➜  catch_imooc2 git:(master) git push origin "v0.0.1"
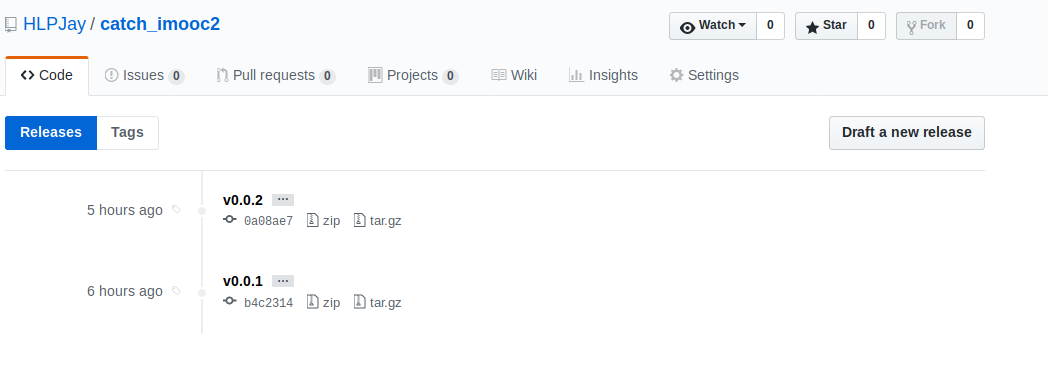
4:在github上查看提交后的版本包:点击项目对应的releases,可以查看到对应的版本,下载相应的code:
同步提交到npm中(package.json中 "name": "hlp7777",和npm的名字相同,最好时git的项目库 名称):--》我不是做前端的,这里只是学习测试,原则上这里应该和项目库名称相同。
1:要注册npm的账号和密码:(注意这里要验证邮箱)
2:要在本地登录npm:
➜  catch_imooc2 git:(master) ✗ npm add-user
Username: hlp7777
Password:
Email: (this IS public) XXXXXXXX@qq.com
➜  catch_imooc2 git:(master) ✗ npm login
Username: hlp7777
Password:
Email: (this IS public) XXXXXXXX@qq.com
3:执行提交动作:
➜  catch_imooc2 git:(master) npm publish .
+ hlp7777@0.0.2
4:即在npm自己的官网处就可以看到自己提交过的版本包信息:
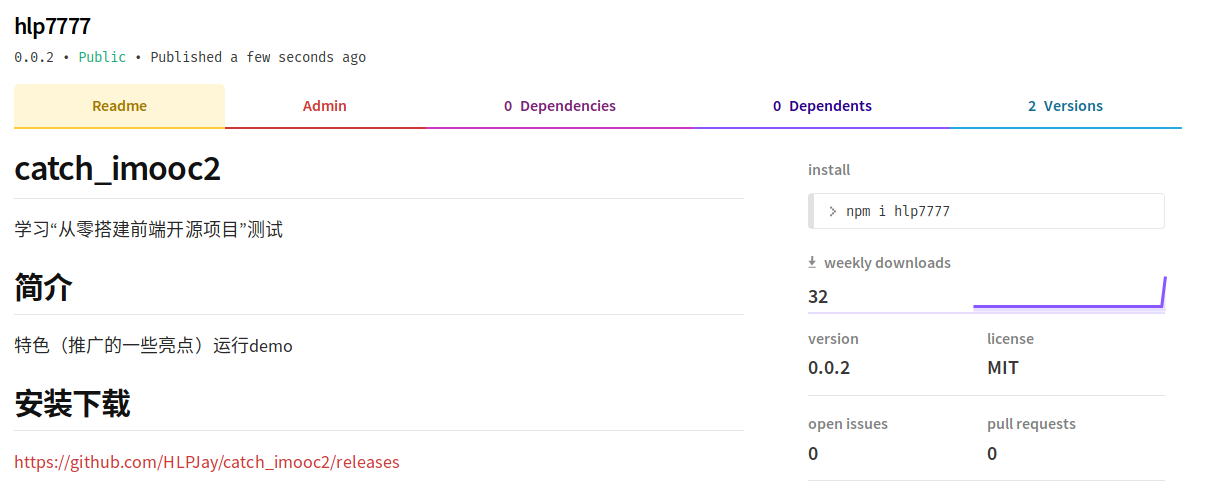
在上图中可以看到:
1:可以通过npm i hlp777 下载该包到别人的库里去直接使用。
2:npm提供了CDN的服务,https://unpkg.com/hlp7777/release/bundle.js
https://unpkg.com/ CDN的地址
hlp7777 项目库的名称
release/bundle.js 自己项目的路径
进入https://unpkg.com/hlp7777/release/bundle.js路径,该路径会自动刷新项目(npm项目这里是hlp7777)包的版本,取最新。
4.8:升级版本:
升级的流程如下:
1:创建新分支,合入修改的代码:(修改内容!!!   修改版本!!!    自测!!!)
➜  catch_imooc2 git:(master) ✗ git checkout -b dev
M    README.md
Switched to a new branch 'dev'
➜  catch_imooc2 git:(dev) ✗ git status
On branch dev
Changes not staged for commit:
  (use "git add <file>..." to update what will be committed)
  (use "git checkout -- <file>..." to discard changes in working directory)

    modified:   README.md
    modified:   doc/use/README.md
    modified:   package.json

no changes added to commit (use "git add" and/or "git commit -a")
➜  catch_imooc2 git:(dev) ✗ git diff
➜  catch_imooc2 git:(dev) ✗ git add .
➜  catch_imooc2 git:(dev) ✗ git commit -m "v0.0.3"
[dev 604e309] v0.0.3
 3 files changed, 11 insertions(+), 2 deletions(-)
➜  catch_imooc2 git:(dev) git push origin dev

2:合并分支代码到master:
➜  catch_imooc2 git:(dev) git checkout master
Switched to branch 'master'
Your branch is up to date with 'origin/master'.
➜  catch_imooc2 git:(master) git merge dev
Updating 0a08ae7..604e309
Fast-forward
 README.md         | 4 +++-
 doc/use/README.md | 7 +++++++
 package.json      | 2 +-
 3 files changed, 11 insertions(+), 2 deletions(-)
➜  catch_imooc2 git:(master) git push origin master
Total 0 (delta 0), reused 0 (delta 0)
To github.com:HLPJay/catch_imooc2.git
   0a08ae7..604e309  master -> master

3:创建tag标签制作新版本:
➜  catch_imooc2 git:(master) git tag -a "v0.0.3" -m "v0.0.3"
➜  catch_imooc2 git:(master) git push origin "v0.0.3"
Counting objects: 1, done.
Writing objects: 100% (1/1), 158 bytes | 158.00 KiB/s, done.
Total 1 (delta 0), reused 0 (delta 0)
To github.com:HLPJay/catch_imooc2.git
 * [new tag]         v0.0.3 -> v0.0.3

4:提交npm:
➜  catch_imooc2 git:(master) npm publish .
+ hlp7777@0.0.3

5:结果验证:
1:在npm项目主页看到v0.0.3版本的代码已经生成。
2:登录CDN 查看版本已经自动更新  https://unpkg.com/hlp7777/release/bundle.js
   显示结果:https://unpkg.com/hlp7777@0.0.3/release/bundle.js
3:升级完成
附:远端用界面把别人提交的merge合并到master之后,本地要执行pull命令拉取远端最新的代码。
4.9:网站官网:
参考:https://pages.github.com/
1:创建一个命名以你github项目账号(用户账号)+github.io的git库:
如我的gitHub用户为HLPJay 创建的项目为HLPJay.github.io.
2:在该库下新建index.html文件即可用HLPJay.github.io.直接访问到。
3:项目相关的网页,可以用gitbook build生成的html文件直接拷贝过来。
➜ catch_imooc2 git:(master) cp -r _book/* ../HLPJay.github.io
4:提交该库下的代码,直接访问测试,这里访问的时该库下对应的index.html的页面:
声明:
该博文只是为了规范自己的习惯,总结遇到过的问题,如有问题,建议或者触犯,请谅解并及时通知我更正。

 浙公网安备 33010602011771号