1-安装配置ubuntu
Ubuntu及vm-tools安装步骤
1.安装Ubuntu
1.配置选择


2.进入系统
然后开机

选择中文

键盘选择英语US


清除整个磁盘并安装,默认选择


重启的时候按Enter键进行重启

3.修改源
(可选,选用国内速度更快)
修改源可以选择华为源(推荐)或者清华源
清华源:https://mirrors.tuna.tsinghua.edu.cn/(在ubuntu22.04需要手动配置)
华为源:https://repo.huaweicloud.com/


选择一个,提示输入密码,然后关闭


手动更改方法
清华源在Ubuntu22.04不支持,需要手动更改
操作步骤如下:
1.备份原来的源
sudo cp /etc/apt/sources.list /etc/apt/sources.list.bat
sudo vim /etc/apt/sources.list
清除里面的所有内容:命令模式:%d
2.复制以下内容
复制以下内容到/etc/apt/sources.list
# deb cdrom:[Ubuntu 22.04 LTS _Jammy Jellyfish_ - Release amd64 (20220419)]/ jammy main restricted

# See http://help.ubuntu.com/community/UpgradeNotes for how to upgrade to
# newer versions of the distribution.
deb http://mirrors.tuna.tsinghua.edu.cn/ubuntu/ jammy main restricted
# deb-src http://cn.archive.ubuntu.com/ubuntu/ jammy main restricted

## Major bug fix updates produced after the final release of the
## distribution.
deb http://mirrors.tuna.tsinghua.edu.cn/ubuntu/ jammy-updates main restricted
# deb-src http://cn.archive.ubuntu.com/ubuntu/ jammy-updates main restricted

## N.B. software from this repository is ENTIRELY UNSUPPORTED by the Ubuntu
## team. Also, please note that software in universe WILL NOT receive any
## review or updates from the Ubuntu security team.
deb http://mirrors.tuna.tsinghua.edu.cn/ubuntu/ jammy universe
# deb-src http://cn.archive.ubuntu.com/ubuntu/ jammy universe
deb http://mirrors.tuna.tsinghua.edu.cn/ubuntu/ jammy-updates universe
# deb-src http://cn.archive.ubuntu.com/ubuntu/ jammy-updates universe

## N.B. software from this repository is ENTIRELY UNSUPPORTED by the Ubuntu
## team, and may not be under a free licence. Please satisfy yourself as to
## your rights to use the software. Also, please note that software in
## multiverse WILL NOT receive any review or updates from the Ubuntu
## security team.
deb http://mirrors.tuna.tsinghua.edu.cn/ubuntu/ jammy multiverse
# deb-src http://cn.archive.ubuntu.com/ubuntu/ jammy multiverse
deb http://mirrors.tuna.tsinghua.edu.cn/ubuntu/ jammy-updates multiverse
# deb-src http://cn.archive.ubuntu.com/ubuntu/ jammy-updates multiverse

## N.B. software from this repository may not have been tested as
## extensively as that contained in the main release, although it includes
## newer versions of some applications which may provide useful features.
## Also, please note that software in backports WILL NOT receive any review
## or updates from the Ubuntu security team.
deb http://mirrors.tuna.tsinghua.edu.cn/ubuntu/ jammy-backports main restricted universe multiverse
# deb-src http://cn.archive.ubuntu.com/ubuntu/ jammy-backports main restricted universe multiverse

deb http://mirrors.tuna.tsinghua.edu.cn/ubuntu/ jammy-security main restricted
# deb-src http://security.ubuntu.com/ubuntu jammy-security main restricted
deb http://mirrors.tuna.tsinghua.edu.cn/ubuntu/ jammy-security universe
# deb-src http://security.ubuntu.com/ubuntu jammy-security universe
deb http://mirrors.tuna.tsinghua.edu.cn/ubuntu/ jammy-security multiverse
# deb-src http://security.ubuntu.com/ubuntu jammy-security multiverse

# This system was installed using small removable media
# (e.g. netinst, live or single CD). The matching "deb cdrom"
# entries were disabled at the end of the installation process.
# For information about how to configure apt package sources,
# see the sources.list(5) manual.
保存退出
:wq
更新源
sudo apt upgrage && sudo apt update
4.初始更新
打开终端

输入:
sudo apt update
sudo apt-get update
sudo apt upgrade
sudo apt-get upgrade


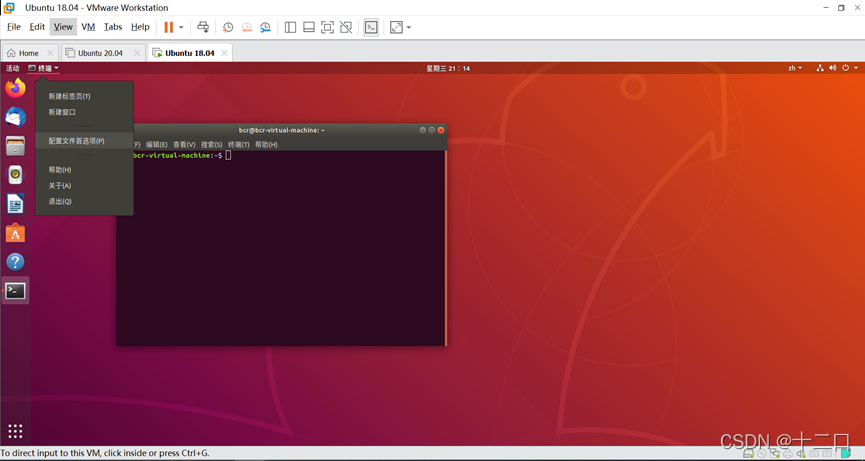
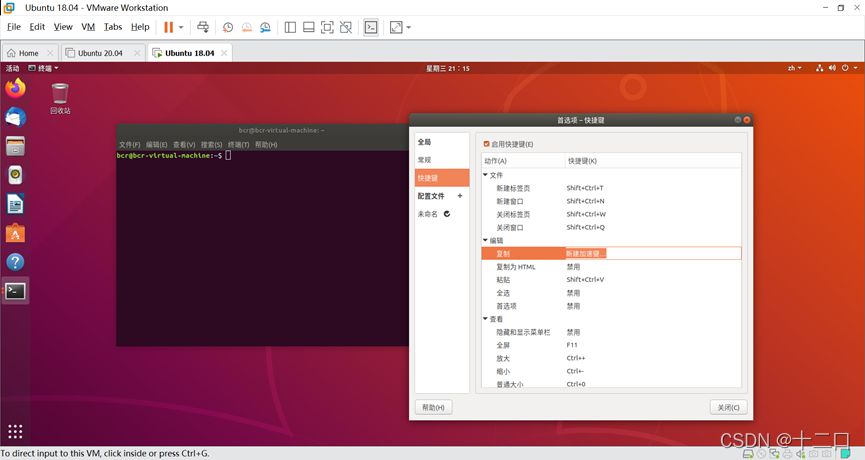
2.修改配置终端快捷键
- 点击“终端”,并在下拉列表中选择“配置文件首选项”。
- 在首选项窗口的左侧边栏中,点击”快捷键“。

- 双击希望修改的快捷键,显示如下图所示时,在键盘上按下希望的设置的快捷键。例如一般为ctrl+c和ctrl+v。
3.设置root初始密码
sudo passwd
输入当前用户密码
输入root密码
重复密码
4.添加用户(可选)
安装 Ubuntu 的时可增加一个名为(名称)的用户。
首先按 ctrl+alt+t 打开终端窗口,输入如下命令创建新用户 :
sudo useradd -m hadoop -s /bin/bash
这条命令创建了可以登陆的 hadoop 用户,并使用 /bin/bash 作为 shell。
sudo命令
本文中会大量使用到sudo命令。sudo是ubuntu中一种权限管理机制,管理员可以授权给一些普通用户去执行一些需要root权限执行的操作。当使用sudo命令时,就需要输入您当前用户的密码.
密码
在Linux的终端中输入密码,终端是不会显示任何你当前输入的密码,也不会提示你已经输入了多少字符密码。而在windows系统中,输入密码一般都会以“*”表示你输入的密码字符
输入法中英文切换
ubuntu中终端输入的命令一般都是使用英文输入。linux中英文的切换方式是使用键盘“shift”键来切换,也可以点击顶部菜单的输入法按钮进行切换。ubuntu自带的Sunpinyin中文输入法已经足够读者使用。win+space切换输入法。
Ubuntu终端复制粘贴快捷键
在Ubuntu终端窗口中,复制粘贴的快捷键需要加上 shift,即粘贴是 ctrl+shift+v。
接着使用如下命令设置密码,可简单设置为 hadoop,按提示输入两次密码:
sudo passwd hadoop
可为 hadoop 用户增加管理员权限,方便部署,避免一些对新手来说比较棘手的权限问题:
sudo adduser hadoop sudo
最后注销当前用户(点击屏幕右上角的齿轮,选择注销),返回登陆界面。在登陆界面中选择刚创建的 hadoop 用户进行登陆。
5.安装vm-tools
1.安装
更新你的 Ubuntu的 操作系统以确保所有现有软件包都是最新的:
sudo apt update && sudo apt upgrade -y
sudo apt install open-vm-tools-desktop -y
sudo apt-get install open-vm-tools
sudo apt install cloud-init open-vm-tools-containerinfo open-vm-tools-salt-minion
sudo reboot
启动服务:(可不要)
vmware-user
2.彻底卸载
sudo vmware-uninstall-tools.pl
sudo apt-get remove open-vm-tools
sudo apt autoremove open-vm-tools
sudo apt autoremove open-vm-tools-desktop
sudo apt-get remove --auto-remove open-vm-tools
sudo apt-get purge open-vm-tools
sudo apt-get purge --auto-remove open-vm-tools
6.配置共享文件夹
1.正常情况下
1.配置共享文件夹
在VMware中右键当前虚拟机,选择设置,在选项的共享文件夹中配置共享文件夹
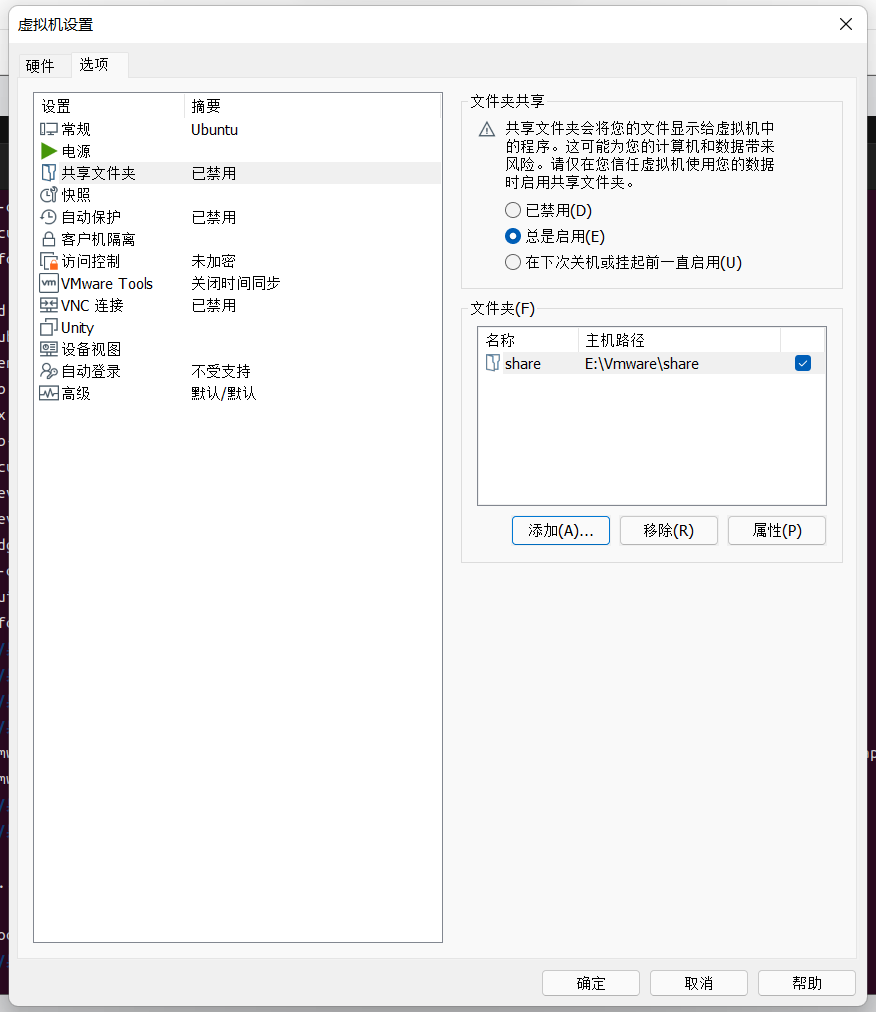
重启虚拟机后生效
sudo reboot
重启后检查VMware Tools相关模块是否加载:
lsmod | grep vmw
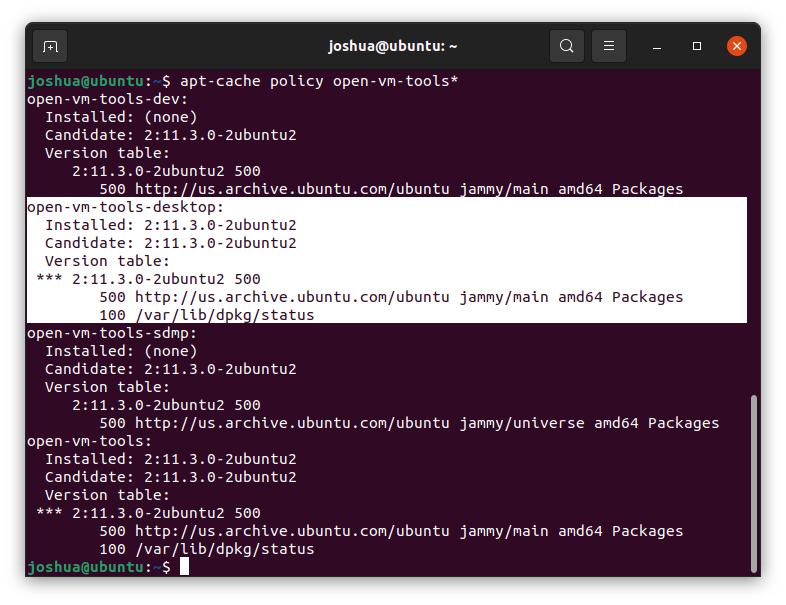
2.验证安装
回到内部后,使用以下命令验证一切是否正常。
apt-cache policy open-vm-tools*
输出示例:
2.发生无法挂载的错误(建议多用)一般出现在Ubuntu 22.04
1.方法一
ubuntu22.04重启后,共享文件夹消失
实际上共享文件夹已经设置成功,只是没有自动挂载。
使用下面的指令可查看共享文件夹是否设置,如果确实设置好了,会输出目录名
vmware-hgfsclient

#输出
gitProjiect
设置开机自动挂载
sudo vim /etc/rc.local
输入以下内容:
#!/bin/sh -e

sudo vmhgfs-fuse .host:/ /mnt/hgfs -o allow_other #挂载共享文件夹到/mnt/hgfs
编辑好后记得给文件添加可执行权限
chmod +x rc.local
设置好之后每次启动就会自动挂载共享为文件夹
报错:(fusermount: option allow_other only allowed if 'user_allow_other' is set in/etc/fuse.conf)解决
fusermount: failed to open/etc/fuse.conf: Permission denied
fusermount: option allow_other only allowed if 'user_allow_other' is set in /etc/fuse.conf
解决办法:
在文件 /etc/fuse.conf 中添加一行 user_allow_other 即可
sudo vim /etc/fuse.conf
2.方法二
1.ubuntu server 22.04 配置共享文件夹 找不到/mnt/hgfs
查看所设置的共享目录,若有显示则表示vmware设置无问题
vmware-hgfsclient
1.先安装VMware tools
sudo apt install open-vm-tools
2.手动创建/mnt/hgfs目录
sudo mkdir /mnt/hgfs
3.执行下面指令,即可看到/mnt/hgfs下你所配置的共享目录
vmhgfs-fuse .host:/share /mnt/hgfs #share:你的共享目录名
4.重启失效则需设置开机自动挂载
sudo vim /etc/fstab
#在尾部加一行
.host://mnt/hgfs  fuse.vmhgfs-fuse  allow_other  0  0(若此代码不行,需要使用解决问题的方法代码)
#不要立即重启,先用mount -a测试下,避免出错导致无法开机,无问题则可重启
mount -a
2.解决问题:fusermount: user has no write access to mountpoint /mnt/hgfs与问题:无法定位软件包 open-vm-dkms
在挂载VMware ubuntu 挂载windows共享文件夹失败后,通过网上资料分析,需要apt-get install open-vm-dkms,在执行该命令是,发现source.list,软件源错误,于是按照文章清华镜像源镜像跟新软件源,继续apt-get install open-vm-dkms,发现该软件不存在,于是使用:apt-get install open-vm-*,执行挂载命令:
正确的是:
1、使用命令:
sudo mount -t fuse.vmhgfs-fuse .host:/VM_Shared(本地电脑共享文件夹名称) /mnt/hgfs -o allow_other
(如果卸载,就把mount -t换成umount -a)或sudo vmhgfs-fuse .host:/VM_Shared /mnt/hgfs
(其中.host:/Documents是共享名,只需把Documents换成使用vmware-hgfsclient 命令得到的目录,/mnt/hgfs是挂载点。)
2.如果每次重启之后想让系统自动挂载
vim /etc/fstab
在最后添加一行:.host:/VM_Shared /mnt/hgfs fuse.vmhgfs-fuse allow_other 0 0
3.VMware-tools安装好后找不到共享文件夹的解决办法(若仍未解决参考内容)
一般共享文件夹在 /mnt/hgfs下面, 如果没有,使用下面步骤,看是否有共享文件夹。
1.若是找不到可以使用命令vmware-hgfsclient查看是否有你的共享文件夹, 例如我的共享文件夹如下图所示:

- /mnt/hgfs下面没有共享文件夹, 是因为没有挂在, 我们把它挂载上即可.
特别注意: Linux 内核4.0之前和4.0之后的语法不一样
挂载命令语法: - ubuntu 22.04 linux内核为 5.17
| 4.0 之前的 Linux 内核 | 4.0 及更高版本的 Linux 内核 | 说明 |
|---|---|---|
| mount -t vmhgfs .host:/ /home/user1/shares | /usr/bin/vmhgfs-fuse .host:/ /home/user1/shares -o subtype=vmhgfs-fuse,allow_other | 将所有共享装载到 /home/user1/shares |
| mount -t vmhgfs .host:/foo /tmp/foo | /usr/bin/vmhgfs-fuse .host:/foo /tmp/foo -o subtype=vmhgfs-fuse,allow_other | 将名为 foo 的共享装载到 /tmp/foo |
| mount -t vmhgfs .host:/foo/bar /var/lib/bar | /usr/bin/vmhgfs-fuse .host:/foo/bar /var/lib/bar -o subtype=vmhgfs-fuse,allow_other | 将共享 foo 中的子目录 bar 装载到 /var/lib/bar |
对于版本 4.0 之前的 Linux 内核,除了标准 mount 语法之外,您还可以使用 VMware 特定的选项。输入命令 /sbin/mount.vmhgfs -h 可列出这些选项。
对于 Linux 内核版本 4.0 或更高版本,输入命令 /usr/bin/vmhgfs-fuse -h 可列出可用的选项。
注:查看Linux内核版本三种方法:
1)  cat /proc/version
2)  uname -a
3)  uname -r

 浙公网安备 33010602011771号