
通过xml文件创建虚拟机
本次试验基于随笔《KVM网络虚拟化之br0搭建》,请先完成网桥的搭建
1、安装虚拟化服务
yum -y install qemu-kvm qemu-system libvirt virt-manager
2、测试服务是否安装成功
service livcvirtd status
virsh list --all
3、编写 xml 配置文件创建虚拟机
<domain type='kvm' id='1'  <name>centos</name> //虚拟机名称唯一
  <memory unit='KiB'>102400</memory>
  <currentMemory unit='KiB'>102400</currentMemory>
  <vcpu placement='static'>1</vcpu>
  <os>
    <type arch='x86_64' machine='rhel6.6.0'>hvm</type>  //arch指出系统架构类型,machine 则是机器类型,查看机器类型:qemu-system-x86_64
    <boot dev='hd'/>         //启动介质,第一次需要装系统可以选择cdrom光盘启动
  </os>
  <features>
    <acpi/>                 //Advanced Configuration and Power Interface,高级配置与电源接口
    <apic/>                 //Advanced Programmable Interrupt Controller,高级可编程中断控制器
    <pae/>                 //Physical Address Extension,物理地址扩展
  </features>
  <clock offset='utc'/>      //虚拟机时钟设置,这里表示本地本机时间
  <on_poweroff>destroy</on_poweroff>       //突发事件动作
  <on_reboot>restart</on_reboot>
  <on_crash>restart</on_crash>
  <devices>
    <emulator>/usr/libexec/qemu-kvm</emulator>       //kvm 默认
    <disk type='file' device='disk'>
      <driver name='qemu' type='qcow2' cache='none'/>    //镜像类型
      <source file='/var/lib/libvirt/images/cirros-0.3.3-x86_64-disk.img'/>    //镜像位置
      <target dev='hda' bus='ide'/>
    </disk>
    <interface type='bridge'>    //虚拟机网卡类型
      <source bridge='br0'/>
      <target dev='vnet0'/>      //宿主机设备名称
    </interface>
    <console type='pty' tty='/dev/pts/2'>   //控制台登录设置
      <source path='/dev/pts/2'/>
      <target type='serial' port='0'/>
    </console>
    <graphics type='vnc' port='5900' autoport='yes' listen='127.0.0.1'>   //配置VNC 设置
      <listen type='address' address='127.0.0.1'/>
    </graphics>
  </devices>
</domain>
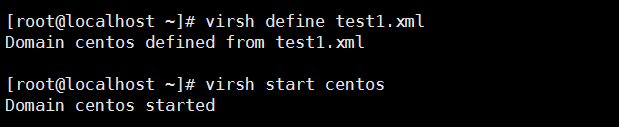
4、运行虚拟机文件并启动
virsh define test1.xml
virsh start centos    #centos 为虚拟机名称
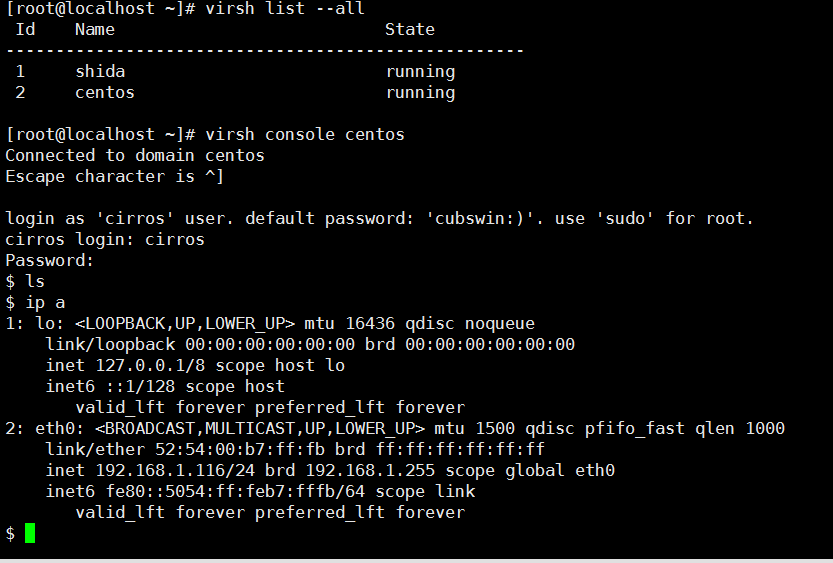
5、测试系统是否启动成功
virsh list --all
virsh console centos

 浙公网安备 33010602011771号