


Dockerfile⭐⭐⭐⭐⭐
案例:手动创建tengine镜像⭐⭐⭐⭐⭐
环境及软件准备
# 1.下载并启动ubuntu:20.0容器(命名为ubuntu20.04_tengine)
    docker run -itd --name ubuntu20.04_tengine ubuntu:20.04 /bin/bash
    docker exec -it ubuntu20.04_tengine /bin/bash
# 2.配置apt源
    sed -ri 's#archive.ubuntu.com|security.ubuntu.com#mirrors.aliyun.com#g' /etc/apt/sources.list
    apt update
# 3.下载软件包
    apt install -y vim curl
    curl -o /tmp/tengine-2.4.1.tar.gz https://tengine.taobao.org/download/tengine-2.4.1.tar.gz
    tar xf /tmp/tengine-2.4.1.tar.gz -C /tmp/
编译安装
# 1.安装依赖
apt install -y libssl-dev make gcc pcre2-utils  libpcre3-dev zlib1g-dev

# 2.配置(指定用户、安装目录、添加或开启模块)
# ./configure 是用来检测系统环境、检查依赖并生成定制化编译配置(Makefile)的脚本
mkdir -p /app/tools/tengine-2.4.1/  # Tengine 的完整安装目录,包含运行所需的所有文
cd /tmp/tengine-2.4.1/

./configure --prefix=/app/tools/tengine-2.4.1/ \
--user=nginx \
--group=nginx \
--with-http_ssl_module \
--with-http_v2_module \
--with-http_realip_module \
--with-http_stub_status_module \
--with-http_mp4_module \
--with-stream \
--with-stream_ssl_module \
--with-stream_realip_module \
--add-module=modules/ngx_http_upstream_check_module/ \
--add-module=modules/ngx_http_upstream_session_sticky_module
echo $?
# 3.编译
make -j 1  # make -j N  -j:允许并行编译 N:并行任务数量
# 4.编译安装
make install 编译安装
软连接、用户、测试、清理、生成镜像
# 创建软连接
  # 创建安装目录的软连接
    ln -s /app/tools/tengine-2.4.1/ /app/tools/tengine
  # 创建nginx命令软连接
    ln -s /app/tools/tengine/sbin/nginx /sbin/nginx
  # 创建日志的软连接(修改完需要重启容器)
    ln -s /dev/stdout /app/tools/tengine/logs/access.log
    ln -s /dev/stderr /app/tools/tengine/logs/error.log
# 添加用户
  groupadd nginx
  useradd -s /sbin/nologin -g nginx nginx
# 测试
  nginx  # 启动nginx
  echo docker-tengine.linux.cn >/app/tools/tengine/html/index.html
  curl localhost
# 清理镜像
  # 清理代码包、解压目录
    rm -rf /app/tools/tengine-2.4.1.tar.gz
    rm -rf /tmp/*
  # 清理apt/缓存
    rm -rf /var/cache/*
# 生成镜像
  docker commit ubuntu20.04_tengine ubuntu_tengine:2.4.1
运行手动创建的自定义镜像注意事项⭐⭐⭐⭐⭐
在Docker中运行手动创建的自定义镜像时,确保容器内有前台运行的服务是保持容器存活的关键
命令解释器的工作原理:在非交互模式下且无命令可执行时,/bin/bash 或 /bin/sh 进程会自行退出
非手动创建的官方镜像已经在Dockerfile中配置了CMD ["nginx", "-g", "daemon off;"]作为默认启动命令
[root@docker01 ~]# docker run -d -p 80:80 --name ubuntu_tengine_2.4.1_no_daemon_off ubuntu_tengine:2.4.1 [root@docker01 ~]# docker run -d -p 81:80 --name ubuntu_tengine_2.4.1_daemon_off ubuntu_tengine:2.4.1 nginx -g 'daemon off;' [root@docker01 ~]# docker ps -a CONTAINER ID IMAGE COMMAND CREATED STATUS PORTS NAMES 0b17409ac7a4 ubuntu_tengine:2.4.1 "nginx -g 'daemon of…" 8 seconds ago Up 8 seconds 0.0.0.0:81->80/tcp, :::81->80/tcp ubuntu_tengine_2.4.1_daemon_off 7bcfca6e9e73 ubuntu_tengine:2.4.1 "/bin/bash" 24 seconds ago Exited (0) 23 seconds ago ubuntu_tengine_2.4.1_no_daemon_off
# nginx -g 'daemon off;'
nginx:启动 Nginx 服务的主命令,直接执行时会读取默认配置文件(通常是/etc/nginx/nginx.conf)并启动服务
-g:在命令行中临时覆盖或补充配置文件中的全局指令
daemon off;:强制 Nginx 以非守护进程模式(前台)运行
Dockerfile中的指令⭐⭐⭐⭐⭐
| Dockerfile指令 | 含义 | 应用 |
| Dockerfile开头部分 | ||
| FROM |
用于指定基本镜像(类似于docker pull 下载镜像)
|
FROM ubuntu:20.04
|
| LABEL |
用于指定镜像的属性信息(作者、说明)
|
LABEL maintainer="yuanxiaojiang" |
| MAINTAINER | 指定镜像维护者信息(不推荐使用) | MAINTAINET “yuanxiaojiang” |
| ENV |
用于创建Dockerfile中使用的变量
|
ENV key=value |
| Dockerfile中间处理部分 | ||
| RUN |
制作镜像过程中需要的执行命令
|
RUN 系统命令 |
| ADD | 把指定文件或目录拷贝到容器中,相对于当前目录(自动解压) | ADD /tmp/tengine-2.4.1 /app/tools/ |
| COPY | 把指定文件或目录拷贝到容器中,相对于当前目录(不自动解压) | COPY /tmp/tengine-2.4.1 /app/tools/ |
| WORKDIR | 指定容器的默认工作目录 | WORKDIR /app/tools/ |
| VOLUME | 挂载数据卷 | VOLUME /app/tools/tengine |
| Dockerfile结尾部分 | ||
| EXPOSE | 指定容器对外暴露的端口 | EXPOSE 80 |
| CMD | 容器启动时默认执行的命令(需要执行docker run才会执行) | CMD ["executable", "param1", "param2"] |
| ENTRYPOINT | ENTRYPOINT 就像是给容器设定了一个“固定主程序”,而 CMD 则是它的“默认参数” | ENTRYPOINT ["executable", "param1", "param2"] |
| CMD和ENTRYPOINT区别 | docker run 运行时,CMD指定的内容会被docker run的参数覆盖 | docker run 运行时,ENTRYPOINT指定的内容会追加到docker run的参数后面 |
案例:构建Dockerfile编译安装tengine⭐⭐⭐⭐⭐
[root@docker01 docker]# tree dockerfile/
dockerfile/
└── ubuntu20.04_tengine:2.4.1
    └── dockerfile

[root@docker01 ~]# cat /app/docker/dockerfile/ubuntu20.04_tengine:2.4.1/dockerfile
FROM ubuntu:20.04
LABEL author="yuanxiaojiang"
ENV Web_User="nginx"
ENV Web_Server="tengine"
ENV Web_Version="2.4.1"
ENV Server_Dir="/app/tools/tengine-2.4.1"
ENV Server_Dir_Soft="/app/tools/tengine"

RUN sed -i 's#archive.ubuntu.com|security.ubuntu.com#mirrors.aliyun.com#g' /etc/apt/sources.list \
    && apt update \
    && apt install -y vim curl \
    && curl -o /tmp/${Web_Server}-${Web_Version}.tar.gz https://tengine.taobao.org/download/${Web_Server}-${Web_Version}.tar.gz \
    && tar xf /tmp/${Web_Server}-${Web_Version}.tar.gz -C /tmp/

RUN apt install -y libssl-dev make gcc pcre2-utils  libpcre3-dev zlib1g-dev \
    && mkdir -p ${Server_Dir} \
    && cd /tmp/${Web_Server}-${Web_Version} \
    && ./configure --prefix=${Server_Dir} \
      --user=${Web_User} \
      --group=${Web_User} \
      --with-http_ssl_module \
      --with-http_v2_module \
      --with-http_realip_module \
      --with-http_stub_status_module \
      --with-http_mp4_module \
      --with-stream \
      --with-stream_ssl_module \
      --with-stream_realip_module \
      --add-module=modules/ngx_http_upstream_check_module/ \
      --add-module=modules/ngx_http_upstream_session_sticky_module \
    && make -j 1 \
    && make install
RUN ln -s  ${Server_Dir} ${Server_Dir_Soft} \
    && ln -s ${Server_Dir_Soft}/sbin/nginx /sbin/nginx \
    && ln -s /dev/stdout ${Server_Dir_Soft}/logs/access.log \
    && ln -s /dev/stderr ${Server_Dir_Soft}/logs/error.log
RUN groupadd ${Web_User} \
    && useradd -s /sbin/nologin -g ${Web_User} ${Web_User}
RUN rm -rf ${Server_Dir}.tar.gz \
    && rm -rf /tmp/* \
    && rm -rf /var/cache/*
EXPOSE 80
CMD ["nginx","-g","daemon off;"]
多服务镜像nginx + php⭐⭐⭐⭐⭐
[root@docker01 centos7_nginx_php]# tree
├── dockerfile
└── entrypoint.sh
dockerfile
FROM centos:7
LABEL author="yuanxiaojiang"

# 修改镜像源地址
RUN mv /etc/yum.repos.d/CentOS-Base.repo /etc/yum.repos.d/CentOS-Base.repo.backup \
    && curl -o /etc/yum.repos.d/CentOS-Base.repo https://mirrors.aliyun.com/repo/Centos-7.repo \
    && curl -o /etc/yum.repos.d/epel.repo https://mirrors.aliyun.com/repo/epel-7.repo \
    && yum -y update

RUN yum install -y nginx \
    # 安装 Remi 仓库(阿里云镜像加速版)
    && yum install -y https://mirrors.aliyun.com/remi/enterprise/remi-release-7.rpm \
    # 启用 PHP 8.1 模块
    && yum-config-manager --enable remi-php81 \
    # 安装php8.1和php-fpm
    && yum install -y php php-fpm \
    # 安装依赖
    && yum install -y php-mysqlnd php-gd php-mbstring php-xml php-zip php-opcache php-curl
RUN sed -i 's/^user = apache/user = nginx/' /etc/php-fpm.d/www.conf \
    && sed -i 's/^group = apache/group = nginx/' /etc/php-fpm.d/www.conf
RUN mkdir -p /run/php-fpm/ \
    && chown nginx:nginx /run/php-fpm/ \
    && chmod 755 /run/php-fpm/
EXPOSE 80
COPY entrypoint.sh /entrypoint.sh
RUN chmod +x /entrypoint.sh
CMD ["/entrypoint.sh"]
entrypoint.sh
[root@docker01 centos7_nginx_php]# cat entrypoint.sh
#!/bin/bash
php-fpm
nginx -g "daemon off;"
测试
docker build -t web:nginx_php .  # 推荐进入到docker所在的目录进行该命令
docker run -d -p 80:80 web:nginx_php
不要使用docker run -dit web:nginx_php /bin/bash ,/bin/bash会替换掉dockerfile中CMD中的指令
docker exec -it awesome_kirch /bin/bash

echo "<?php phpinfo(); ?>" > /usr/share/nginx/html/info.php
[root@5b32f33bca38 /]# cat /etc/nginx/conf.d/php.test.conf
server {
    listen 80;
    server_name 10.0.0.81;
    root /usr/share/nginx/html/;
    index index.html;
    location ~ \.php$ {
        fastcgi_pass 127.0.0.1:9000;
        fastcgi_index info.php;
        fastcgi_param SCRIPT_FILENAME $document_root$fastcgi_script_name;
        include fastcgi_params;
    }
}

nginx -t
nginx -s reload
基于nginx + php镜像部署kodexp(可道云)⭐⭐⭐⭐⭐
[root@docker01 centos7_nginx_php_kodexp]# tree
├── dockerfile
├── entrypoint.sh
├── kodbox.tar.gz    # ADD自动解压不了.zip结尾的压缩包
└── kodexp.linux.cn.conf
dockerfile
FROM web:nginx_php
LABEL author="yuanxiaojiang"
COPY kodexp.linux.cn.conf /etc/nginx/conf.d/
ADD kodexp.tar.gz /app/code/
RUN chown -R nginx.nginx /app/code/
COPY entrypoint.sh /entrypoint.sh
RUN chmod +x /entrypoint.sh
EXPOSE 80
CMD ["/entrypoint.sh"]
nginx配置
[root@docker01 centos7_nginx_php_kodexp]# cat kodexp.linux.cn.conf
server {
  listen 80;
  server_name kodexp.linux.cn;
  root /app/code/kodexp;
  location / {
    index index.php;
  }
  location ~ \.php$ {
    fastcgi_pass 127.0.0.1:9000;
    fastcgi_index index.php;
    fastcgi_param SCRIPT_FILENAME $document_root$fastcgi_script_name;
    include fastcgi_params;
  }
}
entrypoint.sh
[root@docker01 centos7_nginx_php_kodexp]# cat entrypoint.sh
#!/bin/bash
php-fpm
nginx -g "daemon off;"
Dockerfile多阶段构建⭐⭐⭐⭐⭐
多阶段构建允许在一个 Dockerfile 中使用多个 FROM 指令,每个阶段都可以有不同的基础镜像(减小最终生成镜像的大小)
# 编译安装一些软件的时候,一般是先安装各种依赖,然后开始编译安装,编译安装一般会生成新的命令
1个镜像负责编译安装,生成命令.(临时)
1个镜像上一个镜像的命令复制过来+服务必要的配置
最终使用最后的这个镜像
构建阶段
# 第一阶段:构建阶段(使用完整编译环境)
FROM ubuntu:20.04 as builder
LABEL author="yuanxiaojiang"
ENV Web_User="nginx"
ENV Web_Server="tengine"
ENV Web_Version="2.4.1"
ENV Server_Dir="/app/tools/tengine-2.4.1"

# 1. 配置镜像源并安装编译工具
RUN sed -i 's#archive.ubuntu.com|security.ubuntu.com#mirrors.aliyun.com#g' /etc/apt/sources.list \
    && apt update \
    && apt install -y curl libssl-dev make gcc pcre2-utils libpcre3-dev zlib1g-dev

# 2. 下载并编译 Tengine
RUN curl -o /tmp/${Web_Server}-${Web_Version}.tar.gz https://tengine.taobao.org/download/${Web_Server}-${Web_Version}.tar.gz \
    && tar xf /tmp/${Web_Server}-${Web_Version}.tar.gz -C /tmp/ \
    && cd /tmp/${Web_Server}-${Web_Version} \
    && ./configure --prefix=${Server_Dir} \
        --user=${Web_User} \
        --group=${Web_User} \
        --with-http_ssl_module \
        --with-http_v2_module \
        --with-http_realip_module \
        --with-http_stub_status_module \
        --with-http_mp4_module \
        --with-stream \
        --with-stream_ssl_module \
        --with-stream_realip_module \
        --add-module=modules/ngx_http_upstream_check_module/ \
        --add-module=modules/ngx_http_upstream_session_sticky_module \
    && make -j $(nproc) \     # 编译生成的命令目录/tmp/tengine.2.4.1/objs/nginx
    && make install    # 安装生成的命令目录/app/tools/tengine-2.4.1/sbin/(推荐复制Tengine安装目录)
编译(make)时生成命令,安装(make install)时只是复制命令到系统目录
运行阶段
# 第二阶段:运行阶段(使用精简镜像)
FROM ubuntu:20.04
ENV Web_User="nginx"
ENV Web_Server="tengine"
ENV Web_Version="2.4.1"
ENV Server_Dir="/app/tools/tengine-2.4.1"
ENV Server_Dir_Soft="/app/tools/tengine"

# 1. 仅安装运行时依赖
RUN sed -i 's#archive.ubuntu.com|security.ubuntu.com#mirrors.aliyun.com#g' /etc/apt/sources.list \
    && apt update \
    && apt install -y libpcre3 zlib1g openssl \
    && rm -rf /var/lib/apt/lists/*    # 清除apt缓存

# 2. 从构建阶段复制编译好的 Tengine
COPY --from=builder ${Server_Dir} ${Server_Dir}
# 如果构建阶段创建了用户需要执行下面操作
# COPY --from=builder /etc/passwd /etc/passwd
# COPY --from=builder /etc/group /etc/group

# 3. 创建符号链接和日志文件
RUN ln -s ${Server_Dir} ${Server_Dir_Soft} \
    && ln -s ${Server_Dir_Soft}/sbin/nginx /sbin/nginx \
    && ln -s /dev/stdout ${Server_Dir_Soft}/logs/access.log \
    && ln -s /dev/stderr ${Server_Dir_Soft}/logs/error.log \
    && mkdir -p ${Server_Dir_Soft}/logs

# 4. 创建用户和组(保险做法)
RUN groupadd ${Web_User} \
    && useradd -s /sbin/nologin -g ${Web_User} ${Web_User} \
    && chown -R ${Web_User}:${Web_User} ${Server_Dir}

# 4. 清理和暴露端口
RUN rm -rf /var/lib/apt/lists/* /tmp/* /var/cache/*
EXPOSE 80
CMD ["nginx", "-g", "daemon off;"]
容器互联 --link
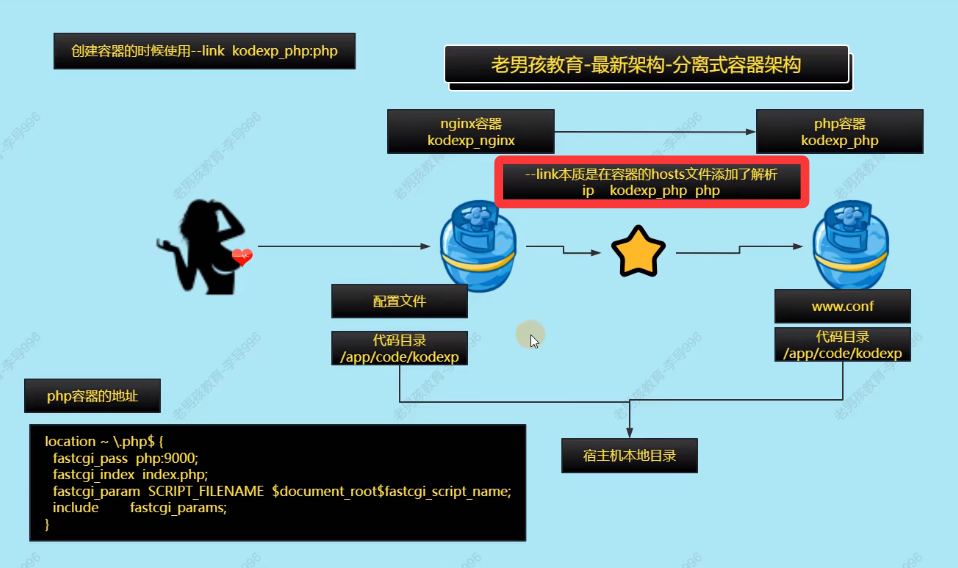
--link使容器连接其他容器的选项,其他容器需要在运行中
操作步骤及
1 nginx:1.28-alpine
2 php:8-fpm-alpine  # /usr/local/etc/php-fpm.d/www.conf
3 修改配置、挂载配置
4 挂载代码
5 权限设置
目录结构
[root@docker01 kodexp]# pwd
/app/docker/kodexp
[root@docker01 kodexp]# tree -L 2
├── code
│   ├── app
│   ├── Changelog.md
│   ├── config
│   ├── data
│   ├── index.php
│   ├── info.php
│   ├── kodexp
│   ├── plugins
│   └── static
└── conf
    ├── kodexp.conf
    ├── nginx.conf
    └── www.conf
配置文件


[www]
user = www-data
group = www-data
listen = 0.0.0.0:9000
pm = dynamic
pm.max_children = 5
pm.start_servers = 2
pm.min_spare_servers = 1
pm.max_spare_servers = 3
server {
  listen 80;
  server_name kodexp.linux.cn;
  root /app/code/kodexp;
  location / {
    index index.php;
  }
  location ~ \.php$ {
    fastcgi_pass php:9000;
    fastcgi_index index.php;
    fastcgi_param SCRIPT_FILENAME $document_root$fastcgi_script_name;
    include fastcgi_params;
  }
}
容器运行
# 先启动php容器
[root@docker01 kodexp]# docker run -d --name "kodexp_php" \
-v /app/docker/kodexp/conf/www.conf:/usr/local/etc/php-fpm.d/www.conf \
-v /app/docker/kodexp/code/:/app/code/kodexp/ \
php:8-fpm-alpine

# 后启动nginx容器
[root@docker01 kodexp]# docker run -d --name "kodexp_nginx" -p 10086:80 \
--link kodexp_php:php \
-v /app/docker/kodexp/conf/nginx.conf:/etc/nginx/nginx.conf \
-v /app/docker/kodexp/conf/kodexp.conf:/etc/nginx/conf.d/default.conf \  # 需要将nginx默认的default.conf禁用或删除(此处将其覆盖)
-v /app/docker/kodexp/code/:/app/code/kodexp/ \
nginx:1.28-alpine

# 权限设置
[root@docker01 ~]# chmod -R 777 /app/docker/kodexp/code

 浙公网安备 33010602011771号