


轮询算法
概述:决定负载均衡如何将请求发送给后端节点,这种分发的方法就是轮询算法
常见的轮询算法
| 负载 | 说明 |
| rr轮询 | round robin(简单轮询):依次循环地将请求或任务分配给每个可用的服务器或处理单元 |
| wrr | weighted round robin(加权轮询):在简单轮询的基础上,为每台服务器分配一个权重,权重越大,获得请求的机会越多 |
| least_conn | least connections(最少连接轮询):将请求分配给当前连接数最少的服务器 |
| ip_hash | ip hash(ip哈希):根据客户端的 IP 地址生成一个哈希值,以决定将请求分配给哪台服务器(同一个客户端的请求始终发送到同一台服务器) |
| url_hash | url_hash:根据客户端的 url 地址生成一个哈希值,以决定将请求分配给哪台服务器(相同的url分配到同一台服务器) |
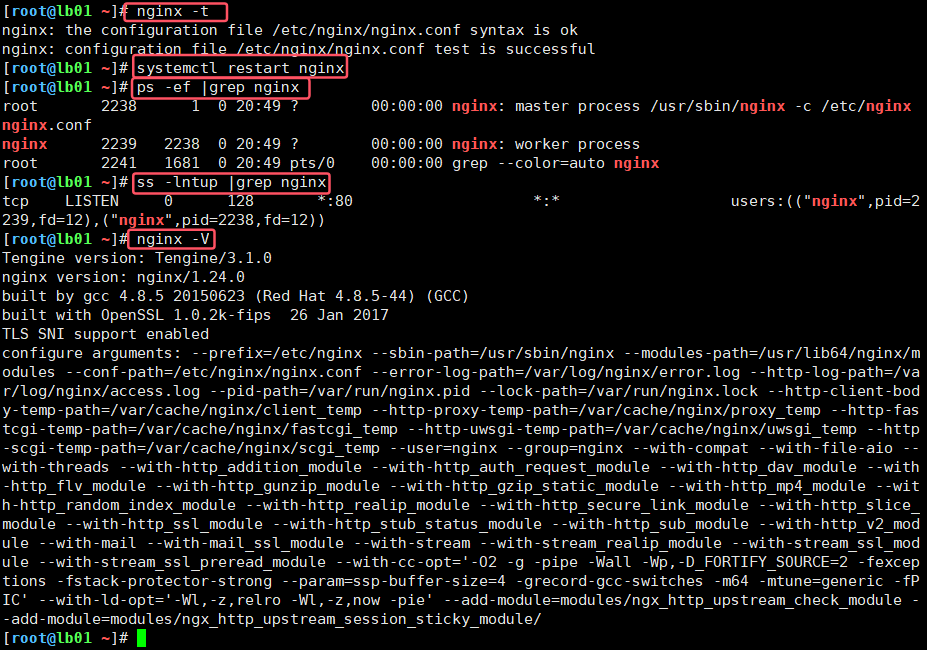
案例:对负载均衡进行状态检查
负载均衡状态检查模块 upstream check web
nginx默认没有安装,是一个第三方模块,需要编译安装该模块,生成nginx命令,替代负载均衡上的ngx命令
安装upstream chek web步骤
# 找一台没有安装nginx的机器(db01),安装tengine并解压

# 进入到解压后的目录
[root@db01 ~]# cd ./tengine-3.1.0/

# 安装依赖
[root@db01 ~/tengine-3.1.0]# yum install -y pcre-devel   openssl-devel

# ./configure配置,指定各种位置(不指定则安装到/usr/local/)
    # 指定已安装的nginx的配置(通过nginx -V 获取)
    [root@db01 ~/tengine-3.1.0]# ./configure --prefix=/etc/nginx --sbin-path=/usr/sbin/nginx --modules-path=/usr/lib64/nginx/modules --conf-path=/etc/nginx/nginx.conf --error-log-path=/var/log/nginx/error.log --http-log-path=/var/log/nginx/access.log --pid-path=/var/run/nginx.pid --lock-path=/var/run/nginx.lock --http-client-body-temp-path=/var/cache/nginx/client_temp --http-proxy-temp-path=/var/cache/nginx/proxy_temp --http-fastcgi-temp-path=/var/cache/nginx/fastcgi_temp --http-uwsgi-temp-path=/var/cache/nginx/uwsgi_temp --http-scgi-temp-path=/var/cache/nginx/scgi_temp --user=nginx --group=nginx --with-compat --with-file-aio --with-threads --with-http_addition_module --with-http_auth_request_module --with-http_dav_module --with-http_flv_module --with-http_gunzip_module --with-http_gzip_static_module --with-http_mp4_module --with-http_random_index_module --with-http_realip_module --with-http_secure_link_module --with-http_slice_module --with-http_ssl_module --with-http_stub_status_module --with-http_sub_module --with-http_v2_module --with-mail --with-mail_ssl_module --with-stream --with-stream_realip_module --with-stream_ssl_module --with-stream_ssl_preread_module --with-cc-opt='-O2 -g -pipe -Wall -Wp,-D_FORTIFY_SOURCE=2 -fexceptions -fstack-protector-strong --param=ssp-buffer-size=4 -grecord-gcc-switches -m64 -mtune=generic -fPIC' --with-ld-opt='-Wl,-z,relro -Wl,-z,now -pie' --add-module=modules/ngx_http_upstream_check_module --add-module=modules/ngx_http_upstream_session_sticky_module/

    # tegine服务将nginx常用的第三方模块放在源代码的modules目录下面
    --add-module=modules/ngx_http_upstream_check_module  # 编译安装的时候安装upstream_check模块
    --add-module=modules/ngx_http_upstream_session_sticky_module/  # 增加会话共享模块

# 进行编译
[root@db01 ~/tengine-3.1.0]# make

# 进行检查
[root@db01 ~/tengine-3.1.0]# echo $?
0

# 由于不需要再db01中安装tengine,所以不执行安装操作(make install)

# 将nginx可执行文件发送到lb01节点的家目录
[root@db01 ~/tengine-3.1.0]# scp -r ./objs/nginx root@lb01:~
    # objs 目录通常是编译过程中生成的目标文件和可执行文件的存放位置
    # objs 目录下的 nginx 是经过编译后生成的 Nginx 可执行文件

给负载均衡节点中的blog.wordpress.cn.conf配置负载均衡状态检查功能
根据官方文档进行配置:https://tengine.taobao.org/document_cn/http_upstream_check_cn.html
[root@lb01 /etc/nginx/conf.d]# cat blog.wordpress.cn.conf
upstream blog_pools {
  server 10.0.0.7:80;
  server 10.0.0.8:80;
  check interval=3000 rise=2 fall=5 timeout=1000 type=http;
  # interval:向后端发送健康检查包的间隔时间(ms)
  # rise:如果连续成功次数达到rise_count,服务器就被认为是up
  # fall:如果连续失败次数达到fall_count,服务器就被认为是down
  # timeout:后端健康请求的超时时间
  # type:健康检查包的类型

  check_http_send "HEAD / HTTP/1.0\r\n\r\n";  # 配置http健康检查包发送的请求内容
  check_http_expect_alive http_2xx http_3xx;  # HTTP回复的成功状态
}
server {
  listen 80;
  server_name blog.wordpress.cn;
  access_log /var/log/nginx/blog.wordpress.linux.cn-access.log main;
  error_log /var/log/nginx/blog.wordpress.linux.cn-error.log notice;
  location / {
    proxy_pass http://blog_pools;
    proxy_set_header Host $http_host;
    proxy_set_header X-Real-IP $remote_addr;
    proxy_set_header X-Forwarded-For $proxy_add_x_forwarded_for;
  }

  location /wordpress_status {
    check_status;  # 开启负载均衡检查页面
    access_log   off;
    allow 10.0.0.1;
    allow 10.0.0.0/24;
    deny all;
  }
}
nginx平滑升级案例
# 检查当前环境
[root@web02 ~]# nginx -v
nginx version: nginx/1.26.1

# 启动nginx
[root@web02 ~]# systemctl start nginx

# 检查端口与pid文件
[root@web02 ~]# ps -ef |grep nginx
root       2906      1  0 21:39 ?        00:00:00 nginx: master process /usr/sbin/nginx -c /etc/nginxnginx.conf
nginx      2907   2906  0 21:39 ?        00:00:00 nginx: worker process
root       2910   1727  0 21:39 pts/0    00:00:00 grep --color=auto nginx
[root@web02 ~]# ll /var/run/nginx*
-rw-r--r-- 1 root root 5 Mar  4 21:39 /var/run/nginx.pid
[root@web02 ~]# cat /var/run/nginx.pid
2906

#
[root@db01 ~/tengine-3.1.0]# scp ./objs/nginx root@web02:~
[root@web02 ~]# ll
-rwxr-xr-x  1 root root 10841520 Mar  4 21:42 nginx

[root@web02 ~]# mv /sbin/nginx /sbin/nginx-v1.26.1
[root@web02 ~]# mv /root/nginx /sbin/nginx
[root@web02 ~]# nginx -v
Tengine version: Tengine/3.1.0
nginx version: nginx/1.24.0

[root@web02 ~]# kill -USR2 `cat /var/run/nginx.pid`
[root@web02 ~]# ll /var/run/nginx.pid*
-rw-r--r-- 1 root root 5 Mar  4 21:46 /var/run/nginx.pid
-rw-r--r-- 1 root root 5 Mar  4 21:39 /var/run/nginx.pid.oldbin


[root@web02 ~]# cat /var/run/nginx.pid
3003
[root@web02 ~]# cat /var/run/nginx.pid.oldbin
2906

[root@web02 ~]# ps -ef |grep nginx
root       2906      1  0 21:39 ?        00:00:00 nginx: master process /usr/sbin/nginx -c /etc/nginxnginx.conf
nginx      2907   2906  0 21:39 ?        00:00:00 nginx: worker process
root       3003   2906  0 21:46 ?        00:00:00 nginx: master process /usr/sbin/nginx -c /etc/nginxnginx.conf
nginx      3004   3003  0 21:46 ?        00:00:00 nginx: worker process
root       3041   1727  0 21:47 pts/0    00:00:00 grep --color=auto nginx

[root@web02 ~]# kill 2906
[root@web02 ~]# ps -ef |grep nginx
root       3003      1  0 21:46 ?        00:00:00 nginx: master process /usr/sbin/nginx -c /etc/nginxnginx.conf
nginx      3004   3003  0 21:46 ?        00:00:00 nginx: worker process
root       3046   1727  0 21:48 pts/0    00:00:00 grep --color=auto nginx
HTTPS(超文本传输安全协议)证书
https是在http的基础上,增加了SSL/TLS(安全套接字层/传输层安全性)协议
https保护数据的安全性和隐私性(如果不使用https,则数据传输的是明文)
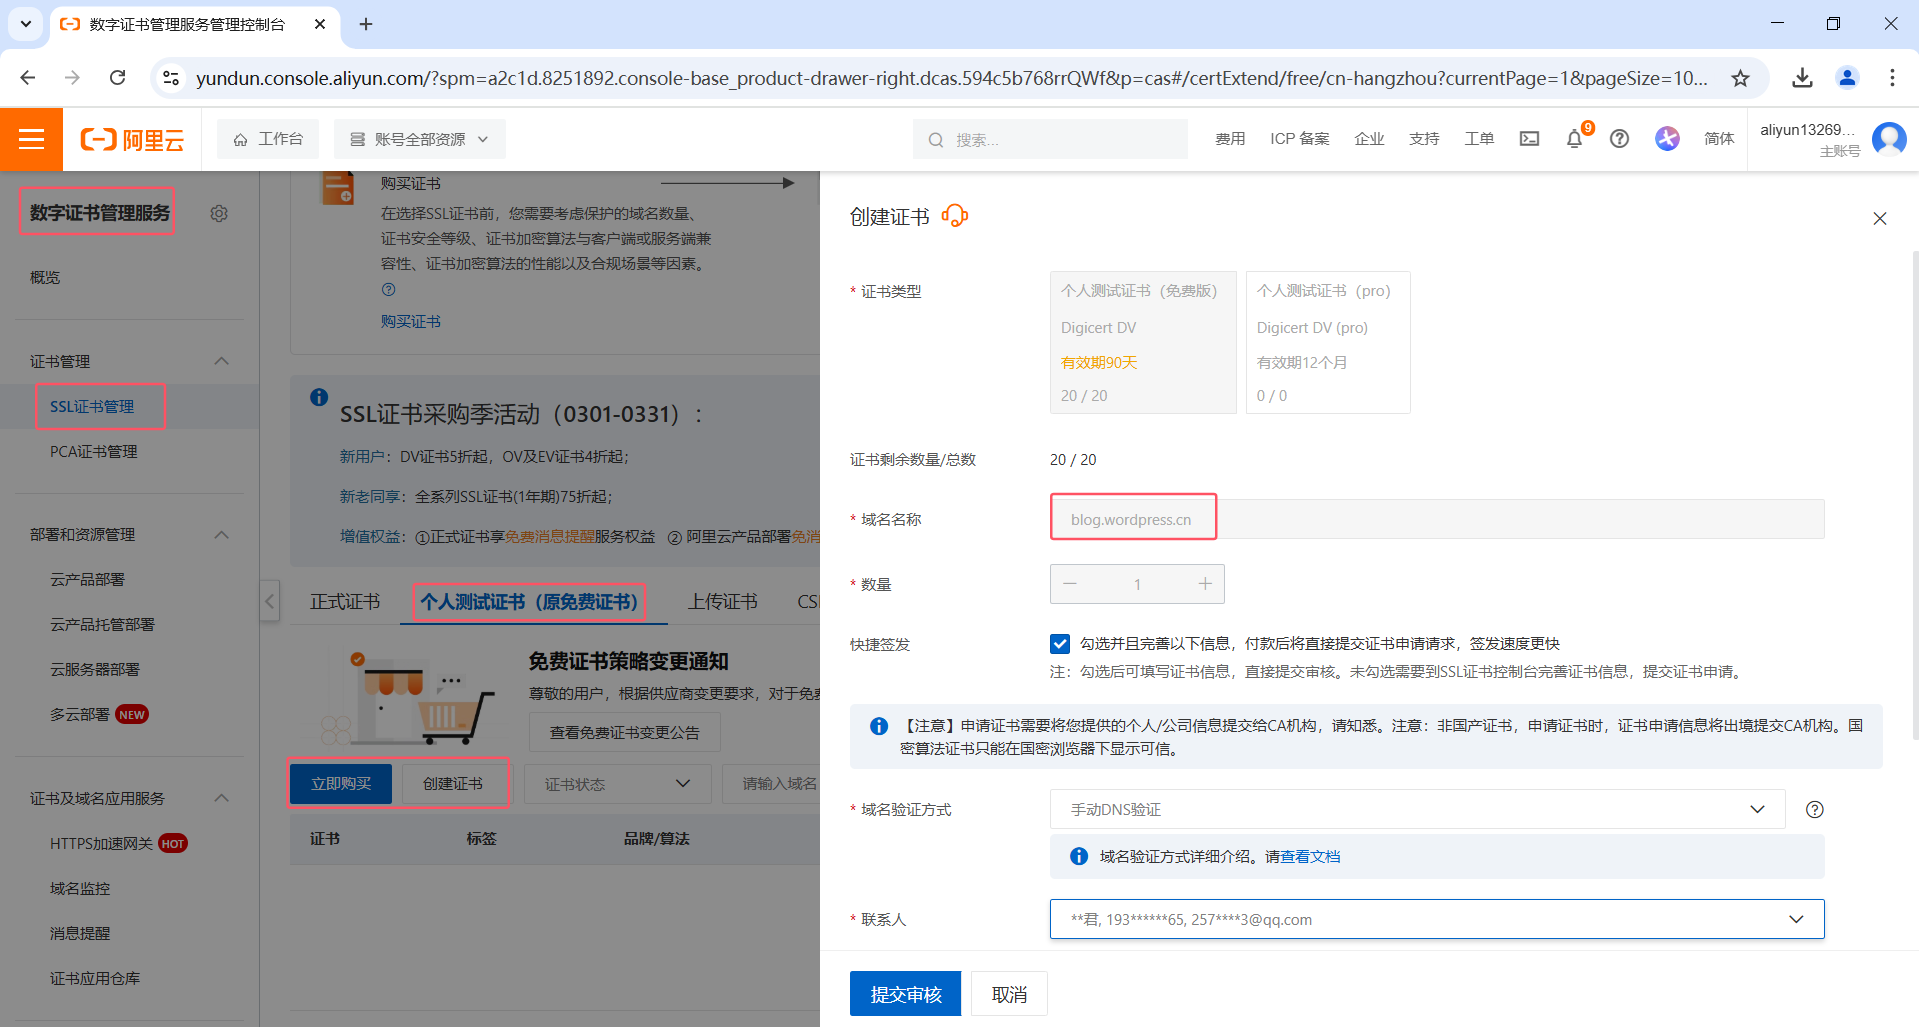
申请https证书
阿里云申请
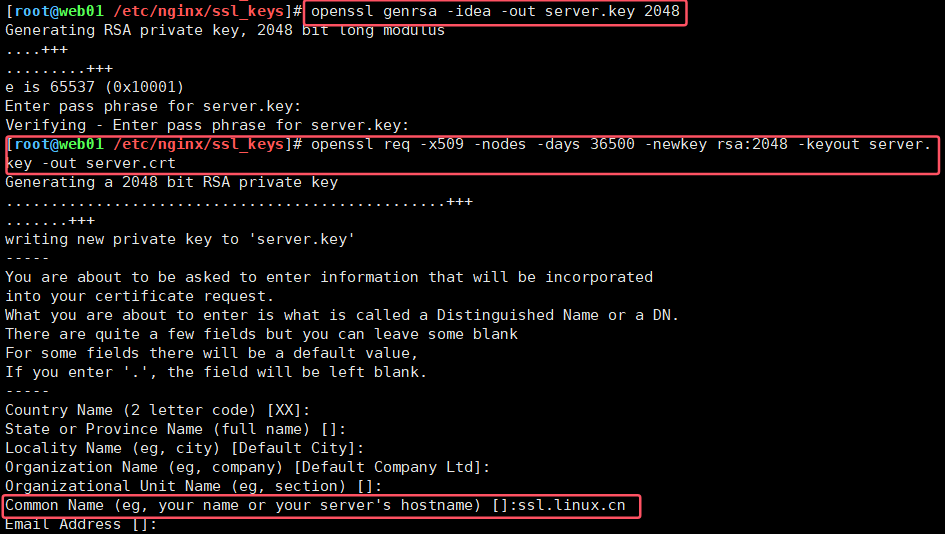
命令行创建https证书(了解)
[root@web01 /etc/nginx/ssl_keys]# openssl genrsa -idea -out server.key 2048
    openssl:这是openssl命令行工具,用于处理SSL/TLS相关任务
    genrsa:用于生成RSA私钥
    -idea:使用IDEA加密算法
    -out server.key:指定输出文件的名称(此处为生成的私钥保存的文件)
    2048:指定生成的RSA密钥的位数
[root@web01 /etc/nginx/ssl_keys]# openssl req -x509 -nodes -days 36500 -newkey rsa:2048 -keyout server.key -out server.crt
    openssl req:用于生成证书签名请求(CSR)或者自签名证书
    -x509:表示生成一个自签名证书
    -nodes:表示生成的私钥不被加密
    -day 66500:指定证书的有效期
    -newkey rsa:2048:表示生成证书的同时也生成一个新的RSA密钥
    -keyout server.key:指定生成的私钥的文件名
    -out server.crt:指定生成的自签名证书的文件名

https加密
http跳转https
[root@web01 /etc/nginx/conf.d]# cat ssl.linux.cn.conf
server {
  listen 80;
  server_name ssl.linux.cn;
  return 301 https://ssl.linux.cn$request_uri;
  # rewrite ^(,*)$ https://ssl.linux.cn$1 permanent;
}
server {
  listen 443;
  server_name ssl.linux.cn;
  root /app/code/ssl;
  ssl_certificate /etc/nginx/ssl_keys/server.crt;
  ssl_certificate_key /etc/nginx/ssl_keys/server.key;
  location / {
    index index.html;
  }
}

[root@web01 /etc/nginx/conf.d]# mkdir -p /app/code/ssl
[root@web01 /etc/nginx/conf.d]# echo ssl.linux.cn web01 > /app/code/ssl/index.html
网站集群https配置
| 配置思路 | |
| 全部加密 | 用户--https--lb--https--web |
| 部分加密 | 用户--https--lb--web |
[root@web01 ~]# scp -r /etc/nginx/ssl_keys/* root@172.16.1.8:/etc/nginx/ssl_keys/
 lb01 /etc/nginx/conf.d/ssl.linux.cn.confweb01/web02 /etc/nginx/conf.d/ssl.linux.cn.conf
用户--https--负载--we:配置php网站的时候有问题
[root@web01 /etc/nginx/conf.d]# cat phpmyadmin.linux.cn.conf
server {
  listen 80;
  server_name phpmyadmin.linux.cn;
  access_log /var/log/nginx/phpmyadmin.linux.cn-access.log main;
  error_log /var/log/nginx/phpmyadmin.linux.cn-error.log notice;
  root /app/code/phpmyadmin/;
  location / {
    index index.php;
  }
  location ~ \.php$ {
        fastcgi_pass 127.0.0.1:9001;
        fastcgi_index index.php;
        fastcgi_param HTTPS on;
          # 需要加入这一行(用于告诉 PHP 应用程序当前的请求是通过 HTTPS 连接的)
        fastcgi_param SCRIPT_FILENAME $document_root$fastcgi_script_name;
        include fastcgi_params;
  }
}
https优化和监控
https优化
server {
    listen 443 ssl;
    keepalive_timeout 70;  # 保持连接的最大时间(超过该时间没有请求则自动关闭原有连接)
    ssl_protocols TLSv1 TLSv1.1 TLSv1.2;  # 指定SSL/TLS加密协议的版本
    ssl_ciphers AES128-SHA:AES256-SHA:RC4-SHA:DES-CBC3-SHA:RC4-MD5:!aNULL:!eNULL:!EXPORT:!DES:!RC4:!MD5;
       # 加密算法、需要排除算法(排除null空算法, md5算法)
    ssl_certificate /usr/local/nginx/conf/cert.pem;  # 指定证书文件路径
    ssl_certificate_key /usr/local/nginx/conf/cert.key;  # 指定私钥文件路径
    ssl_session_cache shared:SSL:10m;  # 设置SSL会话缓存(允许Nginx在多个工作进程之间共享SSL会话 10MB)
    ssl_session_timeout 10m; }# 指定SSL超时时间 10分钟
https监控
- 过期时间获取流程:
- 通过命令获取证书的过期日期
- 与当前日期对比
- 获取剩余的时间
[root@lb02 ~]# curl -vL https://www.baidu.com | grep 'expire date'
有些命令的输出,并非标准的输出,而是作为标准错误输出
[root@lb02 ~]# curl -vL https://www.baidu.com |& grep 'expire date'
*     expire date: Aug 09 01:41:01 2025 GMT
|&:表示把管道前面标准输出和标准错误输出都传递给后面的命令
- 监控证书脚本
[root@lb01 ~]# cat /server/scripts/check_ssl.sh
#!/bin/bash
url=https://www.baidu.com
expire_date_ori=`curl -vL $url |& grep 'expire date' | awk -F ': ' '{print $2}'`
expire_date_opt=`date -d "$expire_date_ori" +%s`
#当前日期与过期时间相减
date_now_second=`date +%s`
expire_days=`echo "($expire_date_opt - $date_now_second)/(60*60*24)"|bc `
echo "网站$url证书过期倒计时:还有 $expire_days 天"
echo "网站过期日期是:`date -d "$expire_date_ori" +%F`"

[root@lb01 ~]# sh /server/scripts/check_ssl.sh
网站https://www.baidu.com证书过期倒计时:还有 150 天
网站过期日期是:2025-08-09

 浙公网安备 33010602011771号