
【redis】3、Redis高阶使用之Redisson分布式锁源码解析
本文介绍了redis的发布订阅模式、redis事务原理、分布式锁的底层原理,包括redisson的分布式锁、联锁(红锁)以及时间轮等相关内容
1、发布订阅模式
在分布式场景下,我们经常会用MQ来做异步解耦,即上游通过发布一条MQ消息到消息中间件,然后下游消费端监听这个消息,并进行消费处理,达到异步通知解耦的作用。但是如果只是为了一个简单的异步通知,特别是这个消息可能还不是特别重要的时候就上一个MQ,显然好像就有点太重了。其实redis也提供了一个发布订阅的机制
1.1、cli客户端体验
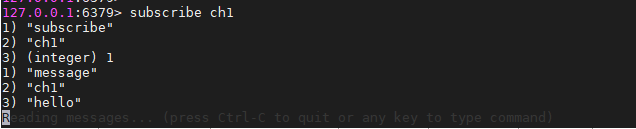
1.1.1、订阅一个channel

也可以一次监听多个,用
psubscribe h* j*,这里的*表示一个或多个符号
1.1.2、发布一条消息

这里提示的1表示有一个客户端在监听
消息发送成功后再回头看订阅ch1的客户端界面:
可以看到已经收到了上面我们发送的hello消息
1.2、java客户端监听
上面简单体验了一下redis的pub/sub模型,但是这些操作是基于redis-cli的,问题是我们经常遇到的场景是要在业务代码中使用,接下来简单用一个demo再次体验一下
1.2.1、引入相关依赖
<dependency>
    <groupId>org.springframework.boot</groupId>
    <artifactId>spring-boot-starter-data-redis</artifactId>
    <version>2.1.0.RELEASE</version>
    <exclusions>
        <exclusion>
            <groupId>io.lettuce</groupId>
            <artifactId>lettuce-core</artifactId>
        </exclusion>
    </exclusions>
</dependency>

<dependency>
    <groupId>io.lettuce</groupId>
    <artifactId>lettuce-core</artifactId>
    <version>6.3.2.RELEASE</version>
</dependency>
1.2.2、redis配置
spring:
  redis:
    password: 密码
    host: 192.168.0.110
    lettuce:
      max-active: 1000
      max-idle: 50
      max-wait: 100
      min-idle: 5
    timeout: 5s
1.2.3、设置监听
1.2.3.1、定义监听器类RedisListener.java
import org.springframework.data.redis.connection.Message;
import org.springframework.data.redis.connection.MessageListener;

public class RedisListener implements MessageListener {

    @Override
    public void onMessage(Message message, byte[] bytes) {
        String channel = new String(message.getChannel());
        String msg = new String(message.getBody());
        System.out.println("Received key expired event for msg: " + msg + ", on channel: " + channel);
    }
}
1.2.3.2、装配一个监听器容器Bean
@Bean
public RedisMessageListenerContainer redisMessageListenerContainer() {
    RedisMessageListenerContainer container = new RedisMessageListenerContainer();
    container.setConnectionFactory(redisConnectionFactory);
    return container;
}
1.2.3.3、在需要的时候监听指定的channel
@RestController
public class RedisListenerController {

    @Resource
    RedisMessageListenerContainer listenerContainer;
    @Resource
    private RedisTemplate<String, Object> redisTemplate;

    @GetMapping("/addListener")
    public String addListener(@RequestParam String channel) {
        listenerContainer.addMessageListener(new RedisListener(), new ChannelTopic(channel));
        return "监听成功";
    }

    @GetMapping("/publish")
    public String publish(@RequestParam String channel, @RequestParam String message) {
        redisTemplate.convertAndSend(channel, message);
        return "消息发送成功";
    }
}
1.2.4、调用
1.2.4.1、开始监听
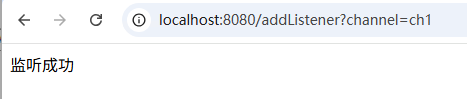
1.2.4.2、发送消息

1.2.4.3、查看监听的结果

注意:redis的发布订阅并不能代替MQ,特别是在要保证消息可靠性的时候,因为redis的事件发布是不可靠的,它只负责发出去,具体后续就它就不管了,所以要慎重
2、redis的事务
现在的redis是支持事务的,事务的基本特性就是要保证多个指令操作的原子性,要么同时成功,要么同时失败,那么redis是怎么做到这一点的呢?我们还是先来体验一把
2.1、redis的事务操作初体验
回想一下MySql是通过begin指令来开启一个事务,commit来提交一个事务,以及通过rollback来回滚一个事务,在redis中,操作也类似:multi开启事务,exec提交事务,DISCARD回滚事务
127.0.0.1:6379> multi
OK
127.0.0.1:6379> set name myname
QUEUED
127.0.0.1:6379> set xixi haha
QUEUED
127.0.0.1:6379> exec
1) OK
2) OK
这里分两步设置了两个key的值,在设置这个key的时候,控制台响应一个QUEUED,字面意思就是入队了,这就是redis的事务原理:redis在用multi指令开启事务之后,这些操作并不是立即执行的,而是将接下来的这些操作放入一个队列里,待用户再次提交一个exec指令的时候再去批量执行这中间的所有指令。
接下来验证一下,开启另外一个客户端,在执行exec之前,我们先查一下这两个key的数据,看有没有变
127.0.0.1:6379> get name
"Navy"
exec之后再查
127.0.0.1:6379> get name
"myname"
事务回滚也是同样的原理:
127.0.0.1:6379> multi
OK
127.0.0.1:6379>
127.0.0.1:6379> set name Navy
QUEUED
127.0.0.1:6379> set xixi meme
QUEUED
127.0.0.1:6379> discard
OK
127.0.0.1:6379>
127.0.0.1:6379> get name
"myname"
2.2、事务异常
上面我们说redis的事务是先将事务提交前的指令都放到一个队列里,待提交exec指令的时候再批量执行。但是如果这中间有指令异常了怎么办?
redis的做法分两种情况:
2.2.1、指令本身语法错误
比如:
127.0.0.1:6379> multi
OK
127.0.0.1:6379>
127.0.0.1:6379> set name Navy
QUEUED
127.0.0.1:6379>
127.0.0.1:6379> setd name NaNa
(error) ERR unknown command 'setd'
127.0.0.1:6379>
127.0.0.1:6379> set name Nana
QUEUED
127.0.0.1:6379> exec
(error) EXECABORT Transaction discarded because of previous errors.
127.0.0.1:6379>
127.0.0.1:6379>
127.0.0.1:6379>
127.0.0.1:6379> get name
"myname"
可以看到,这种情况redis会丢弃本次事务操作,并且其它指令也不会执行
2.2.2、指令内部执行异常
比如对string类型进行加1
127.0.0.1:6379> multi
OK
127.0.0.1:6379> set name Navy
QUEUED
127.0.0.1:6379> set age 18
QUEUED
127.0.0.1:6379> incr name
QUEUED
127.0.0.1:6379> incr age
QUEUED
127.0.0.1:6379> exec
1) OK
2) OK
3) (error) ERR value is not an integer or out of range
4) (integer) 19
127.0.0.1:6379>
127.0.0.1:6379> get name
"Navy"
127.0.0.1:6379> get age
"19"
这里可以看到,redis在执行incr name的时候报错了,但是结果并没有像上面一样导致事务回滚,因为age已经加1了
总结:这两种情况相当于一个是受检异常,一个是运行时异常,对于在入队的之后就能检查出来的异常,redis会回滚本次事务。而如果只能到运行对应的指令才能发现的异常,redis则只能保证对应的指令执行失败,别的指令照常执行。所以这个需要注意
2.3、redis事务的隔离级别
还是对比mysql,我们知道在MySQL中定义了四种事务隔离级别,RU、RC、RR、串行化,通过MVCC和LBCC解决了不同事务之间的数据隔离性和可见性问题,也就是当一个事务要操作的数据,如果这个时候被另外一个事务修改了怎么办。
redis的解决方案是基于cas思想来做的,提供了一个watch指令
2.3.1、事务A执行watch
127.0.0.1:6379> watch name
OK
127.0.0.1:6379> multi
OK
127.0.0.1:6379> set name hanmeimei
QUEUED
127.0.0.1:6379> set age 18
QUEUED
2.3.2、事务B修改数据
127.0.0.1:6379> set name lily
OK
127.0.0.1:6379> get name
"lily"
可以看到数据被修改了
2.3.3、事务A提交事务
127.0.0.1:6379>
127.0.0.1:6379> exec
(nil)
127.0.0.1:6379>
127.0.0.1:6379> get name
"lily"
再次查看的时候,发现name还是事务B修改的值
前面我们说到redis的事务是先将指令统一放到一个队列里,在提交exec的时候再去批量执行,很明显 ,我们事务A的提交是在事务B的set指令之后执行,正常情况下不是应该后者覆盖吗,为什么后提交的没有执行呢?这就是watch的作用
watch指令后的事务,redis会进行cas比较,如果后续的修改的时候当前值是watch的时候的值,则修改成功,否则就修改失败。不妨参考一下不用watch的时候的执行流程:
- 开始事务A:
127.0.0.1:6379> multi
OK
127.0.0.1:6379> set name Lucy
QUEUED
127.0.0.1:6379> set age 17
QUEUED
- 事务B去修改:
127.0.0.1:6379> set name David
OK
127.0.0.1:6379>
127.0.0.1:6379> get name
"David"
- 事务A提交事务并查看key对应的值
127.0.0.1:6379> exec
1) OK
2) OK
127.0.0.1:6379> get name
"Lucy"
可以看到key对应的value被更新了
注意:在实际的业务开发中,我们一般也不会用到redis的事务特性,真正要用到事物的时候还是基于关系型数据库来做。而且redis的事务指令还有一个弊端,那就是客户端在执行事务指令的时候,它就不能再去做别的事情了,不能拿到事务中间的指令结果。而且redis服务器在执行事务指令的时候是阻塞的,这就更加要命了,上redis本来就是为了快,结果你还阻塞上了
3、分布式锁
在我们的日常开发中,特别是分布式应用开发中,经常会遇到需要分布式锁来解决的应用场景,而redis往往是我们会想到的。一般情况下主要就是基于redis的setnx指令来做文章
3.1、锁的特性
在学习并发编程的时候,我们学习了Java的Lock,其本质和分布式锁是一样的
- 竞争
用到锁就说明有线程在竞争资源,要保证资源的线程安全性
- 共享资源
如果所有的资源都是线程私有的,也就没有了并发问题,也就没有必要上锁了
3.2、redis的分布式锁原理
-
setnx指令是单线程执行的
-
如果对应的key不存在,则执行
setnx key value会执行成功,返回的是1 -
如果对应的key存在,则执行对应的
setnx key value就会不成功,返回的是0 -
所以,如果有多个客户端线程在竞争通过
setnx去写这个key的时候,只有一个客户端会执行成功,换言之,就是只有这一个客户端抢到了这个分布式锁
127.0.0.1:6379> setnx lock 1
(integer) 1
127.0.0.1:6379> setnx lock 2
(integer) 0
127.0.0.1:6379> get lock
"1"
3.3、Redission分布式锁
3.3.1、Redisson分布式锁的使用
3.3.1.1、引入相关依赖
<dependency>
    <groupId>org.redisson</groupId>
    <artifactId>redisson</artifactId>
    <version>3.5.4</version>
</dependency>
3.3.1.2、创建客户端
public class RedissonClientUtil {

    private volatile static RedissonClient redissonClient;

    private RedissonClientUtil() {
    }

    public static RedissonClient getRedissonClient() {
        if (redissonClient == null) {
            synchronized (RedissonClientUtil.class) {
                if (redissonClient == null) {
                    Config config = new Config();
                    config.useSingleServer()
                            .setAddress("redis://192.168.0.110:6379")
                            .setPassword("密码");
                    return redissonClient = Redisson.create(config);
                }
            }
        }
        return null;
    }
}
3.3.1.3、API使用
public class RedissonDemo {

    public static void main(String[] args) throws InterruptedException {
        RedissonClient redissonClient = RedissonClientUtil.getRedissonClient();

        if (Objects.isNull(redissonClient)) {
            System.out.println("redissonClient is null");
            return;
        }

        RLock rLock = redissonClient.getLock("mylock");
        if (rLock.tryLock(10L, -1L, TimeUnit.SECONDS)) {
            System.out.println("获取锁成功");
            rLock.unlock();
        } else {
            System.out.println("获取锁失败");
        }
    }
}
核心的api有三个:
- tryLock:尝试获取锁,不阻塞,没有获取到锁直接往后面继续执行
- lock:获取锁,如果没有获取到锁,则在此处阻塞等待
- unlock:释放锁
此外还对用有带超时事件的tryLock和lock以及异步的lockAsync和tryLockAsync,可以根据自己的场景合理选择
3.3.2、redisson分布式锁的底层原理
3.3.2.1、分布式锁的总流程
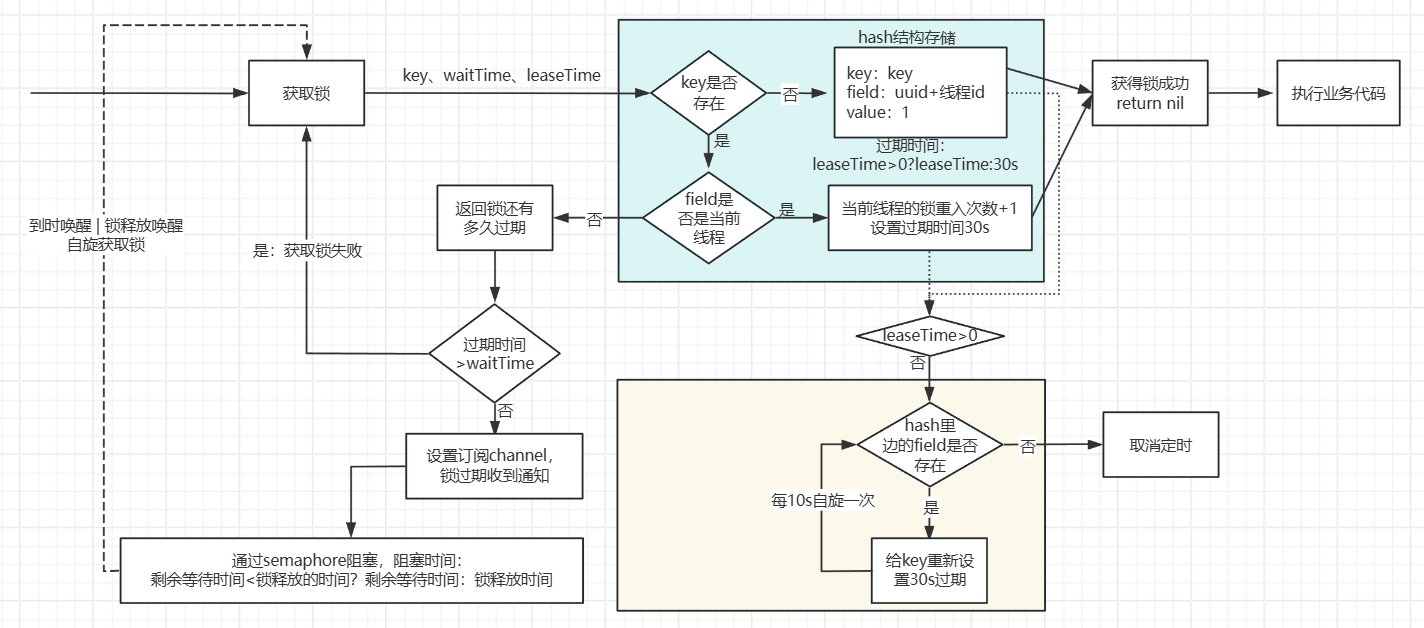
流程解读:
- 客户端获取锁对象,指定一个锁的名称(key)
- 通过锁对象的获取锁的方法去竞争锁,传入获取锁的等待时间(waitTime)和释放锁的时间(leaseTime)
- 判断key是否存在
- 如果不存在,说明没有别的客户端线程抢占到锁,也就是获取锁成功:用当前线程id加一个uuid前缀组成一个field,value设置为1,返回nil表示抢占锁成功,客户端继续执行后续的业务代码
- 如果key已经存在,再去判断field是不是和当前线程id(field:“uuid:线程id")匹配
- 如果匹配,说明这是重入,将当前线程的锁的重入次数(value)加1
- 如果不匹配
- 获取到锁还有多久过期,判断待过期时间是否小于当前来抢占锁的时候传入的等待时间
- 如果待过期的时间更大,说明不用再等了,直接抢占失败
- 如果传入的等待时间更小,则设置对应channel的监听,等抢占到锁的客户端释放锁的时候通知,并且通过信号量阻塞客户端线程,阻塞时间取剩余等待的时候和锁即将释放还需要的时间这俩的最小值
- 获取到锁还有多久过期,判断待过期时间是否小于当前来抢占锁的时候传入的等待时间
- 在客户端抢占到锁之后,如果没有设置释放时间(leaseTime<=0),因为要考虑到后续执行业务逻辑也需要一定的时间,不可能获取到锁就释放,所以redisson引入了”看门狗“(watchDog)
- 看门狗判断hash的key里边field是否存在
- 如果不存在,说明锁已经释放了,取消看门狗定时
- 如果存在,则将key的过期时间设置为30s,并且看门狗定时10s来循环判断一次
- 看门狗判断hash的key里边field是否存在
3.3.2.2、tryLock
程序的入口从tryLock开始
public boolean tryLock(long waitTime, long leaseTime, TimeUnit unit) throws InterruptedException {
    long time = unit.toMillis(waitTime);
    long current = System.currentTimeMillis();
    final long threadId = Thread.currentThread().getId();
    Long ttl = this.tryAcquire(leaseTime, unit, threadId);
    if (ttl == null) {
        //抢占成功
        return true;
    } else {
        //抢占失败
        time -= System.currentTimeMillis() - current;
        //time = 总共等待的时间-已经在抢占锁的时候消耗的时间,小于0说明已经超时了
        if (time <= 0L) {
            //获取锁失败
            this.acquireFailed(threadId);
            return false;
        } else {
            current = System.currentTimeMillis();
            //订阅channel
            final RFuture<RedissonLockEntry> subscribeFuture = this.subscribe(threadId);
            if (!this.await(subscribeFuture, time, TimeUnit.MILLISECONDS)) {
                if (!subscribeFuture.cancel(false)) {
                    subscribeFuture.addListener(new FutureListener<RedissonLockEntry>() {
                        public void operationComplete(Future<RedissonLockEntry> future) throws Exception {
                            if (subscribeFuture.isSuccess()) {
                                RedissonLock.this.unsubscribe(subscribeFuture, threadId);
                            }

                        }
                    });
                }

                this.acquireFailed(threadId);
                return false;
            } else {
                try {
                    time -= System.currentTimeMillis() - current;
                    if (time <= 0L) {
                        this.acquireFailed(threadId);
                        boolean var20 = false;
                        return var20;
                    } else {
                        boolean var16;
                        do {
                            long currentTime = System.currentTimeMillis();
                            ttl = this.tryAcquire(leaseTime, unit, threadId);
                            if (ttl == null) {
                                var16 = true;
                                return var16;
                            }

                            time -= System.currentTimeMillis() - currentTime;
                            if (time <= 0L) {
                                this.acquireFailed(threadId);
                                var16 = false;
                                return var16;
                            }

                            currentTime = System.currentTimeMillis();
                            if (ttl >= 0L && ttl < time) {
                                this.getEntry(threadId).getLatch().tryAcquire(ttl, TimeUnit.MILLISECONDS);
                            } else {
                                this.getEntry(threadId).getLatch().tryAcquire(time, TimeUnit.MILLISECONDS);
                            }

                            time -= System.currentTimeMillis() - currentTime;
                        } while(time > 0L);

                        this.acquireFailed(threadId);
                        var16 = false;
                        return var16;
                    }
                } finally {
                    this.unsubscribe(subscribeFuture, threadId);
                }
            }
        }
    }
}
看看tryAcquire方法:
private Long tryAcquire(long leaseTime, TimeUnit unit, long threadId) {
    return (Long)this.get(this.tryAcquireAsync(leaseTime, unit, threadId));
}
在进tryAcquireAsync去:
private <T> RFuture<Long> tryAcquireAsync(long leaseTime, TimeUnit unit, final long threadId) {
    if (leaseTime != -1L) {
        return this.tryLockInnerAsync(leaseTime, unit, threadId, RedisCommands.EVAL_LONG);
    } else {
        RFuture<Long> ttlRemainingFuture = this.tryLockInnerAsync(this.commandExecutor.getConnectionManager().getCfg().getLockWatchdogTimeout(), TimeUnit.MILLISECONDS, threadId, RedisCommands.EVAL_LONG);
        ttlRemainingFuture.addListener(new FutureListener<Long>() {
            public void operationComplete(Future<Long> future) throws Exception {
                if (future.isSuccess()) {
                    Long ttlRemaining = (Long)future.getNow();
                    if (ttlRemaining == null) {
                        RedissonLock.this.scheduleExpirationRenewal(threadId);
                    }

                }
            }
        });
        return ttlRemainingFuture;
    }
}
继续看tryLockInnerAsync方法:
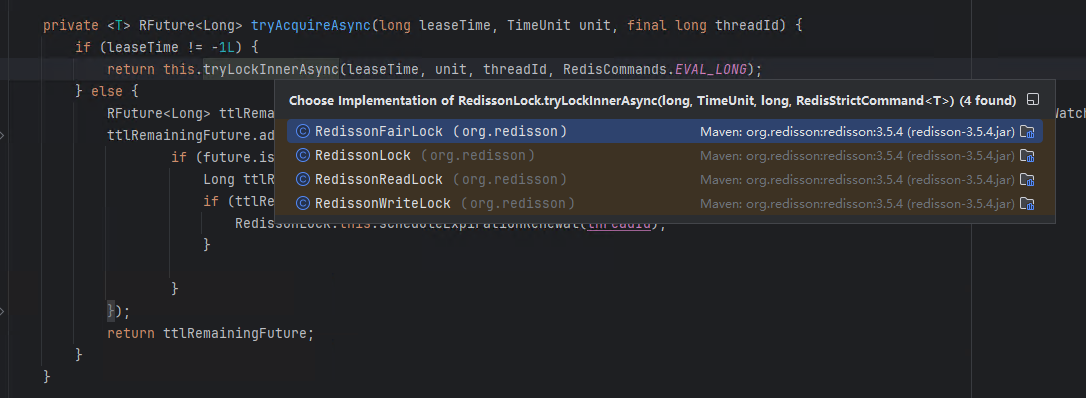
随便进一个,就看默认的RedissonLock吧:
<T> RFuture<T> tryLockInnerAsync(long leaseTime, TimeUnit unit, long threadId, RedisStrictCommand<T> command) {
    this.internalLockLeaseTime = unit.toMillis(leaseTime);
    return this.commandExecutor.evalWriteAsync(this.getName(), LongCodec.INSTANCE, command, "if (redis.call('exists', KEYS[1]) == 0) then redis.call('hset', KEYS[1], ARGV[2], 1); redis.call('pexpire', KEYS[1], ARGV[1]); return nil; end; if (redis.call('hexists', KEYS[1], ARGV[2]) == 1) then redis.call('hincrby', KEYS[1], ARGV[2], 1); redis.call('pexpire', KEYS[1], ARGV[1]); return nil; end; return redis.call('pttl', KEYS[1]);", Collections.singletonList(this.getName()), new Object[]{this.internalLockLeaseTime, this.getLockName(threadId)});
}
这里有一个this.getName()方法,这个name就是上面原理流程图的hash的key,这个值是我们前面获取一个RedissonLock的时候设置的:
RLock rLock = redissonClient.getLock("mylock");
再回看上图的RedissonLock.this.scheduleExpirationRenewal(threadId);
private void scheduleExpirationRenewal(final long threadId) {
    if (!expirationRenewalMap.containsKey(this.getEntryName())) {
        Timeout task = this.commandExecutor.getConnectionManager().newTimeout(new TimerTask() {
            public void run(Timeout timeout) throws Exception {
                RFuture<Boolean> future = RedissonLock.this.commandExecutor.evalWriteAsync(RedissonLock.this.getName(), LongCodec.INSTANCE, RedisCommands.EVAL_BOOLEAN, "if (redis.call('hexists', KEYS[1], ARGV[2]) == 1) then redis.call('pexpire', KEYS[1], ARGV[1]); return 1; end; return 0;", Collections.singletonList(RedissonLock.this.getName()), new Object[]{RedissonLock.this.internalLockLeaseTime, RedissonLock.this.getLockName(threadId)});
                future.addListener(new FutureListener<Boolean>() {
                    public void operationComplete(Future<Boolean> future) throws Exception {
                        RedissonLock.expirationRenewalMap.remove(RedissonLock.this.getEntryName());
                        if (!future.isSuccess()) {
                            RedissonLock.log.error("Can't update lock " + RedissonLock.this.getName() + " expiration", future.cause());
                        } else {
                            if ((Boolean)future.getNow()) {
                                RedissonLock.this.scheduleExpirationRenewal(threadId);
                            }

                        }
                    }
                });
            }
        }, this.internalLockLeaseTime / 3L, TimeUnit.MILLISECONDS);
        if (expirationRenewalMap.putIfAbsent(this.getEntryName(), task) != null) {
            task.cancel();
        }

    }
}
这就是每隔10s递归续期
3.3.2.3、unlock
public void unlock() {
    Boolean opStatus = (Boolean)this.get(this.unlockInnerAsync(Thread.currentThread().getId()));
    if (opStatus == null) {
        throw new IllegalMonitorStateException("attempt to unlock lock, not locked by current thread by node id: " + this.id + " thread-id: " + Thread.currentThread().getId());
    } else {
        if (opStatus) {
            this.cancelExpirationRenewal();
        }

    }
}
org.redisson.RedissonLock#unlockInnerAsync
protected RFuture<Boolean> unlockInnerAsync(long threadId) {
    return this.commandExecutor.evalWriteAsync(this.getName(), LongCodec.INSTANCE, RedisCommands.EVAL_BOOLEAN, "if (redis.call('exists', KEYS[1]) == 0) then redis.call('publish', KEYS[2], ARGV[1]); return 1; end;if (redis.call('hexists', KEYS[1], ARGV[3]) == 0) then return nil;end; local counter = redis.call('hincrby', KEYS[1], ARGV[3], -1); if (counter > 0) then redis.call('pexpire', KEYS[1], ARGV[2]); return 0; else redis.call('del', KEYS[1]); redis.call('publish', KEYS[2], ARGV[1]); return 1; end; return nil;", Arrays.asList(this.getName(), this.getChannelName()), new Object[]{LockPubSub.unlockMessage, this.internalLockLeaseTime, this.getLockName(threadId)});
}
3.3.3、时间轮
在做续期的时候,我们看到有一行代码this.commandExecutor.getConnectionManager().newTimeout,这就是往时间轮上加任务
public Timeout newTimeout(TimerTask task, long delay, TimeUnit unit) {
    try {
        return this.timer.newTimeout(task, delay, unit);
    } catch (IllegalStateException var6) {
        return this.dummyTimeout;
    }
}
io.netty.util.HashedWheelTimer#newTimeout
public Timeout newTimeout(TimerTask task, long delay, TimeUnit unit) {
    ObjectUtil.checkNotNull(task, "task");
    ObjectUtil.checkNotNull(unit, "unit");
    //检验等待任务是否达到阈值
    long pendingTimeoutsCount = this.pendingTimeouts.incrementAndGet();
    if (this.maxPendingTimeouts > 0L && pendingTimeoutsCount > this.maxPendingTimeouts) {
        this.pendingTimeouts.decrementAndGet();
        throw new RejectedExecutionException("Number of pending timeouts (" + pendingTimeoutsCount + ") is greater than or equal to maximum allowed pending timeouts (" + this.maxPendingTimeouts + ")");
    } else {
        //时间轮启动,start方法里边有一个cas,不会重复执行
        this.start();
        //得到任务多久后执行 这个时候this.startTime肯定被子线程赋值了,因为start里面会判断如果=0 会阻塞
        long deadline = System.nanoTime() + unit.toNanos(delay) - this.startTime;
        if (delay > 0L && deadline < 0L) {
            deadline = Long.MAX_VALUE;
        }
		//初始化HashedWheelTimeout 里面持有task
        HashedWheelTimeout timeout = new HashedWheelTimeout(this, task, deadline);
        //timeout放入timeouts队列
        this.timeouts.add(timeout);
        return timeout;
    }
}
3.3.3.1、时间轮的底层原理
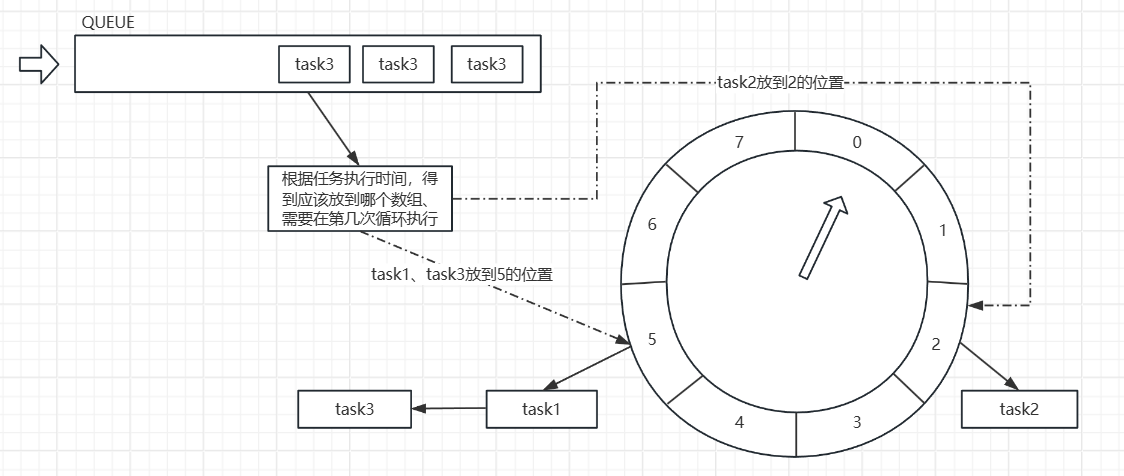
HashWheelTimer是netty提供的一个定时工具,它由一个环状数组组成,如上图示意,我们可以设置执行数组的长度和每”走“一个下标需要多长时间。假如像上图所示,定义了一个8个长度的数组,每走一个下标需要1s,则时间轮走一圈需要8s。
现在要往时间轮上添加几个任务,task1是5s后执行,task3是5s后执行,task2是13s后执行
流程:
- 1、在new一个HashWheelTimer的时候,设置数组的大小是8,数组的循环间隔是1s
- 2、在第一次将task1放入到时间轮的时候,会先将任务丢到一个队列QUEUE中,并且开启哈希环的轮询,并设置时间轮的启动时间
- 3、在循环到第一个数组下标时,会从队列中拿到第一个任务task1,它是5s后执行
- task1任务执行的相对时间=当前时间-时间轮的启动时间+5s,由于是刚开始启动首次执行,所以当前时间和时间轮启动时间几乎相等,所以task1执行的相对时间就无限接近5
- 根据task1执行的相对时间5s,取模hash环的大小-1,即 5 & 7,得到下标为5
- 同理,task3的相对时间也是5,取模得到的下标也是5,但是因为前面已经有task1了,所以就把task3直接挂在task1之后形成一个单链表
- 4、hash环开始轮询,当循环到下标5的时候,会将位置5下边的任务拿出来执行,也就是task1和task3在5s后执行
- 5、当task1和task3执行完成后加入task2,task2是13s后执行
- 计算task2执行的相对时间=当前时间-时间轮启动时间+13s,即18s
- 根据task2执行的相对时间,取模hash环的大小-1,即 18 & 7,得到2,即下标为2
- 接下来计算task2执行需要在第几轮循环:(任务执行的时间13s-当前时间5s/哈希环长度8),设置task2.remainingRounds=1
- 从5走到2的时候,判断task2的remainingRounds是否等于0,显然现在不等,继续转一圈
- 下一次到2的时候,根据公式:task2.remainingRounds=(任务执行的时间13s-当前时间5s/哈希环长度8)=(13s-13s)/8=0,这个时候刚好就是0了,task2被执行
3.3.3.2、时间轮构造器
public HashedWheelTimer(ThreadFactory threadFactory, long tickDuration, TimeUnit unit, int ticksPerWheel, boolean leakDetection, long maxPendingTimeouts, Executor taskExecutor) {
    this.worker = new Worker();
    this.startTimeInitialized = new CountDownLatch(1);
    this.timeouts = PlatformDependent.newMpscQueue();
    this.cancelledTimeouts = PlatformDependent.newMpscQueue();
    this.pendingTimeouts = new AtomicLong(0L);
    ObjectUtil.checkNotNull(threadFactory, "threadFactory");
    ObjectUtil.checkNotNull(unit, "unit");
    ObjectUtil.checkPositive(tickDuration, "tickDuration");
    ObjectUtil.checkPositive(ticksPerWheel, "ticksPerWheel");
    this.taskExecutor = (Executor)ObjectUtil.checkNotNull(taskExecutor, "taskExecutor");
    //默认创建512个轮 就是创建一个长度为512的HashedWheelBucket数组
    this.wheel = createWheel(ticksPerWheel);
    //数组长度-1,用于后续task取模
    this.mask = this.wheel.length - 1;
    //默认tickDuration=100ms 即duration=100000000纳秒
    long duration = unit.toNanos(tickDuration);
    if (duration >= Long.MAX_VALUE / (long)this.wheel.length) {
        throw new IllegalArgumentException(String.format("tickDuration: %d (expected: 0 < tickDuration in nanos < %d", tickDuration, Long.MAX_VALUE / (long)this.wheel.length));
    } else {
        if (duration < MILLISECOND_NANOS) {
            logger.warn("Configured tickDuration {} smaller than {}, using 1ms.", tickDuration, MILLISECOND_NANOS);
            this.tickDuration = MILLISECOND_NANOS;
        } else {
            this.tickDuration = duration;
        }
		//初始化一个新线程,但是没有启动
        this.workerThread = threadFactory.newThread(this.worker);
        this.leak = !leakDetection && this.workerThread.isDaemon() ? null : leakDetector.track(this);
        this.maxPendingTimeouts = maxPendingTimeouts;
        if (INSTANCE_COUNTER.incrementAndGet() > 64 && WARNED_TOO_MANY_INSTANCES.compareAndSet(false, true)) {
            reportTooManyInstances();
        }

    }
}
3.3.3.3、从QUEUE队列将任务添加到hash环
前面提到,时间轮启动后,会有一个线程来轮询哈希环,并且每次轮询的时候会从队列中将任务拿过来放到当前的bucket中,具体代码在io.netty.util.HashedWheelTimer.Worker#transferTimeoutsToBuckets
private void transferTimeoutsToBuckets() {
    for(int i = 0; i < 100000; ++i) {
        //从队列中拿到任务
        HashedWheelTimeout timeout = (HashedWheelTimeout)HashedWheelTimer.this.timeouts.poll();
        if (timeout == null) {
            break;
        }
        if (timeout.state() != 1) {
            long calculated = timeout.deadline / HashedWheelTimer.this.tickDuration;
            timeout.remainingRounds = (calculated - this.tick) / (long)HashedWheelTimer.this.wheel.length;
            long ticks = Math.max(calculated, this.tick);
            //计算当前数组的下标
            int stopIndex = (int)(ticks & (long)HashedWheelTimer.this.mask);
            HashedWheelBucket bucket = HashedWheelTimer.this.wheel[stopIndex];
            bucket.addTimeout(timeout);
        }
    }
}
3.4、联锁(红锁)
3.4.1、红锁的由来
我们知道redis是AP模型,它为了优先保证高可用性,所以会牺牲一定的数据一致性。比如主从方案中,如果主库挂的话,从库是不管数据有没有同步完主库的数据,都会自动升级为主。
那么这样就会出现一种情况:加锁返回是成功的,但是由于发生了主库挂的,从库切换的时候,没有同步到这个锁,从而导致锁失效。这种情况就会有问题,怎么解决呢?因为我们没有办法规避主库挂的情况,所以没有办法注解规避这个问题。但是我们能够从一定程度上减少出现这种情况的可能性,解决方案就是:联锁,即我同时在多台机器上加锁,只要保证过半的机器上获取锁成功,就表示成功,这样就减少了锁丢失的可能性。
Redisson提供了这样的红锁解决方案
3.4.2、联锁的使用
@Autowired
private RedissonClient redissonClient;
@Autowired
private RedissonClient redissonClient1;

public String payMultiLock(Long orderId) throws InterruptedException {
    RLock rLock = redissonClient.getLock("order_lock" + orderId);
    RLock rLock1 = redissonClient1.getLock("order_lock" + orderId);
    //联锁
    RedissonMultiLock multiLock = new RedissonMultiLock(rLock, rLock1);
    if (multiLock.tryLock(-1 -1, TimeUnit.SECONDS)) {
        System.out.println("获取锁成功");
        Thread.sleep(300000);
        multiLock.unlock();
        return "处理完成";
    } else {
        System.out.println("获取锁失败");
        return "请稍等,已经有人在支付!!";
    }
}
3.4.3、联锁源码解析
public boolean tryLock(long waitTime, long leaseTime, TimeUnit unit) throws InterruptedException {
    long newLeaseTime = -1L;
    if (leaseTime != -1L) {
        //如果等待时间跟释放时间都填了,那么释放时间 是等待时间的2倍 防止等待时间大于释放时间,就会出现还在等待但是锁已经失效
        newLeaseTime = waitTime * 2L;
    }

    long time = System.currentTimeMillis();
    long remainTime = -1L;
    if (waitTime != -1L) {
        remainTime = unit.toMillis(waitTime);
    }
    //还能允许失败的数量,如果等于0,代表失败
    int failedLocksLimit = this.failedLocksLimit();
    List<RLock> lockedLocks = new ArrayList(this.locks.size());
    ListIterator<RLock> iterator = this.locks.listIterator();

    while(iterator.hasNext()) {
        //循环要加锁的实例列表、遍历RLock实例
        RLock lock = (RLock)iterator.next();

        boolean lockAcquired;
        try {
            if (waitTime == -1L && leaseTime == -1L) {
                lockAcquired = lock.tryLock();
            } else {
                long awaitTime = unit.convert(remainTime, TimeUnit.MILLISECONDS);
                lockAcquired = lock.tryLock(awaitTime, newLeaseTime, unit);
            }
        } catch (Exception var19) {
            lockAcquired = false;
        }

        if (lockAcquired) {
            lockedLocks.add(lock);
        } else {
            if (this.locks.size() - lockedLocks.size() == this.failedLocksLimit()) {
                //如果某个节点加锁失败 判断是否过半 假如5台机器,必须要有3台的时候 break 代表加锁成功
                break;
            }
            //失败的节点数达到了界限
            if (failedLocksLimit == 0) {
                //将已有加锁的实例删除锁
                this.unlockInner(lockedLocks);
                if (waitTime == -1L && leaseTime == -1L) {
                    //达到了等待时间 返回加锁失败
                    return false;
                }

                failedLocksLimit = this.failedLocksLimit();
                //清空已有的加锁的集合
                lockedLocks.clear();

                while(iterator.hasPrevious()) {
                    iterator.previous();
                }
            } else {
                //加锁失败一次
                --failedLocksLimit;
            }
        }

        if (remainTime != -1L) {
            remainTime -= System.currentTimeMillis() - time;
            time = System.currentTimeMillis();
            if (remainTime <= 0L) {
                this.unlockInner(lockedLocks);
                return false;
            }
        }
    }

    if (leaseTime != -1L) {
        List<RFuture<Boolean>> futures = new ArrayList(lockedLocks.size());
        Iterator var21 = lockedLocks.iterator();

        while(var21.hasNext()) {
            RLock rLock = (RLock)var21.next();
            RFuture<Boolean> future = rLock.expireAsync(unit.toMillis(leaseTime), TimeUnit.MILLISECONDS);
            futures.add(future);
        }

        var21 = futures.iterator();

        while(var21.hasNext()) {
            RFuture<Boolean> rFuture = (RFuture)var21.next();
            rFuture.syncUninterruptibly();
        }
    }

    return true;
}

 浙公网安备 33010602011771号