


Nginx+Tomcat+Keepalived+Memcache 负载均衡动静分离技术
一、概述
Nginx 作负载均衡器的优点许多,简单概括为:
①实现了可弹性化的架构,在压力增大的时候可以临时添加Tomcat服务器添加到这个架构里面去;
②upstream具有负载均衡能力,可以自动判断下面的机器,并且自动踢出不能正常提供服务的机器;
Keepalived 可实现 Nginx负载均衡器双机互备,任意一台机器发生故障,对方都能够将虚拟IP接管过去。
Memcache可以实现Tomcat服务器的Sission共享整个拓补如下:
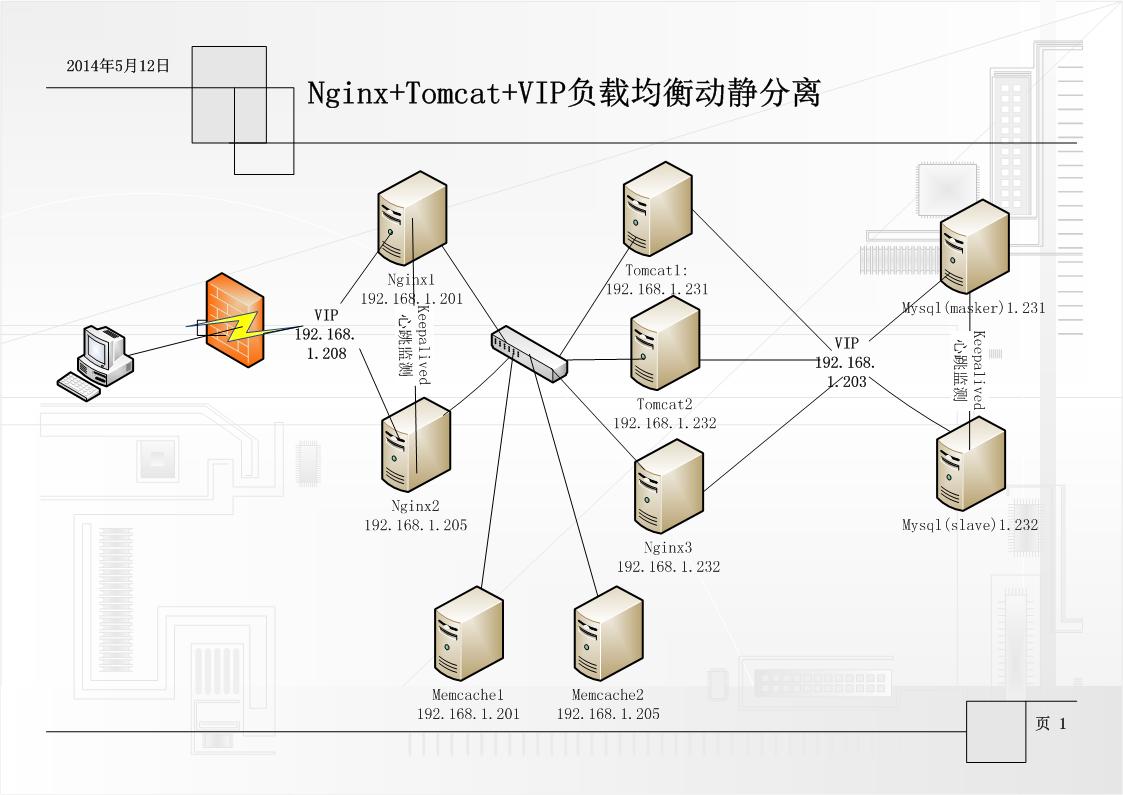
注意:
1、由于服务器有限,IP相同的为同一台机。只是端口不一样。
2、mysql部分本文不再描述,请看之前的文章MYSQL + MHA +keepalive + VIP安装配置.
二、环境
服务器:192.168.1.201 安装软件:Keepalived1、Memcache1、Nginx1(反向代理)
服务器:192.168.1.205 安装软件:Keepalived2、Memcache2、Nginx2(反向代理)
服务器:192.168.1.231 安装软件:Tomcat1、Nginx1(静态处理)
服务器:192.168.1.232 安装软件:Tomcat2、Nginx2(静态处理)
三、Nginx的安装
1、下载最新有稳定包:
shell>wget http://nginx.org/download/nginx-1.4.7.tar.gz
2、安装相关组件
#先安装环境
shell>yum -y install gcc openssl-devel zlib-devel pcre-devel
shell>yum -y install gcc gcc-c++ autoconf automake         //安装编译gcc环境
shell>useradd -s /sbin/nologin -M nginx        //添加nginx 用户,没有登录shell,没有家目录.
shell>wget http://jaist.dl.sourceforge.net/project/pcre/pcre/8.35/pcre-8.35.zip //下载依赖组件,当然还有其它组件。
shell>unzip pcre-8.35.zip
shell>cd pcre-8.35
shell>./configure --prefix=/opt/pcre/
shell>make && make install
注意:可能还有其它组件要安装,请看:Linux Nginx 安装配置
3、安装Nginx
shell>tar -zxvf nginx-1.4.7.tar.gz
shell>#./configure \
  --prefix=/opt/nginx \                             //安装路径
  --sbin-path=/usr/sbin/nginx \                           //可执行文件路径
  --conf-path=/etc/nginx/nginx.conf \                //默认为<prefix>/conf/nginx.conf 最好定义到/etc下
  --pid-path=/var/run/nginx/nginx.pid  \                  //pid文件存放位置,后面将会用到
  --error-log-path=/var/log/nginx/error.log \             //错误日志文件,默认为<prefix>/logs/error.log
  --http-log-path=/var/log/nginx/access.log \             //访问日志,默认为<prefix>/logs/access.log
  --lock-path=/var/lock/nginx.lock \
  --user=nginx \
  --group=nginx \
  --with-http_stub_status_module \                        //以取得一些nginx的运行状态
  --with-http_ssl_module \                                //支持https加密连接
  --with-http_gzip_static_module \                        //静态缓存模块
  --with-http_realip_module  \                            //让Nginx透明获取客户端IP
  --http-client-body-temp-path=/var/tmp/nginx/client/ \   //指定http客户端请求缓存文件存放目录
  --http-proxy-temp-path=/var/tmp/nginx/proxy/ \          //指定http反向代理缓存文件存放目录
  --http-fastcgi-temp-path=/var/tmp/nginx/fcgi/         //指定FastCGI缓存文件存放目录
   --with-pcre=/opt/pcre/
shell>make
shell>make install
注意:./configure 中很多注解,执行时多注意。
4、让Nginx以服务形式启动
vim /etc/init.d/nginx
#!/bin/bash
# nginx Startup script for the Nginx HTTP Server
# it is v.0.0.2 version.
# chkconfig: - 85 15
# description: Nginx is a high-performance web and proxy server.
#              It has a lot of features, but it's not for everyone.
# processname: nginx
# pidfile: /var/run/nginx.pid
# config: /usr/local/nginx/conf/nginx.conf
nginxd=/usr/sbin/nginx
nginx_config=/etc/nginx/nginx.conf
nginx_pid=/var/run/nginx/nginx.pid
RETVAL=0
prog="nginx"
# Source function library.
. /etc/rc.d/init.d/functions
# Source networking configuration.
. /etc/sysconfig/network
# Check that networking is up.
[ ${NETWORKING} = "no" ] && exit 0
[ -x $nginxd ] || exit 0
# Start nginx daemons functions.
start() {
if [ -e $nginx_pid ];then
   echo "nginx already running...."
   exit 1
fi
   echo -n $"Starting $prog: "
   daemon $nginxd -c ${nginx_config}
   RETVAL=$?
   echo
   [ $RETVAL = 0 ] && touch /var/lock/subsys/nginx
   return $RETVAL
}
# Stop nginx daemons functions.
stop() {
        echo -n $"Stopping $prog: "
        killproc $nginxd
        RETVAL=$?
        echo
        [ $RETVAL = 0 ] && rm -f /var/lock/subsys/nginx /var/run/nginx.pid
}
# reload nginx service functions.
reload() {
    echo -n $"Reloading $prog: "
    #kill -HUP `cat ${nginx_pid}`
    killproc $nginxd -HUP
    RETVAL=$?
    echo
}
# See how we were called.
case "$1" in
start)
        start
        ;;
stop)
        stop
        ;;
reload)
        reload
        ;;
restart)
        stop
        start
        ;;
status)
        status $prog
        RETVAL=$?
        ;;
*)
        echo $"Usage: $prog {start|stop|restart|reload|status|help}"
        exit 1
esac
exit $RETVAL
注意:nginx各文件的安装路径要与实际安装的一致。
保存nginxd脚本,赋予执行权限,添加服务和开机启动
#chmod +x /etc/init.d/nginx
#chkconfig --add nginx
5、启动
shell>service nginx start
shell>service nginx restart
shell>service nginx stop
访问:http://127.0.0.1/
注意:iptables 是否开放80端口
6、Nginx 负载均衡的配置
vim /etc/nginx/nginx.conf
(1)、在http{}中增加:
gzip  on;
 gzip_min_length  1100;
 gzip_buffers     4 8k;
 gzip_types       text/plain text/css application/x-javascript image/bmp application/javascript;

 upstream tomcat_server{  #tomcat负载均衡配置
       server 192.168.1.231:8080 weight=1;
       server 192.168.1.232:8080 weight=1;
 }
 upstream nginx_server { #nginx负载均衡配置
       server 192.168.1.231 weight=1;
       server 192.168.1.232 weight=1;
 }
(2)、在http中的server如下:
server {
        listen       80;
        server_name  localhost;
        #charset koi8-r;

        #access_log  logs/host.access.log  main;

        <span style="color: #ff0000;">location ~ .*\.    (htm|html|gif|jpg|jpeg|png|bmp|swf|ioc|rar|zip|txt|flv|mid|doc|ppt|pdf|xls|mp3|wma)$  {
           expires      30d;
           proxy_pass http://nginx_server;   #反向代理,静态的由nginx来处理。
        }</span>
       <span style="color: #ff0000;"> location ~ .*\.(js|css)?$ {
           expires      1h;
           proxy_pass http://nginx_server;   #反向代理,静态的由nginx来处理。
        }

        location / {
           proxy_set_header  Host $host;
           proxy_set_header  X-Real-IP  $remote_addr;
           proxy_pass http://tomcat_server; #反向代理,其它的由tomcat来处理。
        }</span>

        #error_page  404              /404.html;

        # redirect server error pages to the static page /50x.html
        #
        error_page   500 502 503 504  /50x.html;
        location = /50x.html {
            root   html;
        }
       # proxy the PHP scripts to Apache listening on 127.0.0.1:80
        #
        #location ~ \.php$ {
        #    proxy_pass   http://127.0.0.1;
        #}

        # pass the PHP scripts to FastCGI server listening on 127.0.0.1:9000
        #
        #location ~ \.php$ {
        #    root           html;
        #    fastcgi_pass   127.0.0.1:9000;
        #    fastcgi_index  index.php;
        #    fastcgi_param  SCRIPT_FILENAME  /scripts$fastcgi_script_name;
        #    include        fastcgi_params;
        #}

        # deny access to .htaccess files, if Apache's document root
        # concurs with nginx's one
        #
        #location ~ /\.ht {
        #    deny  all;
        #}
}
7、反射代理两台(192.168.1.201\205)Nginx 配制如上。
8、静态处理两台(192.168.1.231\232)Nginx 不用配置第6步:Nginx 负载均衡的配置就可以了。
四、Keepalived安装
1、Keepalived安装部分参考:MYSQL + MHA +keepalive + VIP安装配置(三)-----keepalived安装配置
注意:只安装在192.168.1.201\205两台服务器上。
2、Keepalived配置,这里实现两台互为热备。为了不浪费资源,提供了两个VIP(207\208)可以同时执行两个项目。
(1)、服务器:192.168.1.201的配制如下:
! Configuration File for keepalived

global_defs {
   notification_email {
     licm@hyxt.com
   }
   notification_email_from sunney888@qq.com
   smtp_server smtp.qq.com
   smtp_connect_timeout 30
   router_id LVS_DEVEL
}
vrrp_script check_nginx {
   script "/root/check_nginx.sh"
   interval 2
   weight 2
}
vrrp_sync_group VG1 {
     group {
          VI_1
     }
}
vrrp_instance VI_1 {
    state MASTER
    interface eth1
    virtual_router_id 61
    mcast_src_ip 192.168.1.201
    priority 100
    advert_int 1
    authentication {
        auth_type PASS
        auth_pass 1111
    }

    virtual_ipaddress {
        192.168.1.208
    }
    track_script {
      check_nginx
    }
}
vrrp_instance VI_2 {
    state SLAVE
    interface eth1
    virtual_router_id 60
    mcast_src_ip 192.168.1.201
    priority 90
    advert_int 1
    authentication {
        auth_type PASS
        auth_pass 1111
    }

    virtual_ipaddress {
        192.168.1.207
    }
    track_script {
      check_nginx
    }
}
(2)、服务器:192.168.1.205的配制如下:
! Configuration File for keepalived

global_defs {
   notification_email {
     licm@hyxt.com
   }
   notification_email_from sunney888@qq.com
   smtp_server smtp.qq.com
   smtp_connect_timeout 30
   router_id LVS_DEVEL
}
vrrp_script check_nginx {
   script "/root/check_nginx.sh"
   interval 2
   weight 2
}
vrrp_sync_group VG1 {
     group {
          VI_1
     }
}
vrrp_instance VI_1 {
    state MASTER
    interface eth0
    virtual_router_id 60
    mcast_src_ip 192.168.1.205
    priority 100
    advert_int 1
    authentication {
        auth_type PASS
        auth_pass 1111
    }
    virtual_ipaddress {
        192.168.1.207
    }
    track_script {
      check_nginx
    }
}
vrrp_instance VI_2 {
    state SLAVE
    interface eth0
    virtual_router_id 61
    mcast_src_ip 192.168.1.205
    priority 90
    advert_int 1
    authentication {
        auth_type PASS
        auth_pass 1111
  }
    virtual_ipaddress {
        192.168.1.208
    }
    track_script {
      check_nginx
    }
}
注意:这不说明每个参数的意义,请查看: MYSQL + MHA +keepalive + VIP安装配置(三)-----keepalived安装配置 只是配置不一样。
五、Tomcat安装
1、Tomcat下载,下载最新的吧。
shell>http://apache.fayea.com/apache-mirror/tomcat/tomcat-7/v7.0.53/bin/apache-tomcat-7.0.53.tar.gz
shell>tar -zxvf apache-tomcat-7.0.53.tar.gz
注意:这里解压就可以不用安装。
2、启动与停止
shell>/usr/local/apache-tomcat-7.0.53/bin/startup.sh
shell>/usr/local/apache-tomcat-7.0.53/bin/shutdown.sh
注意:tomcat默认端口是8080,确保 iptable是否开通端口。
当然你也可以配置成以服务的形式来启动/停止。这不在处理。
六、Memcache安装与配置
1、memcache安装,详细安装请看这:linux MemCache安装手册 这不在说明。
服务器(192.168.1.201/205)安装方法一样。
注意:memcache默认端口是11211,确保 iptable是否开通端口。
2、memcache的启动
/usr/local/bin/memcached -d -m 50 -u root -l 192.168.1.201 -p 11211 -c 2048 -P /tmp/memcached.pid
没错误提示的话,证明安装成功并且启动了Memcached服务了。
Memcached基本说明:
启动参数:
-d选项是启动一个守护进程,
-m是分配给Memcache使用的内存数量,单位是MB
-u是运行Memcache的用户
-l是监听的服务器IP地址
-p是设置Memcache监听的端口
-c选项是最大运行的并发连接数,默认是1024
-P是设置保存Memcache的pid文件
结束Memcached进程使用如下语句:
kill `cat /tmp/memcached.pid`
3、memcache测试连接
telnet 192.168.1.201 11211 连接成功后
七、配置session共享
1、tomcat的context.xml
vim /usr/local/apache-tomcat-7.0.53/conf/context.xml
增加如下内容:
<Manager className="de.javakaffee.web.msm.MemcachedBackupSessionManager"
    memcachedNodes="n1:192.168.1.201:11211,n2:192.168.1.205:11211"
    requestUriIgnorePattern=".*\.(png|gif|jpg|css|js)$"
    sessionBackupAsync="false"
    sessionBackupTimeout="1800000"
    copyCollectionsForSerialization="false"
    transcoderFactoryClass="de.javakaffee.web.msm.serializer.javolution.JavolutionTranscoderFactory"/>
注意:memcachedNodes是memcached的节点。可以有多点。
2、增加jar包
(1)、下载包,地址:http://repo1.maven.org/maven2/de/javakaffee/msm/
memcached-session-manager-1.8.1.jar
memcached-session-manager-tc7-1.8.1.jar
msm-flexjson-serializer-1.8.1.jar
msm-javolution-serializer-1.8.1.jar
msm-kryo-serializer-1.8.1.jar
msm-serializer-benchmark-1.8.1.jar
msm-xstream-serializer-1.8.1.jar
(2)、javolution-5.4.3.1.jar、spymemcached-2.8.4.jar这两个包要另外下载。
(3)、把下载的这9个包放到两台tomcat服务器上的lib目录下。
九、测试
把马有安装的服务都启动。把一个要测试的项目同时放到。两个tomcat服务器上及两个Nginx静态处理服务器上。访问VIP:http://192.168.1.207/项目名称。
注意:
1、测试方法先确证两台tomcat的项目能用他自己的IP能正常访问。
2、再访问VIP:http://192.168.1.207/项目名称。测试一下图片、JS及JSP是从哪个服务器上调用的。
3、时间有限这不把测试有具体内容放出来。
十、完成
写的比较急。如有不正确之处请指出。让我们一起学习。谢谢。

 浙公网安备 33010602011771号