一个java程序员自学IOS开发之路(六)
2015/10/28
Day 27
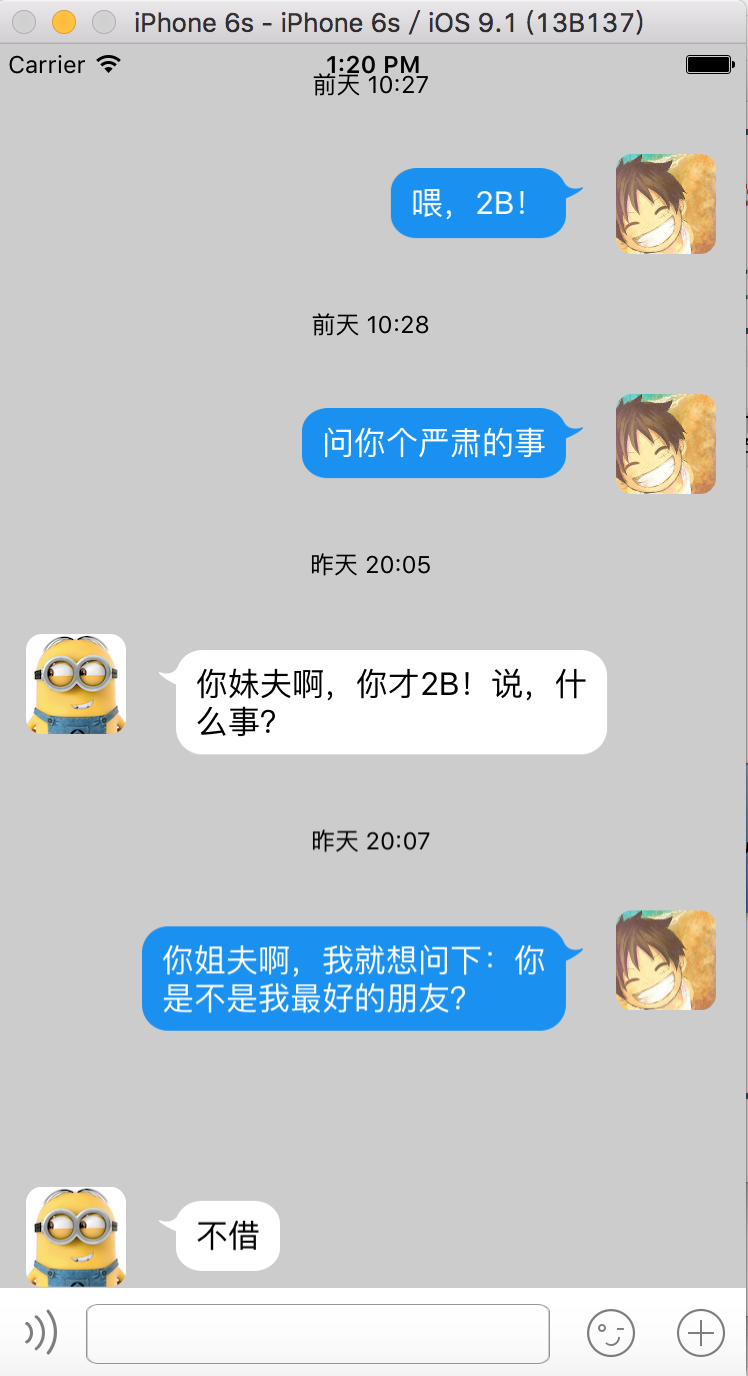
今天学习了即时通讯应用的UI布局,只是简单的利用UITableView展示数据
第一步
先利用storyboard把页面的框架搭起来

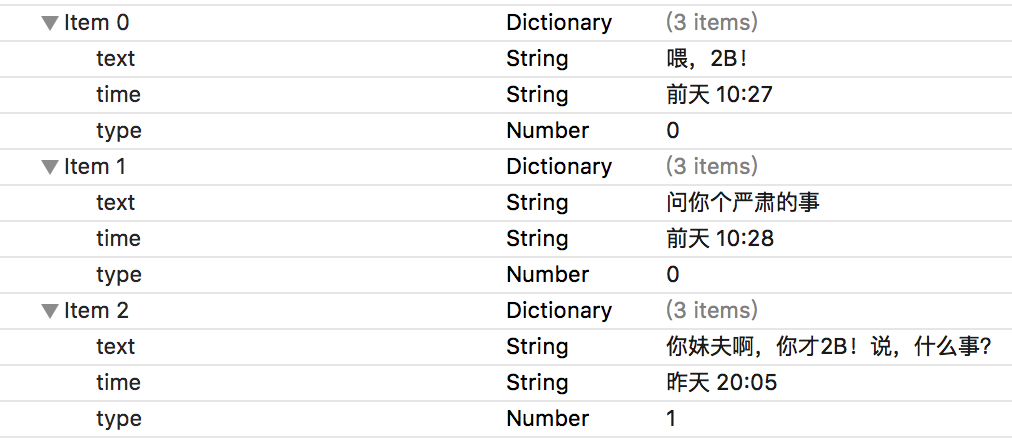
显示的数据是存在plist文件里的,所以要把他们转成模型
typedef enum {
YUMessageTypeMe = 0, // 自己
YUMessageTypeOther // 其他人
} YUMessageType;
@interface YUMessage : NSObject
@property (nonatomic, copy) NSString *text;
@property (nonatomic, copy) NSString *time;
@property (nonatomic, assign) YUMessageType type;
@property (nonatomic, assign) BOOL hiddenTime;
- (instancetype)initWithDic:(NSDictionary *)dic;
+ (instancetype)messageWithDic:(NSDictionary *)dic;
@end
由于自己发的消息与别人的消息显示位置不同,用了枚举来区别,另外hiddenTime是为了不重复显示相同的时间。
每个消息都是显示在一个UITableViewCell上的,因为随着数据的不同,文字的长短有区别,也就导致每个cell的高度可能不一样,这样的情况类似于前面的做的微博页面,解决方法就是再封装一个frame的模型(实体类),在里面计算出子控件的frame和cell的高度
#import <Foundation/Foundation.h>
#import <UIKit/UIKit.h>
@class YUMessage;
@interface YUMessageFrame : NSObject
@property (nonatomic, assign, readonly) CGRect iconF;
@property (nonatomic, assign, readonly) CGRect textF;
@property (nonatomic, assign, readonly) CGRect timeF;
@property (nonatomic, assign, readonly) CGFloat cellHight;
@property (nonatomic, strong) YUMessage *message;
@end
在setMessage方法里设置各个frame和cellHeight
- (void)setMessage:(YUMessage *)message {
_message = message;
CGFloat padding = 15;
//时间
if (message.hiddenTime == NO) {
CGFloat timeW = [UIScreen mainScreen].bounds.size.width;
CGFloat timeH = 40;
_timeF = CGRectMake(0, 0, timeW, timeH);
}
//头像
CGFloat iconX;
CGFloat iconY = CGRectGetMaxY(_timeF) + padding;
CGFloat iconW = 50;
CGFloat iconH = 50;
//消息内容
CGFloat textX;
CGFloat textY = iconY;
CGFloat textMaxW = 200;
CGSize textSize = [message.text boundingRectWithSize:CGSizeMake(textMaxW, MAXFLOAT) options:NSStringDrawingUsesFontLeading | NSStringDrawingUsesLineFragmentOrigin attributes:@{NSFontAttributeName : [UIFont systemFontOfSize:16]} context:nil].size;
CGFloat textW = textSize.width + 40;
CGFloat textH = textSize.height + 30;
if (message.type == YUMessageTypeMe) {
iconX = [UIScreen mainScreen].bounds.size.width - padding - iconW;
textX = iconX - padding - textW;
} else {
iconX = padding;
textX = iconX + iconW + padding;
}
_iconF = CGRectMake(iconX, iconY, iconW, iconH);
_textF = CGRectMake(textX, textY, textW, textH);
_cellHight = MAX(CGRectGetMaxY(_iconF), CGRectGetMaxY(_textF)) + padding;
}
一个个排好就行,值得注意的是,自己的消息在右,别人的消息在左
第二步
ViewController里加载数据,实现数据源方法
在属性的getter方法里懒加载数据
- (NSMutableArray *)messageFrames {
if (_messageFrames == nil) {
NSMutableArray *result = [[NSMutableArray alloc] init];
NSString *path = [[NSBundle mainBundle] pathForResource:@"messages.plist" ofType:nil];
NSArray *dics = [NSArray arrayWithContentsOfFile:path];
for (NSDictionary *dic in dics) {
YUMessage *message = [YUMessage messageWithDic:dic];
YUMessageFrame *lastF = [result lastObject];
YUMessageFrame *messageFrame = [[YUMessageFrame alloc] init];
messageFrame.message = message;
//消息的时间相同就隐藏时间
messageFrame.message.hiddenTime = [lastF.message.time isEqualToString:message.time];
[result addObject:messageFrame];
}
_messageFrames = result;
}
return _messageFrames;
}
#pragma mark - 数据源方法
- (NSInteger)tableView:(UITableView *)tableView numberOfRowsInSection:(NSInteger)section {
return self.messageFrames.count;
}
- (UITableViewCell *)tableView:(UITableView *)tableView cellForRowAtIndexPath:(NSIndexPath *)indexPath {
YUMessageCell *cell = [YUMessageCell cellWithTableView:tableView];
cell.messageFrame = self.messageFrames[indexPath.row];
return cell;
}
由于系统提供的cell根本不够我显示数据,于是自定义cell,YUMessageCell为我自定义cell的类名。cell的创建封装在自己的类方法里,这样即实现了解耦,也简化了ViewController的代码。
在类扩展里包含子控件
@interface YUMessageCell()
@property (nonatomic, weak) UIImageView *iconView;
@property (nonatomic, weak) UILabel *timeView;
@property (nonatomic, weak) UIButton *textView;
@end
在初始化方法里加载子控件
- (instancetype)initWithStyle:(UITableViewCellStyle)style reuseIdentifier:(NSString *)reuseIdentifier {
if (self = [super initWithStyle:style reuseIdentifier:reuseIdentifier]) {
UIImageView *iconView = [[UIImageView alloc] init];
iconView.layer.cornerRadius = 8;
//iconView.clipsToBounds = YES;
[self.contentView addSubview:iconView];
self.iconView = iconView;
UILabel *timeView = [[UILabel alloc] init];
timeView.textAlignment = NSTextAlignmentCenter;
timeView.font = [UIFont systemFontOfSize:12];
[self.contentView addSubview:timeView];
self.timeView = timeView;
UIButton *textView = [[UIButton alloc] init];
textView.titleLabel.font = [UIFont systemFontOfSize:16];
textView.titleLabel.numberOfLines = 0;//自动换行
[self.contentView addSubview:textView];
self.textView = textView;
self.backgroundColor = [UIColor clearColor];
}
return self;
}
在setter方法里设置数据子控件的数据与frame
- (void)setMessageFrame:(YUMessageFrame *)messageFrame {
_messageFrame = messageFrame;
YUMessage *msg = messageFrame.message;
if (msg.hiddenTime) {
self.timeView.hidden = YES;
} else {
self.timeView.hidden = NO;
self.timeView.frame = messageFrame.timeF;
self.timeView.text = msg.time;
}
self.iconView.frame = messageFrame.iconF;
self.iconView.image = [UIImage imageNamed:(msg.type == YUMessageTypeMe)?@"me":@"other"];
self.textView.frame = messageFrame.textF;
[self.textView setTitle:msg.text forState:UIControlStateNormal];
// 4.设置聊天背景
NSString *normal, *high;
if (msg.type == YUMessageTypeOther) {
normal = @"chat_recive_nor";
high = @"chat_recive_press_pic";
[self.textView setTitleColor:[UIColor blackColor] forState:UIControlStateNormal];
} else {
normal = @"chat_send_nor";
high = @"chat_send_press_pic";
[self.textView setTitleColor:[UIColor whiteColor] forState:UIControlStateNormal];
}
//设置按钮内部的内间距
self.textView.contentEdgeInsets = UIEdgeInsetsMake(15, 20, 15, 20);
// 拉伸图片 且保留图片周围的像素不被拉伸
UIImage *normalBackground = [UIImage imageNamed:normal];
normalBackground = [normalBackground stretchableImageWithLeftCapWidth:normalBackground.size.width * 0.5 topCapHeight:normalBackground.size.height * 0.5];
//normalBackground = [normalBackground resizableImageWithCapInsets:UIEdgeInsetsMake(15, 20, 15, 20) resizingMode:UIImageResizingModeStretch];
[self.textView setBackgroundImage:normalBackground forState:UIControlStateNormal];
}
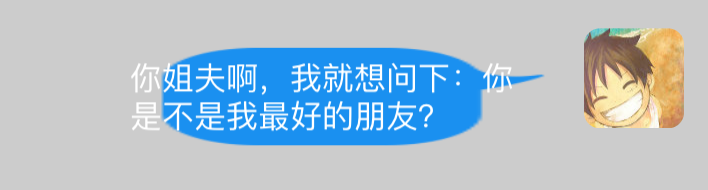
由于,聊天的背景图片是这样的

如果直接放进去,被拉伸后的效果很坑爹
于是需要方法拉伸图片的时候四周不跟着拉伸,个人认为比较好记又好用的方法是UIImage的一个对象方法,
- (UIImage *)stretchableImageWithLeftCapWidth:(NSInteger)leftCapWidth topCapHeight:(NSInteger)topCapHeight __TVOS_PROHIBITED;
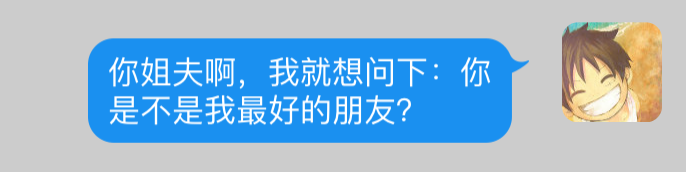
这两个参数一般传入,图片宽度的一半和高度的一半,这个方法的原理是按照你给的参数,在那个坐标取像素为1的正方形进行拉伸,这样就可以保持图片的周边在拉伸的时候像素不变了,效果如下
最后还有个问题,就是点击文本框的时候键盘弹出,就会盖住下方的部分,所以需要监听键盘的状态,在键盘出来的时候View要随着键盘一起动。那么问题又来了,怎么监听键盘呢?
这就要靠通知机制了
- 每一个应用程序都有一个通知中心(NSNotificationCenter)实例,专门负责协助不同对象之间的消息通信
- 任何一个对象都可以向通知中心发布通知(NSNotification),描述自己在做什么。其他感兴趣的对象(Observer)可以申请在某个特定通知发布时(或在某个特定的对象发布通知时)收到这个通知

一个完整的通知一般包含3个属性:
- - (NSString *)name; // 通知的名称
- - (id)object; // 通知发布者(是谁要发布通知)
- - (NSDictionary *)userInfo; // 一些额外的信息(通知发布者传递给通知接收者的信息内容)
初始化一个通知(NSNotification)对象
- + (instancetype)notificationWithName:(NSString *)aName object:(id)anObject;
- + (instancetype)notificationWithName:(NSString *)aName object:(id)anObject userInfo:(NSDictionary *)aUserInfo;
- - (instancetype)initWithName:(NSString *)name object:(id)object userInfo:(NSDictionary *)userInfo;
通知中心(NSNotificationCenter)提供了相应的方法来帮助发布通知
- - (void)postNotification:(NSNotification *)notification;
- 发布一个notification通知,可在notification对象中设置通知的名称、通知发布者、额外信息等
- - (void)postNotificationName:(NSString *)aName object:(id)anObject;
- 发布一个名称为aName的通知,anObject为这个通知的发布者
- - (void)postNotificationName:(NSString *)aName object:(id)anObject userInfo:(NSDictionary *)aUserInfo;
- 发布一个名称为aName的通知,anObject为这个通知的发布者,aUserInfo为额外信息
通知中心(NSNotificationCenter)提供了方法来注册一个监听通知的监听器(Observer)
- (void)addObserver:(id)observer selector:(SEL)aSelector name:(NSString *)aName object:(id)anObject;
observer:监听器,即谁要接收这个通知
aSelector:收到通知后,回调监听器的这个方法,并且把通知对象当做参数传入
aName:通知的名称。如果为nil,那么无论通知的名称是什么,监听器都能收到这个通知
anObject:通知发布者。如果为anObject和aName都为nil,监听器都收到所有的通知
- (id)addObserverForName:(NSString *)name object:(id)obj queue:(NSOperationQueue *)queue usingBlock:(void (^)(NSNotification *note))block;
name:通知的名称
obj:通知发布者
block:收到对应的通知时,会回调这个block
queue:决定了block在哪个操作队列中执行,如果传nil,默认在当前操作队列中同步执行
通知中心不会保留(retain)监听器对象,在通知中心注册过的对象,必须在该对象释放前取消注册。否则,当相应的通知再次出现时,通知中心仍然会向该监听器发送消息。因为相应的监听器对象已经被释放了,所以可能会导致应用崩溃
通知中心提供了相应的方法来取消注册监听器
- - (void)removeObserver:(id)observer;
- - (void)removeObserver:(id)observer name:(NSString *)aName object:(id)anObject;
一般在监听器销毁之前取消注册(如在监听器中加入下列代码):
- (void)dealloc {
//[super dealloc]; 非ARC中需要调用此句
[[NSNotificationCenter defaultCenter] removeObserver:self];
}
UIDevice类提供了一个单例对象,它代表着设备,通过它可以获得一些设备相关的信息,比如电池电量值(batteryLevel)、电池状态(batteryState)、设备的类型(model,比如iPod、iPhone等)、设备的系统(systemVersion)
通过[UIDevice currentDevice]可以获取这个单粒对象
UIDevice对象会不间断地发布一些通知,下列是UIDevice对象所发布通知的名称常量:
➢ UIDeviceOrientationDidChangeNotification // 设备旋转
➢ UIDeviceBatteryStateDidChangeNotification // 电池状态改变
➢ UIDeviceBatteryLevelDidChangeNotification // 电池电量改变
➢ UIDeviceProximityStateDidChangeNotification // 近距离传感器(比如设备贴近了使用者的脸部)
我们经常需要在键盘弹出或者隐藏的时候做一些特定的操作,因此需要监听键盘的状态
键盘状态改变的时候,系统会发出一些特定的通知
➢ UIKeyboardWillShowNotification // 键盘即将显示
➢ UIKeyboardDidShowNotification // 键盘显示完毕
➢ UIKeyboardWillHideNotification // 键盘即将隐藏
➢ UIKeyboardDidHideNotification // 键盘隐藏完毕
➢ UIKeyboardWillChangeFrameNotification // 键盘的位置尺寸即将发生改变
➢ UIKeyboardDidChangeFrameNotification // 键盘的位置尺寸改变完毕
系统发出键盘通知时,会附带一下跟键盘有关的额外信息(字典),字典常见的key如下:
➢ UIKeyboardFrameBeginUserInfoKey // 键盘刚开始的frame
➢ UIKeyboardFrameEndUserInfoKey // 键盘最终的frame(动画执行完毕后)
➢ UIKeyboardAnimationDurationUserInfoKey // 键盘动画的时间
➢ UIKeyboardAnimationCurveUserInfoKey // 键盘动画的执行节奏(快慢)
我测试打印出来的信息如下(用的6s模拟器)
UIKeyboardAnimationCurveUserInfoKey = 7;
UIKeyboardAnimationDurationUserInfoKey = "0.25";
UIKeyboardBoundsUserInfoKey = "NSRect: {{0, 0}, {375, 258}}";
UIKeyboardCenterBeginUserInfoKey = "NSPoint: {187.5, 796}";
UIKeyboardCenterEndUserInfoKey = "NSPoint: {187.5, 538}";
UIKeyboardFrameBeginUserInfoKey = "NSRect: {{0, 667}, {375, 258}}";
UIKeyboardFrameEndUserInfoKey = "NSRect: {{0, 409}, {375, 258}}";
UIKeyboardIsLocalUserInfoKey = 1;
好了,知道这些我就可以监听键盘了,让键盘弹出的同时整个view也向上移动就行了,键盘收起也是一样,跟着向下移动
首先监听键盘通知,一般在viewDidLoad方法里写
//监听键盘的通知
[[NSNotificationCenter defaultCenter] addObserver:self selector:@selector(keyboardChange:) name:UIKeyboardWillChangeFrameNotification object:nil];
实现方法
- (void)keyboardChange:(NSNotification *)note {
CGFloat duration = [note.userInfo[UIKeyboardAnimationDurationUserInfoKey] doubleValue];
CGRect keyboardFrame = [note.userInfo[UIKeyboardFrameEndUserInfoKey] CGRectValue];
CGFloat transfromY = (CGFloat)(keyboardFrame.origin.y - self.view.frame.size.height);
[UIView animateWithDuration:duration animations:^{
self.view.transform = CGAffineTransformMakeTranslation(0, transfromY);
}];
}
利用transform可以同时监听键盘的弹出和收起,动画效果使用block简单方便
好啦!大功告成,总结一下,继续熟悉了UITableView的使用,以及自定义Cell,另外学到了通知机制。
2015/10/30
Day 28
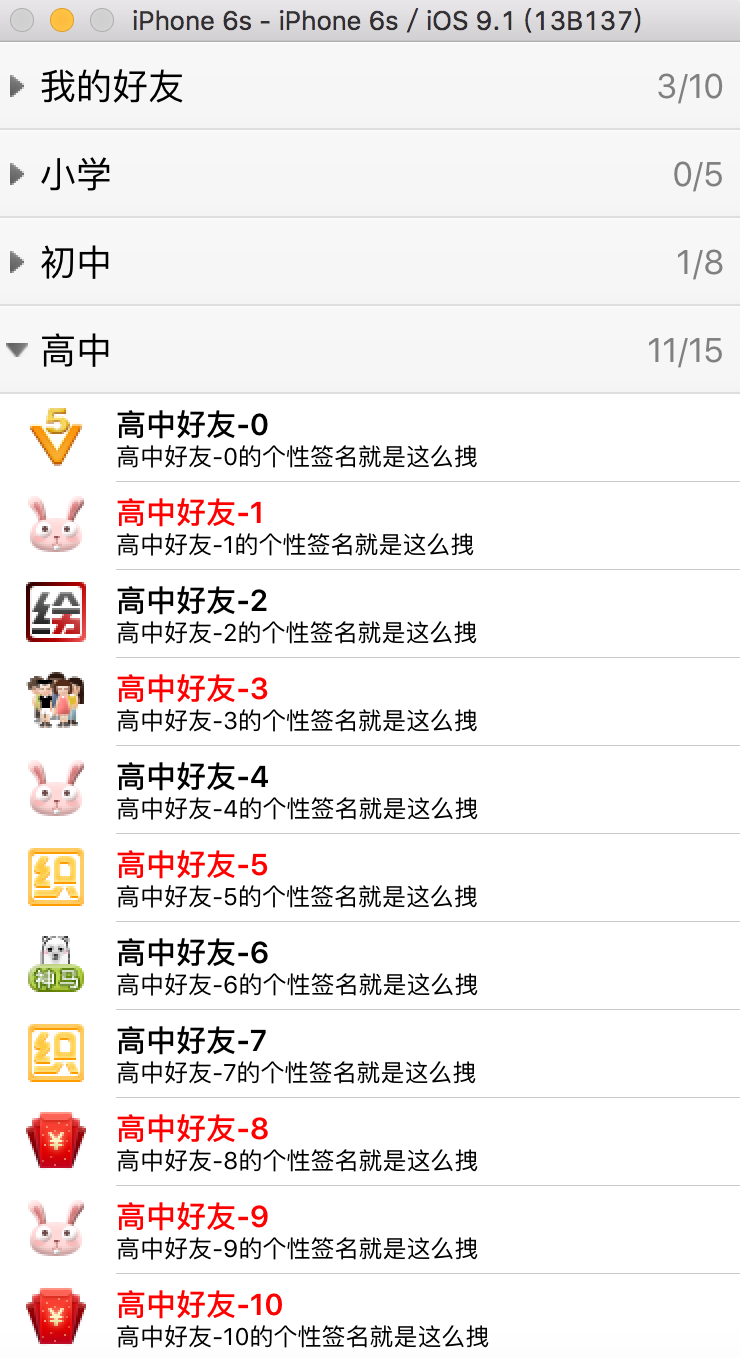
今天做了一个QQ好友列表展示,先放效果图
还是利用UITableView,这回是直接在starboard里拖入一个UITableViewController,这个UITableViewController自动实现数据源方法和代理方法,不需要我手写了
老规矩,先封装模型类

这个算是多维数组了,每个friend会在一个cell中显示,最好分两个模型封装,group和friend
@interface YUFriend : NSObject
@property (nonatomic, copy) NSString *icon;
@property (nonatomic, copy) NSString *intro;
@property (nonatomic, copy) NSString *name;
@property (nonatomic, assign, getter=isVip) BOOL vip;
+ (instancetype)friendWithDic:(NSDictionary *)dic;
- (instancetype)initWithDic:(NSDictionary *)dic;
@end
bool类型的数据getter方法最好用is开头
@interface YUGroup : NSObject
@property (nonatomic, strong) NSArray *friends;
@property (nonatomic, copy) NSString *name;
@property (nonatomic, assign) int online;
@property (nonatomic, assign) BOOL open;
+ (instancetype)groupWithDic:(NSDictionary *)dic;
- (instancetype)initWithDic:(NSDictionary *)dic;
@end
open表示组的打开或关闭
另外group的init方法中,需要把字典数组转化成对象数组
- (instancetype)initWithDic:(NSDictionary *)dic {
if (self = [super init]) {
[self setValuesForKeysWithDictionary:dic];
NSMutableArray *friends = [NSMutableArray array];
for (NSDictionary *dic in self.friends) {
YUFriend *friend = [YUFriend friendWithDic:dic];
[friends addObject:friend];
}
self.friends = friends;
}
return self;
}
然后加载plist数据,实现ViewController的数据源方法
由于这是分组的,numberOfSectionsInTableView终于用上了。
- (NSInteger)numberOfSectionsInTableView:(UITableView *)tableView {
return self.groups.count;
}
- (NSInteger)tableView:(UITableView *)tableView numberOfRowsInSection:(NSInteger)section {
YUGroup *group = self.groups[section];
return group.open ? group.friends.count : 0;
}
自定义cell
- (UITableViewCell *)tableView:(UITableView *)tableView cellForRowAtIndexPath:(NSIndexPath *)indexPath {
YUFriendCell *cell = [YUFriendCell cellWithTableView:tableView];
YUGroup *group = self.groups[indexPath.section];
cell.friendData = group.friends[indexPath.row];
return cell;
}
另外,每组的header也需要自定义(delegate属性后面收缩组的时候要用到)
- (UIView *)tableView:(UITableView *)tableView viewForHeaderInSection:(NSInteger)section {
YUGroupHeader *header = [YUGroupHeader headerWithTableView:tableView];
header.delegate = self;
header.group = self.groups[section];
return header;
}
自定义cell
@interface YUFriendCell : UITableViewCell
@property (nonatomic, strong) YUFriend *friendData;
+ (instancetype)cellWithTableView:(UITableView *)tableView;
@end
setter方法加载数据
- (void)setFriendData:(YUFriend *)friendData {
_friendData = friendData;
self.imageView.image = [UIImage imageNamed:friendData.icon];
self.textLabel.text = friendData.name;
self.textLabel.textColor = friendData.isVip ? [UIColor redColor] : [UIColor blackColor];
self.detailTextLabel.text = friendData.intro;
}
init方法,做些基础的设置
- (instancetype)initWithStyle:(UITableViewCellStyle)style reuseIdentifier:(NSString *)reuseIdentifier {
if (self = [super initWithStyle:style reuseIdentifier:reuseIdentifier]) {
self.textLabel.font = [UIFont boldSystemFontOfSize:15];
}
return self;
}
初始化类方法,方便控制器使用
+ (instancetype)cellWithTableView:(UITableView *)tableView {
static NSString *yu3 = @"friends";
YUFriendCell *cell = [tableView dequeueReusableCellWithIdentifier:yu3];
if (cell == nil) {
cell = [[YUFriendCell alloc] initWithStyle:UITableViewCellStyleSubtitle reuseIdentifier:yu3];
}
return cell;
}
自定义headerView
@interface YUGroupHeader : UITableViewHeaderFooterView
@property (nonatomic, strong) YUGroup *group;
+ (instancetype)headerWithTableView:(UITableView *)tableView;
@end
有两个子控件,左边的按钮和右边的在线人数
@interface YUGroupHeader ()
@property (nonatomic, weak) UIButton *nameBtn;
@property (nonatomic, weak) UILabel *onlineLabel;
@end
init方法里加入子控件和设置子控件的数据,
不建议在这里设置子控件的frame,可能不准
- (instancetype)initWithReuseIdentifier:(NSString *)reuseIdentifier {
。。。
}
在这个方法里设置一定准,另外注意调用super
- (void)layoutSubviews {
[super layoutSubviews];
self.nameBtn.frame = self.bounds;
self.onlineLabel.frame = CGRectMake(self.frame.size.width - 160, 0, 150, self.frame.size.height);
}
这样数据就能全显示出来,然而点击header并不会收起来。
这就需要监听header的点击事件了,是谁要监听呢?这就要看谁负责显示数据了,是TableView,改变group的open属性然后reloadData就可以重新显示数据,显然,交给TableViewController监听是最合适的,A的事件由B来监听,又要用到代理模式了~
首先声明header的代理协议
@protocol YUGroupHeaderDelegate <NSObject>
@optional
- (void)groupHeaderClick:(YUGroupHeader *)header;
@end
然后在header里加个属性
@property (nonatomic, weak) id<YUGroupHeaderDelegate> delegate;
让ViewController遵循协议
@interface ViewController () <YUGroupHeaderDelegate>
实现代理方法,很简单,就是刷新数据
#pragma mark - 代理方法
- (void)groupHeaderClick:(YUGroupHeader *)header {
[self.tableView reloadData];
}
在header里实现headerDidClick方法
- (void)headerDidClick{
self.group.open = !self.group.open;
if ([self.delegate respondsToSelector:@selector(groupHeaderClick:)]) {
[self.delegate groupHeaderClick:self];
}
}
小结:熟悉UITableViewController的使用,代理的使用
通知和代理的选择
共同点
- 利用通知和代理都能完成对象之间的通信
(比如A对象告诉B对象发生了什么事情, A对象传递数据给B对象)
不同点
- 代理 : 一对一关系(1个对象只能告诉另1个对象发生了什么事情)
- 通知 : 多对多关系(1个对象能告诉N个对象发生了什么事情, 1个对象能得知N个对象发生了什么事情)
UIView自带的方法
1> - (void)layoutSubviews;
* 当一个控件的frame发生改变的时候就会自动调用
* 一般在这里布局内部的子控件(设置子控件的frame)
* 一定要调用super的layoutSubviews方法
2> - (void)didMoveToSuperview;
* 当一个控件被添加到父控件中就会调用
3> - (void)willMoveToSuperview:(UIView *)newSuperview;
* 当一个控件即将被添加到父控件中会调用
2015/10/31
Day 29
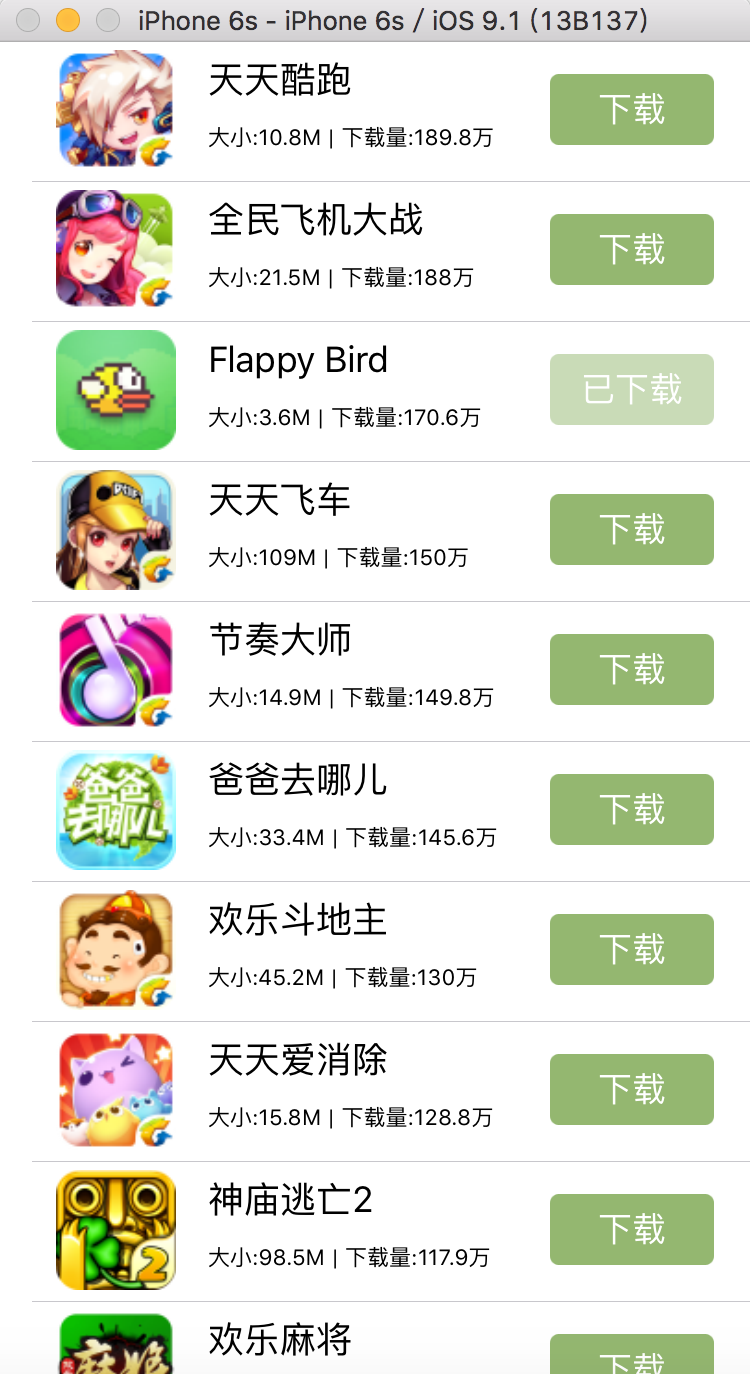
今天还是继续UITableView,利用storyboard在cell里拖入控件显示数据,照例先放效果图
第一步,在storyboard里拖控件,不得不说,感觉比之前写的自定义cell方便多了
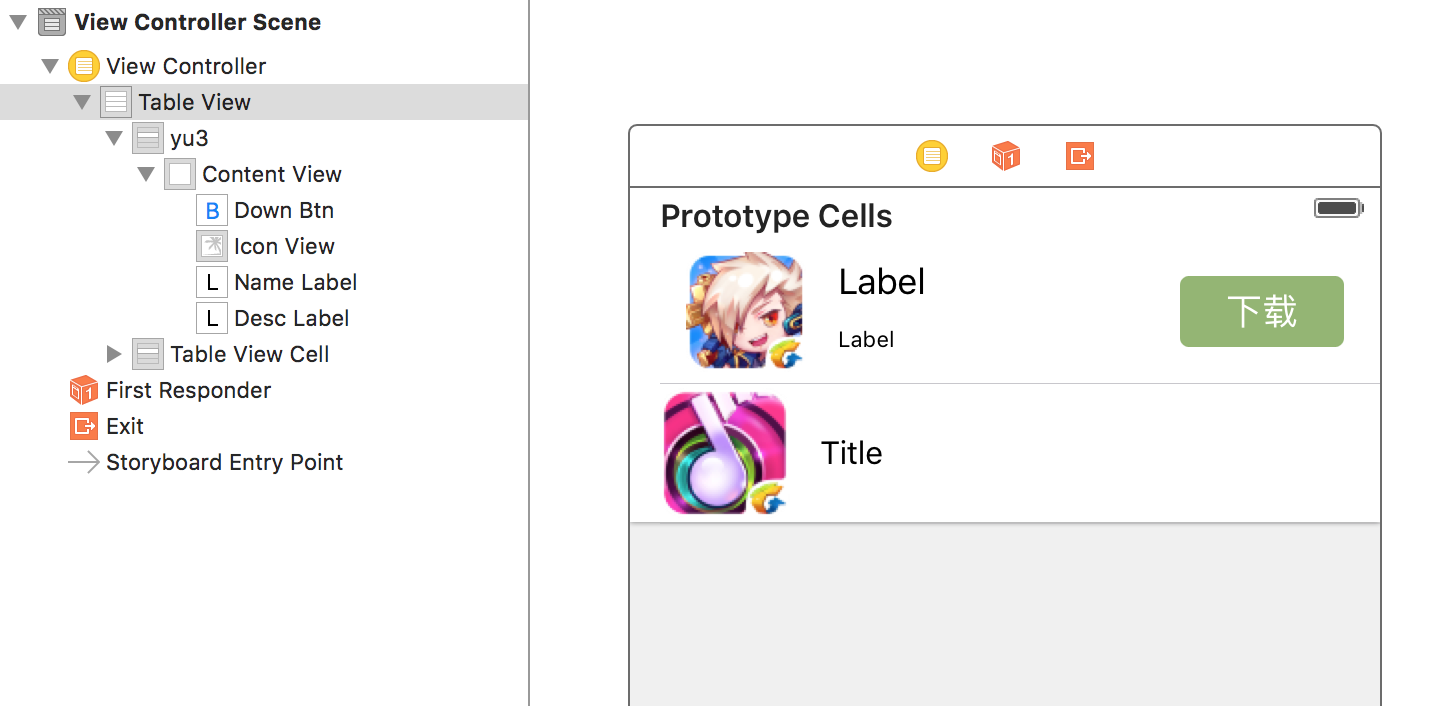
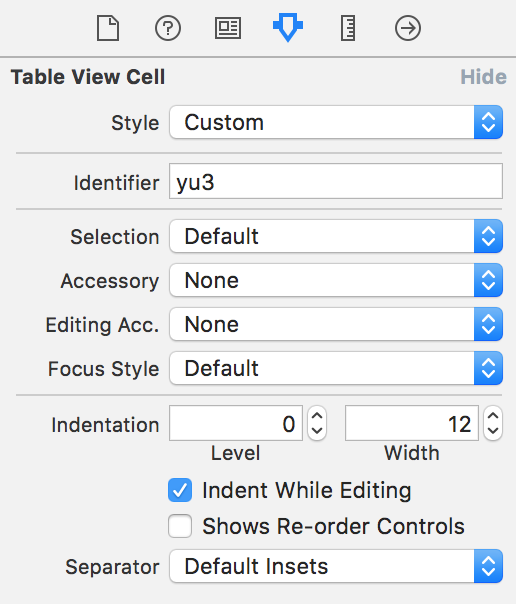
另外要注意你的cell的属性设置,特别是Identifier,
数据的模型封装类,这就不贴了
然后创建cell类
@interface YUAppCell : UITableViewCell
@property (nonatomic, strong) YUApp *app;
@end
利用app属性来传入数据
另外在storyboard里设置cell 的类型为YUAppCell,然后就可以愉快的连线了!
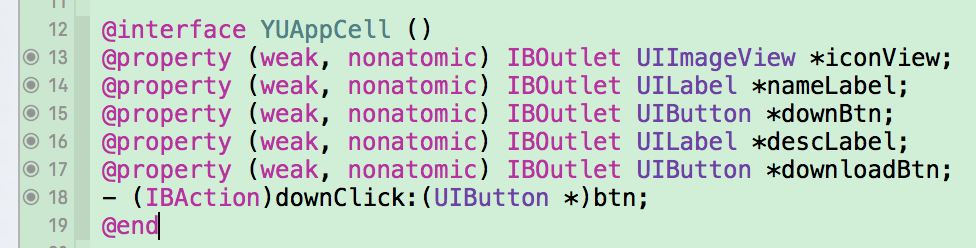
像这样,在.m文件的类扩展里连个痛快!
然后在setter方法里加载数据
- (void)setApp:(YUApp *)app {
_app = app;
self.iconView.image = [UIImage imageNamed:app.icon];
self.nameLabel.text = app.name;
self.descLabel.text = [NSString stringWithFormat:@"大小:%@ | 下载量:%@",app.size,app.download];
}
//按钮点击后不可用
- (IBAction)downClick:(UIButton *)btn {
btn.enabled = NO;
}
最后在ViewController实现数据源方法,就能显示出来了。注意cell的Identifier要跟你在storyboard里的一致
然而坑爹的是,你在上面点了按钮,让按钮不可用了,滑到下面,下面新的条目的按钮也不可用了= =
这就是cell循环利用的一个坑。
解决方法:给cell设置数据的时候同时要把状态也设置一下
在本例中
我在app模型里加入一个bool类型属性,表示按钮是否被点过了
@property (nonatomic, assign, getter=isDownloaded) BOOL downloaded;
然后点按钮的时候,加入一行更新状态
- (IBAction)downClick:(UIButton *)btn {
self.app.downloaded = YES;
btn.enabled = NO;
}
最后在setter方法里设置状态
- (void)setApp:(YUApp *)app {
_app = app;
self.iconView.image = [UIImage imageNamed:app.icon];
self.nameLabel.text = app.name;
self.descLabel.text = [NSString stringWithFormat:@"大小:%@ | 下载量:%@",app.size,app.download];
//覆盖按钮状态
self.downloadBtn.enabled = (self.app.isDownloaded == NO);
}
这样,各个cell里按钮的状态就互不影响了

 浙公网安备 33010602011771号