SpringBoot基础
SpringBoot
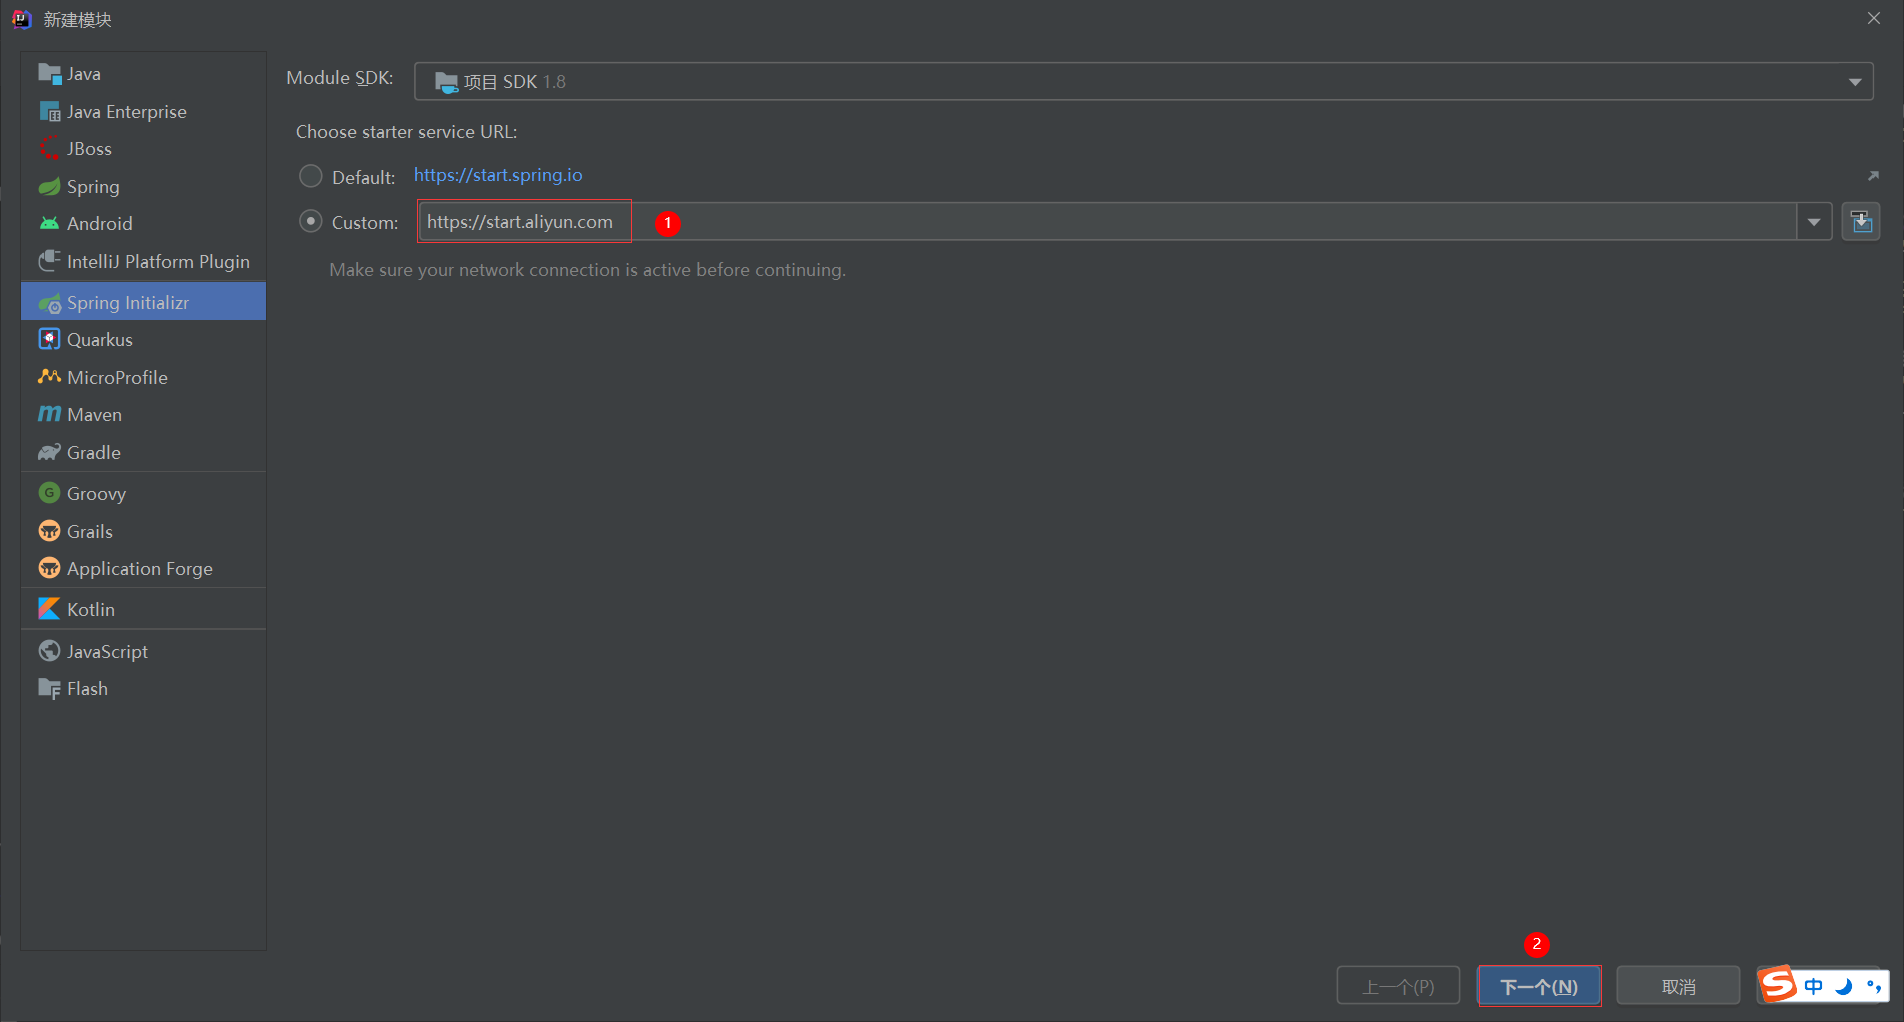
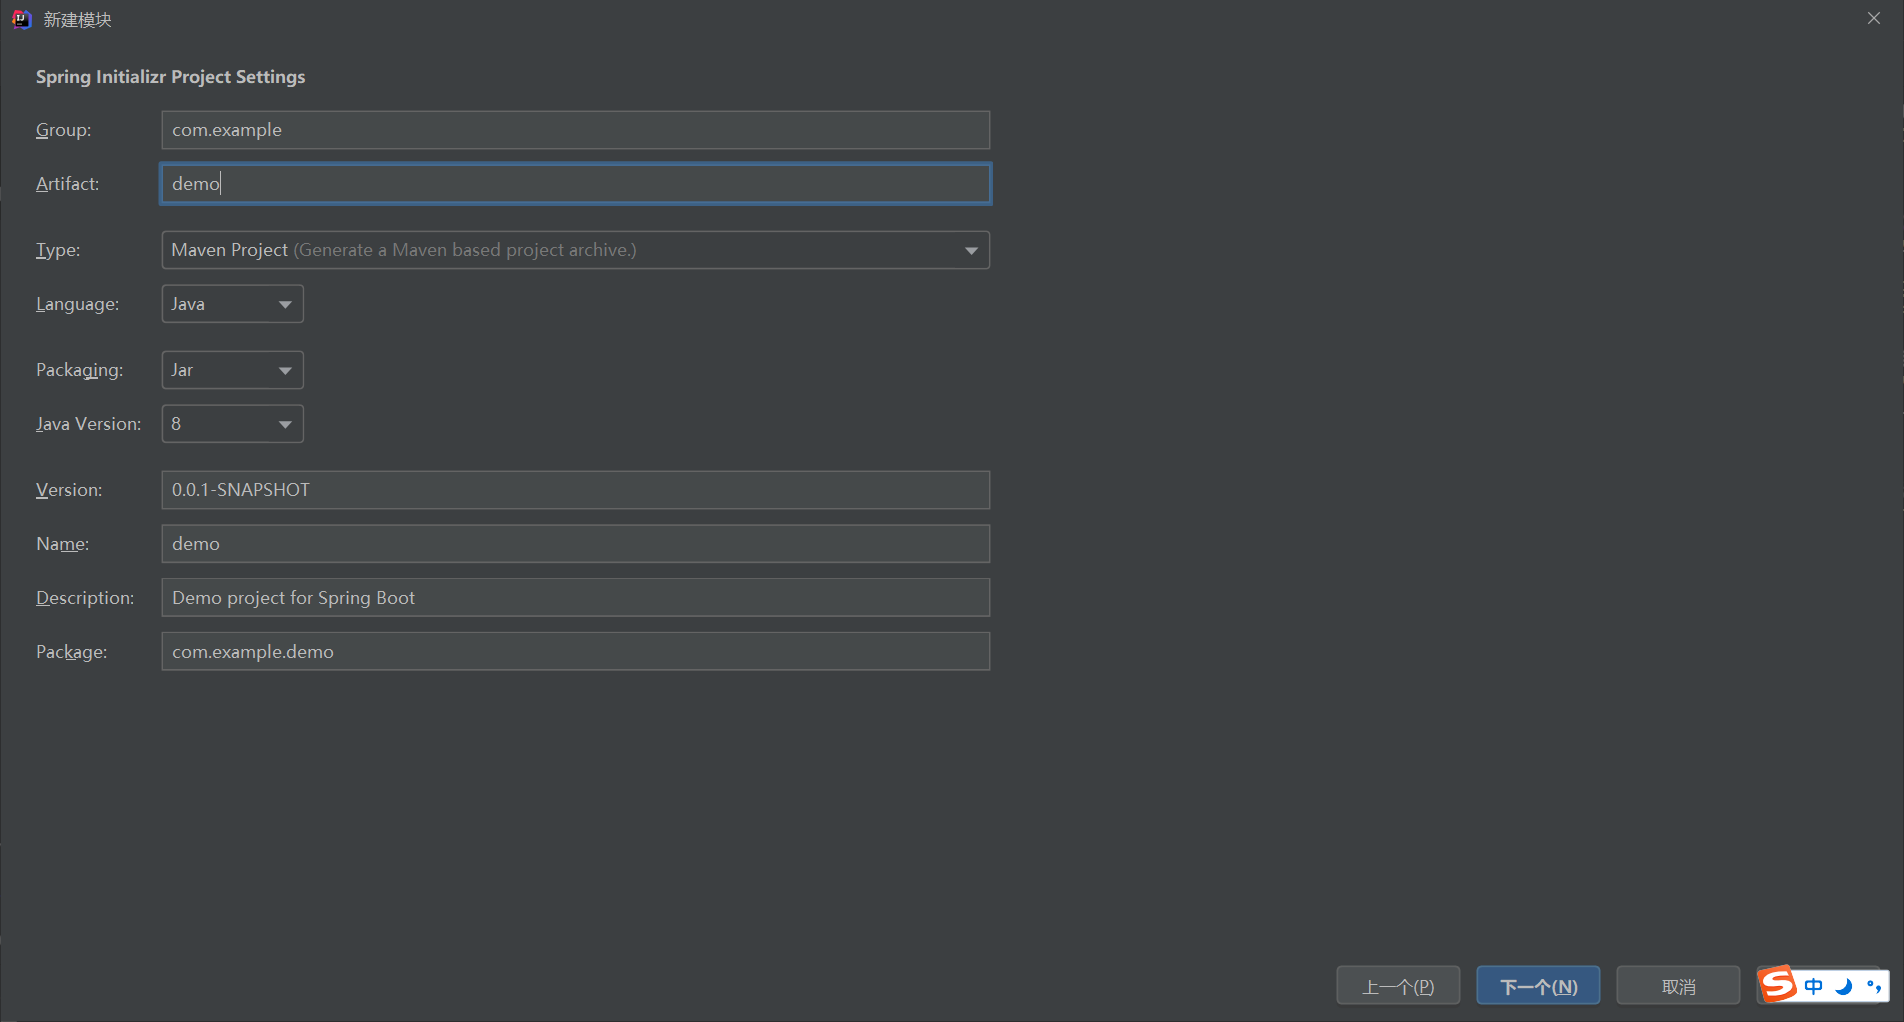
1、基于阿里云创建springboot项目
地址:https://start.aliyun.com
2、SpringBoot简介
springboot是由Pivotal团队提供的全新框架,其设计目的是用来简化spring应用的初始搭建以及开发过程
springboot程序缺点:
- 依赖设置繁琐
- 配置繁琐
springboot程序优点:
- 起步依赖(简化依赖配置)
- 自动配置(简化常用工程相关配置)
- 辅助功能(内置服务,......)
3、常见问题
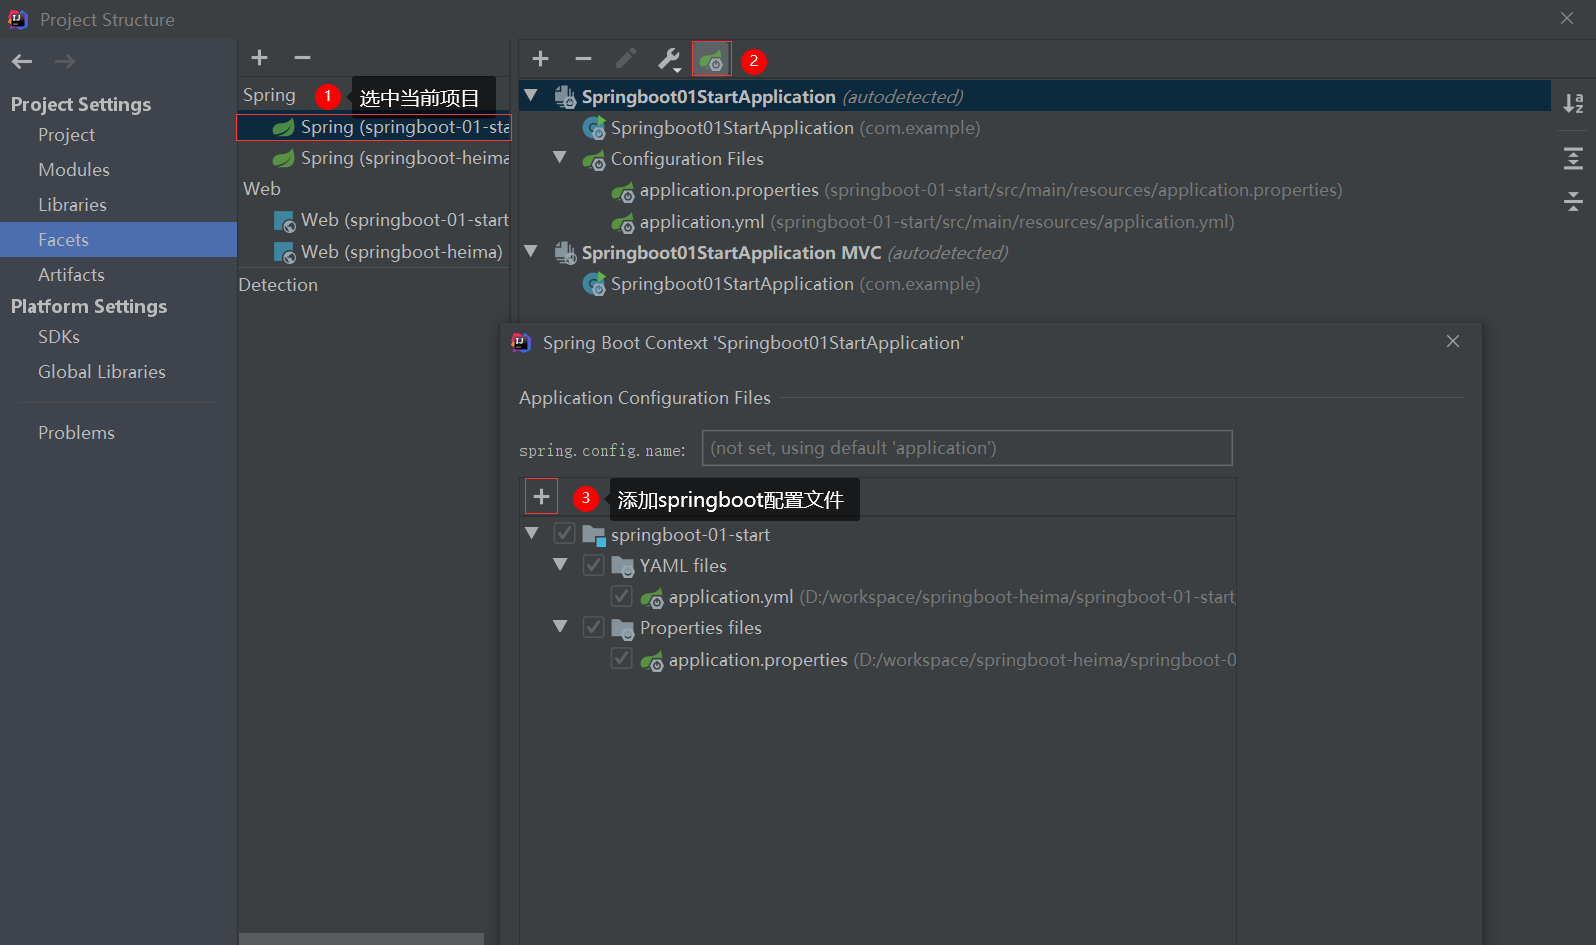
1、创建的springboot配置文件没有提示功能?
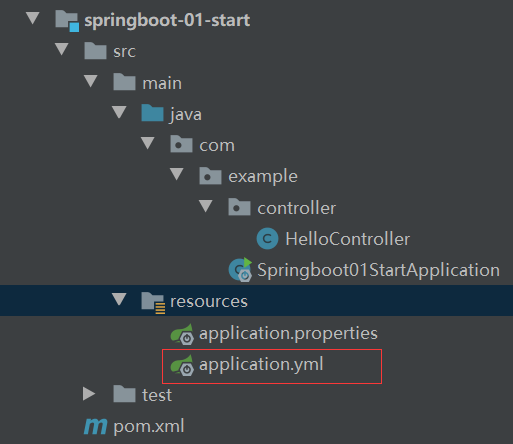
如果和上图所示的图标不一样的话,可以采用下面的方法将指定文件指定为springboot配置文件。
4、yaml格式
# 普通类型
name: zhangsan
age: 21
isTrue: true
birthday: 2021-10-01
# 数组-多行
likes_1:
  - game
  - sleep
  - music
# 数组-行内
likes_2: [game, sleep, music]
# 对象-多行
person_1:
  name: ${name} # 引用上面的普通类型数据
  age: ${age}
# 对象-行内
person_2: {name: zhangsan, age: 21}
# 对象数组-多行
personList_1:
  -
    name: ${name}
    age: ${age}
  -
    name: lisi
    age: 20
# 对象数组-行内
personList_2: [{name: zhangsan, age: 21}, {name: lisi, age: 20}]
注意:
如果属性值中出现转义字符,需要使用双引号包裹。例:lesson: "spring\tboot\nlesson"
5、读取yaml数据
package com.example.controller;

import org.springframework.beans.factory.annotation.Value;
import org.springframework.web.bind.annotation.RequestMapping;
import org.springframework.web.bind.annotation.RestController;

/**
 * @author admin
 */
@RestController
public class HelloController {

    /**
     * 读取普通数据
     */
    @Value("${name}")
    private String name;

    /**
     * 读取对象中的数据
     */
    @Value("${person_1.name}")
    private String personName;

    /**
     * 读取数组中的数据
     */
    @Value("${likes_1[0]}")
    private String like;

    /**
     * 读取对象数组中的数据
     */
    @Value("${personList_1[0].name}")
    private String personArrayName;

    @RequestMapping("/hello")
    public String hello(){
        System.out.println(name);
        System.out.println(personName);
        System.out.println(like);
        System.out.println(personArrayName);
        return "hello,springboot!";
    }
}
6、使用Environment获取配置文件中的值
package com.example.controller;

import org.springframework.beans.factory.annotation.Autowired;
import org.springframework.beans.factory.annotation.Value;
import org.springframework.core.env.Environment;
import org.springframework.web.bind.annotation.RequestMapping;
import org.springframework.web.bind.annotation.RestController;

/**
 * @author admin
 */
@RestController
public class HelloController {

    @Autowired
    private Environment environment;

    @RequestMapping("/hello")
    public String hello(){
        System.out.println(environment.getProperty("name"));
        System.out.println(environment.getProperty("person_1.name"));
        System.out.println(environment.getProperty("likes_1[0]"));
        System.out.println(environment.getProperty("personList_1[0].name"));
        return "hello,springboot!";
    }
}
7、使用@ConfigurationProperties读取yaml配置文件
application.yml
# 创建一个类用于封装下面的数据,由spring帮我们去加载数据到对象中
jdbc:
  driver: com.mysql.cj.jdbc.Driver
  url: jdbc:mysql://localhost:3306/test?characterEncoding=utf8&useSSL=true&serverTimezone=UTC
  username: root
  password: 123456
Jdbc.java
package com.example.pojo;

import org.springframework.boot.context.properties.ConfigurationProperties;
import org.springframework.stereotype.Component;

/**
 * 1. 定义数据模型封装yaml文件中对应的数据
 * 2. 定义为spring管控的bean
 * 3. 指定加载的数据
 * @author admin
 */
@Component
@ConfigurationProperties(prefix = "jdbc")
public class Jdbc {
    private String driver;
    private String url;
    private String username;
    private String password;

    @Override
    public String toString() {
        return "Jdbc{" +
                "driver='" + driver + '\'' +
                ", url='" + url + '\'' +
                ", username='" + username + '\'' +
                ", password='" + password + '\'' +
                '}';
    }

    public String getDriver() {
        return driver;
    }

    public void setDriver(String driver) {
        this.driver = driver;
    }

    public String getUrl() {
        return url;
    }

    public void setUrl(String url) {
        this.url = url;
    }

    public String getUsername() {
        return username;
    }

    public void setUsername(String username) {
        this.username = username;
    }

    public String getPassword() {
        return password;
    }

    public void setPassword(String password) {
        this.password = password;
    }
}
测试
package com.example;

import com.example.pojo.Jdbc;
import org.junit.jupiter.api.Test;
import org.springframework.beans.factory.annotation.Autowired;
import org.springframework.boot.test.context.SpringBootTest;

@SpringBootTest
class Springboot01StartApplicationTests {

    @Autowired
    private Jdbc jdbc;

    @Test
    void contextLoads() {
        System.out.println(jdbc);
    }

}
8、整合第三方技术
8.1、整合MyBatis
maven依赖
<dependency>
    <groupId>mysql</groupId>
    <artifactId>mysql-connector-java</artifactId>
    <scope>runtime</scope>
</dependency>
<dependency>
    <groupId>org.mybatis.spring.boot</groupId>
    <artifactId>mybatis-spring-boot-starter</artifactId>
    <version>2.2.0</version>
</dependency>
application.yml
spring:
  datasource:
    driver-class-name: com.mysql.cj.jdbc.Driver
    url: jdbc:mysql:///test?characterEncoding=utf8&useSSL=true&serverTimezone=UTC
    username: root
    password: 123456
UserDao.java
package com.example.dao;

import com.example.pojo.User;
import org.apache.ibatis.annotations.Mapper;
import org.apache.ibatis.annotations.Select;

/**
 * @author admin
 */
@Mapper
public interface UserDao {

    /**
     * 根据id获取用户
     * @param id
     * @return
     */
    @Select("select * from user where id=#{id}")
    User getUserById(int id);
}
测试
package com.example;

import com.example.dao.TestDao;
import com.example.dao.UserDao;
import com.example.pojo.User;
import org.junit.jupiter.api.Test;
import org.springframework.beans.factory.annotation.Autowired;
import org.springframework.boot.test.context.SpringBootTest;

@SpringBootTest
class Springboot02IntegrationApplicationTests {

    @Autowired
    private UserDao userDao;

    @Test
    public void testGetUserById(){
        User user = userDao.getUserById(1);
        System.out.println(user);
    }
}
8.2、整合MyBatis-Plus
maven依赖
<!-- https://mvnrepository.com/artifact/com.baomidou/mybatis-plus-boot-starter -->
<dependency>
    <groupId>com.baomidou</groupId>
    <artifactId>mybatis-plus-boot-starter</artifactId>
    <version>3.4.2</version>
</dependency>
application.yml
spring:
  datasource:
    driver-class-name: com.mysql.cj.jdbc.Driver
    url: jdbc:mysql:///test?characterEncoding=utf8&useSSL=true&serverTimezone=UTC
    username: root
    password: 123456
UserDao.java
package com.example.dao;

import com.baomidou.mybatisplus.core.mapper.BaseMapper;
import com.example.pojo.User;
import org.apache.ibatis.annotations.Mapper;
import org.apache.ibatis.annotations.Select;

/**
 * @author admin
 */
@Mapper
public interface UserDao extends BaseMapper<User> {
}
测试
package com.example;

import com.example.dao.TestDao;
import com.example.dao.UserDao;
import com.example.pojo.User;
import org.junit.jupiter.api.Test;
import org.springframework.beans.factory.annotation.Autowired;
import org.springframework.boot.test.context.SpringBootTest;

@SpringBootTest
class Springboot02IntegrationApplicationTests {

    @Autowired
    private UserDao userDao;

    @Test
    public void  testSelectById(){
        User user = userDao.selectById(1);
        System.out.println(user);
    }
}
8.3、整合Druid
maven依赖
<!-- https://mvnrepository.com/artifact/com.alibaba/druid-spring-boot-starter -->
<dependency>
    <groupId>com.alibaba</groupId>
    <artifactId>druid-spring-boot-starter</artifactId>
    <version>1.2.6</version>
</dependency>
application.yml
# 使用druid数据源方式一
#spring:
#  datasource:
#    driver-class-name: com.mysql.cj.jdbc.Driver
#    url: jdbc:mysql:///test?characterEncoding=utf8&useSSL=true&serverTimezone=UTC
#    username: root
#    password: 123456
#    type: com.alibaba.druid.pool.DruidDataSource
# 使用druid数据源方式二
spring:
  datasource:
    druid:
      driver-class-name: com.mysql.cj.jdbc.Driver
      url: jdbc:mysql:///test?characterEncoding=utf8&useSSL=true&serverTimezone=UTC
      username: root
      password: 123456
9、MyBatis-Plus实现service层
UserService.java
package com.example.service;

import com.baomidou.mybatisplus.extension.service.IService;
import com.example.pojo.User;

/**
 * @author admin
 */
public interface UserService extends IService<User> {
}
UserServiceImpl.java
package com.example.service.impl;

import com.baomidou.mybatisplus.extension.service.impl.ServiceImpl;
import com.example.dao.UserDao;
import com.example.pojo.User;
import com.example.service.UserService;
import org.springframework.stereotype.Service;

/**
 * @author admin
 */
@Service
public class UserServiceImpl extends ServiceImpl<UserDao, User> implements UserService {
}
测试
package com.example;

import com.example.pojo.User;
import com.example.service.UserService;
import org.junit.jupiter.api.Test;
import org.springframework.beans.factory.annotation.Autowired;
import org.springframework.boot.test.context.SpringBootTest;

@SpringBootTest
class Springboot02IntegrationApplicationTests {

    @Autowired
    private UserService userService;

    @Test
    void testGetById(){
        User user = userService.getById(1);
        System.out.println(user);
    }
}
-------------------------------------------
个性签名:独学而无友,则孤陋而寡闻。做一个灵魂有趣的人!
如果觉得这篇文章对你有小小的帮助的话,记得在右下角点个“推荐”哦,博主在此感谢!
万水千山总是情,打赏一分行不行,所以如果你心情还比较高兴,也是可以扫码打赏博主,哈哈哈(っ•̀ω•́)っ✎⁾⁾!

 浙公网安备 33010602011771号