
Mybatis笔记
声明:本文是狂神说的Mybatis课程的笔记
1、简介
(1)什么是Mybatis
-
MyBatis 是一款优秀的持久层框架
-
它支持自定义 SQL、存储过程以及高级映射
-
MyBatis 免除了几乎所有的 JDBC 代码以及设置参数和获取结果集的工作
-
MyBatis 可以通过简单的 XML 或注解来配置和映射原始类型、接口和 Java POJO(Plain Old Java Objects,普通老式 Java 对象)为数据库中的记录
-
MyBatis 本是apache的一个开源项目iBatis, 2010年这个项目由apache software foundation 迁移到了google code,并且改名为MyBatis 。2013年11月迁移到Github。
(2)如何获得Mybatis
-
1 maven仓库 2 3 <!-- https://mvnrepository.com/artifact/org.mybatis/mybatis --> 4 <dependency> 5 <groupId>org.mybatis</groupId> 6 <artifactId>mybatis</artifactId> 7 <version>3.5.7</version> 8 </dependency> -
Github:
-
中文文档:
(3)持久化
数据持久化。
-
持久化就是将程序的数据在持久状态和瞬时状态转化的过程
-
内存:断电即失
-
数据库(JDBC):io文件持久化
为什么需要持久化?
-
有一些对象,不能让它丢掉
-
内存贵
(4)持久层(Dao层)
-
完成持久工作的代码块
-
层界限十分明显
(5)为什么需要Mybatis
-
方便将数据存入数据库
-
传统的JDBC代码太复杂
-
优点
-
简单易学
-
灵活
-
sql和代码的分离,提高了可维护性
-
提供映射标签,支持对象与数据库的orm字段关系映射
-
提供对象关系映射标签,支持对象关系组建维护
-
提供xml标签,支持编写动态sql
-
2、第一个Mybatis程序
(1)搭建环境
①创建数据库和表
CREATE DATABASE `mybatis`;
USE `mybatis`;
CREATE TABLE `user`(
`id` INT(20) PRIMARY KEY,
`name` VARCHAR(30) DEFAULT NULL,
`pwd` VARCHAR(30) DEFAULT NULL
)ENGINE=INNODB DEFAULT CHARSET=utf8;
INSERT INTO `user`(`id`,`name`,`pwd`) VALUES
(1,'admin','123456'),
(2,'user','123456'),
(3,'user2','123456');
②新建项目
i.新建普通的maven项目
ii.删除src目录
iii.导入相关依赖
<!--导入依赖-->
<dependencies>
    <!--mysql驱动-->
    <dependency>
        <groupId>mysql</groupId>
        <artifactId>mysql-connector-java</artifactId>
        <version>5.1.47</version>
    </dependency>
    <!--Mybatis-->
    <dependency>
        <groupId>org.mybatis</groupId>
        <artifactId>mybatis</artifactId>
        <version>3.5.7</version>
    </dependency>
    <!--Junit-->
    <dependency>
        <groupId>junit</groupId>
        <artifactId>junit</artifactId>
        <version>4.13.1</version>
    </dependency>
</dependencies>
(2)创建一个模块
①编写mybatis的核心配置文件
<?xml version="1.0" encoding="UTF-8" ?>
<!DOCTYPE configuration
PUBLIC "-//mybatis.org//DTD Config 3.0//EN"
"http://mybatis.org/dtd/mybatis-3-config.dtd">
<configuration>
<environments default="development">
<environment id="development">
<transactionManager type="JDBC"/>
<dataSource type="POOLED">
<property name="driver" value="com.mysql.jdbc.Driver"/>
<property name="url" value="jdbc:mysql://localhost:3306/mybatis?useSSL=true&useUnicode=true&characterEncoding=UTF-8"/>
<property name="username" value="root"/>
<property name="password" value="12345678"/>
</dataSource>
</environment>
</environments>
</configuration>
②编写mybatis的工具类
1 //SqlSessionFactory → SqlSession
2 public class MybatisUtil {
3
4 private static SqlSessionFactory sqlSessionFactory;
5
6 //获取SqlSessionFactory对象
7 static {
8 try {
9 String resource = "mybatis-config.xml";
10 InputStream inputStream = Resources.getResourceAsStream(resource);
11 sqlSessionFactory = new SqlSessionFactoryBuilder().build(inputStream);
12 } catch (IOException e) {
13 e.printStackTrace();
14 }
15 }
16
17 //既然有了 SqlSessionFactory,顾名思义,我们可以从中获得 SqlSession 的实例
18 //SqlSession 提供了在数据库执行 SQL 命令所需的所有方法
19
20 public static SqlSession getSqlSession(){
21 return sqlSessionFactory.openSession();
22 }
23 }
(3)编写代码
①实体类
1 //实体类
2 public class User {
3
4 private int id;
5 private String name;
6 private String pwd;
7
8 public User() {
9 }
10
11 public User(int id, String name, String pwd) {
12 this.id = id;
13 this.name = name;
14 this.pwd = pwd;
15 }
16
17 public int getId() {
18 return id;
19 }
20
21 public void setId(int id) {
22 this.id = id;
23 }
24
25 public String getName() {
26 return name;
27 }
28
29 public void setName(String name) {
30 this.name = name;
31 }
32
33 public String getPwd() {
34 return pwd;
35 }
36
37 public void setPwd(String pwd) {
38 this.pwd = pwd;
39 }
40 }
②Dao接口
1 public interface UserDao {
2     List<User> getUserList();
3 }
③接口实现类由原来的UserDaoImpl转变为一个Mapper配置文件
<?xml version="1.0" encoding="UTF-8" ?>
<!DOCTYPE mapper
        PUBLIC "-//mybatis.org//DTD Mapper 3.0//EN"
        "http://mybatis.org/dtd/mybatis-3-mapper.dtd">
<mapper namespace="com.my.dao.UserDao">
    <select id="getUserList" resultType="com.my.pojo.User">
        select * from user
    </select>
</mapper>
(4)测试
JUnit测试。
1 @Test
2 public void test(){
3 //1、获得SqlSession对象
4 SqlSession sqlSession = MybatisUtil.getSqlSession();
5
6 //方式一:getWrapper
7 UserDao userDao = sqlSession.getMapper(UserDao.class);
8 List<User> userList = userDao.getUserList();
9
10 //方式二
11 //List<User> userList = sqlSession.selectList("com.my.dao.UserDao.getUserList");
12
13 for(User user:userList){
14 System.out.println(user);
15 }
16
17 //关闭sqlSession
18 sqlSession.close();
19 }
注意:
org.apache.ibatis.binding.BindingException: Type interface com.my.dao.UserDao is not known to the MapperRegistry
出现该异常是因为没有在mybatis-config.xml核心配置文件中将UserMapper.xml进行注册
java.lang.ExceptionInInitializerError
Caused by: org.apache.ibatis.exceptions.PersistenceException:
Error building SqlSession.
The error may exist in com/my/dao/UserMapper.xml
这是由于maven的约定大于配置,从而出现我们写的配置文件无法被导出或生效,解决方案是在pom.xml中进行如下配置:
<!--在build中配置Resource来防止我们资源导出失败的问题-->
<build>
    <resources>
        <resource>
            <directory>src/main/resources</directory>
            <includes>
                <include>**/*.properties</include>
                <include>**/*.xml</include>
            </includes>
            <filtering>true</filtering>
        </resource>
        <resource>
            <directory>src/main/java</directory>
            <includes>
                <include>**/*.properties</include>
                <include>**/*.xml</include>
            </includes>
            <filtering>true</filtering>
        </resource>
    </resources>
</build>
出现1 字节的 UTF-8 序列的字节 1 无效问题
3、CRUD
(1)namespace
namespace中的包名要和 dao/mapper接口的包名一致。
(2)selelct
-
id: 就是对应的namespace中的方法名
-
resultType:Sq|语句执行的返回值
-
parameterType :参数类型
①编写接口
1 //查询全部用户
2 List<User> getUserList();
3 //根据id查询用户
4 User getUserById(int id);
②编写对应的mapper中的sq|语句
<!--查询全部用户-->
<select id="getUserList" resultType="com.my.pojo.User">
    select * from user
</select>
<!--根据id查询用户-->
<select id="getUserById" parameterType="int" resultType="com.my.pojo.User">
    select * from user where id = #{id}
</select>
③测试
1 @Test
2 public void test(){
3 //1、获得SqlSession对象
4 SqlSession sqlSession = MybatisUtil.getSqlSession();
5
6 UserDao userDao = sqlSession.getMapper(UserDao.class);
7 List<User> userList = userDao.getUserList();
8
9 for(User user:userList){
10 System.out.println(user);
11 }
12
13 sqlSession.close();
14 }
15
16 @Test
17 public void testSelect(){
18 SqlSession sqlSession = MybatisUtil.getSqlSession();
19 UserDao userDao = sqlSession.getMapper(UserDao.class);
20 User user = userDao.getUserById(1);
21 System.out.println(user);
22 sqlSession.close();
23 }
(3)insert
①编写接口
1 //插入数据
2 int insertUser(User user);
②编写对应的mapper中的sq|语句
<!--插入数据-->
<insert id="insertUser" parameterType="com.my.pojo.User">
    insert into user (id,name,pwd)
    values (#{id},#{name},#{pwd});
</insert>
③测试
 1 @Test
 2 public void testInsert(){
 3     SqlSession sqlSession = MybatisUtil.getSqlSession();
 4     UserDao userDao = sqlSession.getMapper(UserDao.class);
 5     int count = userDao.insertUser(new User(4,"zl","123456"));
 6     if(count>0){
 7         System.out.println("插入成功!");
 8     }
 9     //提交事务
10     sqlSession.commit();
11     sqlSession.close();
12 }
(4)update
①编写接口
1 //更新数据
2 int updateUser(User user);
②编写对应的mapper中的sq|语句
<!--更新数据-->
<update id="updateUser" parameterType="com.my.pojo.User">
    update user
    set name = #{name},pwd = #{pwd}
    where id = #{id};
</update>
③测试
 1 @Test
 2 public void testUpdate(){
 3     SqlSession sqlSession = MybatisUtil.getSqlSession();
 4     UserDao userDao = sqlSession.getMapper(UserDao.class);
 5     int count = userDao.updateUser(new User(4,"wu","12345678"));
 6     if(count>0){
 7         System.out.println("更新成功!");
 8     }
 9     //提交事务
10     sqlSession.commit();
11     sqlSession.close();
12 }
(5)delete
①编写接口
1 //删除数据
2 int deleteUserById(int id);
②编写对应的mapper中的sq|语句
<!--删除数据-->
<delete id="deleteUserById" parameterType="int">
    delete from user where id = #{id}
</delete>
③测试
 1 @Test
 2 public void testDelete(){
 3     SqlSession sqlSession = MybatisUtil.getSqlSession();
 4     UserDao userDao = sqlSession.getMapper(UserDao.class);
 5     int count = userDao.deleteUserById(4);
 6     if(count>0){
 7         System.out.println("删除成功!");
 8     }
 9     //提交事务
10     sqlSession.commit();
11     sqlSession.close();
12 }
4、Map
如果我们的实体类或数据库中的表,字段或者参数过多,应当考虑使用Map或者注解。
-
Map传递参数,直接在sql中取出key即可
-
对象传递参数,直接在sql中取对象的属性即可
-
只有一个基本类型参数的情况下,可以直接在sql中取到
1 //根据id查询用户
2 User getUserById2(Map<String,Object> map);
<!--根据id查询用户-->
<select id="getUserById2" parameterType="map" resultType="com.my.pojo.User">
    select * from user where id = #{userId} and name = #{userName}
</select>
 1 @Test
 2 public void testSelect2(){
 3     SqlSession sqlSession = MybatisUtil.getSqlSession();
 4     UserDao userDao = sqlSession.getMapper(UserDao.class);
 5     Map<String,Object> map = new HashMap<String,Object>();
 6     map.put("userId",1);
 7     map.put("userName","admin");
 8     User user = userDao.getUserById2(map);
 9     System.out.println(user);
10     sqlSession.close();
11 }
5、模糊查询
下面的方式都是为了防止sql注入。
①Java代码执行的时候,传递通配符% %
<!--模糊查询-->
<select id="getUserLike" parameterType="String" resultType="com.my.pojo.User">
    select * from user where name like #{value}
</select>
1 List<User> userList = userDao.getUserLike("%u%");
②在Sql拼接中使用通配符
<!--模糊查询-->
<select id="getUserLike" parameterType="String" resultType="com.my.pojo.User">
    select * from user where name like "%"#{value}"%"
</select>
1 List<User> userList = userDao.getUserLike("u");
③使用sql的concat函数
<!--模糊查询-->
<select id="getUserLike" parameterType="String" resultType="com.my.pojo.User">
    select * from user where name like concat('%',#{value},'%')
</select>
1 List<User> userList = userDao.getUserLike("u");
6、配置解析
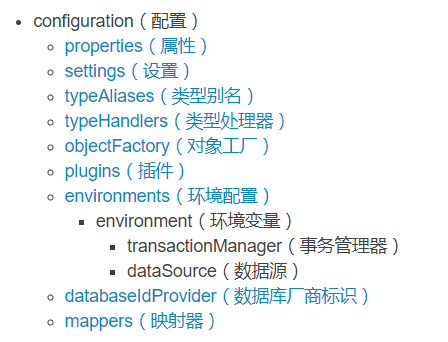
(1)核心配置文件
MyBatis 的配置文件包含了会深深影响 MyBatis 行为的设置和属性信息。 配置文档的顶层结构如下:
(2)环境配置(environments)
-
MyBatis 可以配置成适应多种环境
-
尽管可以配置多个环境,但每个 SqlSessionFactory 实例只能选择一种环境
-
Mybatis默认的事务管理器是JDBC,连接池:POOLED
-
每个数据库对应一个 SqlSessionFactory 实例
<configuration>
    <environments default="test">
        <environment id="development">
            ...
        </environment>
        <environment id="test">
            ...
        </environment>
    </environments>
</configuration>
(3)属性(properties)
我们可以通过properties属性来实现引用配置文件。
这些属性可以在外部进行配置,并可以进行动态替换。你既可以在典型的 Java 属性文件中配置这些属性,也可以在 properties 元素的子元素中设置。
①编写db.properties配置文件
driver=com.mysql.jdbc.Driver
url=jdbc:mysql://localhost:3306/mybatis?useSSL=true&useUnicode=true&characterEncoding=utf-8
username=root
password=12345678
②编写核心配置文件
<configuration>
<!--引入外部配置文件-->
<properties resource="db.properties">
<property name="username" value="root"/>
<property name="password" value="123"/>
</properties>
<environments default="development">
<environment id="development">
<transactionManager type="JDBC"/>
<dataSource type="POOLED">
<property name="driver" value="${driver}"/>
<property name="url" value="${url}"/>
<property name="username" value="${username}"/>
<property name="password" value="${password}"/>
</dataSource>
</environment>
</environments>
<!--每一个Mapper.xml都需要在Mybatis核心配置文件中注册-->
<mappers>
<mapper resource="com/my/dao/UserMapper.xml"/>
</mappers>
</configuration>
-
可以直接引入外部文件
-
可以在其中增加一些属性配置
-
如果两个文件有同一个字段,优先使用外部配置文件的
(4)类型别名(typeAliases)
-
类型别名可为 Java 类型设置一个缩写名字
-
仅用于 XML 配置,意在降低冗余的全限定类名书写
-
实体类较少的时候,使用第一种方式
-
实体类较多的时候,使用第二种方式
①指定具体的实体类
<!--在核心配置文件mybatis-config.xml-->
<!--给实体类起别名-->
<typeAliases>
    <typeAlias type="com.my.pojo.User" alias="userEntity"/>
</typeAliases>
<!--在UserMapper.xml中使用-->
<select id="getUserList" resultType="userEntity">
    select * from user
</select>
②指定一个包名
MyBatis 会在包名下面搜索需要的 Java Bean。在没有注解的情况下,会使用 Bean 的首字母小写的非限定类名来作为它的别名。若有注解,则别名为其注解值。
<!--在核心配置文件mybatis-config.xml-->
<typeAliases>
    <package name="com.my.pojo"/>
</typeAliases>
<!--在UserMapper.xml中使用-->
<select id="getUserList" resultType="user">
    select * from user
</select>
1 <!--存在@Alias注解-->
2 @Alias("Users")
3 public class User {}
<!--在UserMapper.xml中使用-->
<select id="getUserList" resultType="Users">
    select * from user
</select>
(5)设置(settings)
这是 MyBatis 中极为重要的调整设置,它们会改变 MyBatis 的运行时行为。
比较重要的几个设置:
| 设置名 | 描述 | 有效值 | 默认值 |
|---|---|---|---|
| cacheEnabled | 全局性地开启或关闭所有映射器配置文件中已配置的任何缓存。 | true |false | true |
| lazyLoadingEnabled | 延迟加载的全局开关。当开启时,所有关联对象都会延迟加载。 特定关联关系中可通过设置 fetchType 属性来覆盖该项的开关状态。 |
true |false | false |
| logImpl | 指定 MyBatis 所用日志的具体实现,未指定时将自动查找。 | SLF4J |LOG4J |LOG4J2 |JDK_LOGGING |COMMONS_LOGGING |STDOUT_LOGGING |NO_LOGGING | 未设置 |
<settings>
  <setting name="cacheEnabled" value="true"/>
  <setting name="lazyLoadingEnabled" value="true"/>
  <setting name="logImpl" value="LOG4J2"/>
  <setting name="multipleResultSetsEnabled" value="true"/>
  <setting name="useColumnLabel" value="true"/>
  <setting name="useGeneratedKeys" value="false"/>
  <setting name="autoMappingBehavior" value="PARTIAL"/>
  <setting name="autoMappingUnknownColumnBehavior" value="WARNING"/>
  <setting name="defaultExecutorType" value="SIMPLE"/>
  <setting name="defaultStatementTimeout" value="25"/>
  <setting name="defaultFetchSize" value="100"/>
  <setting name="safeRowBoundsEnabled" value="false"/>
  <setting name="mapUnderscoreToCamelCase" value="false"/>
  <setting name="localCacheScope" value="SESSION"/>
  <setting name="jdbcTypeForNull" value="OTHER"/>
  <setting name="lazyLoadTriggerMethods" value="equals,clone,hashCode,toString"/>
</settings>
(6)插件(plugins)
-
mybatis-generator-core
-
mybatis-plus
-
通用mapper
(7)映射器(mappers)
通过映射器(mappers)告诉 MyBatis 到哪里去找到这些SQL 映射语句。
①方式一:使用相对于类路径的资源引用【推荐】
<mappers>
    <mapper resource="com/my/dao/UserMapper.xml"/>
</mappers>
②方式二:使用class文件绑定注册
注意点:
-
-
-
接口和它的Mapper配置文件必须同名
-
接口和它的Mapper配置文件必须在同一个包下
-
-
<mappers>
    <mapper class="com.my.dao.UserMapper"/>
</mappers>
③方式三:使用扫描包进行注册绑定
注意点同方式二一样
<mappers>
    <package name="com.my.dao"/>
</mappers>
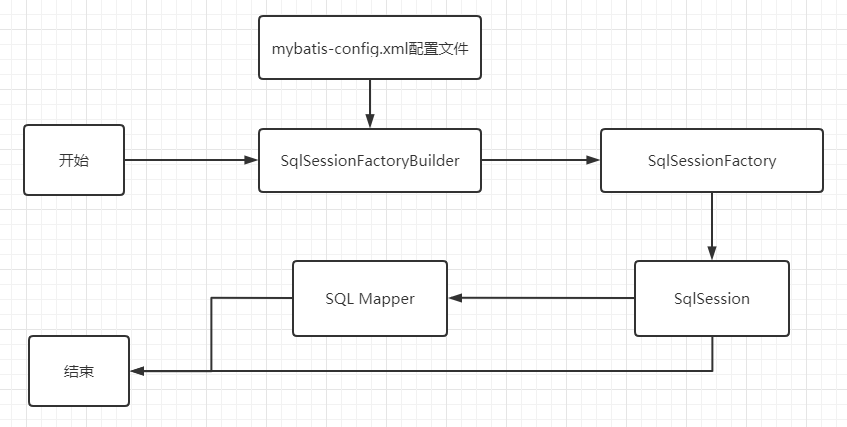
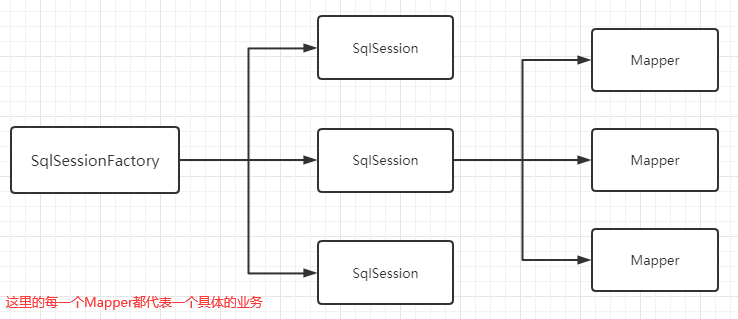
7、作用域(Scope)和生命周期
生命周期和作用域是至关重要的,因为错误的使用会导致非常严重的并发问题。
(1)SqlSessionFactoryBuilder
-
一旦创建了 SqlSessionFactory,就不再需要它了
-
实例的最佳作用域是方法作用域(也就是局部方法变量)
(2)SqlSessionFactory
-
可以想象为:数据库连接池
-
SqlSessionFactory 一旦被创建就应该在应用的运行期间一直存在,没有任何理由丢弃它或重新创建另一个实例
-
SqlSessionFactory 的最佳作用域是应用作用域
-
最简单的就是使用单例模式或者静态单例模式
(3)SqlSession
-
每个线程都应该有它自己的 SqlSession 实例
-
SqlSession 的实例不是线程安全的,因此是不能被共享的,所以它的最佳的作用域是请求或方法作用域
-
8、ResultMap结果集映射
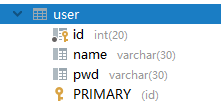
作用是为了解决属性名和字段名不一致的问题。
(1)问题
①实体类的属性
1 public class User {
2     private int id;
3     private String name;
4     private String password;
5 }
②表的字段名
③查询结果

④不灵活的解决方法,给字段起别名
select id,name,pwd as password from user where id = #{id}
(2)resultMap
-
resultMap元素是 MyBatis 中最重要最强大的元素 -
ResultMap 的设计思想是,对简单的语句做到零配置,对于复杂一点的语句,只需要描述语句之间的关系就行了
-
即使没有显示配置resultMap,MyBatis也 会在幕后自动创建一个
ResultMap,再根据属性名来映射列到 JavaBean 的属性上 -
ResultMap的优秀之处—你完全可以不用显式地配置它们
<!--结果集映射-->
<resultMap id="UserMap" type="com.my.pojo.User">
    <!--column数据库字段名,property实体类属性名-->
    <result column="pwd" property="password"/>
</resultMap>

<select id="getUserById" parameterType="int" resultMap="UserMap">
    select id,name,pwd from user where id = #{id}
</select>
9、日志
(1)日志工厂
如果一个数据库操作,出现了异常,我们需要排错。日志就是最好的帮手。

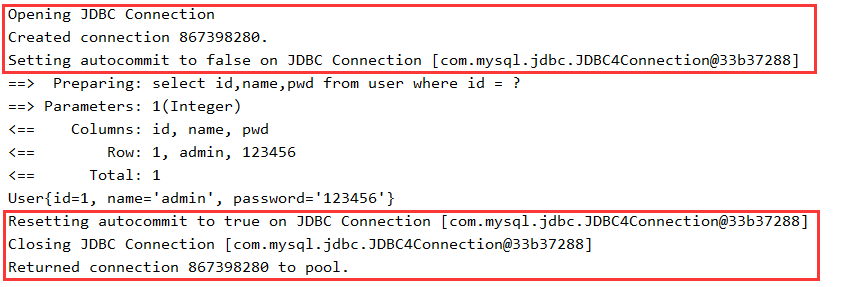
(2)STDOUT_LOGGING标准日志输出
<settings>
    <setting name="logImpl" value="STDOUT_LOGGING"/>
</settings>
(3)Log4j
-
Log4j是Apache的一个开源项目,通过使用Log4j,我们可以控制日志信息输送的目的地是控制台、文件、GUI组件
-
我们也可以控制每一条日志的输出格式
-
通过定义每一条日志信息的级别,我们能够更加细致地控制日志的生成过程
-
可以通过一个配置文件来灵活地进行配置,而不需要修改应用的代码
①导入logj4的包
<!--Log4j-->
<dependency>
    <groupId>log4j</groupId>
    <artifactId>log4j</artifactId>
    <version>1.2.17</version>
</dependency>
②log4j.properties
#将等级为DEBUG的日志信息输出到console ile1这网个日的地,console和file的定义在下面的代码
1og4j.rootLogger=DEBUG,console,file

#控制台输出的相关设置
1og4j.appender.console = org.apache.1og4j.ConsoleAppender
1og4j.appender.console.Target = System.out
1og4j.appender.console.Threshold=DEBUG
1og4j.appender.console.1ayout = org.apache.1og4j.PatternLayout
1og4j.appender.console.layout.ConversionPattern=[%c]-%m%n

#文件输出的相关设置
1og4j.appender.file = org.apache.log4j.RollingFileAppender
1og4j.appender.file.File=./1og/my.1og
1og4j.appender.file.MaxFileSize=10mb
1og4j.appender.file.Threshold=DEBUG
1og4j.appender.file.layout=org.apache.1og4j.PatternLayout
1og4j.appender.file.layout.ConversionPattern=[%p][%d{yy-MM-dd}][%c]%m%n

#日志输出级别
1og4j.logger.org.mybatis=DEBUG
1og4j.logger.java.sq1=DEBUG
1og4j.logger.java.sq1.Statement=DEBUG
1og4j.logger.java.sq1.ResultSet=DEBUG
1og4j.logger.java.sq1.PreparedStatement=DEBUG
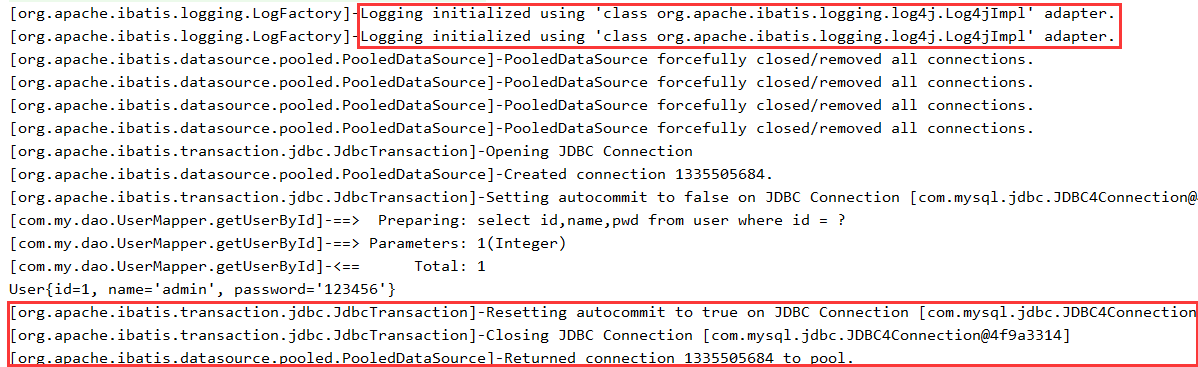
③配置log4j为日志
<settings>
    <setting name="logImpl" value="LOG4J"/>
</settings>
④测试
(4)简单使用
①在要使用log4j的类中,导入包org.apache.log4j.Logger
②日志对象,参数为当前类的class
1 static Logger logger = Logger.getLogger(UserTest.class);
③日志级别
1 logger.info("info:进入了testLog4j");
2 logger.debug("debug:进入了testLog4j");
3 logger.error("error:进入了testLog4j");
10、分页
使用分页是为了减少数据的处理量。
(1)使用Limit分页
语法:SELECT * from user limit startIndex,pageSize;
SELECT * from user limit 3; #[0,n]
(2)使用Mybatis实现分页
①接口
1 List<User> getUserByLimit(Map<String,Integer> map);
②Mapper.xml
<!--分页-->
<select id="getUserByLimit" parameterType="map" resultMap="UserMap">
    select * from user limit #{startIndex},#{pageSize}
</select>
③测试
 1 @Test
 2 public void testSelectByLimit(){
 3     SqlSession sqlSession = MybatisUtils.getSqlSession();
 4     UserMapper mapper = sqlSession.getMapper(UserMapper.class);
 5     Map<String,Integer> map = new HashMap<String,Integer>();
 6     map.put("startIndex",0);
 7     map.put("pageSize",2);
 8     List<User> userList = mapper.getUserByLimit(map);
 9     for (User user : userList) {
10         System.out.println(user);
11     }
12     sqlSession.close();
13 }
(3)RwoBounds分页
不使用SQL实现分页。
①接口
1 List<User> getUserByRowBounds();
②Mapper.xml
<!--分页2-->
<select id="getUserByRowBounds"  resultMap="UserMap">
    select * from user
</select>
③测试
 1 @Test
 2 public void testSelectByRwoBounds(){
 3     SqlSession sqlSession = MybatisUtils.getSqlSession();
 4     //RowBounds实现
 5     RowBounds rowBounds = new RowBounds(0,2);
 6     //通过Java代码层面实现分页
 7     List<User> userList = sqlSession.selectList("com.my.dao.UserMapper.getUserByRowBounds", null,rowBounds);
 8
 9     for (User user : userList) {
10         System.out.println(user);
11     }
12     sqlSession.close();
13 }
(4)分页插件
11、使用注解开发
(1)注解开发
使用注解来映射简单语句会使代码显得更加简洁,但对于稍微复杂一点的语句,Java 注解不仅力不从心,还会让你本就复杂的 SQL 语句更加混乱不堪。 因此,如果你需要做一些很复杂的操作,最好用 XML 来映射语句。
本质是反射机制,底层使用了动态代理。
①注解在接口上实现
1 @Select("select * from user")
2 List<User> getUserList();
②需要在核心配置文件中绑定接口
<!--绑定接口-->
<mappers>
    <mapper class="com.my.dao.UserMapper"/>
</mappers>
③测试
 1 @Test
 2 public void test(){
 3     SqlSession sqlSession = MybatisUtils.getSqlSession();
 4     //底层原理:使用了反射
 5     UserMapper mapper = sqlSession.getMapper(UserMapper.class);
 6     List<User> userList = mapper.getUserList();
 7     for (User user : userList) {
 8         System.out.println(user);
 9     }
10     sqlSession.close();
11 }
(2)设置自动提交
1 public static SqlSession getSqlSession(){
2     return sqlSessionFactory.openSession(true);
3 }
(3)CRUD
 1 @Select("select * from user where id = #{id}")
 2 User getUserById(@Param("id") int id);
 3
 4 @Insert("insert into user values(#{id},#{name},#{pwd})")
 5 int insertUser(User user);
 6
 7 @Update("update user set name = #{name},pwd = #{pwd} where id = #{id}")
 8 int updateUser(User user);
 9
10 @Delete("delete from user where id = #{id}")
11 int deleteUser(int id);
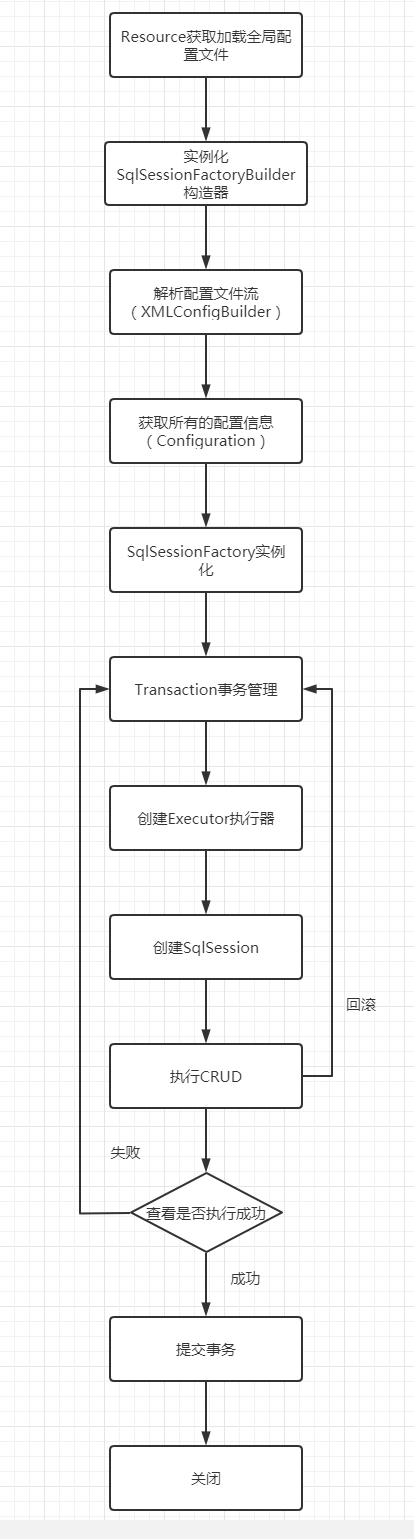
12、Mybatis执行流程剖析
13、Lombok
Lombok其实就是帮助我们编写getter或者equals方法的一个“工具”。其实他的魅力并不在于帮助我们简单的编写对应的getter或者更多的方法,还有一点在于,当我们的字段发生改变时,Lombok也会对相应的getter方法进行改变。
(1)使用步骤
①在IDEA中安装Lombok插件
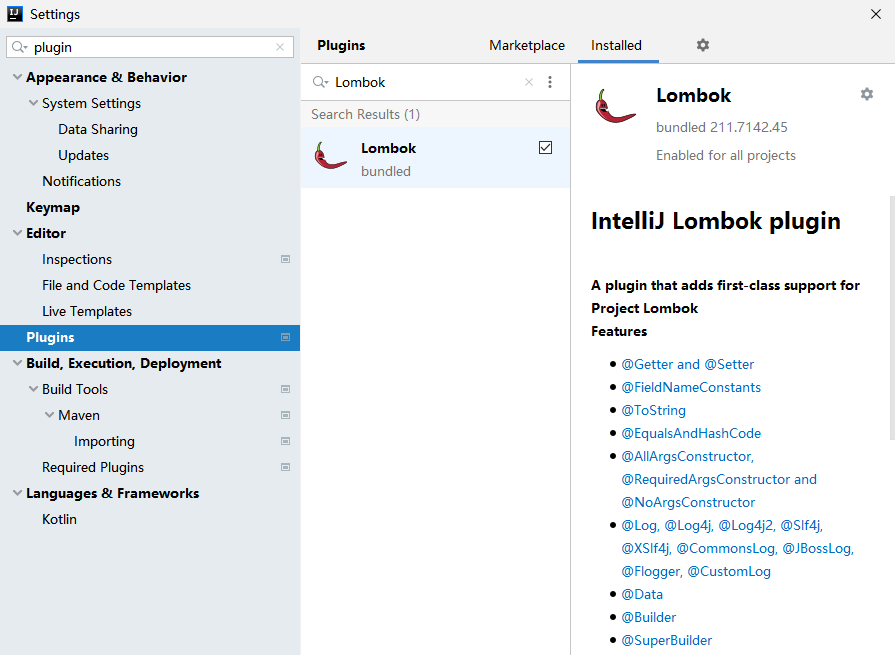
注意:
IDEA 2020最后一个版本已经内置了Lombok插件,SpringBoot 2.1.x之后的版本也在Starter中内置了Lombok依赖
②引入相应的maven包
<!--lombok-->
<dependency>
    <groupId>org.projectlombok</groupId>
    <artifactId>lombok</artifactId>
    <version>1.18.10</version>
</dependency>
③在实体类上加注解
1 @Data
2 @AllArgsConstructor
3 public class User {}
(2)常用注解说明
-
@NonNull:用在方法参数前,会自动对该参数进行非空校验,为空抛出NPE(NullPointerException)
-
@Cleanup:自动管理资源,用在局部变量之前,在当前变量范围内即将执行完毕退出前会清理资源,生成try-finally的代码关闭流
-
@Getter/@Setter:用在属性上,不用自己手写setter和getter方法,还可指定访问范围
-
@ToString:用在类上,可以自动复写toString方法
-
@EqualsAndHashCode:用在类上,自动生成equals方法和hashCode方法
-
@NoArgsConstructor,@RequiredArgsConstructor,@AllArgConstructor:用在类上,自动生成无参构造和使用所有参数的有参构造函数。
-
@Data:用在类上,相当于同时使用了@ToString、@EqualsAndHashCode、@Getter、@Setter和@RequiredArgsConstrutor这些注解,对POJO类十分有用。
-
@Value:用在类上,是@Data的不可变形式,相当于为属性添加final声明,只提供getter方法,而不提供setter方法。
-
@SneakyThrows:自动抛受检异常,而无需显示的方法上使用throws语句。
-
@Synchronized:用在方法上,将方法声明为同步的,并自动加锁。
-
@Getter(lazy=true):可以替代经典的Double Check Lock样板代码
14、多对一处理
(1)环境搭建
①创建teacher表和student表
CREATE TABLE `teacher`(
    `id` INT(10) NOT NULL,
    `name` VARCHAR(30) DEFAULT NULL,
     PRIMARY KEY(`id`)
)ENGINE=INNODB DEFAULT CHARSET=utf8;

INSERT INTO teacher(`id` ,`name`) VALUES(1,'于老师');

CREATE TABLE `student`(
    `id` INT(10) NOT NULL,
    `name` VARCHAR(30) DEFAULT NULL,
    `tid` INT(10) DEFAULT NULL,
    PRIMARY KEY(`id`),
    KEY `fktid` (`tid`),
    CONSTRAINT `fktid` FOREIGN KEY (tid)  REFERENCES `teacher` (`id`)
)ENGINE=INNODB DEFAULT CHARSET=utf8;

INSERT INTO `student`(`id`,`name`,`tid`) VALUES('1','小明','1');
INSERT INTO `student`(`id`,`name`,`tid`) VALUES('2','小今','1');
INSERT INTO `student`(`id`,`name`,`tid`) VALUES('3','小后','1');
②创建实体类
 1 @Data
 2 public class Teacher {
 3     private int id;
 4     private String name;
 5 }
 6
 7 @Data
 8 public class Student {
 9     private int id;
10     private String name;
11     private Teacher teacher;
12 }
③新建Mapper接口
1 public interface StudentMapper {}
2 public interface TeacherMapper {}
④建立Mapper.xml文件
在resources目录下建立StudentMapper.xml和TeacherMapper.xml。
⑤在核心配置文件中绑定注册我们的Mapper接口或者文件
1 <mappers>
2     <mapper resource="StudentMapper.xml"/>
3     <mapper resource="TeacherMapper.xml"/>
4 </mappers>
(2)多对一处理
①按照查询嵌套处理
<!--查询学生以及该学生对应的老师的信息,子查询
        1.查询学生的信息
        2.根据tid查询老师的信息
    -->
<resultMap id="StudentTeacher" type="Student">
    <!--复杂的属性需要单独处理
            association:对象
            collection:集合
        -->
    <association property="teacher" column="tid" javaType="Teacher" select="getTeacher"/>
</resultMap>

<select id="getStudentAndTeacher" resultMap="StudentTeacher">
    select * from student
</select>

<select id="getTeacher" resultType="Teacher">
    select * from teacher where id = #{id}
</select>
②按照结果嵌套处理
<select id="getStudentAndTeacher2" resultMap="StudentTeacher2">
    select s.id as sid,s.name as sname,t.name as tname,s.tid
    from student s,teacher t
    where s.tid = t.id
</select>

<resultMap id="StudentTeacher2" type="Student">
    <result property="id" column="sid"/>
    <result property="name" column="sname"/>
    <association property="teacher" javaType="Teacher">
        <result property="id" column="tid"/>
        <result property="name" column="tname"/>
    </association>
</resultMap>
(3)一对多处理
比如一个老师拥有多个学生。对于老师而言,是一对多的关系。
①实体类
 1 @Data
 2 public class Student {
 3     private int id;
 4     private String name;
 5     private int tid;
 6 }
 7
 8 @Data
 9 public class Teacher {
10     private int id;
11     private String name;
12     //一个老师拥有多个学生
13     private List<Student> studentList;
14 }
②按照结果嵌套处理
<!--按结果嵌套-->
<select id="getTeacherAndStudents" resultMap="TeacherStudent">
    select s.id sid,s.name sname,t.id tid,t.name tname
    from student s,teacher t
    where s.tid = t.id and t.id = #{id}
</select>

<resultMap id="TeacherStudent" type="Teacher">
    <result property="id" column="tid"/>
    <result property="name" column="tname"/>
    <!--javaType:指定属性的类型    ofType:指定集合中的泛型信息-->
    <collection property="studentList" ofType="Student">
        <result property="id" column="sid"/>
        <result property="name" column="sname"/>
        <result property="tid" column="tid"/>
    </collection>
</resultMap>
③按查询嵌套处理
<!--按查询嵌套-->
<select id="getTeacherAndStudents2" resultMap="TeacherStudent2">
    select * from teacher where id = #{id}
</select>

<resultMap id="TeacherStudent2" type="Teacher">
    <result property="id" column="id"/>
    <result property="name" column="name"/>
    <collection column="id" property="studentList" javaType="ArrayList" ofType="Student" select="getStudents"/>
</resultMap>

<select id="getStudents" resultType="Student">
    select * from student where tid = #{id}
</select>
(4)小结
①关联—association [多对一 ]
②集合—collection [一对多]
③javaType & ofType
	1. JavaType用来指定实体类中属性的类型
	2. ofType用来指定映射到List或者集合中的pojo类型,泛型中的约束类型
注意:
保证SQL的可读性,尽量保证通俗易懂
注意一对多和多对一中,属性名和字段的问题
如果问题不好排查错误,可以使用日志,建议使用Log4j
15、动态SQL
-
动态SQL就是根据不同的条件生成不同的SQL。
-
动态SQL本质还是SQL语句,只是我们可以在SQL层面,去执行一个逻辑代码。
-
动态SQL就是在拼接SQL语句,我们只要保证SQL的正确性,按照SQL的样式,去排列组合就可以了。
建议:
先在Mysql中写出完整的SQL,再对应的去修改成为我们的动态SQL实现通用即可
如果你之前用过 JSTL 或任何基于类 XML 语言的文本处理器,你对动态 SQL 元素可能会感觉似曾相识。在 MyBatis 之前的版本中,需要花时间了解大量的元素。借助功能强大的基于 OGNL 的表达式,MyBatis 3 替换了之前的大部分元素,大大精简了元素种类,现在要学习的元素种类比原来的一半还要少。
if
choose (when, otherwise)
trim (where, set)
foreach
(1)搭建环境
①创建表
CREATE TABLE `blog`(
    `id` varchar(50) NOT NULL COMMENT '博客id',
    `title` varchar(100) NOT NULL COMMENT '博客标题',
    `author` varchar(30) NOT NULL COMMENT '博客作者',
    `create_time` datetime NOT NULL COMMENT '创建时间',
    `views` int(30) NOT NULL COMMENT '浏览量'
)ENGINE=InnoDB DEFAULT CHARSET=utf8
②创建实体类
1 @Data
2 public class Blog {
3     private int id;
4     private String title;
5     private String author;
6     private Date createTime;
7     private int views;
8 }
③创建接口和Mapper.xml
(2)if标签
这条语句提供了可选的查找文本功能。
①接口
1 //根据title查询blog
2 List<Blog> getBlogByTitleIf();
3 List<Blog> getBlogByTitleIf(String title);
②Mapper.xml
<select id="getBlogByTitleIf" parameterType="String" resultType="Blog">
    select * from blog where 1=1
    <if test="title != null">
        and title = #{title}
    </if>
</select>
(2)where
where 元素只会在子元素返回任何内容的情况下才插入 “WHERE” 子句。而且,若子句的开头为 “AND” 或 “OR”,where 元素也会将它们去除。
①接口
1 List<Blog> getBlogWhere(Map map);
②Mapper.xml
<select id="getBlogWhere" parameterType="map" resultType="Blog">
    select * from blog
    <where>
        <if test="title != null">
            title = #{title}
        </if>
        <if test="author != null">
            and author = #{author}
        </if>
    </where>
</select>
(3)choose、when、otherwise
有时候,我们不想使用所有的条件,而只是想从多个条件中选择一个使用。针对这种情况,MyBatis 提供了 choose 元素,它有点像 Java 中的 switch 语句。
①接口
1 List<Blog> getBlogChoose(Map map);
②Mapper.xml
<select id="getBlogChoose" parameterType="map" resultType="Blog">
    select * from blog
    <where>
        <choose>
            <when test="title != null">
                title = #{title}
            </when>
            <when test="author != null">
                and author = #{author}
            </when>
            <otherwise>
                and views = #{views}
            </otherwise>
        </choose>
    </where>
</select>
(4)set
set 元素可以用于动态包含需要更新的列,忽略其它不更新的列。set 元素会动态地在行首插入 SET 关键字,并会删掉额外的逗号(这些逗号是在使用条件语句给列赋值时引入的)。
①接口
1 int updateBlogSet(Map map);
②Mapper.xml
<update id="updateBlogSet" parameterType="map">
    update blog
    <set>
        <if test="title != null">
            title = #{title},
        </if>
        <if test="author != null">
            author = #{author},
        </if>
    </set>
    where id = #{id}
</update>
(5)trim
-
prefix—在前面添加代码
-
prefixOverrides—删除不合适的前面代码
-
suffix—在后面添加代码
-
suffixOverrides—删除不合适的后面代码
如果 where 元素与你期望的不太一样,你也可以通过自定义 trim 元素来定制 where 元素的功能。比如,和 where 元素等价的自定义 trim 元素为:
1 List<Blog> getBlogTrim(Map map);
<select id="getBlogTrim" parameterType="map" resultType="Blog">
    select * from blog
    <trim prefix="where" prefixOverrides="and |or">
        <if test="title != null">
            title = #{title}
        </if>
        <if test="author != null">
            and author = #{author}
        </if>
        <if test="views != null">
            or views = #{views}
        </if>
    </trim>
</select>
与 set 元素等价的自定义 trim 元素:
1 int updateBlogTrim(Map map);
<update id="updateBlogTrim" parameterType="map">
    update blog
    <trim prefix="set" suffixOverrides=",">
        <if test="title != null">
            title = #{title},
        </if>
        <if test="author != null">
            author = #{author},
        </if>
    </trim>
    where id = #{id}
</update>
(6)foreach
foreach 元素的功能非常强大,它允许你指定一个集合(collection),声明可以在元素体内使用的集合项(item)和索引(index)变量。它也允许你指定开头(open)与结尾(close)的字符串以及集合项迭代之间的分隔符(separator)。
①接口
1 List<Blog> getBlogForeach(Map map);
②Mapper.xml
<!--select * from blog where id in (1,2,3)-->
<select id="getBlogForeach" parameterType="map" resultType="Blog">
    select * from blog
    <where>
        <foreach collection="ids" item="id"
                 open="id in(" separator="," close=")">
            #{id}
        </foreach>
    </where>
</select>
③测试
 1 @Test
 2 public void testForeach(){
 3     SqlSession sqlSession = MybatisUtils.getSqlSession();
 4     BlogMapper mapper = sqlSession.getMapper(BlogMapper.class);
 5     Map<String,Object> map = new HashMap<String,Object>();
 6     List<String> ids = new ArrayList<String>();
 7     ids.add("1");
 8     ids.add("2");
 9     ids.add("3");
10     map.put("ids",ids);
11     List<Blog> blogList = mapper.getBlogForeach(map);
12     for (Blog blog : blogList) {
13         System.out.println(blog);
14     }
15     sqlSession.close();
16 }
(7)SQL片段
有时候,我们可能会将一些功能的部分抽取出来,从而方便复用。
①使用SQL标签抽取公共的部分
<sql id="if-title-author">
    <if test="title != null">
        title = #{title}
    </if>
    <if test="author != null">
        and author = #{author}
    </if>
</sql>
②在需要使用的地方使用include标签引用即可
<select id="getBlogWhere" parameterType="map" resultType="Blog">
    select * from blog
    <where>
        <include refid="if-title-author"></include>
    </where>
</select>
注意:
最好基于单表来定义SQL片段
不要存在where标签
16、缓存
(1)简介
①什么是缓存[ Cache ]?
-
-
-
存在内存中的临时数据
-
将用户经常查询的数据放在缓存(内存)中,用户去查询数据就不用从磁盘上(关系型数据库数据文件)查询,而是从缓存中查询,从而提高了查询效率,解决了高并发系统的性能问题
-
-
②为什么使用缓存?
-
-
-
减少和数据库的交互次数,减少系统开销,提高系统效率
-
-
③什么样的数据能使用缓存?
-
-
-
经常查询并且不经常改变的数据
-
-
(2)Mybatis缓存
-
MyBatis包含一个非常强大的查询缓存特性,它可以非常方便地定制和配置缓存。缓存可以极大的提升查询效率
-
MyBatis系统中默认定义了两级缓存:一级缓存和二级缓存
-
默认情况下,只有一级缓存开启。(SqISession级别的缓存, 也称为本地缓存)
-
二级缓存需要手动开启和配置,他是基于namespace级别的缓存
-
为了提高扩展性, MyBatis定义了缓存接口Cache。我们可以通过实现Cache接口来自定义二级缓存
-
(3)一级缓存
-
一级缓存也叫本地缓存:SqlSession
-
与数据库同一次会话期间查询到的数据就会存放到本地缓存中
-
以后如果需要获取相同的数据,直接从缓存中拿,没必要再去查询数据库
-
一级缓存是默认开启的,只在一次SqlSession中有效,也就是拿到连接到关闭连接这个区间段
-
测试步骤:
①开启日志
②测试在一个Session中查询两次相同的记录
③查看日志输出
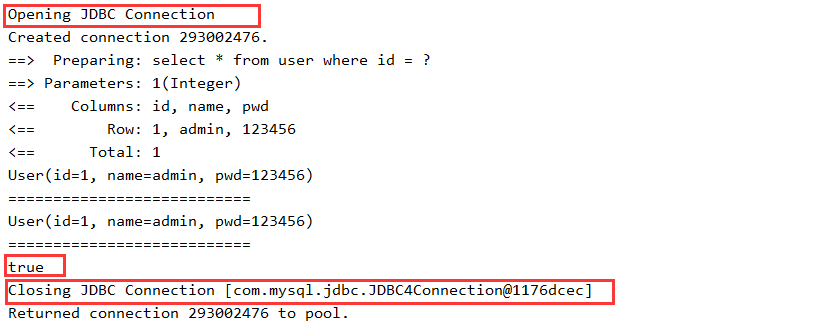
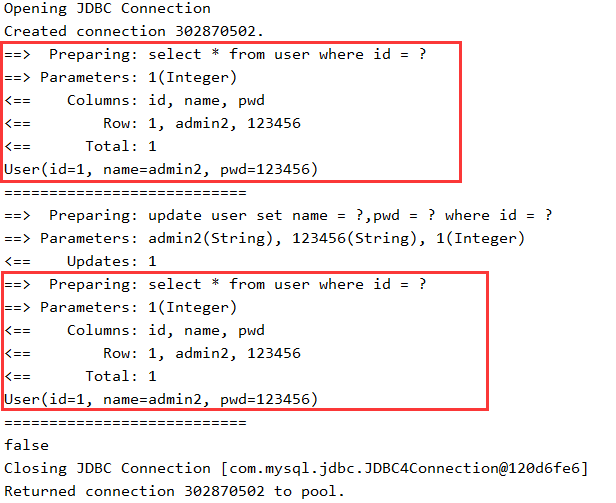
缓存失效的情况:
-
查询不同的东西
-
增删改操作,可能会改变原来的数据,所以必定会刷新缓存
-
查询不同的Mapper.xml
-
手动清理缓存
1 sqlSession.clearCache();//手动清理缓存
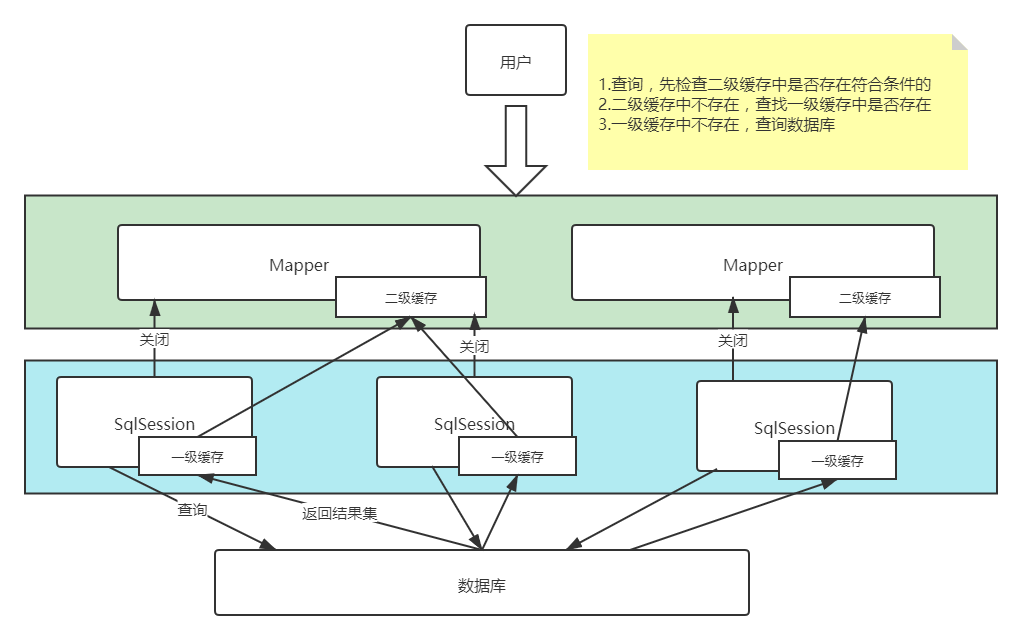
(4)二级缓存
-
二级缓存也叫全局缓存,一级缓存作用域太低了,所以诞生了二级缓存
-
基于namespace级别的缓存,一个名称空间,对应一个二级缓存
-
工作机制
-
一个会话查询一条数据,这个数据就会被放在当前会话的一级缓存中
-
如果当前会话关闭了,这个会话对应的一级缓存就没了;但是我们想要的是,会话关闭了,一级缓存中的数据被保存到二级缓存中
-
新的会话查询信息,就可以从二级缓存中获取内容
-
不同的mapper查出的数据会放在自己对应的缓存(map) 中
-
步骤:
①开启全局缓存
<settings>
    <!--显示开启二级缓存-->
    <setting name="cacheEnabled" value="true"/>
</settings>
②在要使用二级缓存的Mapper中开启
<!--在当前的Mapper.xml中使用二级缓存-->
<cache/>

<!--也可以自定义一些参数-->
<!--创建了一个 FIFO 缓存,每隔 60 秒刷新,最多可以存储结果对象或列表的 512 个引用,而且返回的对象被认为是只读的-->
<cache
  eviction="FIFO"
  flushInterval="60000"
  size="512"
  readOnly="true"/>
③测试
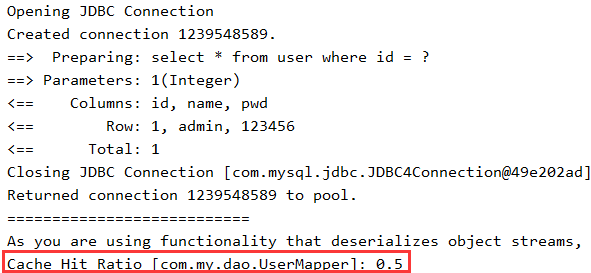
小结:
-
只要开启了二级缓存,在同一个Mapper下就有效
-
所有的数据都会先放在一级缓存中
-
只有当会话提交,或者关闭的时候,才会提交到二级缓冲中
注意:
需要对实体类进行序列化,也就是继承Serializable接口,否则会报以下错误:
org.apache.ibatis.cache.CacheException: Error serializing object. Cause: java.io.NotSerializableException: com.my.pojo.User
(5)缓存原理
(6)自定义缓存—Ehcache
Ehcache是一种广泛使用的开源Java分布式缓存。主要面向通用缓存,具有快速、精干等特点。
①导包
<!--Ehcache-->
<dependency>
    <groupId>org.mybatis.caches</groupId>
    <artifactId>mybatis-ehcache</artifactId>
    <version>1.1.0</version>
</dependency>
②在mapper中指定使用Ehcache缓存实现
<cache type="org.mybatis.caches.ehcache.EhcacheCache"/>
③ehcache.xml
<?xml version="1.0" encoding="UTF-8"?>
<ehcache xmlns:xsi="http://www.w3.org/2001/XMLSchema-instance"
         xsi:noNamespaceSchemaLocation="http://ehcache.org/ehcache.xsd"
         updateCheck="false">
    <!--
       diskStore:为缓存路径,ehcache分为内存和磁盘两级,此属性定义磁盘的缓存位置。参数解释如下:
       user.home – 用户主目录
       user.dir  – 用户当前工作目录
       java.io.tmpdir – 默认临时文件路径
     -->
    <diskStore path="java.io.tmpdir/Tmp_EhCache"/>
    <!--
       defaultCache:默认缓存策略,当ehcache找不到定义的缓存时,则使用这个缓存策略。只能定义一个。
     -->
    <!--
      name:缓存名称。
      maxElementsInMemory:缓存最大数目
      maxElementsOnDisk:硬盘最大缓存个数。
      eternal:对象是否永久有效,一但设置了,timeout将不起作用。
      overflowToDisk:是否保存到磁盘,当系统当机时
      timeToIdleSeconds:设置对象在失效前的允许闲置时间(单位:秒)。仅当eternal=false对象不是永久有效时使用,可选属性,默认值是0,也就是可闲置时间无穷大。
      timeToLiveSeconds:设置对象在失效前允许存活时间(单位:秒)。最大时间介于创建时间和失效时间之间。仅当eternal=false对象不是永久有效时使用,默认是0.,也就是对象存活时间无穷大。
      diskPersistent:是否缓存虚拟机重启期数据 Whether the disk store persists between restarts of the Virtual Machine. The default value is false.
      diskSpoolBufferSizeMB:这个参数设置DiskStore(磁盘缓存)的缓存区大小。默认是30MB。每个Cache都应该有自己的一个缓冲区。
      diskExpiryThreadIntervalSeconds:磁盘失效线程运行时间间隔,默认是120秒。
      memoryStoreEvictionPolicy:当达到maxElementsInMemory限制时,Ehcache将会根据指定的策略去清理内存。默认策略是LRU(最近最少使用)。你可以设置为FIFO(先进先出)或是LFU(较少使用)。
      clearOnFlush:内存数量最大时是否清除。
      memoryStoreEvictionPolicy:可选策略有:LRU(最近最少使用,默认策略)、FIFO(先进先出)、LFU(最少访问次数)。
      FIFO,first in first out,这个是大家最熟的,先进先出。
      LFU, Less Frequently Used,就是上面例子中使用的策略,直白一点就是讲一直以来最少被使用的。如上面所讲,缓存的元素有一个hit属性,hit值最小的将会被清出缓存。
      LRU,Least Recently Used,最近最少使用的,缓存的元素有一个时间戳,当缓存容量满了,而又需要腾出地方来缓存新的元素的时候,那么现有缓存元素中时间戳离当前时间最远的元素将被清出缓存。
   -->
    <defaultCache
            eternal="false"
            maxElementsInMemory="10000"
            overflowToDisk="false"
            diskPersistent="false"
            timeToIdleSeconds="1800"
            timeToLiveSeconds="259200"
            memoryStoreEvictionPolicy="LRU"/>

    <cache
            name="cloud_user"
            eternal="false"
            maxElementsInMemory="5000"
            overflowToDisk="false"
            diskPersistent="false"
            timeToIdleSeconds="1800"
            timeToLiveSeconds="1800"
            memoryStoreEvictionPolicy="LRU"/>

</ehcache>
课程的源码传送门如下,包括课程后面的29道实战题。

 浙公网安备 33010602011771号