k8s安装
2024-01-17 13:41 youxin 阅读(349) 评论(0) 收藏 举报kubectl安装:
https://kubernetes.io/zh-cn/docs/tasks/tools/install-kubectl-linux/
启动 kubectl 自动补全功能
Bash
你现在需要确保一点:kubectl 补全脚本已经导入(sourced)到 Shell 会话中。 可以通过以下两种方法进行设置:
echo 'source <(kubectl completion bash)' >>~/.bashrc
如果 kubectl 有关联的别名,你可以扩展 Shell 补全来适配此别名:
echo 'alias k=kubectl' >>~/.bashrc
echo 'complete -o default -F __start_kubectl k' >>~/.bashrc
bash-completion 负责导入 /etc/bash_completion.d 目录中的所有补全脚本。
两种方式的效果相同。重新加载 Shell 后,kubectl 自动补全功能即可生效。 若要在当前 Shell 会话中启用 Bash 补全功能,源引 ~/.bashrc 文件:
source ~/.bashrc
k8s解决kubectl -bash: _get_comp_words_by_ref: 未找到命令
1. yum -y install bash-completion
2. source /usr/share/bash-completion/bash_completion
3. echo 'source <(kubectl completion bash)' >> ~/.bashrc
kind安装
kind安装
curl -Lo ./kind https://kind.sigs.k8s.io/dl/v0.9.0/kind-linux-amd64
chmod +x ./kind
mv ./kind /$PATH/kind
用go install命令安装:
Installing with go install
When installing with Go please use the latest stable Go release. At least go1.16 or greater is required.
To install use: go install sigs.k8s.io/kind@v0.20.0.
If you are building from a local source clone, use go install . from the top-level directory of the clone.
go install will typically put the kind binary inside the bin directory under go env GOPATH, see Go’s “Compile and install packages and dependencies” for more on this. You may need to add that directory to your $PATH if you encounter the error kind: command not found after installation, you can find a guide for adding a directory to your PATH at https://gist.github.com/nex3/c395b2f8fd4b02068be37c961301caa7#file-path-md.
kind
kind creates and manages local Kubernetes clusters using Docker container 'nodes'

Usage:
  kind [command]

Available Commands:
  build       Build one of [node-image]
  completion  Output shell completion code for the specified shell (bash, zsh or fish)
  create      Creates one of [cluster]
  delete      Deletes one of [cluster]
  export      Exports one of [kubeconfig, logs]
  get         Gets one of [clusters, nodes, kubeconfig]
  help        Help about any command
  load        Loads images into nodes
  version     Prints the kind CLI version

Flags:
  -h, --help              help for kind
      --loglevel string   DEPRECATED: see -v instead
  -q, --quiet             silence all stderr output
  -v, --verbosity int32   info log verbosity, higher value produces more output
      --version           version for kind

Use "kind [command] --help" for more information about a command.
简单说下几个比较常用选项的含义:
build:用来从 Kubernetes 源代码构建一个新的镜像。
create:创建一个 Kubernetes 集群。
delete:删除一个 Kubernetes 集群。
get: 可用来查看当前集群、节点信息以及 Kubectl 配置文件的地址。
load:从宿主机向 Kubernetes 节点内导入镜像。
Command Output: WARNING: Your kernel does not support cgroup namespaces. Cgroup namespace setting discarded.
9e339988d087173127bc4f291b34c6269e4b485cfdfb892789b38db8f0b3e664
docker: Error response from daemon: failed to create shim: OCI runtime create failed: cgroup namespaces aren't enabled in the kernel: unknown.
So unfortunately RHEL 7 is stuck on kernel 3.10, which means that the cgroupns=private feature cannot be used, even though we have a recent enough verison of docker to support it.
Even trying to create any container with that feature fails:
$ docker run -ti --rm --cgroupns=private alpine
WARNING: Your kernel does not support cgroup namespaces.  Cgroup namespace setting discarded.
docker: Error response from daemon: failed to create task for container: failed to create shim task: OCI runtime create failed: runc create failed: cgroup namespaces aren't enabled in the kernel: unknown.
On RHEL8, it uses kernel 4.18, which is sufficient for this feature, and that will also use cgroups v2.
While I understand the project want to use this feature, with good reason, would it be possible to have a flag to disable its use, for use on older environments?
解决办法:降级kind go install sigs.k8s.io/kind@v0.19.0
K8s 创建好之后,我们可以用下列命令查看 K8s 集群
#查看集群
kubectl cluster-info --context kind-tsk8s
#查看node
kubectl get nodes
#查看kube-system空间内运行的pod
kubectl get pods -n kube-system
kubectl get node
NAME STATUS ROLES AGE VERSION
mykind1-control-plane Ready control-plane 4m46s v1.27.1
运行结果
图 11
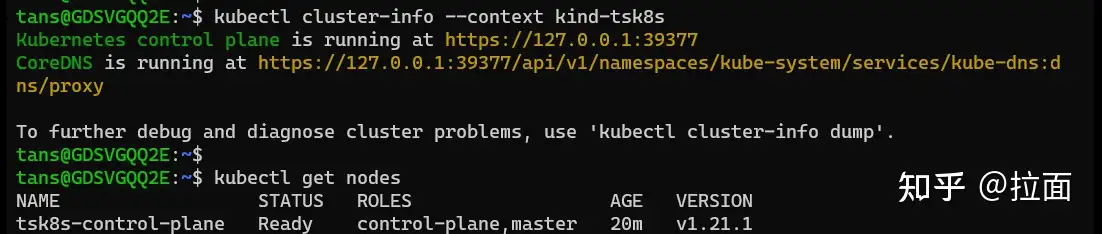
说明:
可以看到现在只有一个 node。上一篇文章中介绍的 control-plance 和工作 node 都在这个 node 上。
图 12
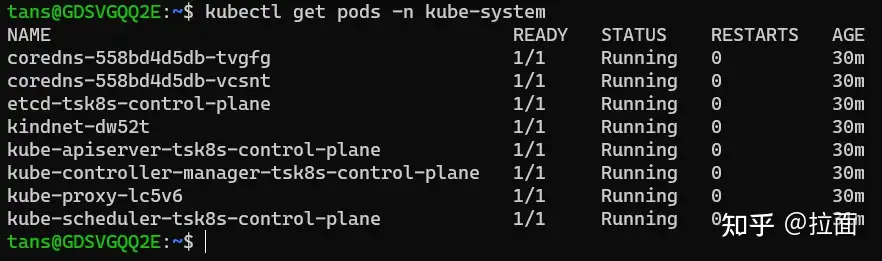
说明:
从这个图片可以看到,上一篇文章中提到到 apiserver,dns,scheduler 等组件均是以 pod 的形式(容器)在运行。
这里 K8s 作为管理容器的服务,本身也是运行容器来实现其功能。
我们用 docker 命令再观察一下现在运行的容器
docker ps
图 13

在 Docker Desktop 中查看容器
图 14
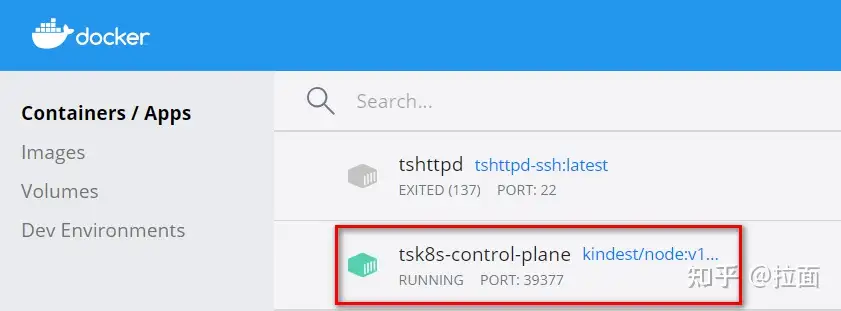
分析:
这里我们看到只有一个运行的容器“tsk8s-control-plane”,但是我们用“kubectl get pods”查看 pod 时,发现有许多 pod 在运行。
这是怎么回事?
原因在于 kind 创建 K8s 时,实际上是利用镜像启了一个容器而 K8s 的整个服务都运行在这个容器内部。
我们进入这个容器的内部进行观察,运行命令
#进入容器内部
docker exec -it tsk8s-control-plane bash
#查看运行的容器
crictl ps

(

crictl 是Kubelet容器接口(CRI)的CLI和验证工具。。 你可以使用它来检查和调试 Kubernetes 节点上的容器运行时和应用程序。 crictl 和它的源代码在 cri-tools 代码库。

)
图 15
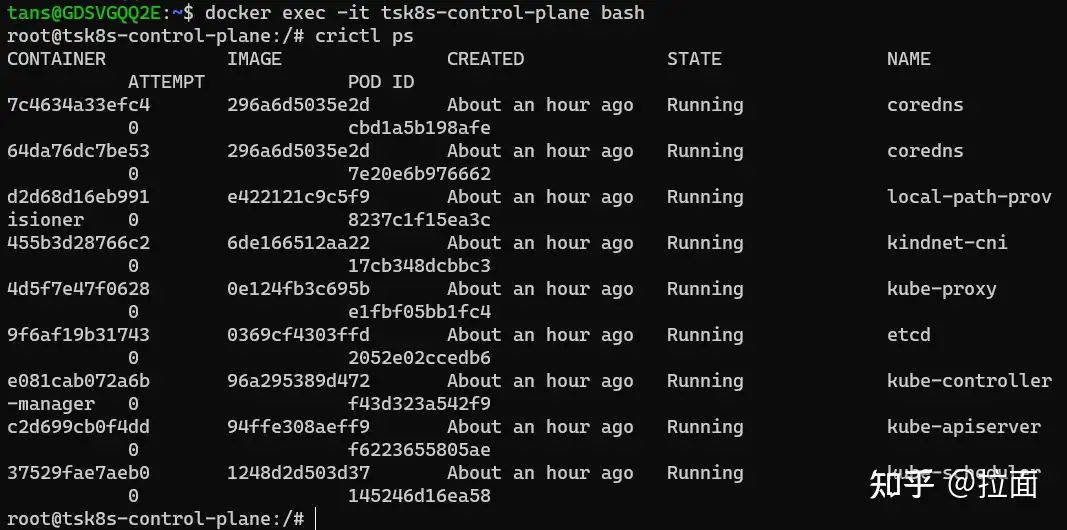
说明:
在“tsk8s-control-plane”容器内部,我们看到了 K8s 集群正在运行的容器
在这里我们用的是“crictl ps”来查看容器,因为在“tsk8s-control-plane”容器中的容器运行环境(runtime)不是 Docker 而是 Containerd。
Containerd 使用的命令与 docker 相似,把 docker 命令中 docker 换成 crictl 即可。
提示:未来 K8s 新版本将不再支持 docker 做为运行环境
对于 kind 创建的 K8s 集群,我们可以简单理解上面用 docker ps 看到的“tsk8s-control-plane”容器就是一台服务器,而我们把 K8s 服务(Control plane + 工作 node)都搭在了这台服务器上。
我们的 WSL 就相当于一个装有 kubectl 命令行的客户端,我们用这个客户端连接 K8s 集群并操作。
5. 使用 Dashboard
我们除了可以用 kubectl 命令行来控制 K8s 外,我们还可以利用 Dashboard 图形界面来进行一些操作。
我们可以利用 Dashboard 监控 K8s,部署应用,创建及修改各种资源。
Dashboard 非默认安装,所以我们需要手工部署。
https://github.com/kubernetes/dashboard?tab=readme-ov-file
kubectl apply -f https://raw.githubusercontent.com/kubernetes/dashboard/v3.0.0-alpha0/charts/kubernetes-dashboard.yaml
cert-manager
3.0需要依赖cert-manager,我们先要这个这个
Kubeflow 组件使用 cert-manager 来为准入 Webhooks 提供证书。
Install cert-manager:
kustomize build common/cert-manager/cert-manager/base | kubectl apply -f -
kubectl wait --for=condition=ready pod -l 'app in (cert-manager,webhook)' --timeout=180s -n cert-manager
kustomize build common/cert-manager/kubeflow-issuer/base | kubectl apply -f -
如果出现如下错误:
Error from server (InternalError): error when creating "STDIN": Internal error occurred: failed calling webhook "webhook.cert-manager.io": failed to call webhook: Post "https://cert-manager-webhook.cert-manager.svc:443/mutate?timeout=10s": dial tcp 10.96.202.64:443: connect: connection refused
这是因为 webhook 尚未准备好接收请求。等待几秒钟,然后重试应用清单
然后就安装成功了
Kubernetes dashboardv2.7.0安装指南:从零开始搭建可视化界面
https://zhuanlan.zhihu.com/p/655525723
命令行代理
你可以使用 kubectl 命令行工具来启用 Dashboard 访问,命令如下:
kubectl proxy
kubectl 会使得 Dashboard 可以通过 http://localhost:8001/api/v1/namespaces/kubernetes-dashboard/services/https:kubernetes-dashboard:/proxy/ 访问。
UI 只能 通过执行这条命令的机器进行访问。更多选项参见 kubectl proxy --help。
Kubeconfig 身份验证方法不支持外部身份提供程序或基于 x509 证书的身份验证。
如果不是localhost访问需要执行:kubectl proxy --address=0.0.0.0
grep 'client-certificate-data' /etc/kubernetes/admin.conf | head -n 1 | awk '{print $2}' | base64 -d >> kubecfg.crt
grep 'client-key-data' /etc/kubernetes/admin.conf | head -n 1 | awk '{print $2}' | base64 -d >> kubecfg.key
openssl pkcs12 -export -clcerts -inkey kubecfg.key -in kubecfg.crt -out kubecfg.p12 -name "kubernetes-client"
导入p12证书。
k8s api访问证书
$ cp /etc/kubernetes/admin.conf $HOME/.kube/config
$ grep 'client-certificate-data' ~/.kube/config | head -n 1 | awk '{print $2}' | base64 -d >> kubecfg.crt
$ grep 'client-key-data' ~/.kube/config | head -n 1 | awk '{print $2}' | base64 -d >> kubecfg.key
$ openssl pkcs12 -export -clcerts -inkey kubecfg.key -in kubecfg.crt -out kubecfg.p12 -name "kubernetes-client"
证书导入后还是访问不了,看了一篇文章:
方法一: kubectl port-forward
注意: 这种方法适合有正式ssl证书的情况. 如果没有, 先用方法二进行访问.
In an environment where one needs to access the dashboard from another host than thekubectl proxy's localhost, one can run:kubectl port-forward --namespace kubernetes-dashboard service/kubernetes-dashboard 10443:443 --address 0.0.0.0to access the dashboard through HTTPS
然后访问: https://ttg12:10443.
不过因为测试环境没有正式的ssl证书, 所以浏览器会拒绝访问. 需要采用方法二.
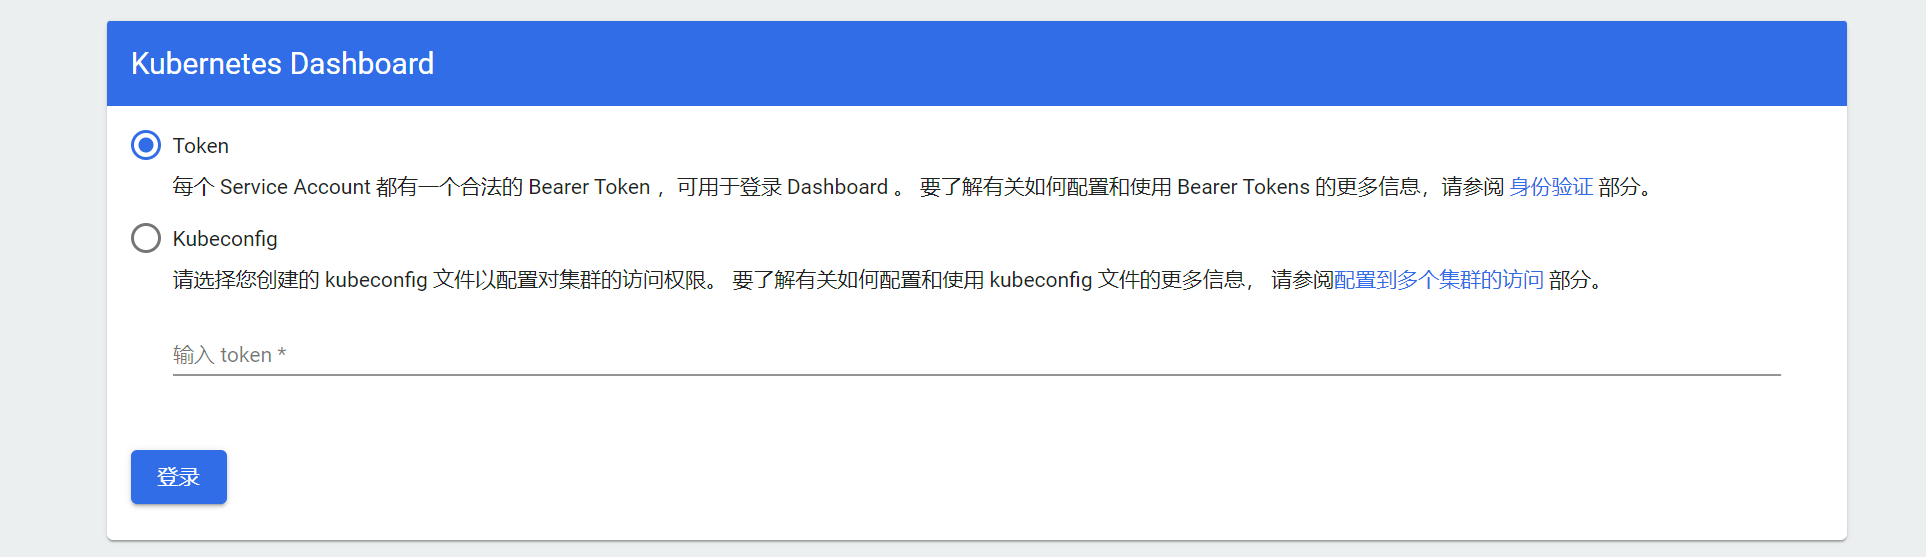
终于可以看到这个界面了
创建token:
https://github.com/kubernetes/dashboard/blob/master/docs/user/access-control/creating-sample-user.md
v3.0.0的配置文件已经给我们配置好了用户名和role。我们只需要执行:
kubectl -n kubernetes-dashboard create token kubernetes-dashboard
用上面生成的token进去后看到的都是空数据,而且右上角通知栏还有提升,没有权限,我们按如下操作:
1、token没有生成
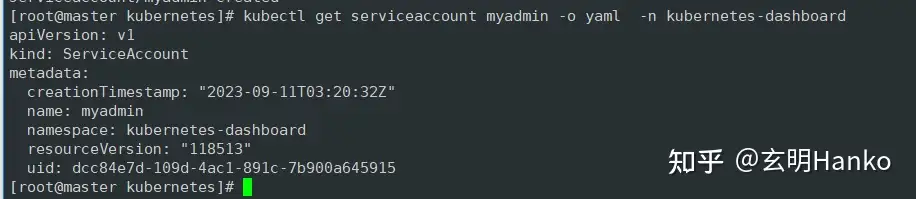
1) 创建serviceaccount
kubectl create serviceaccount myadmin -n kubernetes-dashboard

2)查看账户信息
kubectl get serviceaccount myadmin -o yaml -n kubernetes-dashboard
3)绑定角色
kubectl create clusterrolebinding myadmin --clusterrole=cluster-admin --serviceaccount=kubernetes-dashboard:myadmin -n kubernetes-dashboard

4)生成token
kubectl create token myadmin -n kubernetes-dashboard


 浙公网安备 33010602011771号