

一、python连接mysql时需要导入第三方库——pymysql
在管理员cmd命令行中 pip install pymysql
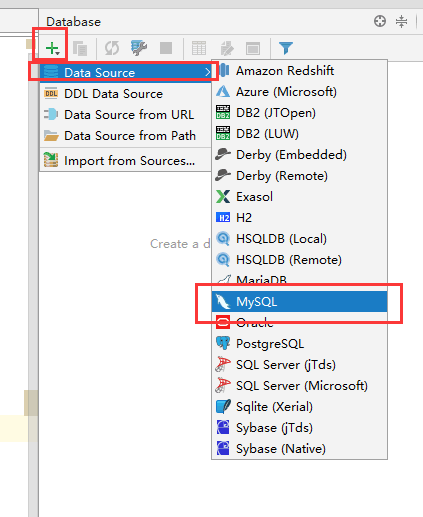
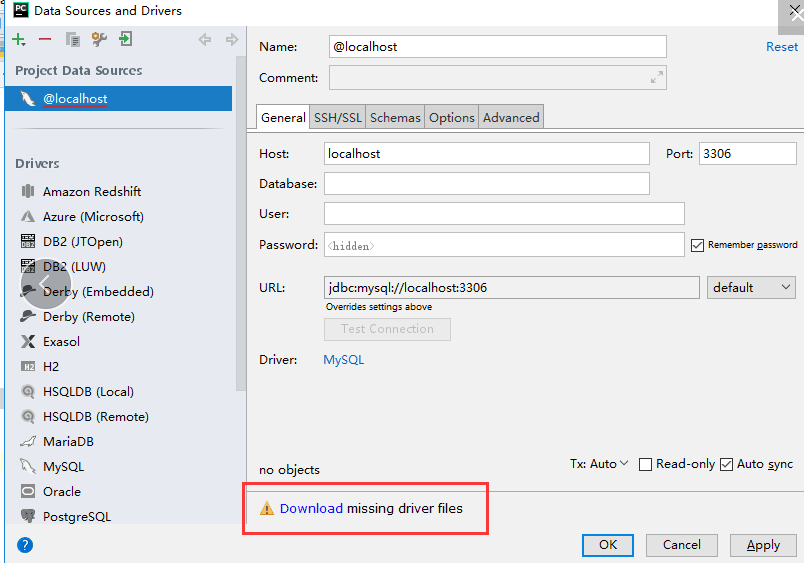
二、配置文件
1、图一

2、图二
3、图三
三、基本使用代码
注意:在执行这些代码前,我们需要在MySQL中创建好数据库和表,并且写入数据记录。
1、基本使用
'''
获取用户登录
'''
import pymysql
# 1、获取用户登录
name = input('请输入用户名:')
pwd = input('请输入密码:')

# 判断用户和密码是否正确
# 去数据库查询一下,用户输入的用户名和密码是否正确
# 在python程序中要链接数据库执行sql语句  -->pymysql模块

# 连接数据库,得到一个连接
conn = pymysql.connect(
    host = '127.0.0.1',
    port = 3306,
    user = 'root',
    password = '123',
    database = 'day43',
    charset = 'utf8'  # charset=“utf8”,编码不要写成"utf-8"
)
# 2 获取光标
cursor = conn.cursor()
# 3 执行sql语句
# 3.1 得到sql语句
sql = "select * from userinfo where name = '%s' and pwd = '%s';" %(name,pwd)
# print(sql)
# 3.2 使用光标对象执行sql语句
ret = cursor.execute(sql)
# 关闭
cursor.close()
conn.close()
# 4 得到结果
if ret:
    print('登录成功')
else:
    print('登录失败')
注意:

2、mysqlSQL注入

基本语句:预防了恶意注入SQL语句
'''
获取用户登录
'''
import pymysql
# 1、获取用户登录
name = input('请输入用户名:')
pwd = input('请输入密码:')

# 判断用户和密码是否正确
# 去数据库查询一下,用户输入的用户名和密码是否正确
# 在python程序中要链接数据库执行sql语句  -->pymysql模块

# 连接数据库,得到一个连接
conn = pymysql.connect(
    host = '127.0.0.1',
    port = 3306,
    user = 'root',
    password = '123',
    database = 'day43',
    charset = 'utf8'
)
# 2 获取光标
cursor = conn.cursor()
# 3 执行sql语句
# 3.1 得到sql语句
sql = "select * from userinfo where name = %s and pwd = %s;" # 按照pymysql模块的写法定义好占位符,占位符%s不需要引号
# print(sql)
# 3.2 使用光标对象执行sql语句
ret = cursor.execute(sql, [name, pwd])  # 让pymysql模块帮我们拼接SQL语句,执行sql语句
# 关闭
cursor.close()
conn.close()
# 4 得到结果
if ret:
    print('登录成功')
else:
    print('登录失败')
四、增删改、查
注意:增删改,涉及数据库的修改,需要提交 conn.commit()
增
import pymysql
conn = pymysql.connect(
    host = '127.0.0.1',
    port = 3306,
    user = 'root',
    password = '123',
    database = 'day43',
    charset = 'utf8'
)
# 2 获取光标
cursor = conn.cursor()
# 3 执行sql语句
# 3.1 得到sql语句
sql = "insert into userinfo(name, pwd) values  (%s,%s);" # 按照pymysql模块的写法定义好占位符,占位符%s不需要引号
# print(sql)
# 3.2 使用光标对象执行sql语句
ret = cursor.execute(sql, ['Eva_j','456'])  # 让pymysql模块帮我们拼接SQL语句,执行sql语句
# 涉及操作数据库的 一定要提交
conn.commit()
# 关闭
cursor.close()
conn.close()

删
import pymysql
conn = pymysql.connect(
    host = '127.0.0.1',
    port = 3306,
    user = 'root',
    password = '123',
    database = 'day43',
    charset = 'utf8'
)
# 2 获取光标
cursor = conn.cursor()
# 3 执行sql语句
# 3.1 得到sql语句
sql = "delete from userinfo where name = %s;" # 按照pymysql模块的写法定义好占位符,占位符%s不需要引号
# print(sql)
# 3.2 使用光标对象执行sql语句
ret = cursor.execute(sql, ['alex'])  # 让pymysql模块帮我们拼接SQL语句,执行sql语句
# 涉及操作数据库的 一定要提交
conn.commit()
# 关闭
cursor.close()
conn.close()

改
import pymysql
conn = pymysql.connect(
    host = '127.0.0.1',
    port = 3306,
    user = 'root',
    password = '123',
    database = 'day43',
    charset = 'utf8'
)
# 2 获取光标
cursor = conn.cursor()
# 3 执行sql语句
# 3.1 得到sql语句
sql = "update userinfo set pwd = %s where name = %s;" # 按照pymysql模块的写法定义好占位符,占位符%s不需要引号
# print(sql)
# 3.2 使用光标对象执行sql语句
ret = cursor.execute(sql, ['123','Eva_j'])  # 让pymysql模块帮我们拼接SQL语句,执行sql语句
# 涉及操作数据库的 一定要提交
conn.commit()
# 关闭
cursor.close()
conn.close()

查
1、显示元组为结果的查
import pymysql
conn = pymysql.connect(
    host = '127.0.0.1',
    port = 3306,
    user = 'root',
    password = '123',
    database = 'day43',
    charset = 'utf8'
)
# 2 获取光标
cursor = conn.cursor()
# 3 执行sql语句
# 3.1 得到sql语句
sql = "select * from userinfo;" # 按照pymysql模块的写法定义好占位符,占位符%s不需要引号
# print(sql)
# 3.2 使用光标对象执行sql语句
cursor.execute(sql)  # 让pymysql模块帮我们拼接SQL语句,执行sql语句
# ret = cursor.fetchall()  # 取出所有的数据
# ret = cursor.fetchone()  # 取出一条数据
# print(ret)
# ret = cursor.fetchone()
# print(ret)
ret = cursor.fetchmany(2)  # 取出n条数据,n为括号内的数值
print(ret)
# 关闭
cursor.close()
conn.close()
2、显示字典为结果的查,以及指定查询数量和位置的查。
import pymysql
conn = pymysql.connect(
    host = '127.0.0.1',
    port = 3306,
    user = 'root',
    password = '123',
    database = 'day43',
    charset = 'utf8'
)
# 2 获取光标
cursor = conn.cursor(cursor=pymysql.cursors.DictCursor)  # 需要设置默认参数,才可以显示字典
# 3 执行sql语句
# 3.1 得到sql语句
sql = "select * from userinfo;" # 按照pymysql模块的写法定义好占位符,占位符%s不需要引号
# print(sql)
# 3.2 使用光标对象执行sql语句
cursor.execute(sql)  # 让pymysql模块帮我们拼接SQL语句,执行sql语句
# ret = cursor.fetchall()  # 取出所有的数据
# ret = cursor.fetchone()  # 取出一条数据
# print(ret)
# ret = cursor.fetchone()
# print(ret)
ret = cursor.fetchmany(2)  # 取出n条数据,n为括号内的数值
print(ret)
# 关闭
cursor.close()
conn.close()
# 查询指定数量的数据
ret = cursor.fetchmany(3)
print(ret)
print(cursor.fetchone())
print(cursor.fetchone())
# cursor.scroll(0, mode='absolute')  # 绝对位置,你让光标移动到哪里
# cursor.scroll(-1, mode='relative')  # 相对位置,基于光标当前位置移动
print(cursor.fetchone())
五、回滚
import pymysql
conn = pymysql.connect(
    host = '127.0.0.1',
    port = 3306,
    user = 'root',
    password = '123',
    database = 'day43',
    charset = 'utf8'
)
# 2 获取光标
cursor = conn.cursor(cursor=pymysql.cursors.DictCursor)
# 3 执行sql语句
# 3.1 得到sql语句
sql = "insert into userinfo(name, pwd) VALUES (%s,%s);" # 按照pymysql模块的写法定义好占位符,占位符%s不需要引号
# print(sql)
# 3.2 使用光标对象执行sql语句
ret = cursor.execute(sql,['ritian','9524'])  # 让pymysql模块帮我们拼接SQL语句,执行sql语句
conn.rollback()  # 回滚,就是撤销上面增加的命令
conn.commit()
# 关闭
cursor.close()
conn.close()
六、获取刚才插入的ID值
# 创建一个出版社和书籍
sql1 = "insert into p(name) values ('西里出版社');"
cursor.lastrowid  # 获取刚才插入到数据库的id值
sql2 = "insert into book(title,p_id) values (%s,%s);"
conn.rollback()  # 回滚
conn.commit()
# 关闭
cursor.close()
conn.close()

 浙公网安备 33010602011771号