Redis-port安装使用实现redis迁移codis,以及简单redis pipe实现将mysql迁移redis
(0)Redis-port原理:
首先是看到下面这篇文档开始研究的redis-port
http://www.itnpc.com/news/web/146085373656602.html 简要截图如下:

上面的两点实际上是实现4个功能,在redis-port安装包README.md的文档中也有介绍

* **DECODE** dumped payload to human readable format (hex-encoding)
* **RESTORE** rdb file to target redis
* **DUMP** rdb file from master redis
* **SYNC** data from master to slave
静态分析RDB文件就是指:decode
解析以及恢复RDB是指:restore
从redis上dumpRDB是指:dump
redis和codis同步数据是指:sync
所以按照README.md的说法看就是将redis-port以slave身份同步redis上的数据到codis
简书上赶集网DBA写了一篇关于redis-port的使用文章很受益,指路:
http://www.jianshu.com/p/a5eec15de485
(1)为方便看我下面的文档,铺一下我的部署情况如下:

(2)准备好redis上需要导入codis的数据
(保证key没有和codis封装的redis重复,有重复的就会以新导入的redis上的为准,因为这里是重新解读rdb文件,原有的codis封装的某一个key会被替换掉)
这里的redis的数据准备我是从mysql的test库中u_2表迁移上去的,
当然你可以自己在redis里面set,或者原本就有数据,我这里正好介绍一下mysql----->redis的操作。
准备步骤如下。
2.1)准备protocol,用redis的pipe把mysql的数据导进redis:
这个步骤实际上是将mysql的字段拼接成redis可以读懂的protocol,
官网指路:英: https://redis.io/topics/protocol 中: http://www.redis.cn/topics/mass-insert.html
[why@wyt1 scripts]$ vim mysql-to-redis.sql
[why@wyt1 scripts]$ cat mysql-to-redis.sql
select
CONCAT('*3\r\n','$','3\r\n','SET\r\n',
'$',LENGTH(empno), '\r\n',empno,'\r\n',
'$',LENGTH(ename), '\r\n',ename, '\r'
)
from test.u_2 ;
[why@wyt1 scripts]$
简单的解释一下protocal:
*<参数数量> CR LF
$<参数 1 的字节数量> CR LF
<参数 1 的数据> CR LF
...
$<参数 N 的字节数量> CR LF
<参数 N 的数据> CR LF
拼接后应该是:
*3\r\n$3\r\nSET\r\n$LENGTH(empno)\r\nempno\r\n$LENGTH(ename)\r\nename\r
*3\r\n:是指3个参数即下面有几个$,这里是set、empno、ename,其实就是SET KEY VALUE,如果是使用hset的命令就是*4,
后面的格式就是“$+命令或者字段长度+”。
2.2)使用redis的管道将mysql表中的数据迁移到redis
[why@wyt1 scripts]$ mysql -uroot -pwhy -P6666 -h192.168.6.10 -N --raw < /home/why/redis-3.0.7/scripts/mysql-to-redis.sql |/home/why/redis-3.0.7/src/redis-cli -a whyredis -h 192.168.6.11 -p 6001 --pipe
Warning: Using a password on the command line interface can be insecure.
All data transferred. Waiting for the last reply...
Last reply received from server.
errors: 0, replies: 14
(3)安装和使用redis-port
3.1)编译:
源码地址:https://github.com/CodisLabs/redis-port
[why@wyt1 packages]$ unzip redis-port-master.zip -d /home/why/codis/application/codis/src/
[why@wyt1 packages]$ cd /home/why/codis/application/codis/src/
[why@wyt1 src]$ mv redis-port-master/ /home/why/codis/application/codis/src/github.com/CodisLabs/redis-port
这里为什么要改名字,因为编译的时候会找这个目录,/home/why/codis/application/codis/src/github.com/CodisLabs/redis-port/pkg/
[why@wyt1 packages]$ cd /home/why/codis/application/codis/src/github.com/CodisLabs/
[why@wyt1 CodisLabs]$ cd redis-port/
[why@wyt1 redis-port]$ make
make: Warning: File `Makefile' has modification time 9.8e+05 s in the future
fatal: Not a git repository (or any of the parent directories): .git
go build -i -o bin/redis-port ./cmd
make: 警告:检测到时钟错误。您的创建可能是不完整的。
忽略警告后发现bin目录已经建好里面有编译好的redis-port,工具是能够正常使用的。
[why@wyt1 redis-port]$ ls
bin cmd Godeps Makefile MIT-LICENSE.txt pkg README.md vendor version wandoujia_license.txt
[why@wyt1 redis-port]$ cd bin
[why@wyt1 bin]$ ls
redis-port version
[why@wyt1 bin]$
3.2)命令参数使用:
详见 https://github.com/CodisLabs/redis-port
Options
- -n N, --ncpu=N
set runtime.GOMAXPROCS to N
- -p M, --parallel=M
set number of parallel routines
- -i INPUT, --input=INPUT
use INPUT as input file, or if it is not given, redis-port reads from stdin (means '/dev/stdin')
- -o OUTPUT, --output=OUTPUT
use OUTPUT as output file, or if it is not given, redis-port writes to stdout (means '/dev/stdout')
- -m MASTER, --master=MASTER
specify the master redis
- -t TARGET, --target=TARGET
specify the slave redis (or target redis)
- -P PASSWORD, --password=PASSWORD
specify the redis auth password
- -A AUTH, --auth=AUTH
specify the auth password for target
- -e, --extra
dump or restore following redis backlog commands
- --redis
target is normal redis instance, default value is false.
- --codis
target is codis proxy, default value is true.
- --filterdb=DB
filter specifed db number, default value is '*'
或者是
[why@wyt1 bin]$ ./redis-port -h
Usage:
redis-port decode [--ncpu=N] [--parallel=M] [--input=INPUT] [--output=OUTPUT]
redis-port restore [--ncpu=N] [--parallel=M] [--input=INPUT] [--faketime=FAKETIME] [--extra] [--filterdb=DB] --target=TARGET [--auth=AUTH] [--redis|--codis]
redis-port sync [--ncpu=N] [--parallel=M] --from=MASTER [--password=PASSWORD] [--psync] [--filterdb=DB] --target=TARGET [--auth=AUTH] [--redis|--codis] [--sockfile=FILE [--filesize=SIZE]]
redis-port dump [--ncpu=N] [--parallel=M] --from=MASTER [--password=PASSWORD] [--extra] [--output=OUTPUT]
redis-port --version
Options:
-n N, --ncpu=N Set runtime.GOMAXPROCS to N.
-p M, --parallel=M Set the number of parallel routines to M.
-i INPUT, --input=INPUT Set input file, default is stdin ('/dev/stdin').
-o OUTPUT, --output=OUTPUT Set output file, default is stdout ('/dev/stdout').
-f MASTER, --from=MASTER Set host:port of master redis.
-t TARGET, --target=TARGET Set host:port of slave redis.
-P PASSWORD, --password=PASSWORD Set redis auth password.
-A AUTH, --auth=AUTH Set auth password for target.
--faketime=FAKETIME Set current system time to adjust key's expire time.
--sockfile=FILE Use FILE to as socket buffer, default is disabled.
--filesize=SIZE Set FILE size, default value is 1gb.
-e, --extra Set true to send/receive following redis commands, default is false.
--redis Target is normal redis instance, default is false.
--codis Target is codis proxy, default is true.
--filterdb=DB Filter db = DB, default is *.
--psync Use PSYNC command.
[why@wyt1 bin]$
可以看到redis-port一共有4种使用:decode、restore、dump、sync,这里我们用sync实现redis到codis
创建一个存放输出日志的位置和文件
[why@wyt1 redis-port]$ mkdir log
[why@wyt1 redis-port]$ cd log
[why@wyt1 log]$ touch redis-to-codis.log
导入之前看一下现在的组一和组二的数据,group1上9个key,group2有9个key(纯属巧合哈)

3.3)使用redis-port:
这里后台执行命令
[why@wyt1 redis-port]$ nohup ./bin/redis-port sync --ncpu=1 --from=192.168.6.11:6001 --password=whyredis --target=192.168.6.11:19002 --auth=codiswyt >> /home/why/codis/application/codis/src/github.com/CodisLabs/redis-port/log/redis-to-codis.log 2>&1 &
[2] 58292
[why@wyt1 redis-port]$
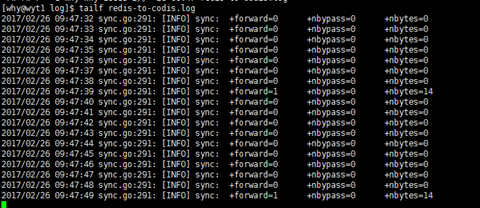
看到日志redis-to-codis.log 输出如下:

看到group1和group2中都导入了数据

可以查看一下,这个进程是一直在工作的
[why@wyt1 redis-port]$ ps -ef | grep redis-port|grep -v grep
why 58292 23483 2 09:44 pts/1 00:00:02 ./bin/redis-port sync --ncpu=1 --from=192.168.6.11:6001 --password=whyredis --target=192.168.6.11:19002 --auth=codiswyt
3.4)观察redis-port工作
但是只要别同步的redis服务不断,redis-port的日志是一直在写的,
当向redis继续插入数据时,可以看到log的输出变化,下图58那里
[why@wyt1 bin]$ ./redis-cli -a whyredis -p 6001
127.0.0.1:6001> get 11370
"SMITH"
127.0.0.1:6001> set idol tfboys
OK
127.0.0.1:6001> set monkey yyqx
OK
127.0.0.1:6001> set rabbit wjk
OK
127.0.0.1:6001> quit

再同时多插入数据看看同步的情况,将mysql中的u_3表的数据添加到codis
[why@wyt1 scripts]$ vim mysql-to-redis-u3.sql
[why@wyt1 scripts]$ cat mysql-to-redis-u3.sql
select
CONCAT('*3\r\n','$','3\r\n','SET\r\n',
'$',LENGTH(empno), '\r\n',empno,'\r\n',
'$',LENGTH(job), '\r\n',job, '\r'
)
from test.u_3 ;
[why@wyt1 scripts]$
[why@wyt1 scripts]$ mysql -uroot -pwhy -P6666 -h192.168.6.10 -N --raw < /home/why/redis-3.0.7/scripts/mysql-to-redis-u3.sql |/home/why/redis-3.0.7/src/redis-cli -a whyredis -h 192.168.6.11 -p 6001 --pipe
Warning: Using a password on the command line interface can be insecure.
All data transferred. Waiting for the last reply...
Last reply received from server.
errors: 0, replies: 14
[why@wyt1 scripts]$
看到下图516的那个地方是突然增加的。

然后停掉6001的redis,看一下redis-port是否会自动断开,6001的正常关闭

已经查不到redis-port的进程,[why@wyt1 redis-port]$ ps -ef | grep redis-port|grep -v grep
看一下redis-to-codis.log日志的输出:是error了,redis-port自己就停了

导入u_2之后检查一下redis-port是按照crc32原理将redis数据导入两个slot:
查源redis上的数据
[why@wyt1 redis-3.0.7]$ ./src/redis-cli -a whyredis -p 6001 -h 192.168.6.11
192.168.6.11:6001> keys *
1) "11370"
2) "11935"
3) "11567"
4) "11699"
5) "11500"
6) "11783"
7) "11655"
8) "11877"
9) "11522"
10) "11901"
11) "11845"
12) "11789"
13) "11903"
192.168.6.11:6001>
看一下上面13个key分布在codis两个slot的情况
[why@wyt1 bin]$ ./redis-cli -a codiswyt -p 8002
127.0.0.1:8002> keys *
1) "11522"
2) "name"
3) "7839"
4) "11783"
5) "7900"
6) "11655"
7) "birth"
8) "7876"
9) "11567"
10) "11370"
11) "11845"
12) "11935"
13) "11789"
14) "7499"
15) "gender"
16) "7902"
17) "7698"
127.0.0.1:8002> quit
[why@wyt1 bin]$ ./redis-cli -a codiswyt -p 7002 -h 192.168.6.10
192.168.6.10:7002> keys *
1) "7788"
2) "11877"
3) "age"
4) "11699"
5) "11500"
6) "11901"
7) "11903"
8) "7521"
9) "7844"
10) "7566"
11) "7782"
12) "7934"
13) "7654"
14) "7369"

 浙公网安备 33010602011771号