odata GET,UPDATA,DELETE
his step-by-step post describes how to UPDATE, DELETE & MODIFY record into table using GET_ENTITY method in oData service.
In my previous post oData Service – with INSERT statement, we have already discussed about how to INSERT record into table using GET_ENTITY method.
Record of Table SCARR:

Step 1: Go to the TCode: SEGW → Click oData project.

Step 2: Created Project will appear in left panel of SEGW TCode. Now Right click on Data model → Import → DDIC structure.
Provide the Entity name and Structure name and select the fields you want to use in oData service. At least one field of Entity should be Key field, selecting CARRID here as Key and click on Finish.


Step 3: Project is successfully created. Now click on below marked button to Generate Runtime Artifacts.

Step 4: You’ll get following Success message after generation Runtime Artifacts successfully.

Step 5: Now navigate to Data Provider Extension (DPC_EXT) class → Double click on DPC_EXT class ZCL_ZMTEST5_UMD_DPC_EXT.

Step 6: Place the cursor on GET_ENTITY method SCARRSET_GET_ENTITY → Click on Redefine button to Redefine GET_ENTITY method. We are implementing this method to fetch records so that Updated / Modified & Deleted records can be validate.

Write below code in GET_ENTITY method:
FIELD-SYMBOLS : <fs_keytab> TYPE /iwbep/s_mgw_name_value_pair.
Table IT_KEY_TAB contains the Input value from Frontend & through
* ER_ENTITY parameter we can send the records back to Frontend.
UNASSIGN <fs_keytab>.
READ TABLE it_key_tab ASSIGNING <fs_keytab> INDEX 1.
IF sy–subrc IS INITIAL.
SELECT SINGLE
FROM scarr
INTO CORRESPONDING FIELDS OF er_entity
WHERE carrid EQ <fs_keytab>–value.
UNASSIGN <fs_keytab>.
ENDIF.

Step 7: Place the cursor on UPDATE_ENTITY method SCARRSET_UPDATE_ENTITY → Click on Redefine button to Redefine UPDATE_ENTITY method.

Write below code in UPDATE_ENTITY method:
DATA : TYPE zcl_zmtest5_umd_mpc=>.
* Capture input value from Frontend into workarea WA_SCARR
CLEAR : wa_scarr.
io_data_provider->read_entry_data( IMPORTING es_data = wa_scarr ).
* Here we can use UPDATE or MODIFY depending on the requirement
UPDATE scarr SET carrname = wa_scarr–carrname
url = wa_scarr–url
WHERE carrid = wa_scarr–carrid.
IF sy–subrc IS INITIAL.
COMMIT WORK.
ENDIF.

Step 8: Place the cursor on DELETE_ENTITY method SCARRSET_DELETE_ENTITY → Click on Redefine button to Redefine DELETE_ENTITY method.
Write below code in DELETE_ENTITY method:
FIELD-SYMBOLS : <fs_keytab> TYPE /iwbep/s_mgw_name_value_pair.
* Parameter IT_KEY_TAB holds the input record from Frontend
UNASSIGN <fs_keytab>.
READ TABLE it_key_tab ASSIGNING <fs_keytab> INDEX 1.
IF sy–subrc IS INITIAL.
DELETE FROM scarr WHERE carrid EQ <fs_keytab>–value.
IF sy–subrc IS INITIAL.
COMMIT WORK.
ENDIF.
UNASSIGN <fs_keytab>.
ENDIF.

Step 9: Now add the Service in T Code: /IWFND/MAINT_SERVICE. Please give a look to my previous post oData service which consumes RFC about how to add a service. You can find the Service name in Runtime Artifacts. Here service name is: ZMTEST5_UMD_SRV.

Step 10: After adding the Service, to test the Service Goto T Code: /IWFND/GW_CLIENT, You’ll get the below screen:
Select the Click on EntitySets and select your entity

Filtering Record with CARRID = ‘ZZ’. Add filter in URL: /sap/opu/odata/sap/ZMTEST5_UMD_SRV/SCARRSet(Carrid=’ZZ’)
After executing record with CARRID = ‘ZZ’ will be displayed as:

Step 11: Testing UPDATE functionality: Click on Use as Request button to copy the HTTP Response contents to HTTP Request, which works as Input.

Select PUT radio button to update the record and change the value of CARRNAME & URL field in HTTP Request → Execute

Status code is 204, means executed successfully.
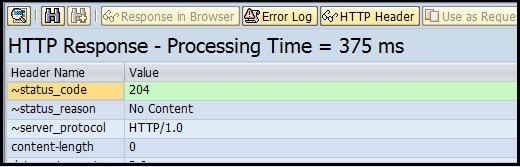
Table has been updated.

Step 12: Testing DELETE functionality: Select DELETE Radiobutton → provide the filter in URL → Execute.

Record with CARRID = ‘ZZ’ has been deleted from SCARR table.

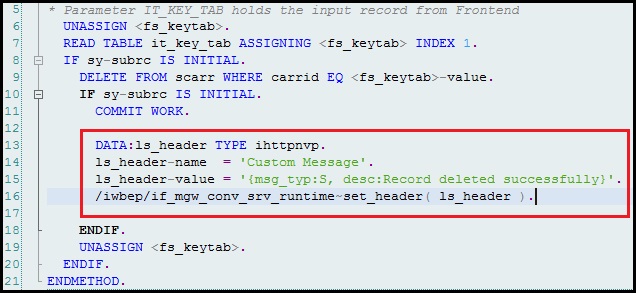
Step 13: Display custom messages after Database operations.
Deleting record from Table SCARR with CARRID = ‘ZX’.

Write below code to display custom messages:
DATA:ls_header TYPE ihttpnvp.
ls_header–name = ‘Custom Message’.
ls_header–value = ‘{msg_typ:S, desc:Record deleted successfully}’.
/iwbep/if_mgw_conv_srv_runtime~set_header( ls_header ).
After deleting the record with CARRID = ‘ZX’ we are getting custom message:


