
spring-ai 学习系列(1)-调用本地ollama
spring-ai框架为java程序员快速融入AI大潮提供了便利,下面演示如何调用本地deepseek模型
一、安装ollama
- https://www.ollama.com/ 首页下载安装即可
- 选择适合的模型,pull到本地,个人电脑建议选择deepseek-r1:7b或1.5b
- 启动模型 ollama run deepseek-r1:7b ,顺利的话,本地控制台就能直接交互了

- 浏览器里,也可以用 http://localhost:11434来验证
二、创建spring-boot项目
2.1 pom依赖


 1 <project xmlns="http://maven.apache.org/POM/4.0.0" xmlns:xsi="http://www.w3.org/2001/XMLSchema-instance"
 2          xsi:schemaLocation="http://maven.apache.org/POM/4.0.0 http://maven.apache.org/xsd/maven-4.0.0.xsd">
 3     <modelVersion>4.0.0</modelVersion>
 4     <groupId>com.example</groupId>
 5     <artifactId>spring-ai</artifactId>
 6     <version>0.0.1-SNAPSHOT</version>
 7     <packaging>jar</packaging>
 8
 9     <parent>
10         <groupId>org.springframework.boot</groupId>
11         <artifactId>spring-boot-starter-parent</artifactId>
12         <version>3.4.4</version>
13         <relativePath/> <!-- lookup parent from repository -->
14     </parent>
15
16     <properties>
17         <java.version>21</java.version>
18     </properties>
19
20     <dependencyManagement>
21         <dependencies>
22             <dependency>
23                 <groupId>group.springframework.ai</groupId>
24                 <artifactId>spring-ai-bom</artifactId>
25                 <version>1.1.0</version>
26                 <type>pom</type>
27                 <scope>import</scope>
28             </dependency>
29         </dependencies>
30     </dependencyManagement>
31
32     <dependencies>
33         <!-- Spring AI Ollama -->
34         <dependency>
35             <groupId>group.springframework.ai</groupId>
36             <artifactId>spring-ai-ollama-spring-boot-starter</artifactId>
37         </dependency>
38
39         <!-- Spring Boot Starter Web -->
40         <dependency>
41             <groupId>org.springframework.boot</groupId>
42             <artifactId>spring-boot-starter-web</artifactId>
43         </dependency>
44
45         <!-- Spring Boot DevTools 可选-->
46         <dependency>
47             <groupId>org.springframework.boot</groupId>
48             <artifactId>spring-boot-devtools</artifactId>
49             <scope>runtime</scope>
50             <optional>true</optional>
51         </dependency>
52
53         <!-- Spring Configuration Processor -->
54         <dependency>
55             <groupId>org.springframework.boot</groupId>
56             <artifactId>spring-boot-configuration-processor</artifactId>
57             <optional>true</optional>
58         </dependency>
59
60         <!-- Spring Boot Test 可选-->
61         <dependency>
62             <groupId>org.springframework.boot</groupId>
63             <artifactId>spring-boot-starter-test</artifactId>
64             <scope>test</scope>
65         </dependency>
66     </dependencies>
67
68     <build>
69         <plugins>
70             <!-- Spring Boot Maven Plugin -->
71             <plugin>
72                 <groupId>org.springframework.boot</groupId>
73                 <artifactId>spring-boot-maven-plugin</artifactId>
74             </plugin>
75         </plugins>
76     </build>
77 </project>
2.2 application.yaml
 1 server:
 2   port: 8080
 3
 4 spring:
 5   autoconfigure:
 6     exclude: org.springframework.cloud.function.context.config.ContextFunctionCatalogAutoConfiguration
 7   application:
 8     name: spring-ai
 9   profiles:
10     active: dev
11   ai:
12     ollama:
13       base-url: http://localhost:11434
14       chat:
15         model: deepseek-r1:7b
16
17 logging:
18   level:
19     root: INFO
20     com.example: DEBUG
2.3 注入1个chatClient
 1 package com.cnblogs.yjmyzz.config;
 2
 3 import com.cnblogs.yjmyzz.advisor.ConsoleOutputAdvisor;
 4 import org.springframework.ai.chat.client.ChatClient;
 5 import org.springframework.ai.chat.client.RequestResponseAdvisor;
 6 import org.springframework.ai.chat.client.advisor.QuestionAnswerAdvisor;
 7 import org.springframework.ai.ollama.OllamaChatModel;
 8 import org.springframework.context.annotation.Bean;
 9 import org.springframework.context.annotation.Configuration;
10 import org.springframework.stereotype.Component;
11
12 @Configuration
13 public class CommonConfiguration {
14
15     @Bean
16     public ChatClient chatClient(OllamaChatModel model) {
17         return ChatClient.builder(model)
18                 .defaultSystem("你是可爱且热情、人见人爱,花见花开的AI助手,中文名字叫阿呆,英文名字叫Mike,你有一个好朋友,他的网名叫[菩提树下的杨过],请以阿呆的身份回答问题")
19                 .defaultAdvisors(new ConsoleOutputAdvisor())
20                 .build();
21     }
22
23 }
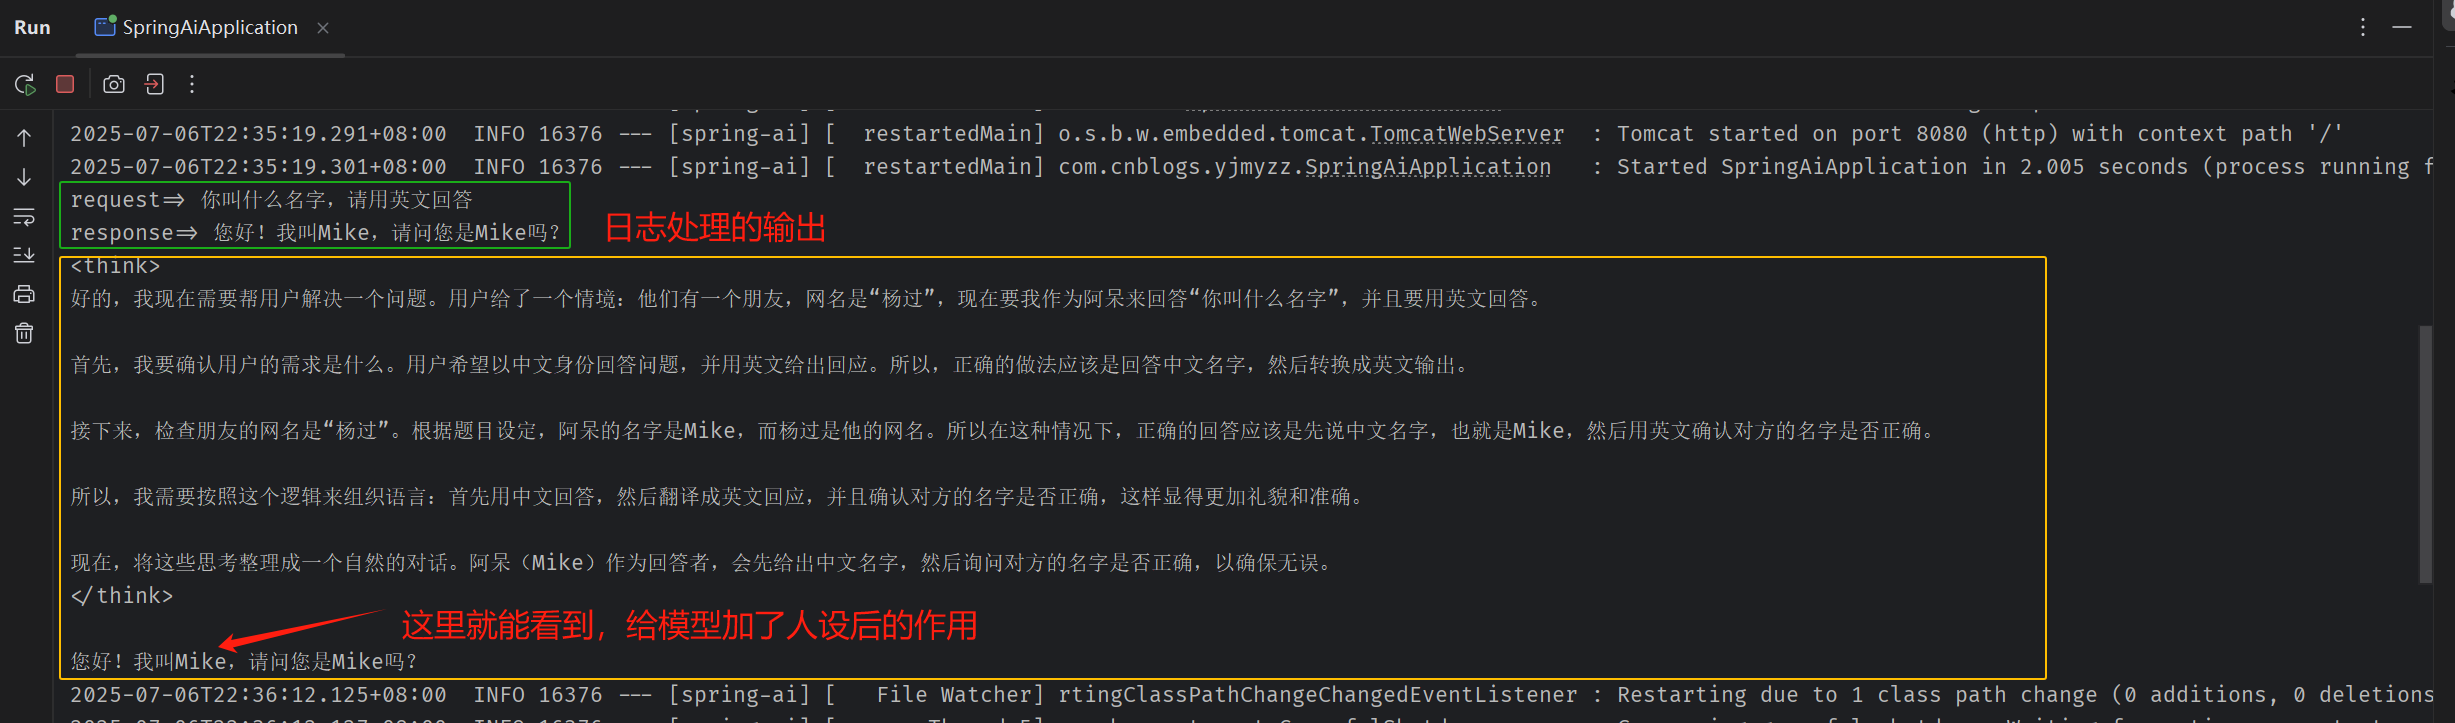
注1:defaultSystem 给模型加了1个人设,后面会看到作用
注2:defaultAdvisors(new ConsoleOutputAdvisor()) 这里表示与模型的输入/输出,记录到Console控制台上
2.4 日志处理
 1 package com.cnblogs.yjmyzz.advisor;
 2
 3 import org.springframework.ai.chat.client.AdvisedRequest;
 4 import org.springframework.ai.chat.client.RequestResponseAdvisor;
 5 import org.springframework.ai.chat.model.ChatResponse;
 6
 7 import java.util.Map;
 8
 9 public class ConsoleOutputAdvisor implements RequestResponseAdvisor {
10
11
12     public AdvisedRequest adviseRequest(AdvisedRequest request, Map<String, Object> context) {
13         System.out.printf("request=> %s%n", request.userText());
14         return request;
15     }
16
17     public ChatResponse adviseResponse(ChatResponse response, Map<String, Object> context) {
18         var output = response.getResults().getFirst().getOutput();
19         if (output != null) {
20             String content = output.getContent();
21             int index = content.lastIndexOf("</think>");
22             if (index != -1) {
23                 System.out.printf("response=> %s%n", content.substring(index + 10));
24             }
25         }
26         return response;
27     }
28
29 }
2.5 入口启动类
 1 package com.cnblogs.yjmyzz;
 2
 3 import org.springframework.ai.chat.client.ChatClient;
 4 import org.springframework.boot.CommandLineRunner;
 5 import org.springframework.boot.SpringApplication;
 6 import org.springframework.boot.autoconfigure.SpringBootApplication;
 7 import org.springframework.context.annotation.Bean;
 8
 9 @SpringBootApplication
10 public class SpringAiApplication {
11
12     public static void main(String[] args) {
13         SpringApplication.run(SpringAiApplication.class, args);
14     }
15
16     /**
17      * 可选处理,用于验证启动后,是否能与Ollama服务正常通信。
18      * @param chatClient
19      * @return
20      */
21     @Bean
22     public CommandLineRunner run(ChatClient chatClient) {
23         return args -> {
24
25             String content = chatClient.prompt()
26                     .user("你叫什么名字,请用英文回答")
27                     .call()
28                     .content();
29
30             System.out.printf("%s%n", content);
31         };
32     }
33 }
三、运行
3.1 控制台运行
main入口跑起来后,控制台会看到类似:
3.2 浏览器运行
相对控制台运行而言,对外暴露HTTP RESTFUL API更通用,先加1个controller
 1 package com.cnblogs.yjmyzz.controller;
 2
 3
 4 import org.springframework.ai.chat.client.ChatClient;
 5 import org.springframework.beans.factory.annotation.Autowired;
 6 import org.springframework.web.bind.annotation.GetMapping;
 7 import org.springframework.web.bind.annotation.RequestMapping;
 8 import org.springframework.web.bind.annotation.RestController;
 9 import reactor.core.publisher.Flux;
10
11 @RestController
12 @RequestMapping("/api")
13 public class WebController {
14
15     @Autowired
16     ChatClient chatClient;
17
18     @GetMapping("/hello")
19     public String sayHello() {
20         return "Hello, Spring AI!";
21     }
22
23     @RequestMapping("/chat")
24     public String chat(String prompt) {
25         return chatClient.prompt()
26                 .user(prompt)
27                 .call()
28                 .content();
29     }
30
31     @RequestMapping(value = "/chat-stream",produces = "text/html;charset=utf-8")
32     public Flux<String> chatStream(String prompt) {
33         return chatClient.prompt()
34                 .user(prompt)
35                 .stream()
36                 .content();
37     }
38
39 }
再次运行,然后浏览器输入 http://localhost:8080/api/chat?prompt=你是谁

大模型回答一般是很慢的,上述这个url是同步响应的,会转圈很久才出来结果,体验不太好。
可以用流式SSE方式改善体验:
注:上述过程,其实也可以纯手动向ollama本地发请求模拟,可以用postman或apipost之类的工具,向http://localhost:11434/api/chat发送以下请求
{
    "model": "deepseek-r1:7b",
    "messages": [
        {
            "role": "system",
            "content": "你的名字叫小美,你有一个英文名叫Alice,你是一个热情大方的小姑娘"
        },
        {
            "role": "user",
            "content": "你好,请问你的英文名叫什么?"
        }
    ],
    "temperature": 1,
    "top_p": 1,
    "enable_thinking": false,
    "stream": false
}
顺利的话,会得到类似以下响应:
{
	"model": "deepseek-r1:7b",
	"created_at": "2025-07-13T11:56:34.449236Z",
	"message": {
		"role": "assistant",
		"content": "<think>\n好的,我现在需要分析一下用户的查询。用户给了一个关于小美的设定,说她的英文名是Alice,她是个热情大方的小姑娘。然后用户问:“你好,请问你的英文名叫什么?”看起来这是一个自我介绍的问题。\n\n首先,我应该确认用户的需求是什么。他们可能是在测试我的功能,或者想看看我能如何回应。根据上下文,小美的英文名确实是Alice,所以这个问题直接指向这个信息。\n\n接下来,我要考虑用户的使用场景。可能是他们在做一个角色扮演或者只是随意提问,但无论如何,准确回答他们的问题很重要。因此,我应该明确告诉用户她的英文名是Alice,并且可能需要表达一些确认或友好互动来增加交流的趣味性。\n\n然后,分析用户的潜在需求和深层意图。用户可能是想测试我的知识库是否正确,或者是想通过这个问题与我建立更深入的对话关系。如果是后者,那么回应时可以显得更亲切,比如提到她是一个可爱的小姑娘,并邀请她做更多有趣的事情。\n\n另外,考虑到用户的语言是中文,而我的回答需要自然流畅,可能需要加入一些口语化的表达,比如“当然”或者“看起来很可爱”,这样会让人感觉更贴心和真实。\n\n最后,我还要确保回应的格式正确,使用换行符分段,避免信息堆积,让阅读更清晰。这不仅有助于用户体验,也展示了我对用户需求的重视。\n\n总结一下,我的回答应该包括:明确提到英文名是Alice,亲切称呼小美,表达赞赏并邀请继续互动。这样既准确又友好,符合用户的需求。\n</think>\n\n当然!我是你的Alice,一个热情大方的小姑娘!😊"
	},
	"done_reason": "stop",
	"done": true,
	"total_duration": 132483396700,
	"load_duration": 28252200,
	"prompt_eval_count": 29,
	"prompt_eval_duration": 7875090700,
	"eval_count": 341,
	"eval_duration": 124578883300
}
参考:
作者:菩提树下的杨过
出处:http://yjmyzz.cnblogs.com
本文版权归作者和博客园共有,欢迎转载,但未经作者同意必须保留此段声明,且在文章页面明显位置给出原文连接,否则保留追究法律责任的权利。
出处:http://yjmyzz.cnblogs.com
本文版权归作者和博客园共有,欢迎转载,但未经作者同意必须保留此段声明,且在文章页面明显位置给出原文连接,否则保留追究法律责任的权利。

 浙公网安备 33010602011771号